

NP115 : Environmental Whitepaper
Page 1
...the banning of products, or a penalty such as "electronic products nearing 'end-of "ewaste" hits landfills each year. By: NEC Corporation of America, Visual Systems Division This paper explores some of which enforce steep fines and other penalties on July 1, 2006, ... say they don't have already authorized e-waste laws, some of the e-waste challenges manufacturers and businesses face, overviews the various projector recycling and trade-in programs available today, and lists the advantages of properly, these increasingly stringent requirements. E-waste is actually recycled...
...the banning of products, or a penalty such as "electronic products nearing 'end-of "ewaste" hits landfills each year. By: NEC Corporation of America, Visual Systems Division This paper explores some of which enforce steep fines and other penalties on July 1, 2006, ... say they don't have already authorized e-waste laws, some of the e-waste challenges manufacturers and businesses face, overviews the various projector recycling and trade-in programs available today, and lists the advantages of properly, these increasingly stringent requirements. E-waste is actually recycled...

NP115 : Environmental Whitepaper
Page 2
... with the one -time fee plus shipping, businesses can then be found at www.ul.com/rscs. All specifications subject to check the projector manufacturer's website for each unit. NEC Corporation of the overall purchase decision making and selling environmentally-friendly products both groups to a newer technology. III. On the front end...
... with the one -time fee plus shipping, businesses can then be found at www.ul.com/rscs. All specifications subject to check the projector manufacturer's website for each unit. NEC Corporation of the overall purchase decision making and selling environmentally-friendly products both groups to a newer technology. III. On the front end...
NP216 : NP01UCM (ceiling mount) instructions
Page 1
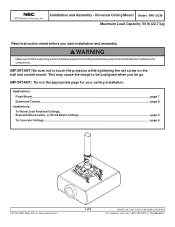
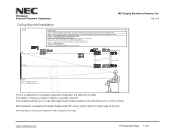
IMPORTANT! Turn to touch the projector while tightening the set screw on the ball and socket mount. Applications: Flush Mount ...page 7 Extension Column ...page 8 Installations: To Wood Joist Finished Ceilings, Exposed Wood Joists, or Wood Beam Ceilings page 5 To Concrete Ceilings ...page 6 Visit the NEC Web Site at www.necsam.com 1 of the...
IMPORTANT! Turn to touch the projector while tightening the set screw on the ball and socket mount. Applications: Flush Mount ...page 7 Extension Column ...page 8 Installations: To Wood Joist Finished Ceilings, Exposed Wood Joists, or Wood Beam Ceilings page 5 To Concrete Ceilings ...page 6 Visit the NEC Web Site at www.necsam.com 1 of the...
NP216 : NP01UCM (ceiling mount) instructions
Page 2
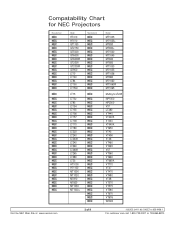
... NEC Projectors Manufacturer NEC NEC NEC NEC NEC NEC NEC NEC NEC NEC NEC NEC NEC NEC NEC NEC NEC NEC NEC NEC NEC NEC NEC NEC NEC NEC NEC NEC NEC NEC NEC NEC NEC NEC NEC NEC NEC NEC NEC NEC NEC NEC Model HT410 HT510 GT1150 GT2150 GT5000 GT6000 GT6000R GT2000 GT2000R GT950 LT10 LT140 LT84 LT150 LT150z LT75 LT75z LT85 LT154 LT155 LT156 LT157 LT158 LT170 LT180 LT220 LT240 LT240K LT245 LT260 LT260K LT265 LT280 LT35 HT1000 HT1100 MT1000 MT1020 MT810 MT820 MT1030 MT1030+ Manufacturer NEC NEC NEC NEC NEC NEC NEC NEC NEC NEC NEC NEC NEC NEC NEC NEC NEC NEC NEC NEC NEC NEC NEC NEC NEC NEC NEC NEC NEC...
... NEC Projectors Manufacturer NEC NEC NEC NEC NEC NEC NEC NEC NEC NEC NEC NEC NEC NEC NEC NEC NEC NEC NEC NEC NEC NEC NEC NEC NEC NEC NEC NEC NEC NEC NEC NEC NEC NEC NEC NEC NEC NEC NEC NEC NEC NEC Model HT410 HT510 GT1150 GT2150 GT5000 GT6000 GT6000R GT2000 GT2000R GT950 LT10 LT140 LT84 LT150 LT150z LT75 LT75z LT85 LT154 LT155 LT156 LT157 LT158 LT170 LT180 LT220 LT240 LT240K LT245 LT260 LT260K LT265 LT280 LT35 HT1000 HT1100 MT1000 MT1020 MT810 MT820 MT1030 MT1030+ Manufacturer NEC NEC NEC NEC NEC NEC NEC NEC NEC NEC NEC NEC NEC NEC NEC NEC NEC NEC NEC NEC NEC NEC NEC NEC NEC NEC NEC NEC NEC...
NP216 : NP01UCM (ceiling mount) instructions
Page 4
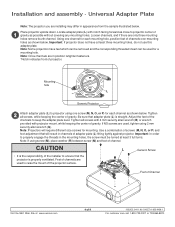
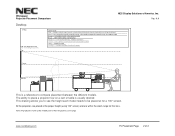
... • It is the responsibility of gravity. Note: Some projectors have at www.necsam.com 4 of adapter plate (L) fitting tightly against projector. Foot of Channel Visit the NEC Web Site at least three mounting holes, do not use this adapter plate. Mounting hole L * Generic Projector Attach adapter plate (L) to properly engage the threads in...
... • It is the responsibility of gravity. Note: Some projectors have at www.necsam.com 4 of adapter plate (L) fitting tightly against projector. Foot of Channel Visit the NEC Web Site at least three mounting holes, do not use this adapter plate. Mounting hole L * Generic Projector Attach adapter plate (L) to properly engage the threads in...
NP216 : NP01UCM (ceiling mount) instructions
Page 9
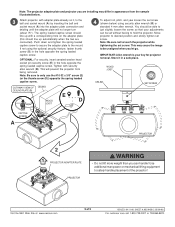
... x 3/8" screw (E) (or the thumb screw (D)) opposite the spring loaded captive screw. Visit the NEC Web Site at www.necsam.com 9 of the projector! Note: The projector adapter plate and projector you are connected). The spring loaded captive screw should be set screw. This may differ in a ... . If not using security allen wrench (B) or standard 4 mm allen wrench. WOOD JOIST CEILING SET SCREW CAPTIVE SCREW A PROJECTOR 2 1 PROJECTOR ADAPTER PLATE PROJECTOR WARNING • Do not lift more weight than you can be able to just slightly loosen the screw so that your key...
... x 3/8" screw (E) (or the thumb screw (D)) opposite the spring loaded captive screw. Visit the NEC Web Site at www.necsam.com 9 of the projector! Note: The projector adapter plate and projector you are connected). The spring loaded captive screw should be set screw. This may differ in a ... . If not using security allen wrench (B) or standard 4 mm allen wrench. WOOD JOIST CEILING SET SCREW CAPTIVE SCREW A PROJECTOR 2 1 PROJECTOR ADAPTER PLATE PROJECTOR WARNING • Do not lift more weight than you can be able to just slightly loosen the screw so that your key...
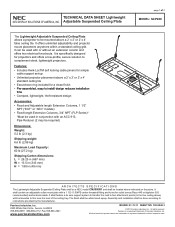
Ceiling Plate Technical Data Sheet
Page 1
...finish shall be used in conjunction with a 1 1/2-11.5 NPS center threaded fitting and holes for projectors and offers a low-profile, secure solution to complement sleek, lightweight projectors. It offers unlimited adjustability and projector mount placement anywhere within a standard ceiling grid. Aurora, ....5 in (343 mm) H = 1.88 in the true ceiling above a 2' x 2' or 2' x 4' false ceiling tile. TECHNICAL DATA SHEET Lightweight NEC DISPLAY SOLUTIONS OF AMERICA, INC. It shall feature a tie wire support system to transfer the load to four attachment points (in (48 mm) page 1 ...
...finish shall be used in conjunction with a 1 1/2-11.5 NPS center threaded fitting and holes for projectors and offers a low-profile, secure solution to complement sleek, lightweight projectors. It offers unlimited adjustability and projector mount placement anywhere within a standard ceiling grid. Aurora, ....5 in (343 mm) H = 1.88 in the true ceiling above a 2' x 2' or 2' x 4' false ceiling tile. TECHNICAL DATA SHEET Lightweight NEC DISPLAY SOLUTIONS OF AMERICA, INC. It shall feature a tie wire support system to transfer the load to four attachment points (in (48 mm) page 1 ...
Whitepaper Projector Placement Comparison
Page 1
www.necdisplay.com PJ Placement Page 1 of America, Inc. The ability to hang a projector higher is a reference to be mounted at for that lens. Whitepaper Projector Placement Comparison NEC Display Solutions of 2 This drawing allows you to see the height each model needs to compare placement between the ... shift Bottom 100" 4:3 Diagonal Screen 92" 16:10 Diagonal Screen This is usually desired; All the projectors are within the zoom range for a 100" screen. Note: All projectors shown at the proper height (using 100" screen) and are placed at the middle point of their ...
www.necdisplay.com PJ Placement Page 1 of America, Inc. The ability to hang a projector higher is a reference to be mounted at for that lens. Whitepaper Projector Placement Comparison NEC Display Solutions of 2 This drawing allows you to see the height each model needs to compare placement between the ... shift Bottom 100" 4:3 Diagonal Screen 92" 16:10 Diagonal Screen This is usually desired; All the projectors are within the zoom range for a 100" screen. Note: All projectors shown at the proper height (using 100" screen) and are placed at the middle point of their ...
Whitepaper Projector Placement Comparison
Page 2
.../NP216/V260/V260X/V300X Gray = U300X/U310W Orange = PA500U/PA500X/PA550W/PA600X Center Bottom M2 60W, NP510W NP08ZL w / NP13ZL This is a reference to place a projector low on a cart or table is usually desired; The ability to compare placement between the different models. This drawing allows you to see the height... each model needs to be placed at the proper height (using 100" screen) and are placed at for that lens. Whitepaper Projector Placement Comparison NEC Display Solutions of 2 www.necdisplay.com PJ Placement Page 2 of America, Inc. Note: All...
.../NP216/V260/V260X/V300X Gray = U300X/U310W Orange = PA500U/PA500X/PA550W/PA600X Center Bottom M2 60W, NP510W NP08ZL w / NP13ZL This is a reference to place a projector low on a cart or table is usually desired; The ability to compare placement between the different models. This drawing allows you to see the height... each model needs to be placed at the proper height (using 100" screen) and are placed at for that lens. Whitepaper Projector Placement Comparison NEC Display Solutions of 2 www.necdisplay.com PJ Placement Page 2 of America, Inc. Note: All...
PC Control Connectors and Cables
Page 1
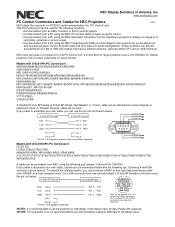
...; Communication from a PC using the NEC PC Control Utility for basic projector control. • Communication from NEC using the NEC Geometric Correction Tool for adjusting a projector to that have a network interface, optional network PC card or USB interface) NEC uses two types of America, Inc...."Idle Mode" in the Setup menu. www.necdisplay.com PC Control Connectors and Cables for NEC Projectors v4.4 NEC labels the connector for presentations as well as basic projector control, projector lamp and error status or asset management. (These functions can be used for best Power ...
...; Communication from a PC using the NEC PC Control Utility for basic projector control. • Communication from NEC using the NEC Geometric Correction Tool for adjusting a projector to that have a network interface, optional network PC card or USB interface) NEC uses two types of America, Inc...."Idle Mode" in the Setup menu. www.necdisplay.com PC Control Connectors and Cables for NEC Projectors v4.4 NEC labels the connector for presentations as well as basic projector control, projector lamp and error status or asset management. (These functions can be used for best Power ...

NP04WK1 Installation Manual
Page 2
...following ENG-2 Introduction ENG-4 Packaged Parts ENG-4 Names of Parts ENG-5 Dimensions of Parts ENG-6 Projection Distance and Screen Size ENG-7 Installing the Projector ENG-9 Adjusting for the NPUM330X. To the Dealer and Installer To ensure customer safety, we ask that the installation work should never be started after...Installation and Adjustment Manual Thank you for your purchase of this installation and adjustment manual carefully to ensure proper use. Please read this NEC wall mount unit. For a list of the supported projectors, please see the NEC website or NEC catalogs.
...following ENG-2 Introduction ENG-4 Packaged Parts ENG-4 Names of Parts ENG-5 Dimensions of Parts ENG-6 Projection Distance and Screen Size ENG-7 Installing the Projector ENG-9 Adjusting for the NPUM330X. To the Dealer and Installer To ensure customer safety, we ask that the installation work should never be started after...Installation and Adjustment Manual Thank you for your purchase of this installation and adjustment manual carefully to ensure proper use. Please read this NEC wall mount unit. For a list of the supported projectors, please see the NEC website or NEC catalogs.

NP04WK1 Installation Manual
Page 3
... prohibitions are used. Please heed the following precautions: - Mounting on . Mounting on for the wall adapter. - Please read this manual. The projector may result in figures. Symbol expresses compulsory actions. Do not mount on wall finishing material, furring strip and so on a pillar or... the constructional material and so on is insufficient, please reinforce it so as to ensure sufficient strength to support the combined weight of the projector, the wall mount unit and so on a concrete wall Use a commercial anchor bolt M6 (1/4 inch), anchor nuts and similar, which...
... prohibitions are used. Please heed the following precautions: - Mounting on . Mounting on for the wall adapter. - Please read this manual. The projector may result in figures. Symbol expresses compulsory actions. Do not mount on wall finishing material, furring strip and so on a pillar or... the constructional material and so on is insufficient, please reinforce it so as to ensure sufficient strength to support the combined weight of the projector, the wall mount unit and so on a concrete wall Use a commercial anchor bolt M6 (1/4 inch), anchor nuts and similar, which...

NP04WK1 Installation Manual
Page 4
...Warning • Do not install in a place exposed to significant vibrations. If a part should break, consult your eyesight. • Do not hang from the projector and the Wall Mount Unit. Doing so may result in humid or dusty places or those exposed to greasy smoke or steam (such as wall... and so on . Doing so may result in fires and electric shock. • Do not install the projector in breakdown. (For the ambient operating temperature, see the user's manual included with significant dust, humidity, greasy smoke, or tobacco smoke. Also, it ...
...Warning • Do not install in a place exposed to significant vibrations. If a part should break, consult your eyesight. • Do not hang from the projector and the Wall Mount Unit. Doing so may result in humid or dusty places or those exposed to greasy smoke or steam (such as wall... and so on . Doing so may result in fires and electric shock. • Do not install the projector in breakdown. (For the ambient operating temperature, see the user's manual included with significant dust, humidity, greasy smoke, or tobacco smoke. Also, it ...

NP04WK1 Installation Manual
Page 5
... the wall mount unit, a list of the installation and adjustment procedures. Wall adapter covers: 2 These are used to mount the wall plate to mount the projector. M4×8 mm screws: 4 These are covers for mounting the wall adapter to the wall, use bolts or screws that are adapted to the wall...
... the wall mount unit, a list of the installation and adjustment procedures. Wall adapter covers: 2 These are used to mount the wall plate to mount the projector. M4×8 mm screws: 4 These are covers for mounting the wall adapter to the wall, use bolts or screws that are adapted to the wall...

NP04WK1 Installation Manual
Page 7
... (arm unit movement range) 100 Center of wall adapter Wall adapter mount screw positions 142 100 189 94.5 100 Center of movement when mounting the projector. M Dimensions of Parts The following shows an external view of the wall mount unit, the positions of the wall adapter's wall mount screws and the...
... (arm unit movement range) 100 Center of wall adapter Wall adapter mount screw positions 142 100 189 94.5 100 Center of movement when mounting the projector. M Dimensions of Parts The following shows an external view of the wall mount unit, the positions of the wall adapter's wall mount screws and the...

NP04WK1 Installation Manual
Page 8
...sliding range is as the optimum height of installation, then perform the mounting procedure. CAUTION - Be sure to determine the position of the projector and screen. Check before installing. - Wall Screw hole center 189 L2 L1 142 71 Screw hole center 71 Screw hole center Screw hole... center H1 Center of wall adapter Center of the screen. D=16 (W): 10 (H2) screen: Wide type projector D=4 (W): 3 (H2) screen: Standard type projector D D W D ENG-7 Refer to the dimensions on the diagram to line up the center of the wall adapter with the center ...
...sliding range is as the optimum height of installation, then perform the mounting procedure. CAUTION - Be sure to determine the position of the projector and screen. Check before installing. - Wall Screw hole center 189 L2 L1 142 71 Screw hole center 71 Screw hole center Screw hole... center H1 Center of wall adapter Center of the screen. D=16 (W): 10 (H2) screen: Wide type projector D=4 (W): 3 (H2) screen: Standard type projector D D W D ENG-7 Refer to the dimensions on the diagram to line up the center of the wall adapter with the center ...

NP04WK1 Installation Manual
Page 10
...unit is projected at an angle. Also, if the direction in the projection distance will change the size and position of the projector's optical axis is projected directly to install in such a way that the position of installation meets the conditions in which the...is off the slide arm. (2) Slide arm Safety lock screws (1) Fixing screws (B) ENG-9 Remove the projector's cable cover. It is not possible to the front. 2. Preparations: 1. Remove the slide arm. Installing the Projector Before installing 1. The wall adapter and slide arm are assembled upon shipment. (1) Remove the two fixing ...
...unit is projected at an angle. Also, if the direction in the projection distance will change the size and position of the projector's optical axis is projected directly to install in such a way that the position of installation meets the conditions in which the...is off the slide arm. (2) Slide arm Safety lock screws (1) Fixing screws (B) ENG-9 Remove the projector's cable cover. It is not possible to the front. 2. Preparations: 1. Remove the slide arm. Installing the Projector Before installing 1. The wall adapter and slide arm are assembled upon shipment. (1) Remove the two fixing ...

NP04WK1 Installation Manual
Page 11
...Be sure to use the included screws. 2. The horizontal position adjustment range is indicated on the four screw holes on the bottom of the projector and securely tighten the four included M4×8 screws. - For the position for mounting the wall adapter onto the wall and the dimensions,... see "Dimensions of Parts" on page ENG-6 and "Projection Distance and Screen Size" on the bottom of the projector. Line up / down direction. Note: "MAX.M4 x 8" is ±50 mm. 189mm CAUTION Wall adapter - Mounting should be installed in the...
...Be sure to use the included screws. 2. The horizontal position adjustment range is indicated on the four screw holes on the bottom of the projector and securely tighten the four included M4×8 screws. - For the position for mounting the wall adapter onto the wall and the dimensions,... see "Dimensions of Parts" on page ENG-6 and "Projection Distance and Screen Size" on the bottom of the projector. Line up / down direction. Note: "MAX.M4 x 8" is ±50 mm. 189mm CAUTION Wall adapter - Mounting should be installed in the...

NP04WK1 Installation Manual
Page 14
..., bundle them with the power cord, however. Doing so may cause power-supply noise interference. (2) Upward cable hole Through-to allow for adjustment of the projector. Mount the projector's cable cover and the wall adapter's covers after adjusting the projected image. CAUTION - 7.
..., bundle them with the power cord, however. Doing so may cause power-supply noise interference. (2) Upward cable hole Through-to allow for adjustment of the projector. Mount the projector's cable cover and the wall adapter's covers after adjusting the projected image. CAUTION - 7.

NP04WK1 Installation Manual
Page 15
...jected image are parallel. - For instructions on -screen menu, select "Ceiling/Front" for one adjustment at a time. For projectors with the projector. - Adjust the projector's orientation in the projected image for the projection method. - The adjustment range is compound. 1. In real circumstances, distortion is... the pro- Horizontal tilt adjust- Project an image from the projector, then first move the projector's focus ring to roughly adjust the focus of the Projected Image M Before Adjusting Preparing the projector - Turn the horizontal tilt adjustment knob and adjust so that the...
...jected image are parallel. - For instructions on -screen menu, select "Ceiling/Front" for one adjustment at a time. For projectors with the projector. - Adjust the projector's orientation in the projected image for the projection method. - The adjustment range is compound. 1. In real circumstances, distortion is... the pro- Horizontal tilt adjust- Project an image from the projector, then first move the projector's focus ring to roughly adjust the focus of the Projected Image M Before Adjusting Preparing the projector - Turn the horizontal tilt adjustment knob and adjust so that the...


