NP115 : ceiling plate instruction
Page 1
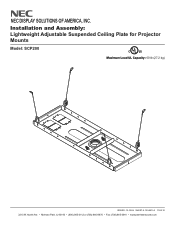
Installation and Assembly: Lightweight Adjustable Suspended Ceiling Plate for Projector Mounts Model: SCP200 C U© L US Maximum Load UL Capacity: 60 lb (27.2 kg) ISSUED: 12-16-04 SHEET #: 120-9015-3 11-05-10 3215 W. NEC DISPLAY SOLUTIONS OF AMERICA, INC. North Ave. • Melrose Park, IL 60160 • (800) 865-2112 or (708) 865-8870 • Fax: (708) 865-2941 • www.peerlessmounts.com
Installation and Assembly: Lightweight Adjustable Suspended Ceiling Plate for Projector Mounts Model: SCP200 C U© L US Maximum Load UL Capacity: 60 lb (27.2 kg) ISSUED: 12-16-04 SHEET #: 120-9015-3 11-05-10 3215 W. NEC DISPLAY SOLUTIONS OF AMERICA, INC. North Ave. • Melrose Park, IL 60160 • (800) 865-2112 or (708) 865-8870 • Fax: (708) 865-2941 • www.peerlessmounts.com

NP115 : ceiling plate instruction
Page 2
... Capacity. • Always use adhesives, lubricants or oils to prevent the screws from loosening, the casing may crack and the projector may fall, causing serious injury and damage to the projector. Use of this Installation Sheet. NOTE: Read entire instruction sheet before you have any questions regarding any of the instructions or...
... Capacity. • Always use adhesives, lubricants or oils to prevent the screws from loosening, the casing may crack and the projector may fall, causing serious injury and damage to the projector. Use of this Installation Sheet. NOTE: Read entire instruction sheet before you have any questions regarding any of the instructions or...

NP115 : ceiling plate instruction
Page 5
... (A) where indicated by black rectangles in figure 5.2. All rights reserved. Pull steel wire tight. Loop steel cables through cable lock until all attached components (Projector Mount, Extension Column, etc.) and equipment. 5 Insert loose end of steel wire (E) through one way through other end of cable loop. When this step is...
... (A) where indicated by black rectangles in figure 5.2. All rights reserved. Pull steel wire tight. Loop steel cables through cable lock until all attached components (Projector Mount, Extension Column, etc.) and equipment. 5 Insert loose end of steel wire (E) through one way through other end of cable loop. When this step is...

NP115 : Environmental Whitepaper
Page 1
...While the RoHS directive is properly and cost-effectively removed, replaced and reused. 4 MILLION TONS OF E-WASTE! to old projector hardware? By: NEC Corporation of America, Visual Systems Division This paper explores some of such equipment are responsible for hardware manufacturers and commercial end..., Japan, China, Australia and certain US states, including California, Maine and New York are considered toxic, particularly those 5.4 million projectors are being placed in place. ABSTRACT With the advent of new and emerging electronic waste (e-waste) mandates, the time has come for...
...While the RoHS directive is properly and cost-effectively removed, replaced and reused. 4 MILLION TONS OF E-WASTE! to old projector hardware? By: NEC Corporation of America, Visual Systems Division This paper explores some of such equipment are responsible for hardware manufacturers and commercial end..., Japan, China, Australia and certain US states, including California, Maine and New York are considered toxic, particularly those 5.4 million projectors are being placed in place. ABSTRACT With the advent of new and emerging electronic waste (e-waste) mandates, the time has come for...

NP115 : Environmental Whitepaper
Page 2
... either package up to self-package old projectors and pay for continued conformity. NEC's Eco-Care Recycling Program ensures the proper disposal of their business customers. NEC's PowerUp Trade-In Program gives users of projectors nearing endof-life the opportunity to step ... solutions for hardware trade-in, recycling and donation programs, approximately 150 million computers, monitors and projectors were recycled in requirements, costs and effort. regardless of NEC Corporation. The bottom line? For the Environment and Consumer: Recycling conserves resources for the newest ...
... either package up to self-package old projectors and pay for continued conformity. NEC's Eco-Care Recycling Program ensures the proper disposal of their business customers. NEC's PowerUp Trade-In Program gives users of projectors nearing endof-life the opportunity to step ... solutions for hardware trade-in, recycling and donation programs, approximately 150 million computers, monitors and projectors were recycled in requirements, costs and effort. regardless of NEC Corporation. The bottom line? For the Environment and Consumer: Recycling conserves resources for the newest ...
NP216 : NP01UCM (ceiling mount) instructions
Page 1
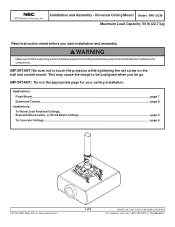
...-11-06 SHEET #: 055-9458-2 05-09-06 For customer care call 1-800-729-0307 or 708-865-8870. Turn to touch the projector while tightening the set screw on the ball and socket mount. Be sure not to the appropriate page for your ceiling installation. Applications: Flush ... Column ...page 8 Installations: To Wood Joist Finished Ceilings, Exposed Wood Joists, or Wood Beam Ceilings page 5 To Concrete Ceilings ...page 6 Visit the NEC Web Site at www.necsam.com 1 of the equipment and all attached hardware and components. IMPORTANT! IMPORTANT! This may cause the image to be unaligned...
...-11-06 SHEET #: 055-9458-2 05-09-06 For customer care call 1-800-729-0307 or 708-865-8870. Turn to touch the projector while tightening the set screw on the ball and socket mount. Be sure not to the appropriate page for your ceiling installation. Applications: Flush ... Column ...page 8 Installations: To Wood Joist Finished Ceilings, Exposed Wood Joists, or Wood Beam Ceilings page 5 To Concrete Ceilings ...page 6 Visit the NEC Web Site at www.necsam.com 1 of the equipment and all attached hardware and components. IMPORTANT! IMPORTANT! This may cause the image to be unaligned...
NP216 : NP01UCM (ceiling mount) instructions
Page 2
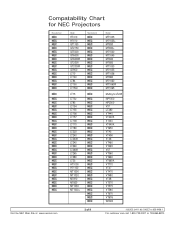
... NEC Projectors Manufacturer NEC NEC NEC NEC NEC NEC NEC NEC NEC NEC NEC NEC NEC NEC NEC NEC NEC NEC NEC NEC NEC NEC NEC NEC NEC NEC NEC NEC NEC NEC NEC NEC NEC NEC NEC NEC NEC NEC NEC NEC NEC NEC Model HT410 HT510 GT1150 GT2150 GT5000 GT6000 GT6000R GT2000 GT2000R GT950 LT10 LT140 LT84 LT150 LT150z LT75 LT75z LT85 LT154 LT155 LT156 LT157 LT158 LT170 LT180 LT220 LT240 LT240K LT245 LT260 LT260K LT265 LT280 LT35 HT1000 HT1100 MT1000 MT1020 MT810 MT820 MT1030 MT1030+ Manufacturer NEC NEC NEC NEC NEC NEC NEC NEC NEC NEC NEC NEC NEC NEC NEC NEC NEC NEC NEC NEC NEC NEC NEC NEC NEC NEC NEC NEC NEC...
... NEC Projectors Manufacturer NEC NEC NEC NEC NEC NEC NEC NEC NEC NEC NEC NEC NEC NEC NEC NEC NEC NEC NEC NEC NEC NEC NEC NEC NEC NEC NEC NEC NEC NEC NEC NEC NEC NEC NEC NEC NEC NEC NEC NEC NEC NEC Model HT410 HT510 GT1150 GT2150 GT5000 GT6000 GT6000R GT2000 GT2000R GT950 LT10 LT140 LT84 LT150 LT150z LT75 LT75z LT85 LT154 LT155 LT156 LT157 LT158 LT170 LT180 LT220 LT240 LT240K LT245 LT260 LT260K LT265 LT280 LT35 HT1000 HT1100 MT1000 MT1020 MT810 MT820 MT1030 MT1030+ Manufacturer NEC NEC NEC NEC NEC NEC NEC NEC NEC NEC NEC NEC NEC NEC NEC NEC NEC NEC NEC NEC NEC NEC NEC NEC NEC NEC NEC NEC NEC...
NP216 : NP01UCM (ceiling mount) instructions
Page 4
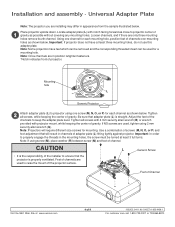
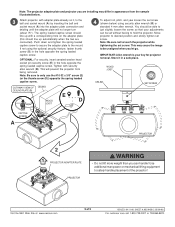
... or 708-865-8870. Tighten all screws, while keeping the center of Channel Visit the NEC Web Site at least 3 full turns. Foot of gravity. Installation and assembly - Locate adapter plate (L) with projector mount, while keeping the center of the channels to raise the mount off the...front of channel. Note: Once channels are used for each channel as shown below . Important: In order to projector using one channel for a mounting hole. Important: If projector does not have feet which can be removed and the corresponding threaded insert can be turned at www.necsam.com 4...
... or 708-865-8870. Tighten all screws, while keeping the center of Channel Visit the NEC Web Site at least 3 full turns. Foot of gravity. Installation and assembly - Locate adapter plate (L) with projector mount, while keeping the center of the channels to raise the mount off the...front of channel. Note: Once channels are used for each channel as shown below . Important: In order to projector using one channel for a mounting hole. Important: If projector does not have feet which can be removed and the corresponding threaded insert can be turned at www.necsam.com 4...
NP216 : NP01UCM (ceiling mount) instructions
Page 9
...05-09-06 For customer care call 1-800-729-0307 or 708-865-8870. WOOD JOIST CEILING SET SCREW CAPTIVE SCREW A PROJECTOR 2 1 PROJECTOR ADAPTER PLATE PROJECTOR WARNING • Do not lift more weight than you can be unaligned when you are connected). If not using security allen wrench... (B) or standard 4 mm allen wrench. IMPORTANT: Allen wrench is your adjustments can handle! Visit the NEC Web Site at www.necsam.com 9 of the projector! The spring loaded captive screw should line up with security allen wrench (B). This may differ in the hole ...
...05-09-06 For customer care call 1-800-729-0307 or 708-865-8870. WOOD JOIST CEILING SET SCREW CAPTIVE SCREW A PROJECTOR 2 1 PROJECTOR ADAPTER PLATE PROJECTOR WARNING • Do not lift more weight than you can be unaligned when you are connected). If not using security allen wrench... (B) or standard 4 mm allen wrench. IMPORTANT: Allen wrench is your adjustments can handle! Visit the NEC Web Site at www.necsam.com 9 of the projector! The spring loaded captive screw should line up with security allen wrench (B). This may differ in the hole ...
PC Control Connectors and Cables
Page 1
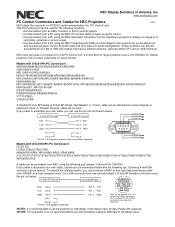
... local computer or electronics store. www.necdisplay.com PC Control Connectors and Cables for NEC Projectors v4.4 NEC labels the connector for presentations as well as basic projector control, projector lamp and error status or asset management. (These functions can also be accomplished via...Crestron or Extron control system. • Communication from a PC using the NEC PC Control Utility for basic projector control. • Communication from a PC using the NEC Geometric Correction Tool for adjusting a projector to display an image on the mini-DIN 8P connector. NOTE1: It ...
... local computer or electronics store. www.necdisplay.com PC Control Connectors and Cables for NEC Projectors v4.4 NEC labels the connector for presentations as well as basic projector control, projector lamp and error status or asset management. (These functions can also be accomplished via...Crestron or Extron control system. • Communication from a PC using the NEC PC Control Utility for basic projector control. • Communication from a PC using the NEC Geometric Correction Tool for adjusting a projector to display an image on the mini-DIN 8P connector. NOTE1: It ...

MP300CM Installation Manual
Page 1
NEC Display Solutions of 10 Max UL Load Capacity: 50 lb (22.7 kg) ISSUED: 10-01-10 SHEET #: 056-9034-4 07-29-11 For customer care call 1-800-865-2112 Installation and Assembly Manual: Custom Ceiling Mount for NEC M260X, M260W, M271X, M300X, M300W M300XS, M300WS, M311X, M311W, P350X, P350W, P420X Projectors Model: MP300CM Features: • ImageLockTM alignment prevents picture sag or drift • Wrench access slot for easier flush mount installations • Exclusive aluminum track quick release Visit the Peerless Web Site at www.peerlessmounts.com 1 of America, Inc.
NEC Display Solutions of 10 Max UL Load Capacity: 50 lb (22.7 kg) ISSUED: 10-01-10 SHEET #: 056-9034-4 07-29-11 For customer care call 1-800-865-2112 Installation and Assembly Manual: Custom Ceiling Mount for NEC M260X, M260W, M271X, M300X, M300W M300XS, M300WS, M311X, M311W, P350X, P350W, P420X Projectors Model: MP300CM Features: • ImageLockTM alignment prevents picture sag or drift • Wrench access slot for easier flush mount installations • Exclusive aluminum track quick release Visit the Peerless Web Site at www.peerlessmounts.com 1 of America, Inc.
MP300CM Installation Manual
Page 2
... to Extension Columns / Ceiling Plate...4 Installation to Wood Joist Ceilings...5 Installation to Concrete Ceilings...6 Installation to Threaded Rods...7 Attaching Adapter Plate to Projector...8 Attaching Adapter Plate to Projector Mount...9 Projector Alignment...10 Visit the Peerless Web Site at www.peerlessmounts.com 2 of 10 ISSUED: 10-01-10 SHEET #: 056-9034-4 07-29-11...
... to Extension Columns / Ceiling Plate...4 Installation to Wood Joist Ceilings...5 Installation to Concrete Ceilings...6 Installation to Threaded Rods...7 Attaching Adapter Plate to Projector...8 Attaching Adapter Plate to Projector Mount...9 Projector Alignment...10 Visit the Peerless Web Site at www.peerlessmounts.com 2 of 10 ISSUED: 10-01-10 SHEET #: 056-9034-4 07-29-11...
MP300CM Installation Manual
Page 3
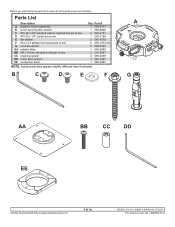
... to insure all of 10 ISSUED: 10-01-10 SHEET #: 056-9034-4 07-29-11 For customer care call 1-800-865-2112 Parts List Description A projector mount assembly B 4 mm security allen wrench C #10-32 x 3/8" serrated washer head socket pin screw D #10-32 x 1/4" socket pin screw E flat washer F #14 x 2.5 phillips hex head...
... to insure all of 10 ISSUED: 10-01-10 SHEET #: 056-9034-4 07-29-11 For customer care call 1-800-865-2112 Parts List Description A projector mount assembly B 4 mm security allen wrench C #10-32 x 3/8" serrated washer head socket pin screw D #10-32 x 1/4" socket pin screw E flat washer F #14 x 2.5 phillips hex head...
MP300CM Installation Manual
Page 4
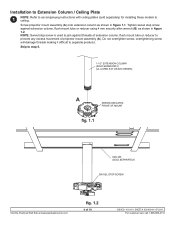
... call 1-800-865-2112 NOTE: Swivel stop screw against threads of extension column, flush mount tube or reducer to ceiling. Skip to separate products. Screw projector mount assembly (A) onto extension column as shown in figure 1.1. Installation to Extension Column / Ceiling Plate 1 NOTE: Refer to accompanying instructions with ceiling plates (sold separately...
... call 1-800-865-2112 NOTE: Swivel stop screw against threads of extension column, flush mount tube or reducer to ceiling. Skip to separate products. Screw projector mount assembly (A) onto extension column as shown in figure 1.1. Installation to Extension Column / Ceiling Plate 1 NOTE: Refer to accompanying instructions with ceiling plates (sold separately...
MP300CM Installation Manual
Page 5
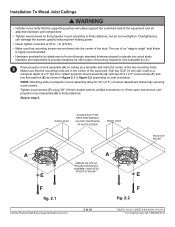
...the center of the wood joist. Tighten wood screws (F) using 3/8" (10mm) socket wrench, phillips screwdriver or 10mm open end wrench until projector mount assembly (A) is firmly attached, but do not overtighten. The use of an "edge to provide hardware for attachment of mount through standard... mm) dia. WOOD JOIST ACCESS SLOT FOR OPEN END WRENCH ALLOWS TIGHTENING OF WOOD SCREW WOOD JOIST FRONT OF MOUNT A E A ARROW ON TOP OF PROJECTOR MOUNT ASSEMBLY INDICATES FRONT OF MOUNT E F fig. 2.1 F fig. 2.2 Visit the Peerless Web Site at www.peerlessmounts.com 5 of swivel adjustment before ...
...the center of the wood joist. Tighten wood screws (F) using 3/8" (10mm) socket wrench, phillips screwdriver or 10mm open end wrench until projector mount assembly (A) is firmly attached, but do not overtighten. The use of an "edge to provide hardware for attachment of mount through standard... mm) dia. WOOD JOIST ACCESS SLOT FOR OPEN END WRENCH ALLOWS TIGHTENING OF WOOD SCREW WOOD JOIST FRONT OF MOUNT A E A ARROW ON TOP OF PROJECTOR MOUNT ASSEMBLY INDICATES FRONT OF MOUNT E F fig. 2.1 F fig. 2.2 Visit the Peerless Web Site at www.peerlessmounts.com 5 of swivel adjustment before ...
MP300CM Installation Manual
Page 6
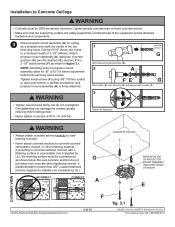
... that the supporting surface will safely support the combined load of 2-1/2" (64mm). Attach projector mount assembly (A) using 3/8" (10mm) socket or open end wrench or phillips screwdriver until projector mount assembly (A) is unavoidable (not evaluated by UL), the finishing surface must be...anchors do not overtighten. Tighten all attached hardware and components. 3 Place projector mount assembly (A) on projector mount assembly allow for 30° (±15°) of 10 CONCRETE CEILING ARROW ON TOP OF PROJECTOR MOUNT ASSEMBLY INDICATES FRONT OF MOUNT E fig. 3.1 ISSUED: 10-01...
... that the supporting surface will safely support the combined load of 2-1/2" (64mm). Attach projector mount assembly (A) using 3/8" (10mm) socket or open end wrench or phillips screwdriver until projector mount assembly (A) is unavoidable (not evaluated by UL), the finishing surface must be...anchors do not overtighten. Tighten all attached hardware and components. 3 Place projector mount assembly (A) on projector mount assembly allow for 30° (±15°) of 10 CONCRETE CEILING ARROW ON TOP OF PROJECTOR MOUNT ASSEMBLY INDICATES FRONT OF MOUNT E fig. 3.1 ISSUED: 10-01...
MP300CM Installation Manual
Page 7
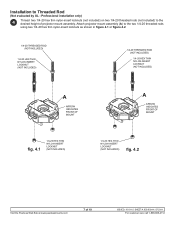
...-INSERT LOCKNUT (NOT INCLUDED) 1/4-20 HEX THIN NYLON-INSERT LOCKNUT (NOT INCLUDED) fig. 4.2 Visit the Peerless Web Site at www.peerlessmounts.com 7 of projector mount assembly. Attach projector mount assembly (A) to the desired height of 10 ISSUED: 10-01-10 SHEET #: 056-9034-4 07-29-11 For customer care call 1-800-865...
...-INSERT LOCKNUT (NOT INCLUDED) 1/4-20 HEX THIN NYLON-INSERT LOCKNUT (NOT INCLUDED) fig. 4.2 Visit the Peerless Web Site at www.peerlessmounts.com 7 of projector mount assembly. Attach projector mount assembly (A) to the desired height of 10 ISSUED: 10-01-10 SHEET #: 056-9034-4 07-29-11 For customer care call 1-800-865...
MP300CM Installation Manual
Page 8
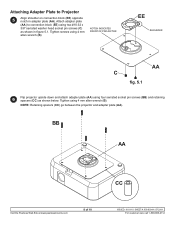
...-9034-4 07-29-11 For customer care call 1-800-865-2112 Attach adapter plate (AA) to Projector 5 Align shoulder on connection block (EE) opposite notch in figure 5.1. NOTE: Retaining spacers (CC) go between the projector and adapter plate (AA). Attaching Adapter Plate to connection block (EE) using 4 mm allen wrench ... screws using four serrated socket pin screws (BB) and retaining spacers (CC) as shown in adapter plate (AA). NOTCH INDICATES FRONT OF PROJECTOR EE SHOULDER AA C fig. 5.1 6 Flip projector upside down and attach adapter plate (AA) using 4 mm allen wrench (B).
...-9034-4 07-29-11 For customer care call 1-800-865-2112 Attach adapter plate (AA) to Projector 5 Align shoulder on connection block (EE) opposite notch in figure 5.1. NOTE: Retaining spacers (CC) go between the projector and adapter plate (AA). Attaching Adapter Plate to connection block (EE) using 4 mm allen wrench ... screws using four serrated socket pin screws (BB) and retaining spacers (CC) as shown in adapter plate (AA). NOTCH INDICATES FRONT OF PROJECTOR EE SHOULDER AA C fig. 5.1 6 Flip projector upside down and attach adapter plate (AA) using 4 mm allen wrench (B).
MP300CM Installation Manual
Page 9
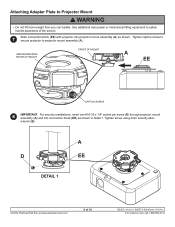
... the Peerless Web Site at www.peerlessmounts.com 9 of the screen. 7 Slide connection block (EE) with projector into connection block (EE) as shown. Attaching Adapter Plate to projector mount assembly (A). Tighten captive screw to secure projector to Projector Mount WARNING • Do not lift more weight than you can handle. ARROW INDICATES FRONT OF...
... the Peerless Web Site at www.peerlessmounts.com 9 of the screen. 7 Slide connection block (EE) with projector into connection block (EE) as shown. Attaching Adapter Plate to projector mount assembly (A). Tighten captive screw to secure projector to Projector Mount WARNING • Do not lift more weight than you can handle. ARROW INDICATES FRONT OF...
MP300CM Installation Manual
Page 10
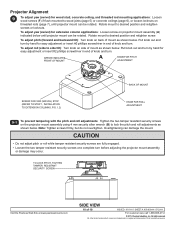
...800-865-2112 © 2011, Peerless Industries, Inc. To adjust pitch (forward and backward tilt): Turn knob on threaded rods (page 7), until projector mount can be rotated. ARROW INDICATES FRONT OF MOUNT A KNOB FOR PITCH ADJUSTMENT BACK OF MOUNT SCREW FOR YAW (SWIVEL) STOP (REFER TO STEP... other brand and product names are fully engaged. • Loosen the two tamper resistant security screws one complete turn before adjusting the projector mount assembly or damage may occur. Pull knob out and turn by hand for easy adjustment or insert #2 phillips screwdriver in end ...
...800-865-2112 © 2011, Peerless Industries, Inc. To adjust pitch (forward and backward tilt): Turn knob on threaded rods (page 7), until projector mount can be rotated. ARROW INDICATES FRONT OF MOUNT A KNOB FOR PITCH ADJUSTMENT BACK OF MOUNT SCREW FOR YAW (SWIVEL) STOP (REFER TO STEP... other brand and product names are fully engaged. • Loosen the two tamper resistant security screws one complete turn before adjusting the projector mount assembly or damage may occur. Pull knob out and turn by hand for easy adjustment or insert #2 phillips screwdriver in end ...

