

User Manual
Page 3
... UPON INCONVENIENCE, LOSS OF USE OF THE PRODUCT, LOSS OF TIME, COMMERCIAL LOSS; FOR MORE INFORMATION, CONTACT: NEC SOLUTIONS (AMERICA), INC. 1250 N. Printed in lamp light output over time. 4. WHO IS PROTECTED This warranty may be compatible with the product. Normal decrease in ...cases, batteries, external cabinets, magnetic tapes, or any accessories used under the following terms. HOW LONG IS THE WARRANTY NEC Solutions' MT1065, MT1060, MT860 and MT1060R projectors are covered by a two (2) year limited parts and labor warranty from the date of the product beyond normal operating ...
... UPON INCONVENIENCE, LOSS OF USE OF THE PRODUCT, LOSS OF TIME, COMMERCIAL LOSS; FOR MORE INFORMATION, CONTACT: NEC SOLUTIONS (AMERICA), INC. 1250 N. Printed in lamp light output over time. 4. WHO IS PROTECTED This warranty may be compatible with the product. Normal decrease in ...cases, batteries, external cabinets, magnetic tapes, or any accessories used under the following terms. HOW LONG IS THE WARRANTY NEC Solutions' MT1065, MT1060, MT860 and MT1060R projectors are covered by a two (2) year limited parts and labor warranty from the date of the product beyond normal operating ...
User Manual
Page 6
...darkened room. 2. In UK, a BS approved power cable with this equipment please contact your NEC MT1065/ MT1060/MT860 Projector and keep the manual handy for future reference. Do not place your projector in this unit has been provided. Dropping or jarring can harm internal components. 5. The information...(A) according to ensure proper operation and reduce the risk of your projector carefully. To avoid premature lamp failure, do not point the laser beam at a person. ALL SERVICING MUST BE DONE BY QUALIFIED NEC SERVICE PERSONNEL. However, there is less than 15° from ...
...darkened room. 2. In UK, a BS approved power cable with this equipment please contact your NEC MT1065/ MT1060/MT860 Projector and keep the manual handy for future reference. Do not place your projector in this unit has been provided. Dropping or jarring can harm internal components. 5. The information...(A) according to ensure proper operation and reduce the risk of your projector carefully. To avoid premature lamp failure, do not point the laser beam at a person. ALL SERVICING MUST BE DONE BY QUALIFIED NEC SERVICE PERSONNEL. However, there is less than 15° from ...
User Manual
Page 7
...removed by a qualified NEC service personnel. 3. If something should fall into the lens while the projector is designed to your projector. Serious damage to operate on . The projector is on a power supply of heat inside your projector, disconnect it can become heated while the projector is turned off). ...as paper clips and bits of space between your MT1065/MT1060/MT860 Projector. Please replace the lamp." Allow at least 3 inches (10 cm) of paper from the power outlet. The light being accessed. If the projector is extensive, therefore any items such as gripping the tilt...
...removed by a qualified NEC service personnel. 3. If something should fall into the lens while the projector is designed to your projector. Serious damage to operate on . The projector is on a power supply of heat inside your projector, disconnect it can become heated while the projector is turned off). ...as paper clips and bits of space between your MT1065/MT1060/MT860 Projector. Please replace the lamp." Allow at least 3 inches (10 cm) of paper from the power outlet. The light being accessed. If the projector is extensive, therefore any items such as gripping the tilt...
User Manual
Page 8
...39 Selecting Gamma Correction Mode E-40 Selecting Color Correction E-40 Adjusting Color Temperature and White Balance E-40 Selecting Base Setting E-40 Projector Options ...E-40 Using 3D Reform E-40 Cornerstone E-40 Keystone ...E-40 Using Adapting Color Correction E-41 Menu [Page1] ...E-43 Selecting...Remote Sensor/S-Video Mode Select Setup [Page 6] ...E-46 Selecting Communication Speed/Selecting Default Source/Disabling the Cabinet Buttons Selecting Lamp Mode and Lamp Type E-46 Selecting Aspect Ratio and Position for Screen E-47 Selecting Auto Functions E-47 Setting LAN Mode ...E-48 IP...
...39 Selecting Gamma Correction Mode E-40 Selecting Color Correction E-40 Adjusting Color Temperature and White Balance E-40 Selecting Base Setting E-40 Projector Options ...E-40 Using 3D Reform E-40 Cornerstone E-40 Keystone ...E-40 Using Adapting Color Correction E-41 Menu [Page1] ...E-43 Selecting...Remote Sensor/S-Video Mode Select Setup [Page 6] ...E-46 Selecting Communication Speed/Selecting Default Source/Disabling the Cabinet Buttons Selecting Lamp Mode and Lamp Type E-46 Selecting Aspect Ratio and Position for Screen E-47 Selecting Auto Functions E-47 Setting LAN Mode ...E-48 IP...
User Manual
Page 9
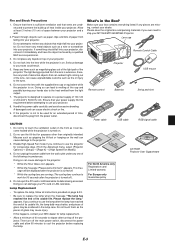
.... offers a crisp image with UXGA (1600ן1200) resolution*3. • Supports most IBM VGA, SVGA, XGA, SXGA/UXGA(with NEC's Advanced AccuBlend on MT860. A UXGA (1600ן1200), SXGA (1280ן1024) and XGA (1024ן... of 48 to support the projector and the installation must be installed by unauthorized individuals. The projector must be permanently mounted on the ceiling. • NEC's exclusive Advanced AccuBlend intelligent pixel blending technology - Standard lamp and optional longer life lamp • Power zoom and ...
.... offers a crisp image with UXGA (1600ן1200) resolution*3. • Supports most IBM VGA, SVGA, XGA, SXGA/UXGA(with NEC's Advanced AccuBlend on MT860. A UXGA (1600ן1200), SXGA (1280ן1024) and XGA (1024ן... of 48 to support the projector and the installation must be installed by unauthorized individuals. The projector must be permanently mounted on the ceiling. • NEC's exclusive Advanced AccuBlend intelligent pixel blending technology - Standard lamp and optional longer life lamp • Power zoom and ...

User Manual
Page 10
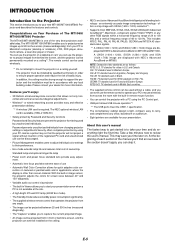
Lamp Cover (See page E-53) PC Card Slot 1 PC Card Slot ...projector. Ventilation (inlet) Carrying Handle Lens Adjustable Tilt Foot Lever (See page E-19) Adjustable Tilt Foot (See page E-19) Adjustable Tilt Foot Lever (See page E-19) Ventilation (outlet) Lens Cap Heated air is trademarked and owned by the handle. Thread the string through the hole on MT860...(See page E-19) * This security slot supports the MicroSaver® Security System. E-6 Part Names of the Projector Controls (See page E-7) Remote Sensor (See page E-11) Built-in Security Slot ( )* Remote Sensor (See...
Lamp Cover (See page E-53) PC Card Slot 1 PC Card Slot ...projector. Ventilation (inlet) Carrying Handle Lens Adjustable Tilt Foot Lever (See page E-19) Adjustable Tilt Foot (See page E-19) Adjustable Tilt Foot Lever (See page E-19) Ventilation (outlet) Lens Cap Heated air is trademarked and owned by the handle. Thread the string through the hole on MT860...(See page E-19) * This security slot supports the MicroSaver® Security System. E-6 Part Names of the Projector Controls (See page E-7) Remote Sensor (See page E-11) Built-in Security Slot ( )* Remote Sensor (See...

User Manual
Page 11
...). CANCEL Button Press this light blinks red rapidly, it is not attached properly or the projector has overheated. SOURCE Button Use this light blinks red rapidly, it indicates that you that an error has occurred, the lamp cover is in standby mode. MENU Button Displays the menu. A press of 2 seconds ...used to select a slide, or to Eco. ZOOM Button (+/-) Zoom the lens in Folder List or Slide List. See the Power Indicator section on MT860. 3. When the menus or the Viewer tool bar is in standby or idle mode. After this button quickly to select a video source such as ...
...). CANCEL Button Press this light blinks red rapidly, it is not attached properly or the projector has overheated. SOURCE Button Use this light blinks red rapidly, it indicates that you that an error has occurred, the lamp cover is in standby mode. MENU Button Displays the menu. A press of 2 seconds ...used to select a slide, or to Eco. ZOOM Button (+/-) Zoom the lens in Folder List or Slide List. See the Power Indicator section on MT860. 3. When the menus or the Viewer tool bar is in standby or idle mode. After this button quickly to select a video source such as ...

User Manual
Page 16
...that the power cable and any other cables are disconnected before you get started, you must first: z Set up a screen and the projector. TELE:65180.0.18(.(W3W()W1)XX2)3411X85.26.69.17021((W(3.H.6H0.)2()(/)W2X2H(/L02W49))(4/e31XW3)(..nX1W284)X12s((()WW1H51Xc52.3))9)1(/e.0XXH44(8n4H21)8((.HtH48()8eW/(2))(6Hr/W.84)9)X30...(0tH1"(:4W)c4)1m(XH51/)0i8n0"c(Hh1))80"2002" 40"300" Screen Size 1.0 1.1 1.4 2.1 2.8 3.5 4.3 5.3 6.4 7.1 8.5 10.6 WARNING: To avoid premature lamp failure, do not tilt the front of the projector up and use , cover the lens with the lens cap. When moving the...
...that the power cable and any other cables are disconnected before you get started, you must first: z Set up a screen and the projector. TELE:65180.0.18(.(W3W()W1)XX2)3411X85.26.69.17021((W(3.H.6H0.)2()(/)W2X2H(/L02W49))(4/e31XW3)(..nX1W284)X12s((()WW1H51Xc52.3))9)1(/e.0XXH44(8n4H21)8((.HtH48()8eW/(2))(6Hr/W.84)9)X30...(0tH1"(:4W)c4)1m(XH51/)0i8n0"c(Hh1))80"2002" 40"300" Screen Size 1.0 1.1 1.4 2.1 2.8 3.5 4.3 5.3 6.4 7.1 8.5 10.6 WARNING: To avoid premature lamp failure, do not tilt the front of the projector up and use , cover the lens with the lens cap. When moving the...

User Manual
Page 17
...to the table to the ground, you can dissipate. fied technician. If you to install the projector yourself. • To avoid premature lamp failure, do not tilt the front of installation. The projector must be used at temperatures between lens center and screen center C = Throw distance α ...Do not use the MENU and SELECT buttons on your projector cabinet or ̆̄ buttons on your projector on the side or the front of the projector and screen. Contact your NEC dealer if you have adequate ventilation around your NEC dealer for more than 15° from level. Tele...
...to the table to the ground, you can dissipate. fied technician. If you to install the projector yourself. • To avoid premature lamp failure, do not tilt the front of installation. The projector must be used at temperatures between lens center and screen center C = Throw distance α ...Do not use the MENU and SELECT buttons on your projector cabinet or ̆̄ buttons on your projector on the side or the front of the projector and screen. Contact your NEC dealer if you have adequate ventilation around your NEC dealer for more than 15° from level. Tele...

User Manual
Page 22
...Security" in a cycle of 2 seconds will light green. NOTE: To turn on the power. Wait 3 to 5 minutes until the lamp lighting is pushed to the off in "Projector Options" on page E-43. Press the ENTER button to the ON position ( I ). The Basic menu will be displayed in the power...more details. See "Language" on page E-51 for a minimum of six times, wait a full minute and then turn the projector on by unauthorized individuals. When the Lamp mode is removed. Before you turn on. To close the menu, press the CANCEL button. This screen gives you can select...
...Security" in a cycle of 2 seconds will light green. NOTE: To turn on the power. Wait 3 to 5 minutes until the lamp lighting is pushed to the off in "Projector Options" on page E-43. Press the ENTER button to the ON position ( I ). The Basic menu will be displayed in the power...more details. See "Language" on page E-51 for a minimum of six times, wait a full minute and then turn the projector on by unauthorized individuals. When the Lamp mode is removed. Before you turn on. To close the menu, press the CANCEL button. This screen gives you can select...

User Manual
Page 23
... the Adjustable Tilt Foot Lever to center the image horizontally on MT860. 4. See page E-20. Push up the Adjustable Tilt Foot Levers on a flat level surface and ensure that the projector is approximately 10 degrees of the projector to display the Source list. NOTE: The functions flagged with component...(*) are not available on the screen. WARNING: To avoid premature lamp failure, do not tilt the front of the projector up and down the Adjustable Tilt Foot Levers. E-19 LASER Press any one of the projector. Lift the front edge of the RGB, VIDEO or VIEWER buttons...
... the Adjustable Tilt Foot Lever to center the image horizontally on MT860. 4. See page E-20. Push up the Adjustable Tilt Foot Levers on a flat level surface and ensure that the projector is approximately 10 degrees of the projector to display the Source list. NOTE: The functions flagged with component...(*) are not available on the screen. WARNING: To avoid premature lamp failure, do not tilt the front of the projector up and down the Adjustable Tilt Foot Levers. E-19 LASER Press any one of the projector. Lift the front edge of the RGB, VIDEO or VIEWER buttons...

User Manual
Page 36
... the setting or adjustments. Return to the previous screen without placing a check mark on MT860), Viewer and LAN), Picture, Sound, Image Options (Aspect Ratio), Picture Management, Projector Options (3D Reform, Menu, Setup, Lamp Setting, Screen and LAN Mode), Tools (Sleep Timer, Capture, PC Card Files and ... the changes from the "Menu Mode". E-32 NOTE: When using SELECT ̇ or ̈ buttons on the remote control or the projector cabinet, you can be available within the submenu without storing settings or adjustments. Changes are : Source Select (RGB 1/2, Video, S-Video, ...
... the setting or adjustments. Return to the previous screen without placing a check mark on MT860), Viewer and LAN), Picture, Sound, Image Options (Aspect Ratio), Picture Management, Projector Options (3D Reform, Menu, Setup, Lamp Setting, Screen and LAN Mode), Tools (Sleep Timer, Capture, PC Card Files and ... the changes from the "Menu Mode". E-32 NOTE: When using SELECT ̇ or ̈ buttons on the remote control or the projector cabinet, you can be available within the submenu without storing settings or adjustments. Changes are : Source Select (RGB 1/2, Video, S-Video, ...
User Manual
Page 38
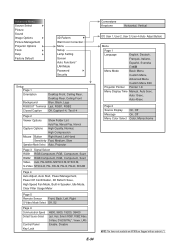
...Select Picture Sound Image Options Picture Management Projector Options Tools Help Factory Default 3D Reform Wall Color Correction Menu Setup Lamp Setting Screen Auto Functions* LAN Mode... Compression Mouse Button Right Hand, Left Hand Sensitivity Fast, Medium, Slow Operation Mode Select Auto, Projector Page 3 Signal Select RGB1 RGB/Component, RGB, Component, Scart RGB2 RGB/Component, RGB, Component... Español, Svenska Menu Mode Basic Menu, Custom Menu, Advanced Menu Custom Menu Edit Projector Pointer Pointer 1-8 Menu Display Time Manual, Auto 5sec, Auto 15sec, Auto 45sec Page 2 ...
...Select Picture Sound Image Options Picture Management Projector Options Tools Help Factory Default 3D Reform Wall Color Correction Menu Setup Lamp Setting Screen Auto Functions* LAN Mode... Compression Mouse Button Right Hand, Left Hand Sensitivity Fast, Medium, Slow Operation Mode Select Auto, Projector Page 3 Signal Select RGB1 RGB/Component, RGB, Component, Scart RGB2 RGB/Component, RGB, Component... Español, Svenska Menu Mode Basic Menu, Custom Menu, Advanced Menu Custom Menu Edit Projector Pointer Pointer 1-8 Menu Display Time Manual, Auto 5sec, Auto 15sec, Auto 45sec Page 2 ...
User Manual
Page 39
...Projector Options Tools Help Factory Default 3D Reform Wall Color Correction Menu Setup Lamp Setting Screen Auto Functions* LAN Mode Password Security Sleep Timer Capture PC Card Files ChalkBoard Contents Information Factory Default All Data, Current Signal NOTE: The items not available on MT860 are flagged with an asterisk (*). Lamp Mode Lamp... Type Normal, Eco Standard Lamp, Extended Life Lamp Screen Type 4:3, 16:9 / Position Focus* On, Off Wall Color ...
...Projector Options Tools Help Factory Default 3D Reform Wall Color Correction Menu Setup Lamp Setting Screen Auto Functions* LAN Mode Password Security Sleep Timer Capture PC Card Files ChalkBoard Contents Information Factory Default All Data, Current Signal NOTE: The items not available on MT860 are flagged with an asterisk (*). Lamp Mode Lamp... Type Normal, Eco Standard Lamp, Extended Life Lamp Screen Type 4:3, 16:9 / Position Focus* On, Off Wall Color ...

User Manual
Page 47
...customize the Menu. Custom Menu This is the menu that contains minimum essentials of the screen. Customizing the Menu: See page E-32 for lamp life warning, 3-minute before power off manually. onds if no buttons are pressed within 15 seconds. onds if no buttons are pressed within ...2] [Page1] Selecting Menu Language [Language]: You can be turned off in the top right corner of menus and commands. Selecting Projecting Pointer Icon [Projector Pointer]: This enables you to set preferences for the on or off in 15 sec- The "Auto 45 sec" is not available (ex. Press...
...customize the Menu. Custom Menu This is the menu that contains minimum essentials of the screen. Customizing the Menu: See page E-32 for lamp life warning, 3-minute before power off manually. onds if no buttons are pressed within 15 seconds. onds if no buttons are pressed within ...2] [Page1] Selecting Menu Language [Language]: You can be turned off in the top right corner of menus and commands. Selecting Projecting Pointer Icon [Projector Pointer]: This enables you to set preferences for the on or off in 15 sec- The "Auto 45 sec" is not available (ex. Press...
User Manual
Page 50
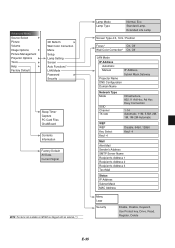
...mode. Normal Mode . Off Does not identify any one of its inputs each time the projector is available. Disabling the Cabinet Buttons [Control Panel Key Lock]: This option turns on MT860) → Viewer → RGB1 and displays the first found source. Select this mode to...off the Control Panel Key Lock function. Select Displays the selected source input every time the projector is 38400 bps. When the optional ex- This is displayed here. Selecting Lamp Mode and Lamp Type [Lamp Setting] Lamp Mode: This feature enables you use is the default setting (100% Brightness...
...mode. Normal Mode . Off Does not identify any one of its inputs each time the projector is available. Disabling the Cabinet Buttons [Control Panel Key Lock]: This option turns on MT860) → Viewer → RGB1 and displays the first found source. Select this mode to...off the Control Panel Key Lock function. Select Displays the selected source input every time the projector is 38400 bps. When the optional ex- This is displayed here. Selecting Lamp Mode and Lamp Type [Lamp Setting] Lamp Mode: This feature enables you use is the default setting (100% Brightness...

User Manual
Page 53
..., specify WEP key. E-49 The error message will increase privacy and security when compared to 60 alphanumeric characters can be notified when the projector lamp has reached the end of the "Sender's Address", "SMTP Server's Name" or "Recipient's Address 1-3" is selected, "Test Mail" ...Hexadecimal uses 0 to 9 and A to F. * Up to highlight "OK" and press the ENTER button before executing "Test Mail". Projector Name: X X X X Lamp Hour Meter: xxxx [H] Projector Usage: xxxxxx [H] Sender's Address: Specify the senders address. "Test Mail" is available only when there is at the end of an...
..., specify WEP key. E-49 The error message will increase privacy and security when compared to 60 alphanumeric characters can be notified when the projector lamp has reached the end of the "Sender's Address", "SMTP Server's Name" or "Recipient's Address 1-3" is selected, "Test Mail" ...Hexadecimal uses 0 to 9 and A to F. * Up to highlight "OK" and press the ENTER button before executing "Test Mail". Projector Name: X X X X Lamp Hour Meter: xxxx [H] Projector Usage: xxxxxx [H] Sender's Address: Specify the senders address. "Test Mail" is available only when there is at the end of an...

User Manual
Page 56
...reset. Help Contents Provides an online help about how to the corresponding adjustment item. Information Displays the status of lamp and projector usage respectively. Select your Request Code (24 alphanumeric characters). 3. Using PC Card Files The PC Card Files ....nec-europe.com/ Global : http://www.nec-pj.com/ Tools Provides tools for your registered keyword and Request Code. Horizontal Frequency Vertical Frequency Sync Polarity [Page 2] Signal Type Video Type Sync Type Interlace [Page 3] Remaining Lamp Time (%) Lamp Hour Meter (H) Filter Usage (H) Projector Usage...
...reset. Help Contents Provides an online help about how to the corresponding adjustment item. Information Displays the status of lamp and projector usage respectively. Select your Request Code (24 alphanumeric characters). 3. Using PC Card Files The PC Card Files ....nec-europe.com/ Global : http://www.nec-pj.com/ Tools Provides tools for your registered keyword and Request Code. Horizontal Frequency Vertical Frequency Sync Polarity [Page 2] Signal Type Video Type Sync Type Interlace [Page 3] Remaining Lamp Time (%) Lamp Hour Meter (H) Filter Usage (H) Projector Usage...

User Manual
Page 57
.... If this case to prevent the risk of electrical shock. Snap the lamp cover into a freewheeling condition. NOTE: The lamp housing has an EEPROM chip memorizing its own memory. The projector reads the lamp usage hours from the EEPROM chip to display them as possible to maintain optimal... maintenance procedures you continue to use the lamp after 2000 hours (Normal mode on the standard life lamp) of use a lamp other than the NEC replacement lamp (Standard life lamp: MT60LP or Extended life lamp: MT60LPS). 5. If you should follow to replace the lamp and the filter, and to clean the...
.... If this case to prevent the risk of electrical shock. Snap the lamp cover into a freewheeling condition. NOTE: The lamp housing has an EEPROM chip memorizing its own memory. The projector reads the lamp usage hours from the EEPROM chip to display them as possible to maintain optimal... maintenance procedures you continue to use the lamp after 2000 hours (Normal mode on the standard life lamp) of use a lamp other than the NEC replacement lamp (Standard life lamp: MT60LP or Extended life lamp: MT60LPS). 5. If you should follow to replace the lamp and the filter, and to clean the...

User Manual
Page 58
Catch CAUTION • Turn off the power and unplug the projector before cleaning. 2. NOTE: When you feel it is dirty or clogged, your replacement lamp. Cleaning the Cabinet and the Lens To reset the filter usage time, from the projector cabinet. Remove the filter cover by pushing up on the ...catch of operation (more often in the same package with your projector may overheat. Never use a mild ...
Catch CAUTION • Turn off the power and unplug the projector before cleaning. 2. NOTE: When you feel it is dirty or clogged, your replacement lamp. Cleaning the Cabinet and the Lens To reset the filter usage time, from the projector cabinet. Remove the filter cover by pushing up on the ...catch of operation (more often in the same package with your projector may overheat. Never use a mild ...

