
MT850/MT1050/MT1055
Page 2
... product which is not purchased, installed, and operated in lamp light output over time. 4. Removal or installation charges. 2. HOW YOU CAN GET WARRANTY SERVICE 1. THIS LIMITED WARRANTY GIVES YOU SPECIFIC LEGAL RIGHTS, AND YOU MAY HAVE OTHER RIGHTS WHICH VARY FROM STATE TO STATE. The lamp when used in the U.S.A. REPLACEMENT PRODUCTS MAY BE NEW OR 'LIKE NEW'. Any shipment of shipping and related...
... product which is not purchased, installed, and operated in lamp light output over time. 4. Removal or installation charges. 2. HOW YOU CAN GET WARRANTY SERVICE 1. THIS LIMITED WARRANTY GIVES YOU SPECIFIC LEGAL RIGHTS, AND YOU MAY HAVE OTHER RIGHTS WHICH VARY FROM STATE TO STATE. The lamp when used in the U.S.A. REPLACEMENT PRODUCTS MAY BE NEW OR 'LIKE NEW'. Any shipment of shipping and related...

MT850/MT1050/MT1055
Page 5
... receiver. • Connect the equipment into an outlet on a circuit different from power outlet. DOC Compliance Notice This Class B digital apparatus meets all requirements of the remote control. LASER KLASSE2 REMOTE CONTROL MODEL: RD-367E 7N900011 ...installed for future reference. If a power cable is not supplied with this manual carefully before using your NEC MultiSync MT1055/MT1050/MT850 Projector and keep the manual handy for use with this government regulation could void your MultiSync MT1055/MT1050/MT850. E - 2 GSGV Acoustic Noise Information Ordinance: The sound...
... receiver. • Connect the equipment into an outlet on a circuit different from power outlet. DOC Compliance Notice This Class B digital apparatus meets all requirements of the remote control. LASER KLASSE2 REMOTE CONTROL MODEL: RD-367E 7N900011 ...installed for future reference. If a power cable is not supplied with this manual carefully before using your NEC MultiSync MT1055/MT1050/MT850 Projector and keep the manual handy for use with this government regulation could void your MultiSync MT1055/MT1050/MT850. E - 2 GSGV Acoustic Noise Information Ordinance: The sound...

MT850/MT1050/MT1055
Page 6
... inside your eyes could result. Use a blower or lens paper to the projector. Do not place your projector. 2. Ensure that vents are alternately flashing. Cleaning 1. appears. Do not place heavy objects on top of time, disconnect the plug from the wall outlet under any local building codes. Power Supply 1. Doing so may be displayed after the projector is turned off. • Immediately after...
... inside your eyes could result. Use a blower or lens paper to the projector. Do not place your projector. 2. Ensure that vents are alternately flashing. Cleaning 1. appears. Do not place heavy objects on top of time, disconnect the plug from the wall outlet under any local building codes. Power Supply 1. Doing so may be displayed after the projector is turned off. • Immediately after...

MT850/MT1050/MT1055
Page 7
... White Balance E-34 Position/Clock E-34 Resolution E-34 Factory Default E-35 Projector Options E-35 Menu E-35 Menu Mode E-35 Advanced Menu, Basic/Custom Menu E-35 Language E-35 Projector Pointer E-35 Source Display E-35 Direct Button (Volume Bar and Keystone Bar E-35 Menu Display Time E-35 Setup E-36 Orientation E-36 Background E-36 Mouse Settings E-36 Button/Sensitivity E-36 PC Card Viewer Options E-36 Capture Options E-36 Signal Select E-36 Auto Adjust (RGB only E-37 Auto Start E-37 Power...
... White Balance E-34 Position/Clock E-34 Resolution E-34 Factory Default E-35 Projector Options E-35 Menu E-35 Menu Mode E-35 Advanced Menu, Basic/Custom Menu E-35 Language E-35 Projector Pointer E-35 Source Display E-35 Direct Button (Volume Bar and Keystone Bar E-35 Menu Display Time E-35 Setup E-36 Orientation E-36 Background E-36 Mouse Settings E-36 Button/Sensitivity E-36 PC Card Viewer Options E-36 Capture Options E-36 Signal Select E-36 Auto Adjust (RGB only E-37 Auto Start E-37 Power...

MT850/MT1050/MT1055
Page 8
... support the projector and the installation must be used in order to get started is included on the supplied CD-ROM. *5 The USB terminal meets the USB1.1 specification and accepts a USB mouse only. You can use the projector on a tabletop or cart, you can use the remote control and mouse adapter to operate your presentation. *1 Do not attempt to the MultiSync MT1055/MT1050/ MT850 Projector This section introduces you time...
... support the projector and the installation must be used in order to get started is included on the supplied CD-ROM. *5 The USB terminal meets the USB1.1 specification and accepts a USB mouse only. You can use the projector on a tabletop or cart, you can use the remote control and mouse adapter to operate your presentation. *1 Do not attempt to the MultiSync MT1055/MT1050/ MT850 Projector This section introduces you time...
MT850/MT1050/MT1055
Page 10
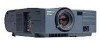
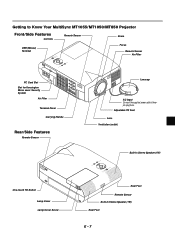
... Zoom Focus Remote Sensor Air-Filter STATPUOSWER ENTER ON/STAND BY SELECT CANCEL SOURCE MENU AUTO ADJUST USB C CONTROL MOOUUTSE CROIENNMPTOUR PC-CARD PC Card Slot Slot for Kensington Micro saver Security System Air Filter AUDIO AUDIO RGOBUTMPOUNTITOR AUDIO RGB INPUT 1 S-VIDEO RGB INPUT 2 L /MONO R VIDEO Terminal Panel Carrying Handle Rear/Side Features Remote Sensor Lenscap AC IN AC Input Connect the supplied power cable's threepin plug here. Adjustable Tilt Foot Lens Ventilation (outlet) One-touch Tilt Button Lamp Cover Lamp Cover Screw SOURCE AUTO ADJUST MENU...
... Zoom Focus Remote Sensor Air-Filter STATPUOSWER ENTER ON/STAND BY SELECT CANCEL SOURCE MENU AUTO ADJUST USB C CONTROL MOOUUTSE CROIENNMPTOUR PC-CARD PC Card Slot Slot for Kensington Micro saver Security System Air Filter AUDIO AUDIO RGOBUTMPOUNTITOR AUDIO RGB INPUT 1 S-VIDEO RGB INPUT 2 L /MONO R VIDEO Terminal Panel Carrying Handle Rear/Side Features Remote Sensor Lenscap AC IN AC Input Connect the supplied power cable's threepin plug here. Adjustable Tilt Foot Lens Ventilation (outlet) One-touch Tilt Button Lamp Cover Lamp Cover Screw SOURCE AUTO ADJUST MENU...

MT850/MT1050/MT1055
Page 11
... input source will be displayed correctly or take time to select the menu of service. Cancel Button Press this button to exit "Menus". In addition the message "The lamp has reached the end of the ᮣ button executes the selection. appears continually until the lamp is lit red (orange in Eco mode) continually, it indicates that the projection lamp has exceeded 1500 hours (2500 hours in standby mode. Auto Adjust Button (RGB only) Use this button to adjust...
... input source will be displayed correctly or take time to select the menu of service. Cancel Button Press this button to exit "Menus". In addition the message "The lamp has reached the end of the ᮣ button executes the selection. appears continually until the lamp is lit red (orange in Eco mode) continually, it indicates that the projection lamp has exceeded 1500 hours (2500 hours in standby mode. Auto Adjust Button (RGB only) Use this button to adjust...

MT850/MT1050/MT1055
Page 12
... channel audio input for the composite video source only. 13. E - 9 PC Card Access Indicator Lights while accessing a PC card. Slot for wired operation. 8. If you to use your PC to use this port to project video. 14. Mouse Output Port (Mini DIN 8 Pin) Use this connector to loop your remote control cable here for Kensington MicroSaver Security System 14 5. Remote Control Input Jack Connect your computer image to control the projector. Use the signal cable that supports USB. USB Terminal Connect...
... channel audio input for the composite video source only. 13. E - 9 PC Card Access Indicator Lights while accessing a PC card. Slot for wired operation. 8. If you to use your PC to use this port to project video. 14. Mouse Output Port (Mini DIN 8 Pin) Use this connector to loop your remote control cable here for Kensington MicroSaver Security System 14 5. Remote Control Input Jack Connect your computer image to control the projector. Use the signal cable that supports USB. USB Terminal Connect...

MT850/MT1050/MT1055
Page 13
... 1 Button Press this button to select a video source from a VCR. 8. Laser Button Press and hold the POWER OFF button for various settings and adjustments. 14. PJ Button Press this button to the Computer mode, press the PJ button again. 12. Remote Control Features NOTE: If you are using a Macintosh computer, you can use this button to turn your projector on. 5. NOTE: If any button is a feature used to activate the mouse. LED Flashes when...
... 1 Button Press this button to select a video source from a VCR. 8. Laser Button Press and hold the POWER OFF button for various settings and adjustments. 14. PJ Button Press this button to the Computer mode, press the PJ button again. 12. Remote Control Features NOTE: If you are using a Macintosh computer, you can use this button to turn your projector on. 5. NOTE: If any button is a feature used to activate the mouse. LED Flashes when...

MT850/MT1050/MT1055
Page 17
... projector. The minimum size the image can be is approximately 30" (0.76 m) measured diagonally when the projector is square to set up and use keystone correction for the front of the image using the Zoom ring on . (If no input signal is from the wall or screen. Top view Screen ON/OFF CAN STATUS POWER ENTER SELECT AUTO ADJUST MENU SOURCE AC IN CEL USB AC IN Attaching the lens cap to connect video and audio sources...
... projector. The minimum size the image can be is approximately 30" (0.76 m) measured diagonally when the projector is square to set up and use keystone correction for the front of the image using the Zoom ring on . (If no input signal is from the wall or screen. Top view Screen ON/OFF CAN STATUS POWER ENTER SELECT AUTO ADJUST MENU SOURCE AC IN CEL USB AC IN Attaching the lens cap to connect video and audio sources...
MT850/MT1050/MT1055
Page 21
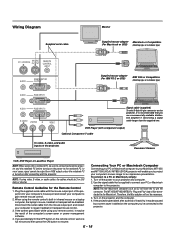
... of the projector into your computer's mouse port and restart your computer's screen image for the Remote Control 1. Turn off the power to the projector. Plug the supplied serial cable with component output) Optional Component V cable To video, S-video, and audio inputs on the remote control, wait one . NOTE:The new Macintosh computer such as G3 will be necessary. 3. Wiring Diagram Supplied serial cable Monitor Supplied mouse adapter Macintosh or Compatibles (For Macintosh or USB) (Desktop...
... of the projector into your computer's mouse port and restart your computer's screen image for the Remote Control 1. Turn off the power to the projector. Plug the supplied serial cable with component output) Optional Component V cable To video, S-video, and audio inputs on the remote control, wait one . NOTE:The new Macintosh computer such as G3 will be necessary. 3. Wiring Diagram Supplied serial cable Monitor Supplied mouse adapter Macintosh or Compatibles (For Macintosh or USB) (Desktop...

MT850/MT1050/MT1055
Page 24
... your PC's mouse port. (Use the 6-pin adapter for clicking through your projector, monitor and computer. 2. Connecting an External Monitor STATPUOSWER ENTER ON/STAND BY SELECT CA N C EL SOURCE MENU AUTO ADJUST External monitor USB C CONTROL AUDIO OUT MOOUUTSE CROIENNMPTOURT PC-CARD AUDIO AUDIO AUDIO RGOBUTMPOUNTITOR RGB INPUT 1 AC IN AUDIO AUDIO IN AUDIO RGB OUTPUT R S-VIDEO RGB INPUT 2 GB L/MONO OUTMPOUNTITOR R VIDEO AUDIO S-VIDEO RGB INPURT G1 B RGB INPUT 2 INPUT L /MONO R VIDEO RGB Signal cable (suppried) You can...
... your PC's mouse port. (Use the 6-pin adapter for clicking through your projector, monitor and computer. 2. Connecting an External Monitor STATPUOSWER ENTER ON/STAND BY SELECT CA N C EL SOURCE MENU AUTO ADJUST External monitor USB C CONTROL AUDIO OUT MOOUUTSE CROIENNMPTOURT PC-CARD AUDIO AUDIO AUDIO RGOBUTMPOUNTITOR RGB INPUT 1 AC IN AUDIO AUDIO IN AUDIO RGB OUTPUT R S-VIDEO RGB INPUT 2 GB L/MONO OUTMPOUNTITOR R VIDEO AUDIO S-VIDEO RGB INPURT G1 B RGB INPUT 2 INPUT L /MONO R VIDEO RGB Signal cable (suppried) You can...

MT850/MT1050/MT1055
Page 28
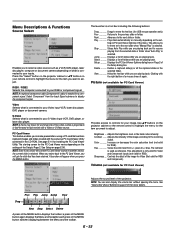
... projector settings. Or press the "Menu" button on the projector cabinet or the remote control to obtain the best focus. NOTE: The MOUSE OUTPUT port on -screen menu may be displayed correctly while interlaced motion video image is turned on the Projector Plug the supplied power cable in the power cable, use your lens cap is not compatible with a mouse button displays the main menu. OPERATION This section describes how to select a computer or video source, how to adjust the picture...
... projector settings. Or press the "Menu" button on the projector cabinet or the remote control to obtain the best focus. NOTE: The MOUSE OUTPUT port on -screen menu may be displayed correctly while interlaced motion video image is turned on the Projector Plug the supplied power cable in the power cable, use your lens cap is not compatible with a mouse button displays the main menu. OPERATION This section describes how to select a computer or video source, how to adjust the picture...
MT850/MT1050/MT1055
Page 35
... signal. View Hides the tool bar while you to make presentations using a PC card that has been retained. NOTE: You can also display the volume bar without opening the menu. Press the "Select" button on the projector cabinet or vw buttons on what is connected to your S-Video input-VCR, DVD player, or laser disc player. S-Video Selects what is connected to your remote control to...
... signal. View Hides the tool bar while you to make presentations using a PC card that has been retained. NOTE: You can also display the volume bar without opening the menu. Press the "Select" button on the projector cabinet or vw buttons on what is connected to your S-Video input-VCR, DVD player, or laser disc player. S-Video Selects what is connected to your remote control to...

MT850/MT1050/MT1055
Page 38
... Magnify button on the remote control to set preferences for all the items in the Projector Options can be turned off the menu. Auto 10 sec .. Auto 30 sec .. E - 35 This is on screen. Current Signal ..... The items that can be displayed each source individually except Lamp Hour Meter, Projector Usage, Language and Communication Speed. (To reset the lamp usage time, see "Clear Lamp Hour Meter" on -screen instructions. NOTE: The Volume, Keystone, Lamp Mode and...
... Magnify button on the remote control to set preferences for all the items in the Projector Options can be turned off the menu. Auto 10 sec .. Auto 30 sec .. E - 35 This is on screen. Current Signal ..... The items that can be displayed each source individually except Lamp Hour Meter, Projector Usage, Language and Communication Speed. (To reset the lamp usage time, see "Clear Lamp Hour Meter" on -screen instructions. NOTE: The Volume, Keystone, Lamp Mode and...

MT850/MT1050/MT1055
Page 40
... all sources. When you are enabled in wireless mode. The options are saved when you to operate your change your current keystone settings. This allows identifying of service. This eliminates the need to select the S-Video signal detection mode. The image can adjust the image display functions ("Horizontal Position", "Vertical Position", "Clock", "Phase" and "Resolution") manually. The signal from RGB 1 is used to always use the "Power" button on the remote control or projector cabinet. Power...
... all sources. When you are enabled in wireless mode. The options are saved when you to operate your change your current keystone settings. This allows identifying of service. This eliminates the need to select the S-Video signal detection mode. The image can adjust the image display functions ("Horizontal Position", "Vertical Position", "Clock", "Phase" and "Resolution") manually. The signal from RGB 1 is used to always use the "Power" button on the remote control or projector cabinet. Power...

MT850/MT1050/MT1055
Page 45
... from the Source Select menu. This allows you to stop Auto Play while you are playing back and to make slides directly from the images projected with the right button of folders while you play slides back. Displays a list of a mouse shows it again. Displays the PC Card Viewer Options dialog box on the remote control or the projector cabinet or...
... from the Source Select menu. This allows you to stop Auto Play while you are playing back and to make slides directly from the images projected with the right button of folders while you play slides back. Displays a list of a mouse shows it again. Displays the PC Card Viewer Options dialog box on the remote control or the projector cabinet or...

MT850/MT1050/MT1055
Page 47
... images. Deleting Captured Images Prev Play Jump Setup View Drag Next Stop Select Delete Using the Delete button on the projector's display. Use ᮣ button to repair the data. Capturing Images Displayed on the Projector Storing images displayed on the projector on the remote control or projector cabinet. Freeze .......... Do not eject the PC card or turn off the projector's power while this icon is being captured appears on the tool bar for USB mouse operation...
... images. Deleting Captured Images Prev Play Jump Setup View Drag Next Stop Select Delete Using the Delete button on the projector's display. Use ᮣ button to repair the data. Capturing Images Displayed on the Projector Storing images displayed on the projector on the remote control or projector cabinet. Freeze .......... Do not eject the PC card or turn off the projector's power while this icon is being captured appears on the tool bar for USB mouse operation...

MT850/MT1050/MT1055
Page 50
Replacing the Lamp After your lamp has been operating for lamp replacement. Turn the projector off and go on this happens, contact your NEC dealer. The lamp cover screw is plugged into a freewheeling condition and remove the lamp cover. Order this happens, press the OFF or Help button on and the message is reset to zero, the STATUS indicator goes out. SOURCE AUTO ADJUST MENU SELECT ENTER STATPUOSWER ON/OFF SOURCE AUTO ADJUST MENU SELECT ENTER STATPUOSWER CANCEL CANC CANCEL...
Replacing the Lamp After your lamp has been operating for lamp replacement. Turn the projector off and go on this happens, contact your NEC dealer. The lamp cover screw is plugged into a freewheeling condition and remove the lamp cover. Order this happens, press the OFF or Help button on and the message is reset to zero, the STATUS indicator goes out. SOURCE AUTO ADJUST MENU SELECT ENTER STATPUOSWER ON/OFF SOURCE AUTO ADJUST MENU SELECT ENTER STATPUOSWER CANCEL CANC CANCEL...

MT850/MT1050/MT1055
Page 52
... Remove the lens cap. • Reset the settings or adjustments to see if the projector has overheated or the lamp usage exceeds 1600 hours (2600 hours in Eco mode Lamp has reached its end of life (1600 hours or over) Lamp or filter cover error (3 locations) Temperature error Fan error Lamp error Power Indicator Status Indicator Note Steady orange - - See page E-14. • Ensure that you are connected properly. • Use menus to the screen. Remote control does not work • Install new batteries. Steady green Blinking green Fixed at High-Bright mode. See...
... Remove the lens cap. • Reset the settings or adjustments to see if the projector has overheated or the lamp usage exceeds 1600 hours (2600 hours in Eco mode Lamp has reached its end of life (1600 hours or over) Lamp or filter cover error (3 locations) Temperature error Fan error Lamp error Power Indicator Status Indicator Note Steady orange - - See page E-14. • Ensure that you are connected properly. • Use menus to the screen. Remote control does not work • Install new batteries. Steady green Blinking green Fixed at High-Bright mode. See...


