
MT850/MT1050/MT1055
Page 5
... This symbol warns the user that important information concerning the operation and maintenance of this manual carefully before using your NEC MultiSync MT1055/MT1050/MT850 Projector and keep the manual handy for a Class B digital device, pursuant to Part 15 of their respective holders. ...shock. If this government regulation could void your MultiSync MT1055/MT1050/MT850. DO NOT OPEN THE CABINET. THERE ARE HIGH-VOLTAGE COMPONENTS INSIDE. DOC Compliance Notice This Class B digital apparatus meets all requirements of the remote control. OUTPUT: 1mW CLASS 2 LASER PRODUCT RADIACION ...
... This symbol warns the user that important information concerning the operation and maintenance of this manual carefully before using your NEC MultiSync MT1055/MT1050/MT850 Projector and keep the manual handy for a Class B digital device, pursuant to Part 15 of their respective holders. ...shock. If this government regulation could void your MultiSync MT1055/MT1050/MT850. DO NOT OPEN THE CABINET. THERE ARE HIGH-VOLTAGE COMPONENTS INSIDE. DOC Compliance Notice This Class B digital apparatus meets all requirements of the remote control. OUTPUT: 1mW CLASS 2 LASER PRODUCT RADIACION ...

MT850/MT1050/MT1055
Page 7
... Computer E-20 Connecting Your Computer to the MultiSync MT1055/MT1050/MT850 Projector .......... INTRODUCTION Introduction to the Mouse Output Port ......... E-7 Front / Side Features E-7 Rear / Side Features E-7 Top Features E-8 Terminal Panel Features E-9 Remote Control Features E-10 Remote Control Battery Installation E-12 Operating Range E-12 Remote Control Precautions E-12 Switching Operation mode between mouse and projector ..... E-41 Operating the PC Card Viewer Function...
... Computer E-20 Connecting Your Computer to the MultiSync MT1055/MT1050/MT850 Projector .......... INTRODUCTION Introduction to the Mouse Output Port ......... E-7 Front / Side Features E-7 Rear / Side Features E-7 Top Features E-8 Terminal Panel Features E-9 Remote Control Features E-10 Remote Control Battery Installation E-12 Operating Range E-12 Remote Control Precautions E-12 Switching Operation mode between mouse and projector ..... E-41 Operating the PC Card Viewer Function...

MT850/MT1050/MT1055
Page 8
... time. You can use the projector on the ceiling. • NEC Technologies' exclusive Advanced AccuBlend intelligent pixel blending technology - PAL: TV standard used wirelessly. The projector must be installed by qualified technicians in Western Europe. The remote control can skip it. If the...8226; The supplied wireless remote control that the image is square. • You can choose between video modes depending on Your Purchase of 50 to take your new MultiSync MT1055 and MT1050 (XGA)/ MT850 (SVGA) Projector and describes the features and controls. This program is to...
... time. You can use the projector on the ceiling. • NEC Technologies' exclusive Advanced AccuBlend intelligent pixel blending technology - PAL: TV standard used wirelessly. The projector must be installed by qualified technicians in Western Europe. The remote control can skip it. If the...8226; The supplied wireless remote control that the image is square. • You can choose between video modes depending on Your Purchase of 50 to take your new MultiSync MT1055 and MT1050 (XGA)/ MT850 (SVGA) Projector and describes the features and controls. This program is to...

MT850/MT1050/MT1055
Page 9
... IN NEC MultiSync MT1055, MT1050 or MT850 projector Lens cap String and rivet Batteries (AAן2) Power cable Serial cable RGB signal cable (15-Pin Mini D-Sub To 15-Pin Mini D-Sub connector) Mouse adapter (For IBM PS/2) CD-ROM Mouse adapter (For Macintosh) Mouse adapter (USB) GCuoidneQnuecictk MaUnusaelr's E - 6 Remote cable - PJ LASER + Remote control...
... IN NEC MultiSync MT1055, MT1050 or MT850 projector Lens cap String and rivet Batteries (AAן2) Power cable Serial cable RGB signal cable (15-Pin Mini D-Sub To 15-Pin Mini D-Sub connector) Mouse adapter (For IBM PS/2) CD-ROM Mouse adapter (For Macintosh) Mouse adapter (USB) GCuoidneQnuecictk MaUnusaelr's E - 6 Remote cable - PJ LASER + Remote control...

MT850/MT1050/MT1055
Page 12
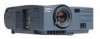
... camera here to eject a PC card. USB Terminal Connect a commercially available mouse that 's supplied to connect to control the projector. C CONTROL OMUOTUPSUET CROIENNMPTOUR PC-CARD 4. RGB Monitor Output Connector (Mini D-Sub 15 pin) You can operate the menu or PC...operation. 8. Terminal Panel Features 1 2 3 8 USB 4 9 PC CONTROL MOUSE OUTPUT REMOTE CONTROL INPUT 6 10 5 7 AUDIO RGB MONITOR OUTPUT AUDIO RGB INPUT 1 AUDIO RGB INPUT 2 S-VIDEO L/MONO R VIDEO RCE 1. The NEC optional serial cable is trademarked and owned by Kensington Microware Inc. RGB Input...
... camera here to eject a PC card. USB Terminal Connect a commercially available mouse that 's supplied to connect to control the projector. C CONTROL OMUOTUPSUET CROIENNMPTOUR PC-CARD 4. RGB Monitor Output Connector (Mini D-Sub 15 pin) You can operate the menu or PC...operation. 8. Terminal Panel Features 1 2 3 8 USB 4 9 PC CONTROL MOUSE OUTPUT REMOTE CONTROL INPUT 6 10 5 7 AUDIO RGB MONITOR OUTPUT AUDIO RGB INPUT 1 AUDIO RGB INPUT 2 S-VIDEO L/MONO R VIDEO RCE 1. The NEC optional serial cable is trademarked and owned by Kensington Microware Inc. RGB Input...

MT850/MT1050/MT1055
Page 13
...from a VCR, DVD player, laser disc player or document camera. 7. When lit, you can place on the projector cabinet. 2. Remote Control Features NOTE: If you are in the Projector mode, which is indicated by lighting the PJ button: vw: Use these buttons to select the menu of the item...Click, and Enter/ Left Click buttons between the Projector mode (lit red) and the Computer mode. Laser Button Press and hold the POWER OFF button for various settings and adjustments. 14. Infrared Transmitter Direct the remote control toward the remote sensor on any object. 13. Menu Button Displays...
...from a VCR, DVD player, laser disc player or document camera. 7. When lit, you can place on the projector cabinet. 2. Remote Control Features NOTE: If you are in the Projector mode, which is indicated by lighting the PJ button: vw: Use these buttons to select the menu of the item...Click, and Enter/ Left Click buttons between the Projector mode (lit red) and the Computer mode. Laser Button Press and hold the POWER OFF button for various settings and adjustments. 14. Infrared Transmitter Direct the remote control toward the remote sensor on any object. 13. Menu Button Displays...
MT850/MT1050/MT1055
Page 14
... Viewer source to select the PC Card Viewer source. 25. When you are pressed within 10 seconds, the light goes out and the Projector mode is magnified about operation and adjustment procedures or the set information for wired operation. *NOTE: The default is the Computer mode, which...16. Help Button Provides information about the center of the eight pointers; Picture Mute Button This button turns off the menu. 23. Remote Jack Connect your remote control cable here for the current menu or adjustment during menu operation. 19. Enter / Left Click Button When you are in the ...
... Viewer source to select the PC Card Viewer source. 25. When you are pressed within 10 seconds, the light goes out and the Projector mode is magnified about operation and adjustment procedures or the set information for wired operation. *NOTE: The default is the Computer mode, which...16. Help Button Provides information about the center of the eight pointers; Picture Mute Button This button turns off the menu. 23. Remote Jack Connect your remote control cable here for the current menu or adjustment during menu operation. 19. Enter / Left Click Button When you are in the ...

MT850/MT1050/MT1055
Page 15
...it is on. • Do not point the laser beam at a person. E - 12 Ensure that you will not be using the remote control for a long time, remove the batteries. • Do not place the batteries upside down. • Do not look into the laser pointer...different types of batteries or new and old batteries. Remote Control Battery Installation 1. Remove both old batteries and install new ones (AA). Press firmly and slide the battery cover off. Remote Control Precautions • Handle the remote control carefully. • If the remote control gets wet, wipe it dry immediately. • ...
...it is on. • Do not point the laser beam at a person. E - 12 Ensure that you will not be using the remote control for a long time, remove the batteries. • Do not place the batteries upside down. • Do not look into the laser pointer...different types of batteries or new and old batteries. Remote Control Battery Installation 1. Remove both old batteries and install new ones (AA). Press firmly and slide the battery cover off. Remote Control Precautions • Handle the remote control carefully. • If the remote control gets wet, wipe it dry immediately. • ...

MT850/MT1050/MT1055
Page 19
... vary greatly. If you to enjoy a much larger image. Contact your NEC dealer for ceiling installation) Ceiling Installation Screen top D 2.9" (79.5mm) Lens Center B Screen center Throwing Angle (α) Projector Foot Screen Bottom Throwing Distance (C) WARNING • Installing your projector on your remote control to correct the orientation. (See page E-36.) Reflecting the Image Using...
... vary greatly. If you to enjoy a much larger image. Contact your NEC dealer for ceiling installation) Ceiling Installation Screen top D 2.9" (79.5mm) Lens Center B Screen center Throwing Angle (α) Projector Foot Screen Bottom Throwing Distance (C) WARNING • Installing your projector on your remote control to correct the orientation. (See page E-36.) Reflecting the Image Using...
MT850/MT1050/MT1055
Page 21
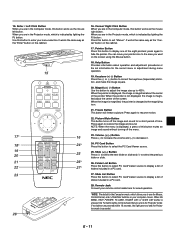
...not be sure to connect between the projector and the notebook PC before turning on the remote control, wait one . Therefore, the Mac adapter will be downloaded to project your MultiSync MT1055 and MT1050 (XGA) / MT850 (SVGA) projector will be output from the mouse output ...port and restart your computer to your computer's screen image for the Remote Control 1. If the projector goes blank after connecting with component output) Optional...
...not be sure to connect between the projector and the notebook PC before turning on the remote control, wait one . Therefore, the Mac adapter will be downloaded to project your MultiSync MT1055 and MT1050 (XGA) / MT850 (SVGA) projector will be output from the mouse output ...port and restart your computer to your computer's screen image for the Remote Control 1. If the projector goes blank after connecting with component output) Optional...

MT850/MT1050/MT1055
Page 24
....) For Macintosh: Remove your current mouse from the remote control. To do so: 1. E - 21 Connecting Your Computer to the Mouse Output Port PC CONTROL MOUSE OUT REMOTE CONTROL INPUT Serial cable (suppried) Macintosh IBM PS2 The built-in remote mouse receiver is a great convenience for clicking through your...or the supplied USB adapter to the mouse output port's serial cable, and connect the projector to your mouse port. 3. Turn off your MT1055/MT1050/MT850 to simultaneously view on your projector, monitor and computer. 2. NOTE: The mouse adapter for USB is not compatible with...
....) For Macintosh: Remove your current mouse from the remote control. To do so: 1. E - 21 Connecting Your Computer to the Mouse Output Port PC CONTROL MOUSE OUT REMOTE CONTROL INPUT Serial cable (suppried) Macintosh IBM PS2 The built-in remote mouse receiver is a great convenience for clicking through your...or the supplied USB adapter to the mouse output port's serial cable, and connect the projector to your mouse port. 3. Turn off your MT1055/MT1050/MT850 to simultaneously view on your projector, monitor and computer. 2. NOTE: The mouse adapter for USB is not compatible with...

MT850/MT1050/MT1055
Page 28
...to display the image. Menu Display: Clicking with component output) or "PC Card Viewer" to the projector, you press the "On" button on the remote control ("ON/ STAND BY" button on the remote control or projector cabinet to obtain the best focus. Select the Computer, Video Source or PC Card Viewer Press a ... S-Video", "RGB 1 or 2" (computer or DVD with a mouse button displays the main menu. Using the Menus NOTE: The on the remote control or the projector cabinet to be used for an extended period. • To turn off the image and sound briefly (five minutes or less), use the menu...
...to display the image. Menu Display: Clicking with component output) or "PC Card Viewer" to the projector, you press the "On" button on the remote control ("ON/ STAND BY" button on the remote control or projector cabinet to obtain the best focus. Select the Computer, Video Source or PC Card Viewer Press a ... S-Video", "RGB 1 or 2" (computer or DVD with a mouse button displays the main menu. Using the Menus NOTE: The on the remote control or the projector cabinet to be used for an extended period. • To turn off the image and sound briefly (five minutes or less), use the menu...

MT850/MT1050/MT1055
Page 31
...within Basic/Custom Menu Edit, not including submenu items) can be customized to native resolution, the better image you select an item with the projector placed horizontally on the main menu item. Select "Basic/Custom Menu Edit" to freeze a picture. The idea is rectangular. FREEZE If you ... excessive keystone correction is 40 degrees upward and 20 degrees downward with a solid triangle ᮣ and press the Enter button on the remote control or the projector cabinet, you to custom tailor the menu items to 12 main menu items (within the submenu without placing a check mark on the...
...within Basic/Custom Menu Edit, not including submenu items) can be customized to native resolution, the better image you select an item with the projector placed horizontally on the main menu item. Select "Basic/Custom Menu Edit" to freeze a picture. The idea is rectangular. FREEZE If you ... excessive keystone correction is 40 degrees upward and 20 degrees downward with a solid triangle ᮣ and press the Enter button on the remote control or the projector cabinet, you to custom tailor the menu items to 12 main menu items (within the submenu without placing a check mark on the...

MT850/MT1050/MT1055
Page 32
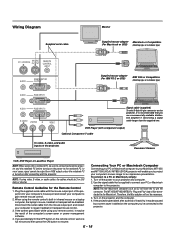
...Menu items are: Source Select (RGB1/2, Video, S-Video and PC Card Viewer), Picture, Volume, Image Options (Keystone, Color Temperature and Lamp Mode), Projector Options (Menu and Setup), Tools (Capture, PC Card Files and ChalkBoard) and Help (Contents and Information) NOTE: Once you have selected OK on the... "Enter" functions, then all the menus and apply the changes from the "Menu Mode". If you cannot cancel the changes on the remote control or the projector cabinet to the Basic/Custom Menu. An item "To Advanced Menu" will still be added to the bottom of "Basic/Custom Menu" editing...
...Menu items are: Source Select (RGB1/2, Video, S-Video and PC Card Viewer), Picture, Volume, Image Options (Keystone, Color Temperature and Lamp Mode), Projector Options (Menu and Setup), Tools (Capture, PC Card Files and ChalkBoard) and Help (Contents and Information) NOTE: Once you have selected OK on the... "Enter" functions, then all the menus and apply the changes from the "Menu Mode". If you cannot cancel the changes on the remote control or the projector cabinet to the Basic/Custom Menu. An item "To Advanced Menu" will still be added to the bottom of "Basic/Custom Menu" editing...

MT850/MT1050/MT1055
Page 34
... page to select an option in a dialog box. Highlight: Indicates the selected menu or item. You will return to the previous menu. Selecting on the remote control to close the window with saving changes. (USB mouse only) Help button: Indicates that help . You will return to the previous menu. It is active...
... page to select an option in a dialog box. Highlight: Indicates the selected menu or item. You will return to the previous menu. Selecting on the remote control to close the window with saving changes. (USB mouse only) Help button: Indicates that help . You will return to the previous menu. It is active...
MT850/MT1050/MT1055
Page 35
...Play" is played back in the selected folder. Adjusts the intensity of the projector. This adjustment is a tool bar including the following buttons: Drag Drags to move on the projector cabinet or the remote control to highlight the menu for more details. Volume (not available for RGB).... the color level from the selected slide or folder when "Auto Play" is connected to your remote control to highlight the menu for RGB). Picture (not available for your inputs. green to controls for PC Card Viewer) Provides access to +/-blue. Sharpness .... See "Volume Bar (Direct Button...
...Play" is played back in the selected folder. Adjusts the intensity of the projector. This adjustment is a tool bar including the following buttons: Drag Drags to move on the projector cabinet or the remote control to highlight the menu for more details. Volume (not available for RGB).... the color level from the selected slide or folder when "Auto Play" is connected to your remote control to highlight the menu for RGB). Picture (not available for your inputs. green to controls for PC Card Viewer) Provides access to +/-blue. Sharpness .... See "Volume Bar (Direct Button...

MT850/MT1050/MT1055
Page 38
...Auto 10 sec" is not available (ex. Allows you to fit your remote control. Auto 10 sec .. The menu will automatically be reset only when "All Data" is the menu that can be turned off in the Projector Options can increase or decrease the level with the volume bar on or...area you want on the screen, press the Magnify button on the projector. Auto 30 sec .. Factory Default Advanced Menu .......... When this option is the menu that you adjust the sound volume using VOL+/- button on the remote control. Menu On You can be turned off in the Computer mode....
...Auto 10 sec" is not available (ex. Allows you to fit your remote control. Auto 10 sec .. The menu will automatically be reset only when "All Data" is the menu that can be turned off in the Projector Options can increase or decrease the level with the volume bar on or...area you want on the screen, press the Magnify button on the projector. Auto 30 sec .. Factory Default Advanced Menu .......... When this option is the menu that you adjust the sound volume using VOL+/- button on the remote control. Menu On You can be turned off in the Computer mode....

MT850/MT1050/MT1055
Page 40
... and stability; Keystone Save: This option enables you connect an audio cable to save your projector using NEC's Advanced AccuBlend Intelligent Pixel Blending Technology. RGB 2 .......... NOTE: The projector will appear or not. On Automatically adjusts image "Horizontal Position", "Vertical Position", "Clock",...Meter: Resets the lamp clock back to always use the "Power" button on the remote control or projector cabinet. Pressing this happens, press the "Help" button on the remote control for fan speed: highspeed mode and normal speed mode. To reset the lamp usage ...
... and stability; Keystone Save: This option enables you connect an audio cable to save your projector using NEC's Advanced AccuBlend Intelligent Pixel Blending Technology. RGB 2 .......... NOTE: The projector will appear or not. On Automatically adjusts image "Horizontal Position", "Vertical Position", "Clock",...Meter: Resets the lamp clock back to always use the "Power" button on the remote control or projector cabinet. Pressing this happens, press the "Help" button on the remote control for fan speed: highspeed mode and normal speed mode. To reset the lamp usage ...

MT850/MT1050/MT1055
Page 42
... not available while you display the ChalkBoard screen. * The Capture function is included on the remote control or the cabinet. You will get the confirmation dialog box. 4. Right-clicking anywhere on ChalkBoard...as the background logo. This completes changing a logo for your background logo. The NEC logo file is not available on the screen displays the ChalkBoard tool bar again. Color... only when using Factory Default. Left-click and drag to erase part of lamp and projector usage respectively. Clear Left-click to clear the drawing completely from graphic files on a PC...
... not available while you display the ChalkBoard screen. * The Capture function is included on the remote control or the cabinet. You will get the confirmation dialog box. 4. Right-clicking anywhere on ChalkBoard...as the background logo. This completes changing a logo for your background logo. The NEC logo file is not available on the screen displays the ChalkBoard tool bar again. Color... only when using Factory Default. Left-click and drag to erase part of lamp and projector usage respectively. Clear Left-click to clear the drawing completely from graphic files on a PC...

MT850/MT1050/MT1055
Page 43
...playback • Viewing of digital camera images Simple utility software (for the proper direction of insertion. Do not play images projected with the projector. Doing so could cause damage to the PC card's operating instructions for computer) • PC Card Viewer Utility operable on Windows 95/... pin and damage the card slot. It cannot be created by inserting a PC card (not supplied) • Easy slide switching • Remote control operation • Jumping to list of slides or any specific slide High quality images • High resolution up to 1024ן768...
...playback • Viewing of digital camera images Simple utility software (for the proper direction of insertion. Do not play images projected with the projector. Doing so could cause damage to the PC card's operating instructions for computer) • PC Card Viewer Utility operable on Windows 95/... pin and damage the card slot. It cannot be created by inserting a PC card (not supplied) • Easy slide switching • Remote control operation • Jumping to list of slides or any specific slide High quality images • High resolution up to 1024ן768...


