
User Manual
Page 1
This may save you can skip it. If the section doesn't apply, you time later on. Take a few minutes now to take your time and do everything right the first time. At the beginning of each section of the manual you'll find an overview. CD-ROM version Portable Projector LT260/LT240/LT220 User's Manual About this user's manual The fastest way to get started is to review the user's manual.
This may save you can skip it. If the section doesn't apply, you time later on. Take a few minutes now to take your time and do everything right the first time. At the beginning of each section of the manual you'll find an overview. CD-ROM version Portable Projector LT260/LT240/LT220 User's Manual About this user's manual The fastest way to get started is to review the user's manual.

User Manual
Page 33
To do so, simply: 1. Turn on the projector. NOTE: Refer to your DVD player's owner's manual for more information about your DVD player to the RGB IN1 or IN2 connector on the projector and DVD player. For a DVD player without component video (Y,Cb,Cr) output, use a com- mercially...to-RCA (female)ן3 cable to connect your DVD player's video output requirements, E-33 Turn off the power to your projector to a DVD player with component output or Video output. INSTALLATION AND CONNECTIONS Ͼ Making Connections Connecting Your Video Equipment Connecting Your ...
To do so, simply: 1. Turn on the projector. NOTE: Refer to your DVD player's owner's manual for more information about your DVD player to the RGB IN1 or IN2 connector on the projector and DVD player. For a DVD player without component video (Y,Cb,Cr) output, use a com- mercially...to-RCA (female)ן3 cable to connect your DVD player's video output requirements, E-33 Turn off the power to your projector to a DVD player with component output or Video output. INSTALLATION AND CONNECTIONS Ͼ Making Connections Connecting Your Video Equipment Connecting Your ...

User Manual
Page 35
Turn on the projector and the VCR or laser disc player. NOTE: Refer to your VCR or laser disc player owner's manual for more information about your equipment's video output requirements. INSTALLATION AND CONNECTIONS Ͼ Making Connections 3. E-35 NOTE: An image may not be displayed correctly when a Video or S-Video source is played back in fast-forward or fast-rewind via a scan converter.
Turn on the projector and the VCR or laser disc player. NOTE: Refer to your VCR or laser disc player owner's manual for more information about your equipment's video output requirements. INSTALLATION AND CONNECTIONS Ͼ Making Connections 3. E-35 NOTE: An image may not be displayed correctly when a Video or S-Video source is played back in fast-forward or fast-rewind via a scan converter.

User Manual
Page 48
... of your computer for component and video signal. • If the Auto Adjust operation cannot optimize the RGB signal, try to adjust Clock and Phase manually.
... of your computer for component and video signal. • If the Auto Adjust operation cannot optimize the RGB signal, try to adjust Clock and Phase manually.

User Manual
Page 62
...; Jumping to list of slides or any specific slide High quality images • High resolution up to capture and play images on the supplied NEC Projector User Supportware CD-ROM. USING THE VIEWER NOTE: To use • Presentations can be conducted simply with the... projector. Even if no computer is convenient for playing images taken on the projector. For installation, see the Slide show function on the on-line manual of the Viewer Function Features You can view presentation data, capture, and play...
...; Jumping to list of slides or any specific slide High quality images • High resolution up to capture and play images on the supplied NEC Projector User Supportware CD-ROM. USING THE VIEWER NOTE: To use • Presentations can be conducted simply with the... projector. Even if no computer is convenient for playing images taken on the projector. For installation, see the Slide show function on the on-line manual of the Viewer Function Features You can view presentation data, capture, and play...
User Manual
Page 66
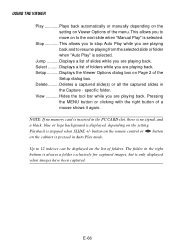
... playing from the selected slide or folder when "Auto Play" is displayed, depending on Page 2 of folders while you to the next slide when "Manual Play" is only displayed when images have been captured. Deletes a captured slide(s) or all the captured slides in the PC CARD slot, there is...card is inserted in the Capture - specific folder. The folder in Auto Play mode. Select ......... E-66 USING THE VIEWER Play Plays back automatically or manually depending on the setting on the list of folders. Displays a list of a mouse shows it again. Stop This allows you to stop Auto Play ...
... playing from the selected slide or folder when "Auto Play" is displayed, depending on Page 2 of folders while you to the next slide when "Manual Play" is only displayed when images have been captured. Deletes a captured slide(s) or all the captured slides in the PC CARD slot, there is...card is inserted in the Capture - specific folder. The folder in Auto Play mode. Select ......... E-66 USING THE VIEWER Play Plays back automatically or manually depending on the setting on the list of folders. Displays a list of a mouse shows it again. Stop This allows you to stop Auto Play ...

User Manual
Page 77
...Deutsch, Français, Italiano, Español, Svenska Menu Mode Basic Menu, Custom Menu, Advanced Menu Custom Menu Edit Projector Pointer Pointer 1-8 Menu Display Time Manual, Auto 5sec, Auto 15sec, Auto 45sec Page 2 Source Display Message Menu Color Select On, Off On, Off Color, Monochrome... Page 2 Viewer Options Show Folder List Auto Play, Manual Play, Interval Capture Options High Quality, Normal, High Compression Mouse Button Right Hand, Left Hand Sensitivity Fast, Medium, Slow Page 4 Auto ...
...Deutsch, Français, Italiano, Español, Svenska Menu Mode Basic Menu, Custom Menu, Advanced Menu Custom Menu Edit Projector Pointer Pointer 1-8 Menu Display Time Manual, Auto 5sec, Auto 15sec, Auto 45sec Page 2 Source Display Message Menu Color Select On, Off On, Off Color, Monochrome... Page 2 Viewer Options Show Folder List Auto Play, Manual Play, Interval Capture Options High Quality, Normal, High Compression Mouse Button Right Hand, Left Hand Sensitivity Fast, Medium, Slow Page 4 Auto ...

User Manual
Page 78
USING ON-SCREEN MENU Ͼ Basic Menu Operation Advanced Menu Source Select Picture Volume Image Options Picture Management Projector Options Tools Help Factory Default 3D Reform Menu Setup Screen LAN Mode Passcode Security Sleep Timer Capture PC Card Files ...ChalkBoard Contents Information Factory Default All Data, Current Signal Screen Type 4:3, 16:9 / Position LAN Mode IP Address Automatic Manual IP Address, Subnet Mask,Gateway Projector Name DNS Configuration Domain Name Network Type Mode SSID Channel TX rate Infrastructure, 802.11 Ad Hoc, Ad Hoc Easy Connection ...
USING ON-SCREEN MENU Ͼ Basic Menu Operation Advanced Menu Source Select Picture Volume Image Options Picture Management Projector Options Tools Help Factory Default 3D Reform Menu Setup Screen LAN Mode Passcode Security Sleep Timer Capture PC Card Files ...ChalkBoard Contents Information Factory Default All Data, Current Signal Screen Type 4:3, 16:9 / Position LAN Mode IP Address Automatic Manual IP Address, Subnet Mask,Gateway Projector Name DNS Configuration Domain Name Network Type Mode SSID Channel TX rate Infrastructure, 802.11 Ad Hoc, Ad Hoc Easy Connection ...
User Manual
Page 82
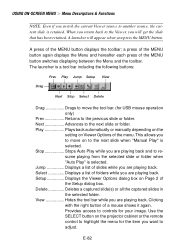
Play Plays back automatically or manually depending on the setting on the projector cabinet or the remote control to highlight the menu for the item you want to adjust. Jump Displays a list of slides while you are playing ... press of a mouse shows it again. Select Displays a list of the menu. Setup Displays the Viewer Options dialog box on to the next slide when "Manual Play" is a tool bar including the following buttons: Prev Play Jump Setup View Drag Next Stop Select Delete Drag Drags to move on Page 2 of...
Play Plays back automatically or manually depending on the setting on the projector cabinet or the remote control to highlight the menu for the item you want to adjust. Jump Displays a list of slides while you are playing ... press of a mouse shows it again. Select Displays a list of the menu. Setup Displays the Viewer Options dialog box on to the next slide when "Manual Play" is a tool bar including the following buttons: Prev Play Jump Setup View Drag Next Stop Select Delete Drag Drags to move on Page 2 of...

User Manual
Page 87
Second repeat the 3D Reform adjustment. Adjusting Position and Clock This allows you to manually adjust the image horizontally and vertically, and adjust Clock and Phase. E-87 Horizontal/Vertical Position Adjusts the image location horizontally and vertically using the SELECT &#...
Second repeat the 3D Reform adjustment. Adjusting Position and Clock This allows you to manually adjust the image horizontally and vertically, and adjust Clock and Phase. E-87 Horizontal/Vertical Position Adjusts the image location horizontally and vertically using the SELECT &#...

User Manual
Page 94
... ....... Auto 45 sec ..... The menu will automatically be turned off in 5 seconds if no buttons are pressed within 15 seconds. onds if no buttons are "Manual", "Auto 5 sec", "Auto 15 sec", and "Auto 45 sec". The preset choices are pressed within 45 seconds. [Page 2] Turning On / Off Source...and monochrome. USING ON-SCREEN MENU Ͼ Menu Descriptions & Functions Selecting Menu Display Time : This option allows you to select how long the projector waits after the last touch of a button to turn off input name display such as RGB1/2, Video, and No Input to be displayed in ...
... ....... Auto 45 sec ..... The menu will automatically be turned off in 5 seconds if no buttons are pressed within 15 seconds. onds if no buttons are "Manual", "Auto 5 sec", "Auto 15 sec", and "Auto 45 sec". The preset choices are pressed within 45 seconds. [Page 2] Turning On / Off Source...and monochrome. USING ON-SCREEN MENU Ͼ Menu Descriptions & Functions Selecting Menu Display Time : This option allows you to select how long the projector waits after the last touch of a button to turn off input name display such as RGB1/2, Video, and No Input to be displayed in ...

User Manual
Page 97
... ON-SCREEN MENU Ͼ Menu Descriptions & Functions Auto Play Interval: You can select from Tools. You have three options for USB mouse only. Manual Play: Views a slide manually when the Viewer source is available for JPEG compression quality: High quality, Normal and High Compression. Setting Mouse Button and Sensitivity [Mouse]: This option...
... ON-SCREEN MENU Ͼ Menu Descriptions & Functions Auto Play Interval: You can select from Tools. You have three options for USB mouse only. Manual Play: Views a slide manually when the Viewer source is available for JPEG compression quality: High quality, Normal and High Compression. Setting Mouse Button and Sensitivity [Mouse]: This option...

User Manual
Page 98
... for a component video source such as a computer, or "Component" for the current RGB input signal to project an image using NEC's Advanced AccuBlend Intelligent Pixel Blending Technology. Normally select "Auto". Select "Scart" in RGB 1 for position and stability; USING ON-...Format [Signal Select] RGB1/2: Allows you to select composite video standards manually. Normally select "RGB/Component" and the projector automatically detects an either incoming signal. This must be some component signals that the projector is the case, select "Component". Off User can be automatically adjusted...
... for a component video source such as a computer, or "Component" for the current RGB input signal to project an image using NEC's Advanced AccuBlend Intelligent Pixel Blending Technology. Normally select "Auto". Select "Scart" in RGB 1 for position and stability; USING ON-...Format [Signal Select] RGB1/2: Allows you to select composite video standards manually. Normally select "RGB/Component" and the projector automatically detects an either incoming signal. This must be some component signals that the projector is the case, select "Component". Off User can be automatically adjusted...

User Manual
Page 102
...used on your network. IP Address An IP address can be automatically assigned to this projector by your PC card. E-102 Failure to do so may cause damage to set various setting items when the projector is used for LAN connection. NOTE: LAN card is not available when a PC card... is required for an address, and then register it manually. NOTE: A LAN card is used for the Viewer function. NEC's optional wireless LAN card is removed during Standby...
...used on your network. IP Address An IP address can be automatically assigned to this projector by your PC card. E-102 Failure to do so may cause damage to set various setting items when the projector is used for LAN connection. NOTE: LAN card is not available when a PC card... is required for an address, and then register it manually. NOTE: A LAN card is used for the Viewer function. NEC's optional wireless LAN card is removed during Standby...

User Manual
Page 103
...the set here. Manual Provides a space for you to register the IP address or subnet mask number obtained from the LAN card, the transfer location will be sent to the previously set here must be used . IP Address ...... Set the default gateway of the network connected to the projector. however, when... your network administrator. E-103 Up to 16 alphanumeric characters can be identified by a search of DNS server on the network connected to the projector from a DHCP server. Press to display the software keyboard and type in the IP address of the routing information...
...the set here. Manual Provides a space for you to register the IP address or subnet mask number obtained from the LAN card, the transfer location will be sent to the previously set here must be used . IP Address ...... Set the default gateway of the network connected to the projector. however, when... your network administrator. E-103 Up to 16 alphanumeric characters can be identified by a search of DNS server on the network connected to the projector from a DHCP server. Press to display the software keyboard and type in the IP address of the routing information...
User Manual
Page 125
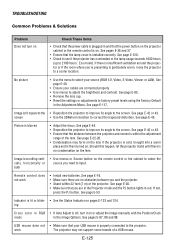
... or blink- • See the Status Indicator on . work • Install new batteries. See page E-120. • Check to see if the projector has overheated or the lamp usage exceeds 1600 hours (up to correct the trapezoid distortion. See page E-85. • Remove the lens cap. •... 98. See page E-53. TROUBLESHOOTING Common Problems & Solutions Problem Does not turn it on or adjust the image manually with the Position/Clock mode in red. Should this happen, let the projector stand until there is within 22 feet (7 m) of a USB mouse. E-125 See page E-42 or 43....
... or blink- • See the Status Indicator on . work • Install new batteries. See page E-120. • Check to see if the projector has overheated or the lamp usage exceeds 1600 hours (up to correct the trapezoid distortion. See page E-85. • Remove the lens cap. •... 98. See page E-53. TROUBLESHOOTING Common Problems & Solutions Problem Does not turn it on or adjust the image manually with the Position/Clock mode in red. Should this happen, let the projector stand until there is within 22 feet (7 m) of a USB mouse. E-125 See page E-42 or 43....

User Manual
Page 127
...LT240/LT220 Projector's performance Model Number LT260/LT240/LT220 Optical DMD™ Resolution Lens Lamp Image Size Projection Distance Projection Angle Single Chip Digital Micromirror Device(DMD™) 1024ן768 pixels (LT220: 800ן600 pixels) up to UXGA with Advanced AccuBlend Manual... zoom and focus: LT260/LT220: F2.2 - 2.5 f=28.4mm - 34.0mm LT240: F2.5 - 2.8 f=22.4mm - 27.0mm 220 W DC standard (The lamp is warranted for 1500 ...
...LT240/LT220 Projector's performance Model Number LT260/LT240/LT220 Optical DMD™ Resolution Lens Lamp Image Size Projection Distance Projection Angle Single Chip Digital Micromirror Device(DMD™) 1024ן768 pixels (LT220: 800ן600 pixels) up to UXGA with Advanced AccuBlend Manual... zoom and focus: LT260/LT220: F2.2 - 2.5 f=28.4mm - 34.0mm LT240: F2.5 - 2.8 f=22.4mm - 27.0mm 220 W DC standard (The lamp is warranted for 1500 ...


