User Manual
Page 3
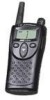
... manufacturing, property and hotel management and more. Off. © 2001 Motorola, Inc. Motorola Consumer Products Division 1705 Belle Meade Court Lawrenceville, GA 30043 Package Contents • Radio • Swivel Belt Holster • NiMH Battery • 10-Hour Charger • User's Guide • Accessory ...Brochure • Warranty Card Motorola, the Stylized M Logo, and all of today's fast-paced industries. The XSeries radios...
... manufacturing, property and hotel management and more. Off. © 2001 Motorola, Inc. Motorola Consumer Products Division 1705 Belle Meade Court Lawrenceville, GA 30043 Package Contents • Radio • Swivel Belt Holster • NiMH Battery • 10-Hour Charger • User's Guide • Accessory ...Brochure • Warranty Card Motorola, the Stylized M Logo, and all of today's fast-paced industries. The XSeries radios...
User Manual
Page 4
... Editing Scan List 15 Safety and General Information i Getting Started 3 Diagram of Radio and Functions 4 Installing The NiMH Battery 5 Charging 7 Installing AA Alkaline Batteries 8 Battery Meter 8 Setting the Battery Type 16 Lock Keypad 16 End-of-Transmission Tone 16 Keypad Tones 17 Settings and Functions Display 17 Programming Mode 18 ...and Care 24 Call Tone 12 Frequency and Code Charts 25 Microphone Gain 13 Troubleshooting 29 Hands-Free Use/VOX 13 Motorola Limited Warranty 33 With Accessories 13 Product Services: Without Accessories 14 1-800-353-2729 U.S.A.
... Editing Scan List 15 Safety and General Information i Getting Started 3 Diagram of Radio and Functions 4 Installing The NiMH Battery 5 Charging 7 Installing AA Alkaline Batteries 8 Battery Meter 8 Setting the Battery Type 16 Lock Keypad 16 End-of-Transmission Tone 16 Keypad Tones 17 Settings and Functions Display 17 Programming Mode 18 ...and Care 24 Call Tone 12 Frequency and Code Charts 25 Microphone Gain 13 Troubleshooting 29 Hands-Free Use/VOX 13 Motorola Limited Warranty 33 With Accessories 13 Product Services: Without Accessories 14 1-800-353-2729 U.S.A.
User Manual
Page 11
Potentially Explosive Atmospheres Turn off your radio prior to entering any other area where you drive. Do not remove, install, or charge batteries in bodily injury or even death. When using your vehicle engine. Note: The areas with a potentially explosive atmosphere, unless it is placed in the air ...
Potentially Explosive Atmospheres Turn off your radio prior to entering any other area where you drive. Do not remove, install, or charge batteries in bodily injury or even death. When using your vehicle engine. Note: The areas with a potentially explosive atmosphere, unless it is placed in the air ...
User Manual
Page 12
...may burst, causing personal injury and damage. the battery 2. Charging Safety Instructions Before using the battery. Caution: To reduce the risk of batteries may complete an electrical circuit (short circuit) and become quite hot. vi the battery charger, and 3. Obey all instructions and cautionary ...General Information Blasting Caps and Areas To avoid possible interference with blasting operations, turn off twoway radio." the radio using the battery charger, read all signs and instructions. If a damaged antenna comes into contact with your radio when you are near ...
...may burst, causing personal injury and damage. the battery 2. Charging Safety Instructions Before using the battery. Caution: To reduce the risk of batteries may complete an electrical circuit (short circuit) and become quite hot. vi the battery charger, and 3. Obey all instructions and cautionary ...General Information Blasting Caps and Areas To avoid possible interference with blasting operations, turn off twoway radio." the radio using the battery charger, read all signs and instructions. If a damaged antenna comes into contact with your radio when you are near ...
User Manual
Page 15
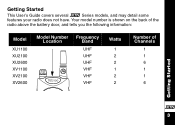
Your model number is shown on the back of the radio above the battery door, and tells you the following information: Model XU1100 XU2100 XU2600 XV1100 XV2100 XV2600 Model Number Location Frequency Band UHF UHF UHF VHF VHF VHF Watts 1 2 2 1 2 2 Number of Channels 1 1 6 1 1 6 Getting Started X 3 Getting Started This User's Guide covers several XSeries models, and may detail some features your radio does not have.
Your model number is shown on the back of the radio above the battery door, and tells you the following information: Model XU1100 XU2100 XU2600 XV1100 XV2100 XV2600 Model Number Location Frequency Band UHF UHF UHF VHF VHF VHF Watts 1 2 2 1 2 2 Number of Channels 1 1 6 1 1 6 Getting Started X 3 Getting Started This User's Guide covers several XSeries models, and may detail some features your radio does not have.
User Manual
Page 17
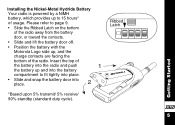
... radio away from the battery door, or toward the contacts. • Slide and lift the battery door off. • Position the battery with the Motorola Logo side up to 15 hours* of the battery into the radio and push 1 the battery up and into the battery compartment to fit tightly... into place. • Slide and snap the battery door into place. 2 *Based ...
... radio away from the battery door, or toward the contacts. • Slide and lift the battery door off. • Position the battery with the Motorola Logo side up to 15 hours* of the battery into the radio and push 1 the battery up and into the battery compartment to fit tightly... into place. • Slide and snap the battery door into place. 2 *Based ...
User Manual
Page 18
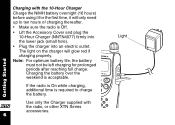
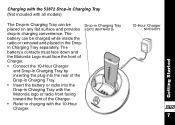
... not be left charging for the first time, it for prolonged periods after reaching full charge. Light Charging the battery over the weekend is required to ten hours of charging thereafter. • Make sure the radio is Off. • Lift the Accessory Cover and... into an electric outlet. Getting Started If the radio is On while charging, additional time is acceptable. Charging with the radio, or other XTN Series accessories. X 6 Use only the Charger supplied with the 10-Hour Charger Charge the NiMH battery overnight (16 hours) before using it will glow red if charging properly.
... not be left charging for the first time, it for prolonged periods after reaching full charge. Light Charging the battery over the weekend is required to ten hours of charging thereafter. • Make sure the radio is Off. • Lift the Accessory Cover and... into an electric outlet. Getting Started If the radio is On while charging, additional time is acceptable. Charging with the radio, or other XTN Series accessories. X 6 Use only the Charger supplied with the 10-Hour Charger Charge the NiMH battery overnight (16 hours) before using it will glow red if charging properly.
User Manual
Page 19
... or radio front facing toward the front of the Drop-in Charging Tray. • Insert the battery or radio into the Drop-in Charging Tray separately. The battery's contacts must face down and the Motorola Logo must face the front of Charger. • Connect the 10-Hour Charger and Drop-in Charging Tray...
... or radio front facing toward the front of the Drop-in Charging Tray. • Insert the battery or radio into the Drop-in Charging Tray separately. The battery's contacts must face down and the Motorola Logo must face the front of Charger. • Connect the 10-Hour Charger and Drop-in Charging Tray...
User Manual
Page 20
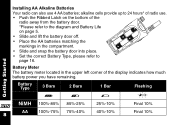
...provide up to 24 hours* of radio use 4 AA batteries; Battery Meter The battery meter located in the compartment. • Slide and snap the battery door into place. • Set the correct Battery Type, please refer to page 16. Installing AA Alkaline Batteries Your radio can also use . • Push the ...Ribbed Latch on the bottom of the radio away from the battery door. *Please refer to the diagram and Battery Life on page 5. • Slide and lift the battery door off. • Place the AA batteries matching the markings in the upper left corner of the display indicates how...
...provide up to 24 hours* of radio use 4 AA batteries; Battery Meter The battery meter located in the compartment. • Slide and snap the battery door into place. • Set the correct Battery Type, please refer to page 16. Installing AA Alkaline Batteries Your radio can also use . • Push the ...Ribbed Latch on the bottom of the radio away from the battery door. *Please refer to the diagram and Battery Life on page 5. • Slide and lift the battery door off. • Place the AA batteries matching the markings in the upper left corner of the display indicates how...
User Manual
Page 21
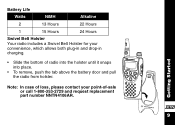
Note: In case of loss, please contact your convenience, which allows both plug-in and drop-in charging. • Slide the bottom of -sale or call 1-800-353-2729 and request replacement part number NNTN4106AR. Getting Started X 9 Battery Life Watts NiMH Alkaline 2 13 Hours 22 Hours 1 15 Hours 24 Hours Swivel Belt Holster Your radio includes a Swivel Belt Holster for your point-of radio into the holster until it snaps into place. • To remove, push the tab above the battery door and pull the radio from holster.
Note: In case of loss, please contact your convenience, which allows both plug-in and drop-in charging. • Slide the bottom of -sale or call 1-800-353-2729 and request replacement part number NNTN4106AR. Getting Started X 9 Battery Life Watts NiMH Alkaline 2 13 Hours 22 Hours 1 15 Hours 24 Hours Swivel Belt Holster Your radio includes a Swivel Belt Holster for your point-of radio into the holster until it snaps into place. • To remove, push the tab above the battery door and pull the radio from holster.

User Manual
Page 28
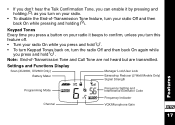
... A • Press [ or ] until d displays. End-of-Transmission Tone When you turn this feature On, your choice of single-cell batteries. Scan Advancement allows you to temporarily remove a channel from the scan list, but only temporarily. Features Lock Keypad To maintain settings and lock keypad... return the next time you use the Scan feature. • Depressing [ will not appear if the Motorola NiMH Battery is flashing. Setting the Battery Type* This feature allows the battery meter to begin scanning again, but only temporarily. Note: *This menu will remove a Channel from your...
... A • Press [ or ] until d displays. End-of-Transmission Tone When you turn this feature On, your choice of single-cell batteries. Scan Advancement allows you to temporarily remove a channel from the scan list, but only temporarily. Features Lock Keypad To maintain settings and lock keypad... return the next time you use the Scan feature. • Depressing [ will not appear if the Motorola NiMH Battery is flashing. Setting the Battery Type* This feature allows the battery meter to begin scanning again, but only temporarily. Note: *This menu will remove a Channel from your...
User Manual
Page 29
... are transmitted. Note: End-of -Transmission Tone feature, turn your radio On while you press and hold [. Settings and Functions Display Scan (XU2600, XV2600 Only) Battery Meter Manager Lock/User Lock Eavesdrop Reducer (2 Watt Models Only) Signal Strength Features Programming Mode Channel Frequency Setting and Interference Eliminator Code Frequency Indicator VOX...
... are transmitted. Note: End-of -Transmission Tone feature, turn your radio On while you press and hold [. Settings and Functions Display Scan (XU2600, XV2600 Only) Battery Meter Manager Lock/User Lock Eavesdrop Reducer (2 Watt Models Only) Signal Strength Features Programming Mode Channel Frequency Setting and Interference Eliminator Code Frequency Indicator VOX...
User Manual
Page 36
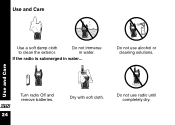
Do not use radio until completely dry. Use and Care X 24 Turn radio Off and remove batteries. Dry with soft cloth. If the radio is submerged in water. Do not immerse in water... Do not use alcohol or cleaning solutions. Use and Care XXX Use a soft damp cloth to clean the exterior.
Do not use radio until completely dry. Use and Care X 24 Turn radio Off and remove batteries. Dry with soft cloth. If the radio is submerged in water. Do not immerse in water... Do not use alcohol or cleaning solutions. Use and Care XXX Use a soft damp cloth to clean the exterior.
User Manual
Page 41
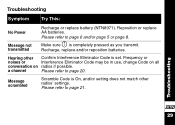
.... Message not transmitted Make sure M is On, and/or setting does not match other Confirm Interference Eliminator Code is set. Recharge, replace and/or reposition batteries. a channel Please refer to page 21. Troubleshooting X 29 Please refer to page 6 and/or page 5 or page 8. Troubleshooting Symptom Try This: No Power Recharge or...
.... Message not transmitted Make sure M is On, and/or setting does not match other Confirm Interference Eliminator Code is set. Recharge, replace and/or reposition batteries. a channel Please refer to page 21. Troubleshooting X 29 Please refer to page 6 and/or page 5 or page 8. Troubleshooting Symptom Try This: No Power Recharge or...
User Manual
Page 42
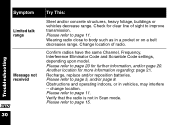
... regarding: page 21. Confirm radios have the same Channel, Frequency, Interference Eliminator Code and Scramble Code settings, depending upon model. Recharge, replace and/or reposition batteries. Check for clear line of radio. Please refer to improve transmission. Another location for further information, and/or page 20. Please refer to page 11...
... regarding: page 21. Confirm radios have the same Channel, Frequency, Interference Eliminator Code and Scramble Code settings, depending upon model. Recharge, replace and/or reposition batteries. Check for clear line of radio. Please refer to improve transmission. Another location for further information, and/or page 20. Please refer to page 11...
User Manual
Page 43
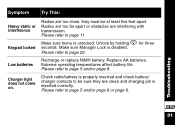
...does not come on. Radios are too far apart or obstacles are too close, they are clean and charging pin is properly inserted and check battery/ charger contacts to be sure they must be at least five feet apart. Make sure Manager Lock is unlocked. Please refer to page 22.... Symptom Try This: Heavy static or interference Radios are interfering with transmission. Please refer to page 5 and/or page 8 or page 6. Replace AA batteries. Unlock by holding \ for three Keypad locked seconds. Please refer to page 11. Troubleshooting X 31 Extreme operating temperatures affect...
...does not come on. Radios are too far apart or obstacles are too close, they are clean and charging pin is properly inserted and check battery/ charger contacts to be sure they must be at least five feet apart. Make sure Manager Lock is unlocked. Please refer to page 22.... Symptom Try This: Heavy static or interference Radios are interfering with transmission. Please refer to page 5 and/or page 8 or page 6. Replace AA batteries. Unlock by holding \ for three Keypad locked seconds. Please refer to page 11. Troubleshooting X 31 Extreme operating temperatures affect...
User Manual
Page 44
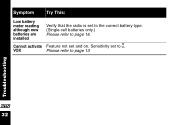
Cannot activate Feature not set to 0. VOX Please refer to page 16. Sensitivity set and on. Symptom Try This: Low battery meter reading although new batteries are installed Verify that the radio is set to the correct battery type. (Single-cell batteries only.) Please refer to page 13 Troubleshooting X 32
Cannot activate Feature not set to 0. VOX Please refer to page 16. Sensitivity set and on. Symptom Try This: Low battery meter reading although new batteries are installed Verify that the radio is set to the correct battery type. (Single-cell batteries only.) Please refer to page 13 Troubleshooting X 32
User Manual
Page 45
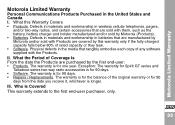
Defects in materials and workmanship in the media that are purchased by Motorola (Products). • Batteries. The warranty is for one year. X 33 What the Period of the original warranty or for 90 days. • Software. The ...GT series and Talkabout series two-way radio accessories is for 90 days from the date you receive it, whichever is for 90 days. • Repairs / Replacements. Defects in materials and workmanship in the United States and Canada I. II. Motorola Limited Warranty Motorola Limited Warranty Personal Communications Products Purchased in batteries that...
Defects in materials and workmanship in the media that are purchased by Motorola (Products). • Batteries. The warranty is for one year. X 33 What the Period of the original warranty or for 90 days. • Software. The ...GT series and Talkabout series two-way radio accessories is for 90 days from the date you receive it, whichever is for 90 days. • Repairs / Replacements. Defects in materials and workmanship in the United States and Canada I. II. Motorola Limited Warranty Motorola Limited Warranty Personal Communications Products Purchased in batteries that...
User Manual
Page 46
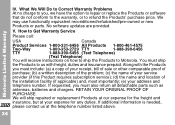
...OF PURCHASE. If additional information is needed, X please contact us with the Products you must also return all detachable parts such as antennas, batteries and chargers. What We Will Do to Correct Warranty Problems At no charge to you, we have the option to repair or replace the ...Products or software that do not conform to the warranty, or to Motorola. Motorola Limited Warranty V. Along with freight, duties and insurance prepaid. How to Get Warranty Service Please call: USA Canada Product Services 1-800-331-6456...
...OF PURCHASE. If additional information is needed, X please contact us with the Products you must also return all detachable parts such as antennas, batteries and chargers. What We Will Do to Correct Warranty Problems At no charge to you, we have the option to repair or replace the ...Products or software that do not conform to the warranty, or to Motorola. Motorola Limited Warranty V. Along with freight, duties and insurance prepaid. How to Get Warranty Service Please call: USA Canada Product Services 1-800-331-6456...
User Manual
Page 47
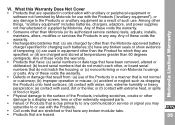
... use of these voids the warranty. • Someone other things, "ancillary equipment" includes batteries, chargers, adaptors, and power supplies not manufactured or supplied by Motorola for which they are charged by other than the Motorola-approved battery charger specified for charging such batteries; (b) have any damage to a display screen, lens or other , or board serial...
... use of these voids the warranty. • Someone other things, "ancillary equipment" includes batteries, chargers, adaptors, and power supplies not manufactured or supplied by Motorola for which they are charged by other than the Motorola-approved battery charger specified for charging such batteries; (b) have any damage to a display screen, lens or other , or board serial...


