
User Manual
Page 3
Left Soft Key Perform function in lower left display. 032471a Right Soft Key Perform function in lower right display. We are pleased that you have chosen the Motorola V220 GSM wireless phone. Volume Keys Camera / Smart Key Take pictures, select items. Send Key Make & answer calls. Menu Key 5-Way Navigation Key Scroll through menus & lists. Power Connector Voice Key Power & End Key Turn phone on/off, end calls, exit menu system. Welcome Welcome to the world of Motorola digital wireless communications! Headset Jack 1
Left Soft Key Perform function in lower left display. 032471a Right Soft Key Perform function in lower right display. We are pleased that you have chosen the Motorola V220 GSM wireless phone. Volume Keys Camera / Smart Key Take pictures, select items. Send Key Make & answer calls. Menu Key 5-Way Navigation Key Scroll through menus & lists. Power Connector Voice Key Power & End Key Turn phone on/off, end calls, exit menu system. Welcome Welcome to the world of Motorola digital wireless communications! Headset Jack 1

User Manual
Page 17
Taking and Sending a Photo To activate your phone's camera: Find the Feature M > Multimedia > Camera The active viewfinder image appears on your phone than make and receive calls! Point the camera lens at the photo subject, then: 15 Return to previous Press M to change zoom, or bc to open subscreen. Press S : to change brightness. IMAGE AREA 0323480a32481o BACK CAPTURE Take a photo. Highlight Features Highlight Features You can do much more with your display. menu. This section describes some of your phone's highlight features.
Taking and Sending a Photo To activate your phone's camera: Find the Feature M > Multimedia > Camera The active viewfinder image appears on your phone than make and receive calls! Point the camera lens at the photo subject, then: 15 Return to previous Press M to change zoom, or bc to open subscreen. Press S : to change brightness. IMAGE AREA 0323480a32481o BACK CAPTURE Take a photo. Highlight Features Highlight Features You can do much more with your display. menu. This section describes some of your phone's highlight features.
User Manual
Page 18
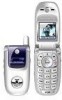
... stored on your choice Press M to adjust picture settings. Set a timer for storing pictures. 16 Delete all pictures. See how much memory remains for the camera to take a photo view storage options If you choose to store the photo, continue to step 3. delete the photo and return to the active viewfinder... scroll to Send in Message, Store Only, Apply as Wallpaper, or Apply as Screen Saver perform the storage option of your phone. Open the setup menu to open the Pictures Menu when the...
... stored on your choice Press M to adjust picture settings. Set a timer for storing pictures. 16 Delete all pictures. See how much memory remains for the camera to take a photo view storage options If you choose to store the photo, continue to step 3. delete the photo and return to the active viewfinder... scroll to Send in Message, Store Only, Apply as Wallpaper, or Apply as Screen Saver perform the storage option of your phone. Open the setup menu to open the Pictures Menu when the...

User Manual
Page 24
...hide the menu feature icons to allow a better view of the menu feature icons. Ring Styles Phonebook 032483o Service Provider à th n STYLES CAMERA Browser Multimedia Clock Left Soft Key Label Right Soft Key Label Menu Indicator Press the 5-way navigation key (S) left, right, up, or down... to Use Your Phone See page 1 for a basic phone diagram. Learning to Use Your Phone Learning to select one of 22 For example, your service provider may look different from the display shown above....
...hide the menu feature icons to allow a better view of the menu feature icons. Ring Styles Phonebook 032483o Service Provider à th n STYLES CAMERA Browser Multimedia Clock Left Soft Key Label Right Soft Key Label Menu Indicator Press the 5-way navigation key (S) left, right, up, or down... to Use Your Phone See page 1 for a basic phone diagram. Learning to Use Your Phone Learning to select one of 22 For example, your service provider may look different from the display shown above....
User Manual
Page 25
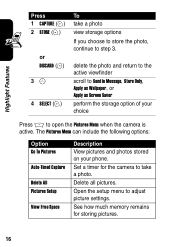
... at the bottom corners of the display show the strength of the network connection. Roam Line 03235P5r1eosence 7. Data Transmission Service Provider à th n 032484o STYLES CAMERA 10. You can display an analog or digital clock in the home screen (see page 73. You cannot make or receive calls when the 0 (no.... 23 Signal Strength 2. Ring Alert 8. Message 1. Location Learning to perform the function indicated by the left soft key (-) or right soft key (+) to Use Your Phone 1. Your phone can still select the menu icons when they are hidden from view.
... at the bottom corners of the display show the strength of the network connection. Roam Line 03235P5r1eosence 7. Data Transmission Service Provider à th n 032484o STYLES CAMERA 10. You can display an analog or digital clock in the home screen (see page 73. You cannot make or receive calls when the 0 (no.... 23 Signal Strength 2. Ring Alert 8. Message 1. Location Learning to perform the function indicated by the left soft key (-) or right soft key (+) to Use Your Phone 1. Your phone can still select the menu icons when they are hidden from view.

User Manual
Page 66
Not all features may vary on your phone. Phone Features Menu Map Main Menu n Phonebook s Recent Calls • Received Calls • Dialed Calls • Notepad • Call Times • Call Cost • Data Times &#... Access • Browser • Web Shortcuts • Stored Pages • History • Go To URL • Browser Setup • Web Sessions h Multimedia • Themes • Camera • Pictures • Sounds • MotoMixer • Videos ã IM • Log In • Offline Convs. • Offline Settings • Help w Settings • (see next...
Not all features may vary on your phone. Phone Features Menu Map Main Menu n Phonebook s Recent Calls • Received Calls • Dialed Calls • Notepad • Call Times • Call Cost • Data Times &#... Access • Browser • Web Shortcuts • Stored Pages • History • Go To URL • Browser Setup • Web Sessions h Multimedia • Themes • Camera • Pictures • Sounds • MotoMixer • Videos ã IM • Log In • Offline Convs. • Offline Settings • Help w Settings • (see next...
User Manual
Page 87
Feature Create Ring Tones Camera Description Create ring tones that you can use with your phone: M > Multimedia > Sounds > [New iMelody] Adjust light level and other settings for the built-in camera: M > Multimedia > Pictures M > Pictures Setup Phone Features 85
Feature Create Ring Tones Camera Description Create ring tones that you can use with your phone: M > Multimedia > Sounds > [New iMelody] Adjust light level and other settings for the built-in camera: M > Multimedia > Pictures M > Pictures Setup Phone Features 85


