
User Guide
Page 2
...Removing the Belt Clip 15 Turning Your Radio On and Off 15 Setting the Volume 15 Setting a Channel 16 Channels and Frequencies 16 Talking and Listening 17 Talk Range 17 Checking the Channel Before Transmitting ..17 Special Features 18 Interference Eliminator Code 18 Push to Talk Timeout Timer 18 Locking the Keypad 18 Scanning Channels 19 Advanced Scan 19 Alerts 20 Channel Busy Indicator 20 Setting and Transmitting Call Tones 20 Transmitting a Talk Confirmation Tone ..........21 QT Noise Filtering 21 Accessories 23 Using Audio Accessories 23 Voice Activation (VOX 23 Setting...
...Removing the Belt Clip 15 Turning Your Radio On and Off 15 Setting the Volume 15 Setting a Channel 16 Channels and Frequencies 16 Talking and Listening 17 Talk Range 17 Checking the Channel Before Transmitting ..17 Special Features 18 Interference Eliminator Code 18 Push to Talk Timeout Timer 18 Locking the Keypad 18 Scanning Channels 19 Advanced Scan 19 Alerts 20 Channel Busy Indicator 20 Setting and Transmitting Call Tones 20 Transmitting a Talk Confirmation Tone ..........21 QT Noise Filtering 21 Accessories 23 Using Audio Accessories 23 Voice Activation (VOX 23 Setting...

User Guide
Page 3
... Talk (PTT) button. • To receive calls, release the PTT button. Transmitting 50% of the time, or less, is important because the radio generates measurable RF energy exposure only when transmitting (in user guides published prior to the following RF energy exposure standards and guidelines: • United States Federal Communications Commission, Code of Federal Regulations; 47CFR part 2 sub-part J 2 Transmit and Receive Procedure Your two-way radio contains a transmitter and a receiver...
... Talk (PTT) button. • To receive calls, release the PTT button. Transmitting 50% of the time, or less, is important because the radio generates measurable RF energy exposure only when transmitting (in user guides published prior to the following RF energy exposure standards and guidelines: • United States Federal Communications Commission, Code of Federal Regulations; 47CFR part 2 sub-part J 2 Transmit and Receive Procedure Your two-way radio contains a transmitter and a receiver...
User Guide
Page 4
... to radio frequency electromagnetic energy is "IN USE." Portable Radio Operation and EME Exposure Antenna Care Use only the supplied or an approved replacement antenna. Unauthorized antennas,modifications, or attachments could damage the radio and may violate FCC regulations. DO NOT hold the antenna when the radio is within the guidelines set forth in the Frequency Range from July 2, 2002" To assure optimal radio performance and make sure human...
... to radio frequency electromagnetic energy is "IN USE." Portable Radio Operation and EME Exposure Antenna Care Use only the supplied or an approved replacement antenna. Unauthorized antennas,modifications, or attachments could damage the radio and may violate FCC regulations. DO NOT hold the antenna when the radio is within the guidelines set forth in the Frequency Range from July 2, 2002" To assure optimal radio performance and make sure human...

User Guide
Page 5
... use position, ensure the radio and its antenna at www.Motorola.com. Electromagnetic Interference/Compatibility Note: Nearly every electronic device is susceptible to 5 cm) away from your body when transmitting. Two-way Radio Operation Safety and General Information When using your body when transmitting, always place the radio in a Motorolasupplied or approved clip, holder, holster, case, or body harness for electro- 4 magnetic compatibility. Approved Accessories For a list...
... use position, ensure the radio and its antenna at www.Motorola.com. Electromagnetic Interference/Compatibility Note: Nearly every electronic device is susceptible to 5 cm) away from your body when transmitting. Two-way Radio Operation Safety and General Information When using your body when transmitting, always place the radio in a Motorolasupplied or approved clip, holder, holster, case, or body harness for electro- 4 magnetic compatibility. Approved Accessories For a list...

User Guide
Page 8
... instructions. Do not remove, install, or charge batteries in bodily injury or even death. Blasting Caps and Areas To avoid possible interference with blasting operations, turn off your vehicle engine. Safety and General Information Potentially Explosive Atmospheres Turn off your skin, a minor burn can cause an explosion or fire resulting in such areas. Operational Cautions Antennas Do not use in areas posted: "Turn...
... instructions. Do not remove, install, or charge batteries in bodily injury or even death. Blasting Caps and Areas To avoid possible interference with blasting operations, turn off your vehicle engine. Safety and General Information Potentially Explosive Atmospheres Turn off your skin, a minor burn can cause an explosion or fire resulting in such areas. Operational Cautions Antennas Do not use in areas posted: "Turn...

User Guide
Page 11
... maintenance and repairs in the private land mobile and fixed services as technically qualified to have the document faxed or mailed, or have questions, please use the following contact information. FCC Licensing Information FCC Licensing Information Your Motorola radio operates on General Mobile Radio Service (GMRS) frequencies and is subject to government regulations and may void the user's authority granted by the FCC to operate this radio outside the...
... maintenance and repairs in the private land mobile and fixed services as technically qualified to have the document faxed or mailed, or have questions, please use the following contact information. FCC Licensing Information FCC Licensing Information Your Motorola radio operates on General Mobile Radio Service (GMRS) frequencies and is subject to government regulations and may void the user's authority granted by the FCC to operate this radio outside the...

User Guide
Page 12
Model T5000 Use to: • Turn radio on/off • Adjust volume LED Indicator Light Use to: • Talk • Save a setting Use to: • Transmit call tone Speaker Use to: • Select menu options • Exit the menu (when pressed while in a menu) • Lock and unlock the keypad (when held down and not in a menu) Accessory Jack Use to: • Scan Use and to: • Scroll through menus Microphone 11 Model T5000 Control Buttons - Control Buttons -
Model T5000 Use to: • Turn radio on/off • Adjust volume LED Indicator Light Use to: • Talk • Save a setting Use to: • Transmit call tone Speaker Use to: • Select menu options • Exit the menu (when pressed while in a menu) • Lock and unlock the keypad (when held down and not in a menu) Accessory Jack Use to: • Scan Use and to: • Scroll through menus Microphone 11 Model T5000 Control Buttons - Control Buttons -

User Guide
Page 13
Model T5500 and T5550 Use to: • Turn radio on/off • Adjust volume LED Indicator Light Use to: • Talk • Save a setting Use to: • Transmit call tone Removeable front cover Speaker 12 Use to: • Select menu options • Exit the menu (when pressed while in a menu) • Lock and unlock the keypad (when held down and not in a menu) Accessory Jack Use to: • Scan Use and to: • Scroll through menus Microphone Model T5500 and T5550 Control Buttons - Control Buttons -
Model T5500 and T5550 Use to: • Turn radio on/off • Adjust volume LED Indicator Light Use to: • Talk • Save a setting Use to: • Transmit call tone Removeable front cover Speaker 12 Use to: • Select menu options • Exit the menu (when pressed while in a menu) • Lock and unlock the keypad (when held down and not in a menu) Accessory Jack Use to: • Scan Use and to: • Scroll through menus Microphone Model T5500 and T5550 Control Buttons - Control Buttons -
User Guide
Page 15
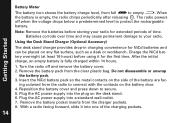
... battery pack from the charger pockets. 8. Insert the NiCd battery pack so the metal contacts on the battery door. 4. ing outward from the radio to secure. 5. The radio powers off and remove the battery cover. 2. Plug the AC power supply into one of the charging pockets. 14 With a radio facing forward, slide it for the first time. After the initial charge, an empty battery is empty, the radio chirps...
... battery pack from the charger pockets. 8. Insert the NiCd battery pack so the metal contacts on the battery door. 4. ing outward from the radio to secure. 5. The radio powers off and remove the battery cover. 2. Plug the AC power supply into one of the charging pockets. 14 With a radio facing forward, slide it for the first time. After the initial charge, an empty battery is empty, the radio chirps...

User Guide
Page 16
... belt clip to turn the radio off. The display then scrolls through the available channels and Interference Eliminator Codes. Attaching the Belt Clip Getting Started 1. Turning Your Radio On and Off Turn clockwise to turn the radio on and counterclockwise to release the catch. 2. Removing the Belt Clip 1. Rotate clockwise to increase the volume or counterclockwise to decrease the volume. 15 Notes • The light on the charging base will glow continuously when radio/battery...
... belt clip to turn the radio off. The display then scrolls through the available channels and Interference Eliminator Codes. Attaching the Belt Clip Getting Started 1. Turning Your Radio On and Off Turn clockwise to turn the radio on and counterclockwise to release the catch. 2. Removing the Belt Clip 1. Rotate clockwise to increase the volume or counterclockwise to decrease the volume. 15 Notes • The light on the charging base will glow continuously when radio/battery...
User Guide
Page 17
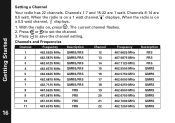
... a 0.5 watt channel, displays. 1. Press or to save the channel setting. Getting Started Channels and Frequencies Channel Frequency Description Channel Frequency Description 1 462.5625 MHz GMRS/FRS 12 467.6625 MHz FRS 2 462.5875 MHz GMRS/FRS 13 467.6875 MHz FRS 3 462.6125 MHz GMRS/FRS 14 467.7125 MHz FRS 4 462.6375 MHz GMRS/FRS 15 462.5500 MHz GMRS 5 462.6625 MHz GMRS/FRS 16 462.5750 MHz GMRS 6 462.6875 MHz GMRS/FRS 17 462.6000 MHz GMRS 7 462.7125 MHz GMRS/FRS 18 462.6250 MHz GMRS 8 467.5625 MHz FRS 19 462.6500 MHz GMRS...
... a 0.5 watt channel, displays. 1. Press or to save the channel setting. Getting Started Channels and Frequencies Channel Frequency Description Channel Frequency Description 1 462.5625 MHz GMRS/FRS 12 467.6625 MHz FRS 2 462.5875 MHz GMRS/FRS 13 467.6875 MHz FRS 3 462.6125 MHz GMRS/FRS 14 467.7125 MHz FRS 4 462.6375 MHz GMRS/FRS 15 462.5500 MHz GMRS 5 462.6625 MHz GMRS/FRS 16 462.5750 MHz GMRS 6 462.6875 MHz GMRS/FRS 17 462.6000 MHz GMRS 7 462.7125 MHz GMRS/FRS 18 462.6250 MHz GMRS 8 467.5625 MHz FRS 19 462.6500 MHz GMRS...
User Guide
Page 18
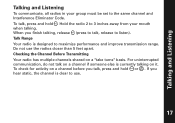
... Interference Eliminator Code. To check for activity on it. For uninterrupted communication, do not talk on a channel if someone else is currently talking on a channel before you talk, press and hold . If you finish talking, release (press to talk, release to maximize performance and improve transmission range. To talk, press and hold or . Checking the Channel Before Transmitting Your radio has multiple channels shared on a "take turns...
... Interference Eliminator Code. To check for activity on it. For uninterrupted communication, do not talk on a channel if someone else is currently talking on a channel before you talk, press and hold . If you finish talking, release (press to talk, release to maximize performance and improve transmission range. To talk, press and hold or . Checking the Channel Before Transmitting Your radio has multiple channels shared on a "take turns...

User Guide
Page 19
...setting. Locking the Keypad To avoid accidentally changing your radio settings, press and hold for 3 seconds or until is no longer displayed. 18 Press until displays. Push to on and off, adjust the volume, receive, transmit, send a call tone, and monitor channels. Special Features Special Features Interference Eliminator Code Interference Eliminator Codes help minimize interference by providing you press for 60 continuous seconds. All other FRS radios that uses Interference Eliminator Codes to save battery life, the radio emits a continuous warning tone and stops transmitting...
...setting. Locking the Keypad To avoid accidentally changing your radio settings, press and hold for 3 seconds or until is no longer displayed. 18 Press until displays. Push to on and off, adjust the volume, receive, transmit, send a call tone, and monitor channels. Special Features Special Features Interference Eliminator Code Interference Eliminator Codes help minimize interference by providing you press for 60 continuous seconds. All other FRS radios that uses Interference Eliminator Codes to save battery life, the radio emits a continuous warning tone and stops transmitting...
User Guide
Page 20
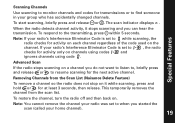
... radio stops scanning on a channel you started the scan (called your radio's Interference Eliminator Code is set to while scanning, the radio checks for activity on each channel regardless of the code used on the channel. This temporarily removes the channel from the Scan List (Nuisance Delete Feature) To remove a channel so the radio does not stop on it stops scanning and you can hear the transmission. Special Features Note: If your group who has accidentally changed channels. Removing Channels from the scan list. Scanning Channels Use scanning to monitor channels...
... radio stops scanning on a channel you started the scan (called your radio's Interference Eliminator Code is set to while scanning, the radio checks for activity on each channel regardless of the code used on the channel. This temporarily removes the channel from the Scan List (Nuisance Delete Feature) To remove a channel so the radio does not stop on it stops scanning and you can hear the transmission. Special Features Note: If your group who has accidentally changed channels. Removing Channels from the scan list. Scanning Channels Use scanning to monitor channels...
User Guide
Page 21
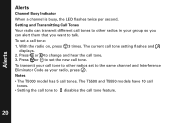
Alerts Alerts Channel Busy Indicator When a channel is busy, the LED flashes twice per second. To transmit your call tone feature. 20 The current call tones. Press or to the same channel and Interference Eliminator Code as your group so you can alert them that you want to disables the call tone to other radios in your radio, press . To set the new call tone to talk. Notes • The T5000 model has 5 call tone setting flashes and displays. 2. With...
Alerts Alerts Channel Busy Indicator When a channel is busy, the LED flashes twice per second. To transmit your call tone feature. 20 The current call tones. Press or to the same channel and Interference Eliminator Code as your group so you can alert them that you want to disables the call tone to other radios in your radio, press . To set the new call tone to talk. Notes • The T5000 model has 5 call tone setting flashes and displays. 2. With...

User Guide
Page 24
.... 3. Turn the radio off . 2. Voice Activation (VOX) (T5500 and T5550 models only) Voice activation (VOX) allows you to talk handsfree when used with optional accessories connected to the brochure included with your radio, contact the place of the audio accessory firmly into the accessory jack (see page 12). 3. Using Audio Accessories 1. Insert the plug of purchase. For more information, refer to the radio. See the Motorola Talkabout accessory brochure for available VOX accessories...
.... 3. Turn the radio off . 2. Voice Activation (VOX) (T5500 and T5550 models only) Voice activation (VOX) allows you to talk handsfree when used with optional accessories connected to the brochure included with your radio, contact the place of the audio accessory firmly into the accessory jack (see page 12). 3. Using Audio Accessories 1. Insert the plug of purchase. For more information, refer to the radio. See the Motorola Talkabout accessory brochure for available VOX accessories...

User Guide
Page 25
... time you connect a VOX accessory, the radio is automatically set to select the sensitivity level: = High Sensitivity for quiet environments = Medium Sensitivity for most environments = Low Sensitivity for noisy environments Note: When you start talking and when the radio transmits. 6. To turn VOX off, press or remove the audio accessory. To transmit, speak into accessory microphone. Setting the Sensitivity Level Adjusting the radio's sensitivity level helps minimize the possibility of unintended noises...
... time you connect a VOX accessory, the radio is automatically set to select the sensitivity level: = High Sensitivity for quiet environments = Medium Sensitivity for most environments = Low Sensitivity for noisy environments Note: When you start talking and when the radio transmits. 6. To turn VOX off, press or remove the audio accessory. To transmit, speak into accessory microphone. Setting the Sensitivity Level Adjusting the radio's sensitivity level helps minimize the possibility of unintended noises...

User Guide
Page 28
...-way radios that operate via Family Radio Service or General Mobile Radio Service that it manufactures ("Products"), the Motorola branded or certified accessories sold for use with these Products that it manufactures ("Accessories") and Motorola branded software contained on CD-Roms or other tangible media and sold for use with these Products that leak are accompanied by the first consumer ment of parts due to new Motorola...
...-way radios that operate via Family Radio Service or General Mobile Radio Service that it manufactures ("Products"), the Motorola branded or certified accessories sold for use with these Products that it manufactures ("Accessories") and Motorola branded software contained on CD-Roms or other tangible media and sold for use with these Products that leak are accompanied by the first consumer ment of parts due to new Motorola...

User Guide
Page 32
... Service or Other Information? What will receive instructions on how to ship the Products, Accessories or Software, at no charge repair, replace or refund the purchase price of the installation facility (if applicable) and, most importantly; (e) your Product, Accessory or Software, including but not limited to personal contacts, games and ringer tones, will at your expense, to a Giant International Ltd. We may use...
... Service or Other Information? What will receive instructions on how to ship the Products, Accessories or Software, at no charge repair, replace or refund the purchase price of the installation facility (if applicable) and, most importantly; (e) your Product, Accessory or Software, including but not limited to personal contacts, games and ringer tones, will at your expense, to a Giant International Ltd. We may use...
User Guide
Page 35
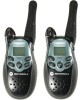
... used under 3 years. • 22 Channels (8 GMRS, 7 GMRS/FRS, 7 FRS) with 38 Interference Eliminator Codes GMRS channels feature increased power for children under license from other products or service names are finished talking. • Durable, Fixed Antenna Maximizes talk range. • Weather-resistant Helps protect radios against the elements. • 1 Year Limited Warranty For warranty details, please ask your settings in dark places. • Quick Release Swivel Belt Clip Included • User's Guide Included FRS/GMRS use approved in heavy radio...
... used under 3 years. • 22 Channels (8 GMRS, 7 GMRS/FRS, 7 FRS) with 38 Interference Eliminator Codes GMRS channels feature increased power for children under license from other products or service names are finished talking. • Durable, Fixed Antenna Maximizes talk range. • Weather-resistant Helps protect radios against the elements. • 1 Year Limited Warranty For warranty details, please ask your settings in dark places. • Quick Release Swivel Belt Clip Included • User's Guide Included FRS/GMRS use approved in heavy radio...


