

User Guide
Page 1
C51 Series Wireless Camera Model Family: SD7504 Users Guide
C51 Series Wireless Camera Model Family: SD7504 Users Guide

User Guide
Page 3
SD7504 User Guide Table of Contents Important Safety Instructions vii Welcome ...1 Camera Overview ...2 How to Use this Guide ...3 Getting Started ...4 Battery Safety Instructions ...4 Installing the Camera Battery 5 Selecting a Location for Your Camera 6 Charging the Camera Battery 7 Camera Indicators ...8 Registering Your New Camera 9 Using Your New Camera...10 Monitoring a Room with a Registered Handset 11 Using the Zoom and Pan Features (Color handset only 12 Capturing Images from Your Camera (Color handset only 13 i
SD7504 User Guide Table of Contents Important Safety Instructions vii Welcome ...1 Camera Overview ...2 How to Use this Guide ...3 Getting Started ...4 Battery Safety Instructions ...4 Installing the Camera Battery 5 Selecting a Location for Your Camera 6 Charging the Camera Battery 7 Camera Indicators ...8 Registering Your New Camera 9 Using Your New Camera...10 Monitoring a Room with a Registered Handset 11 Using the Zoom and Pan Features (Color handset only 12 Capturing Images from Your Camera (Color handset only 13 i
User Guide
Page 4
SD7504 User Guide Customizing Your New Camera 14 Transferring Calls from Your Handset to Your Camera 16 Changing the Order of Devices 18 Troubleshooting...19 Warranty ...20 ii
SD7504 User Guide Customizing Your New Camera 14 Transferring Calls from Your Handset to Your Camera 16 Changing the Order of Devices 18 Troubleshooting...19 Warranty ...20 ii
User Guide
Page 11
... packaging to ensure that your purchase includes each of a Motorola SD7504 Series wireless camera. Product registration is not available in Canada. Registration is not required for your records. Check the contents listing on your new Motorola product. To register your product online, visit: http://broadbandregistration.motorola.com Product registration is an important step toward enjoying your...
... packaging to ensure that your purchase includes each of a Motorola SD7504 Series wireless camera. Product registration is not available in Canada. Registration is not required for your records. Check the contents listing on your new Motorola product. To register your product online, visit: http://broadbandregistration.motorola.com Product registration is an important step toward enjoying your...

User Guide
Page 13
... some base units. Use the softkeys to distinguish between the FUNCTIONS and FEATURES/OPTIONS associated with the handsets and some Left soft key base units. SD7504 User Guide How to Use this guide, use a color or black and white handset to (CONNECT TO) different devices. • FEATURES/OPTIONS are ... allow you to perform actions such as placing calls (ON/FLASH), ending calls (OFF/CANCEL), and connecting to receive images and sound from your camera. When you to access menus such as Ringer, Alarm Clock, and Phonebook. This guide makes use of two fonts to select features and options ...
... some base units. Use the softkeys to distinguish between the FUNCTIONS and FEATURES/OPTIONS associated with the handsets and some Left soft key base units. SD7504 User Guide How to Use this guide, use a color or black and white handset to (CONNECT TO) different devices. • FEATURES/OPTIONS are ... allow you to perform actions such as placing calls (ON/FLASH), ending calls (OFF/CANCEL), and connecting to receive images and sound from your camera. When you to access menus such as Ringer, Alarm Clock, and Phonebook. This guide makes use of two fonts to select features and options ...
User Guide
Page 15
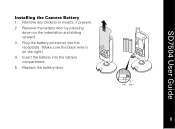
Plug the battery connector into the battery compartment. 5. Remove any stickers or inserts, if present. 2. Insert the battery into the receptacle. (Make sure the black wire is on the indentation and sliding upward. 3. Red Black 5 5 Replace the battery door. Remove the battery door by pressing down on the right.) 4. SD7504 User Guide Installing the Camera Battery 1.
Plug the battery connector into the battery compartment. 5. Remove any stickers or inserts, if present. 2. Insert the battery into the receptacle. (Make sure the black wire is on the indentation and sliding upward. 3. Red Black 5 5 Replace the battery door. Remove the battery door by pressing down on the right.) 4. SD7504 User Guide Installing the Camera Battery 1.
User Guide
Page 16
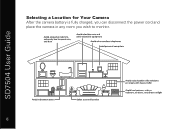
SD7504 User Guide Selecting a Location for Your Camera After the camera battery is fully charged, you can disconnect the power cord and place the camera in any room you wish to monitor. 6 6
SD7504 User Guide Selecting a Location for Your Camera After the camera battery is fully charged, you can disconnect the power cord and place the camera in any room you wish to monitor. 6 6
User Guide
Page 17
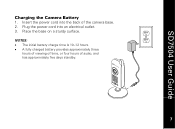
Insert the power cord into an electrical outlet. 3. NOTES: • The initial battery charge time is 10-12 hours. • A fully charged battery provides approximately three hours of viewing of time, or four hours of the camera base. 2. Plug the power cord into the back of audio, and has approximately five days standby. 7 7 SD7504 User Guide Charging the Camera Battery 1. Place the base on a sturdy surface.
Insert the power cord into an electrical outlet. 3. NOTES: • The initial battery charge time is 10-12 hours. • A fully charged battery provides approximately three hours of viewing of time, or four hours of the camera base. 2. Plug the power cord into the back of audio, and has approximately five days standby. 7 7 SD7504 User Guide Charging the Camera Battery 1. Place the base on a sturdy surface.
User Guide
Page 18
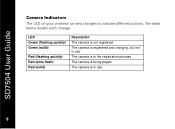
LED Green (flashing quickly) Green (solid) Red (flashing quickly) Red (slow flash) Red (solid) Description The camera is not registered The camera is registered and charging, but not in use The camera is in the registration process The camera is being paged The camera is in use 8 8 The table below details each change. SD7504 User Guide Camera Indicators The LED on your wireless camera changes to indicate different actions.
LED Green (flashing quickly) Green (solid) Red (flashing quickly) Red (slow flash) Red (solid) Description The camera is not registered The camera is registered and charging, but not in use The camera is in the registration process The camera is being paged The camera is in use 8 8 The table below details each change. SD7504 User Guide Camera Indicators The LED on your wireless camera changes to indicate different actions.

User Guide
Page 19
... unit's PAGE button. Release the button after approximately four seconds or until the base unit's IN USE LED flashes. To register a new camera: 1. SD7504 User Guide Registering Your New Camera Before you can use your new wireless camera, you to register up to 12 devices (e.g., handsets, cameras, cell docks), and use up to your base unit.
... unit's PAGE button. Release the button after approximately four seconds or until the base unit's IN USE LED flashes. To register a new camera: 1. SD7504 User Guide Registering Your New Camera Before you can use your new wireless camera, you to register up to 12 devices (e.g., handsets, cameras, cell docks), and use up to your base unit.
User Guide
Page 20
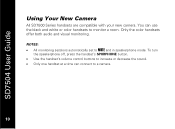
SD7504 User Guide Using Your New Camera All SD7500 Series handsets are compatible with your new camera. You can connect to a camera. 10 10 Only the color handsets offer both audio and visual monitoring. NOTES: • All monitoring sessions automatically set to monitor a room. To turn the speakerphone off, press the handset's SPKRPHONE button. • Use the handset's volume control buttons to increase or decrease the sound. • Only one handset at a time can use the black and white or color handsets to MUTE and in speakerphone mode.
SD7504 User Guide Using Your New Camera All SD7500 Series handsets are compatible with your new camera. You can connect to a camera. 10 10 Only the color handsets offer both audio and visual monitoring. NOTES: • All monitoring sessions automatically set to monitor a room. To turn the speakerphone off, press the handset's SPKRPHONE button. • Use the handset's volume control buttons to increase or decrease the sound. • Only one handset at a time can use the black and white or color handsets to MUTE and in speakerphone mode.
User Guide
Page 21
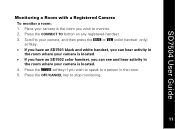
... or VIEW (color handset only) softkey. • If you have an SD7501 black and white handset, you can hear activity in the room where your camera is located. • If you have an SD7502 color handset, you can see and hear activity in the room where your... camera in the room. 5. Place your camera is located. 4. Press the CONNECT TO button on any registered handset. 3. Press the UNMUTE softkey if you wish to a person in the room you wish...
... or VIEW (color handset only) softkey. • If you have an SD7501 black and white handset, you can hear activity in the room where your camera is located. • If you have an SD7502 color handset, you can see and hear activity in the room where your... camera in the room. 5. Place your camera is located. 4. Press the CONNECT TO button on any registered handset. 3. Press the UNMUTE softkey if you wish to a person in the room you wish...
User Guide
Page 22
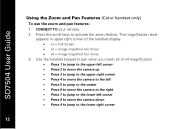
... right corner of the handset display. • x1 = Full screen • x2 = Image magnified two times • x4 = Image magnified four times 3. CONNECT TO your camera. 2. Use the handset keypad to pan when you reach x2 or x4 magnification. • Press 1 to jump to the upper left corner • Press 2 to... • Press 7 to jump to the lower left corner • Press 8 to move the camera down • Press 9 to jump to activate the zoom feature. Press the scroll keys to the lower right corner 12 12 SD7504 User Guide Using the Zoom and Pan Features (Color handset only) To use the zoom...
... right corner of the handset display. • x1 = Full screen • x2 = Image magnified two times • x4 = Image magnified four times 3. CONNECT TO your camera. 2. Use the handset keypad to pan when you reach x2 or x4 magnification. • Press 1 to jump to the upper left corner • Press 2 to... • Press 7 to jump to the lower left corner • Press 8 to move the camera down • Press 9 to jump to activate the zoom feature. Press the scroll keys to the lower right corner 12 12 SD7504 User Guide Using the Zoom and Pan Features (Color handset only) To use the zoom...
User Guide
Page 23
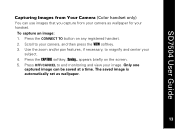
... and/or pan features, if necessary, to end monitoring and view your image. Only one captured image can use images that you capture from Your Camera (Color handset only) You can be saved at a time. Press the CONNECT TO button on the screen. 5. Press OFF/CANCEL to magnify and ...center your subject. 4. Scroll to your camera, and then press the VIEW softkey. 3. Press the CAPTURE softkey. Saving... The saved image is automatically set as wallpaper for your handset. appears briefly on...
... and/or pan features, if necessary, to end monitoring and view your image. Only one captured image can use images that you capture from Your Camera (Color handset only) You can be saved at a time. Press the CONNECT TO button on the screen. 5. Press OFF/CANCEL to magnify and ...center your subject. 4. Scroll to your camera, and then press the VIEW softkey. 3. Press the CAPTURE softkey. Saving... The saved image is automatically set as wallpaper for your handset. appears briefly on...

User Guide
Page 24
Press the MENU softkey on the following page) you wish to change. 6. Scroll to and select Setup Devices. 3. Press the EXIT softkey after you have completed all changes. 14 14 Press the SETUP softkey. 5. Scroll to and select the option (see the listing on any registered handset. 2. Scroll to and select your camera: 1. SD7504 User Guide Customizing Your New Camera The Setup Devices menu allows you to configure optional SD7500 devices, such as your camera, after you have registered them to your base unit. To set up your camera from the list. 4.
Press the MENU softkey on the following page) you wish to change. 6. Scroll to and select Setup Devices. 3. Press the EXIT softkey after you have completed all changes. 14 14 Press the SETUP softkey. 5. Scroll to and select the option (see the listing on any registered handset. 2. Scroll to and select your camera: 1. SD7504 User Guide Customizing Your New Camera The Setup Devices menu allows you to configure optional SD7500 devices, such as your camera, after you have registered them to your base unit. To set up your camera from the list. 4.
User Guide
Page 25
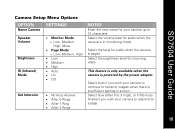
...; Auto • On • Off • No Auto Answer • After 0 Rings • After 1 Ring • After 3 Rings NOTES Enter the new name for your camera up to transmit images when there is powered by the power adapter. Select Auto if you wish your... monitoring mode Select the level for audio when the camera is paged Select the brightness level for incoming video This feature is only available when the camera is insufficient lighting in a room. Select how (after 0 to 3 rings), or if (No Auto Answer) you wish your camera to respond to a page SD7504 User Guide 1155
...; Auto • On • Off • No Auto Answer • After 0 Rings • After 1 Ring • After 3 Rings NOTES Enter the new name for your camera up to transmit images when there is powered by the power adapter. Select Auto if you wish your... monitoring mode Select the level for audio when the camera is paged Select the brightness level for incoming video This feature is only available when the camera is insufficient lighting in a room. Select how (after 0 to 3 rings), or if (No Auto Answer) you wish your camera to respond to a page SD7504 User Guide 1155
User Guide
Page 26
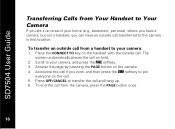
... button on the handset with the outside call. To transfer an outside call and hang up. 6. The system automatically places the call on the call if you can have an outside call from the camera, press the PAGE button once. 16 16 To end the call from a handset to your... OFF/CANCEL to transfer the call transferred to the camera in an area of your home (e.g., basement, pet area), where you have a camera, but not a handset, you wish, and then press the CONF softkey to join everyone on hold. 2. Announce the call . 5. SD7504 User Guide Transferring Calls from Your Handset to Your...
... button on the handset with the outside call. To transfer an outside call and hang up. 6. The system automatically places the call on the call if you can have an outside call from the camera, press the PAGE button once. 16 16 To end the call from a handset to your... OFF/CANCEL to transfer the call transferred to the camera in an area of your home (e.g., basement, pet area), where you have a camera, but not a handset, you wish, and then press the CONF softkey to join everyone on hold. 2. Announce the call . 5. SD7504 User Guide Transferring Calls from Your Handset to Your...
User Guide
Page 27
The beeping stops when any equipped device answers the page, or by pressing the camera's PAGE button again. • If a black and white handset answers the page, an audio-only link is established. • If a color handset answers the page, an audio and video link is automatically established. 1177 All devices registered to your camera sends out a global page. SD7504 User Guide Using the Camera Page Feature Pressing the PAGE button on your base unit beep in response.
The beeping stops when any equipped device answers the page, or by pressing the camera's PAGE button again. • If a black and white handset answers the page, an audio-only link is established. • If a color handset answers the page, an audio and video link is automatically established. 1177 All devices registered to your camera sends out a global page. SD7504 User Guide Using the Camera Page Feature Pressing the PAGE button on your base unit beep in response.
User Guide
Page 28
... EXIT softkey to return to reposition the item. 6. You can change the order of registered devices: 1. Press the MOVE softkey to the menu. 18 18 SD7504 User Guide Changing the Order of Devices If you CONNECT TO your CONNECT TO list in the order in which you wish to move the... device. 5. Press the MENU softkey. 2. Use the scroll key to move . By default, registered devices appear on your camera often, you may wish to and select Device Reorder. 3. Scroll to change where it appears on the list of registered devices.
... EXIT softkey to return to reposition the item. 6. You can change the order of registered devices: 1. Press the MOVE softkey to the menu. 18 18 SD7504 User Guide Changing the Order of Devices If you CONNECT TO your CONNECT TO list in the order in which you wish to move the... device. 5. Press the MENU softkey. 2. Use the scroll key to move . By default, registered devices appear on your camera often, you may wish to and select Device Reorder. 3. Scroll to change where it appears on the list of registered devices.
User Guide
Page 29
...1199 If there is properly inserted and fully charged. • The layout of range. If your camera. If the camera does not work at www.motorola.com/cordless. Try moving the appliance or the camera to the camera, or relocate it. • Make sure the battery is noise, static, or a weak signal ...your handset picks up excess noise and/or static: • You may be out of your home may be limiting the range. SD7504 User Guide Troubleshooting The suggestions below should solve most problems you are near the camera: • Household appliances can sometimes cause interference.
...1199 If there is properly inserted and fully charged. • The layout of range. If your camera. If the camera does not work at www.motorola.com/cordless. Try moving the appliance or the camera to the camera, or relocate it. • Make sure the battery is noise, static, or a weak signal ...your handset picks up excess noise and/or static: • You may be out of your home may be limiting the range. SD7504 User Guide Troubleshooting The suggestions below should solve most problems you are near the camera: • Household appliances can sometimes cause interference.