User Guide
Page 4
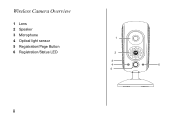
Wireless Camera Overview 1 Lens 2 Speaker 3 Microphone 4 Optical light sensor 5 Registration/Page Button 6 Registration/Status LED 1 2 3 4 6 5 ii
Wireless Camera Overview 1 Lens 2 Speaker 3 Microphone 4 Optical light sensor 5 Registration/Page Button 6 Registration/Status LED 1 2 3 4 6 5 ii
User Guide
Page 5
Table of Contents Welcome i Wireless Camera Overview ii Important Safety Instructions v Getting Started 1 Battery Safety Instructions 1 Charging the Camera Battery 3 Setting Up 4 Registering Your Camera 4 Placing Your Camera 6 Using Your Camera 8 Monitoring a Room with Your Camera 8 Lighting Tips for Your Camera 9 Setting Contrast for SD4502 Handset 10 FCC Information 11 iii
Table of Contents Welcome i Wireless Camera Overview ii Important Safety Instructions v Getting Started 1 Battery Safety Instructions 1 Charging the Camera Battery 3 Setting Up 4 Registering Your Camera 4 Placing Your Camera 6 Using Your Camera 8 Monitoring a Room with Your Camera 8 Lighting Tips for Your Camera 9 Setting Contrast for SD4502 Handset 10 FCC Information 11 iii

User Guide
Page 13
In stand by mode, a fully charged battery will operate your new camera is at least 12 hours. The camera operates using a charged battery or while plug into an electric outlet. Note: The initial battery charging time for your camera for a few days, or for a few hours in viewing mode. 3 Getting Started Charging the Camera Battery 1 Plug the power cord into the back of the swivel base. 2 Plug the power cord into an outlet.
In stand by mode, a fully charged battery will operate your new camera is at least 12 hours. The camera operates using a charged battery or while plug into an electric outlet. Note: The initial battery charging time for your camera for a few days, or for a few hours in viewing mode. 3 Getting Started Charging the Camera Battery 1 Plug the power cord into the back of the swivel base. 2 Plug the power cord into an outlet.
User Guide
Page 14
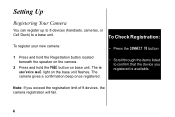
...; Press the CONNECT TO button 1 Press and hold the Registration button located beneath the speaker on the camera. 2 Press and hold the PAGE button on the base unit flashes. The camera gives a confirmation beep once registered. • Scroll through the items listed to a base unit. Note: If you ...registered is available. The in use/voice mail light on base unit. Setting Up Registering Your Camera You can register up to 8 devices (handsets, cameras, or Cell Dock) to confirm that the device you exceed the registration limit of 8 devices, the...
...; Press the CONNECT TO button 1 Press and hold the Registration button located beneath the speaker on the camera. 2 Press and hold the PAGE button on the base unit flashes. The camera gives a confirmation beep once registered. • Scroll through the items listed to a base unit. Note: If you ...registered is available. The in use/voice mail light on base unit. Setting Up Registering Your Camera You can register up to 8 devices (handsets, cameras, or Cell Dock) to confirm that the device you exceed the registration limit of 8 devices, the...
User Guide
Page 16
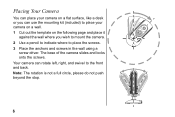
The base of the camera slides and locks onto the screws. Placing Your Camera You can place your camera on a wall. 1 Cut out the template on a flat surface, like a desk or you wish to mount the camera. 2 Use a pencil to indicate where to the front and back. Your camera can use the mounting kit (...included) to place your camera on the following page and place it against the wall where you can rotate left...
The base of the camera slides and locks onto the screws. Placing Your Camera You can place your camera on a wall. 1 Cut out the template on a flat surface, like a desk or you wish to mount the camera. 2 Use a pencil to indicate where to the front and back. Your camera can use the mounting kit (...included) to place your camera on the following page and place it against the wall where you can rotate left...
User Guide
Page 18
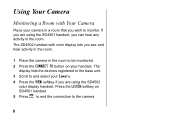
... you are using the SD4502 color display handset. Press the LISTEN softkey on your handset. Using Your Camera Monitoring a Room with color display lets you see and hear activity in the room. 1 Place the camera in the room to be monitored. 2 Press the CONNECT TO button on B SD4501 handset. 5 ...Press to end the connection to monitor. The SD4502 handset with Your Camera Place your Camera. 4 Press the VIEW softkey if you can hear any activity in a room that you wish to the camera 8 The display lists the devices registered to the base unit. 3 Scroll to and select ...
... you are using the SD4502 color display handset. Press the LISTEN softkey on your handset. Using Your Camera Monitoring a Room with color display lets you see and hear activity in the room. 1 Place the camera in the room to be monitored. 2 Press the CONNECT TO button on B SD4501 handset. 5 ...Press to end the connection to monitor. The SD4502 handset with Your Camera Place your Camera. 4 Press the VIEW softkey if you can hear any activity in a room that you wish to the camera 8 The display lists the devices registered to the base unit. 3 Scroll to and select ...
User Guide
Page 19
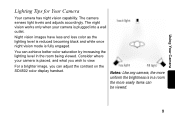
...lighting level is reduced becoming black and white once night vision mode is plugged into a wall outlet. The night vision works only when your camera is in a room the more easily items can achieve better color saturation by increasing the lighting level in the room being viewed. Notes: Like... any camera, the more uniform the brightness is placed, and what you can adjust the contrast on the SD4502 color display handset. You can be viewed....
...lighting level is reduced becoming black and white once night vision mode is plugged into a wall outlet. The night vision works only when your camera is in a room the more easily items can achieve better color saturation by increasing the lighting level in the room being viewed. Notes: Like... any camera, the more uniform the brightness is placed, and what you can adjust the contrast on the SD4502 color display handset. You can be viewed....
User Guide
Page 20
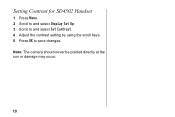
Note: The camera should never be pointed directly at the sun or damage may occur. 10 Setting Contrast for SD4502 Handset 1 Press Menu. 2 Scroll to and select Display Set Up. 3 Scroll to and select Set Contrast. 4 Adjust the contrast setting by using the scroll keys. 5 Press OK to save changes.
Note: The camera should never be pointed directly at the sun or damage may occur. 10 Setting Contrast for SD4502 Handset 1 Press Menu. 2 Scroll to and select Display Set Up. 3 Scroll to and select Set Contrast. 4 Adjust the contrast setting by using the scroll keys. 5 Press OK to save changes.