User Guide
Page 9
Do not retrieve the handset or base until after you are covered by the unplugged cords..... • Liquid has been spilled into the product. • The product has been exposed to clean this phone. 7 Clean this product with your home, consult with a soft, damp cloth. Follow all instructions and save them... to rain or water. Operate this phone using only the power source that are unsure of other controls may fall, causing serious damage to normal operation. 7. Important Safety Instructions Unplug this cordless phone immediately from the wall. Installation Guidelines ...
Do not retrieve the handset or base until after you are covered by the unplugged cords..... • Liquid has been spilled into the product. • The product has been exposed to clean this phone. 7 Clean this product with your home, consult with a soft, damp cloth. Follow all instructions and save them... to rain or water. Operate this phone using only the power source that are unsure of other controls may fall, causing serious damage to normal operation. 7. Important Safety Instructions Unplug this cordless phone immediately from the wall. Installation Guidelines ...
User Guide
Page 11
... Choosing a Location 12 Connecting the Base Station 12 Optional Backup Battery Pack 13 Installing the Battery Pack in the Handset 14 Charging the Handset 15 Connecting the Phone Line 15 Mounting the Base Station on a Wall 16 Base Station Controls 17 Handset Controls 17 Using the Displays 18 Base Station Standby Screen Example 18...
... Choosing a Location 12 Connecting the Base Station 12 Optional Backup Battery Pack 13 Installing the Battery Pack in the Handset 14 Charging the Handset 15 Connecting the Phone Line 15 Mounting the Base Station on a Wall 16 Base Station Controls 17 Handset Controls 17 Using the Displays 18 Base Station Standby Screen Example 18...
User Guide
Page 12
...the Speakerphone Volume on the Base Station During a Call 28 Making and Ending a Call Using the Handset . . . . . 28 Adjusting the Volume on the Handset During a Call 29 Using the Speakerphone on the Handset (handsfree operation 29 Using Call Waiting 30 Message Waiting 30 Muting a Call 30 Putting a Call ...on Hold 31 Saving a Name/Number in the Phonebook 31 Base Station Phonebook 31 Handset Phonebooks 31 Inserting Pauses in a Phone Number 32 Saving a Caller ID or Redial Number in the Phonebook 33 Calling a Number from the Phonebook 33 Deleting ...
...the Speakerphone Volume on the Base Station During a Call 28 Making and Ending a Call Using the Handset . . . . . 28 Adjusting the Volume on the Handset During a Call 29 Using the Speakerphone on the Handset (handsfree operation 29 Using Call Waiting 30 Message Waiting 30 Muting a Call 30 Putting a Call ...on Hold 31 Saving a Name/Number in the Phonebook 31 Base Station Phonebook 31 Handset Phonebooks 31 Inserting Pauses in a Phone Number 32 Saving a Caller ID or Redial Number in the Phonebook 33 Calling a Number from the Phonebook 33 Deleting ...

User Guide
Page 13
... From the Base Station to a Specific Handset . . . . 46 From a Handset to the Base Station 47 From a Handset to a Handset 47 From a Handset to All Handsets and Base Station 47 Answering a Base Station to Handset Intercom Call 48 Transferring Calls 48 Unannounced Transfer from the Base Station or a Handset 48 Announced Transfer 49 Motorola Limited Warranty for the United States...
... From the Base Station to a Specific Handset . . . . 46 From a Handset to the Base Station 47 From a Handset to a Handset 47 From a Handset to All Handsets and Base Station 47 Answering a Base Station to Handset Intercom Call 48 Transferring Calls 48 Unannounced Transfer from the Base Station or a Handset 48 Announced Transfer 49 Motorola Limited Warranty for the United States...
User Guide
Page 14
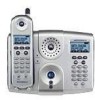
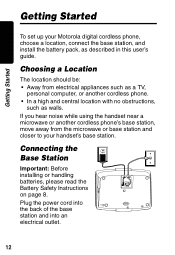
...into an electrical outlet. 12 If you hear noise while using the handset near a microwave or another cordless phone's base station, move away from electrical appliances such as a TV, personal computer, or another cordless phone. • In a high and central location with no obstructions, ... this user's guide. Getting Started Getting Started To set up your handset's base station. Choosing a Location The location should be: • Away from the microwave or base station and closer to your Motorola digital cordless phone, choose a location, connect the base station, and install the battery...
...into an electrical outlet. 12 If you hear noise while using the handset near a microwave or another cordless phone's base station, move away from electrical appliances such as a TV, personal computer, or another cordless phone. • In a high and central location with no obstructions, ... this user's guide. Getting Started Getting Started To set up your handset's base station. Choosing a Location The location should be: • Away from the microwave or base station and closer to your Motorola digital cordless phone, choose a location, connect the base station, and install the battery...
User Guide
Page 15
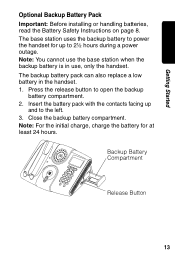
..., charge the battery for up and to open the backup battery compartment. 2. The backup battery pack can also replace a low battery in use, only the handset. Close the backup battery compartment. Getting Started Optional Backup Battery Pack Important: Before installing or handling batteries, read the Battery Safety Instructions on page 8. Insert... with the contacts facing up to 2½ hours during a power outage. Note: You cannot use the base station when the backup battery is in the handset. 1. The base station uses the backup battery to power the...
..., charge the battery for up and to open the backup battery compartment. 2. The backup battery pack can also replace a low battery in use, only the handset. Close the backup battery compartment. Getting Started Optional Backup Battery Pack Important: Before installing or handling batteries, read the Battery Safety Instructions on page 8. Insert... with the contacts facing up to 2½ hours during a power outage. Note: You cannot use the base station when the backup battery is in the handset. 1. The base station uses the backup battery to power the...

User Guide
Page 16
Slide the battery cover upward and into the compartment with the metal contacts facing down and off the handset. 2. Remove the battery cover by pressing on page 8. 1. Battery Compartment Charging Contacts 031615 14 Getting Started Installing the Battery Pack in the Handset Important: Before installing or handling batteries, read the Battery Safety Instructions on the recess and sliding the cover down and aligned with the contacts. 3. Insert the battery into place.
Slide the battery cover upward and into the compartment with the metal contacts facing down and off the handset. 2. Remove the battery cover by pressing on page 8. 1. Battery Compartment Charging Contacts 031615 14 Getting Started Installing the Battery Pack in the Handset Important: Before installing or handling batteries, read the Battery Safety Instructions on the recess and sliding the cover down and aligned with the contacts. 3. Insert the battery into place.
User Guide
Page 17
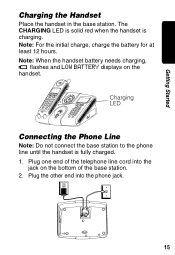
Charging LED Connecting the Phone Line Note: Do not connect the base station to the phone line until the handset is charging. Getting Started Charging the Handset Place the handset in the base station. The CHARGING LED is solid red when the handset is fully charged. 1. Note: For the initial charge, charge the battery for at least 12 hours. Plug the other end into the jack on the handset. Note: When the handset battery needs charging, l flashes and LOW BATTERY displays on the bottom of the telephone line cord into the phone jack. 15 Plug one end of the base station. 2.
Charging LED Connecting the Phone Line Note: Do not connect the base station to the phone line until the handset is charging. Getting Started Charging the Handset Place the handset in the base station. The CHARGING LED is solid red when the handset is fully charged. 1. Note: For the initial charge, charge the battery for at least 12 hours. Plug the other end into the jack on the handset. Note: When the handset battery needs charging, l flashes and LOW BATTERY displays on the bottom of the telephone line cord into the phone jack. 15 Plug one end of the base station. 2.
User Guide
Page 19
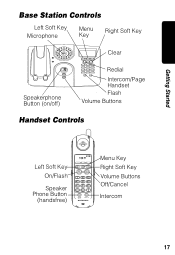
Getting Started Base Station Controls Left Soft Key Microphone Menu Key Right Soft Key Clear Speakerphone Button (on/off) Redial Intercom/Page Handset 031612o.eps Flash Volume Buttons Handset Controls Left Soft Key On/Flash Speaker Phone Button (handsfree) Menu Key Right Soft Key Volume Buttons Off/Cancel Intercom 17
Getting Started Base Station Controls Left Soft Key Microphone Menu Key Right Soft Key Clear Speakerphone Button (on/off) Redial Intercom/Page Handset 031612o.eps Flash Volume Buttons Handset Controls Left Soft Key On/Flash Speaker Phone Button (handsfree) Menu Key Right Soft Key Volume Buttons Off/Cancel Intercom 17

User Guide
Page 20
When the base station and handset are not in use, the standby screen displays. Base Station Standby Screen Example 2 NEW CALLS VSU Left Soft Key Menu Right Soft Key Function Function Handset Standby Screen Example Time Ringer Off Battery Meter Wm 4:26 PM VSU Left Soft Key Menu Right Soft Key Function Function 18 Getting Started Using the Displays Your base station and handset each have a display.
When the base station and handset are not in use, the standby screen displays. Base Station Standby Screen Example 2 NEW CALLS VSU Left Soft Key Menu Right Soft Key Function Function Handset Standby Screen Example Time Ringer Off Battery Meter Wm 4:26 PM VSU Left Soft Key Menu Right Soft Key Function Function 18 Getting Started Using the Displays Your base station and handset each have a display.

User Guide
Page 22
Action 1 Press MENU (a). 2 Scroll to the standby screen. 20 If you make a mistake, press (left arrow) (a), to clear the digit(s). 4 Press AM/PM (a) to switch between am and pm, then press SAVE (a). 5 Press OFF, to return to SET TIME, then press OK (a). 3 Using the keypad, enter the time (2 digits each for example, 03:56). Use a leading zero for a single-digit hour, (for the hour and the minutes). Setting Up Your Base Station and Handset Setting Up Your Base Station and Handset Setting the Time on the Handset Note: The time displays only on the handset, not the base station.
Action 1 Press MENU (a). 2 Scroll to the standby screen. 20 If you make a mistake, press (left arrow) (a), to clear the digit(s). 4 Press AM/PM (a) to switch between am and pm, then press SAVE (a). 5 Press OFF, to return to SET TIME, then press OK (a). 3 Using the keypad, enter the time (2 digits each for example, 03:56). Use a leading zero for a single-digit hour, (for the hour and the minutes). Setting Up Your Base Station and Handset Setting Up Your Base Station and Handset Setting the Time on the Handset Note: The time displays only on the handset, not the base station.

User Guide
Page 23
...a call. When set the volume to OFF, W displays. Setting Up Your Base Station and Handset Personalizing Your Base Station and Handset You can personalize the base station and handset by setting unique ringer tones, adjusting the ringer volume, and setting the language (English, Spanish..., Portuguese, or French). Note: When setting options on the handset, select HANDSET SETTINGS from the MENU. Action 1 Press MENU (a). 2 Scroll (a) to BASE SETTINGS or HANDSET SETTINGS, then press OK (a). 3 Ensure RINGER VOLUME is highlighted, then press OK (a). 4 ...
...a call. When set the volume to OFF, W displays. Setting Up Your Base Station and Handset Personalizing Your Base Station and Handset You can personalize the base station and handset by setting unique ringer tones, adjusting the ringer volume, and setting the language (English, Spanish..., Portuguese, or French). Note: When setting options on the handset, select HANDSET SETTINGS from the MENU. Action 1 Press MENU (a). 2 Scroll (a) to BASE SETTINGS or HANDSET SETTINGS, then press OK (a). 3 Ensure RINGER VOLUME is highlighted, then press OK (a). 4 ...

User Guide
Page 24
Each tone plays as you want, press OK (a). 5 Press CLEAR or OFF twice to return to the standby screen, or scroll (a) to RINGER MELODY or RINGER TONE, then press OK (a). 4 Scroll (a) through them. When you hear the ring tone you scroll through the ring tones. Action 1 Press MENU (a). 2 Scroll (a) to BASE SETTINGS or HANDSET SETTINGS, then press OK (a). 3 Scroll (a) to another option. 22 Setting Up Your Base Station and Handset Setting the Ringer Tone You can set a ringer tone for incoming calls.
Each tone plays as you want, press OK (a). 5 Press CLEAR or OFF twice to return to the standby screen, or scroll (a) to RINGER MELODY or RINGER TONE, then press OK (a). 4 Scroll (a) through them. When you hear the ring tone you scroll through the ring tones. Action 1 Press MENU (a). 2 Scroll (a) to BASE SETTINGS or HANDSET SETTINGS, then press OK (a). 3 Scroll (a) to another option. 22 Setting Up Your Base Station and Handset Setting the Ringer Tone You can set a ringer tone for incoming calls.

User Guide
Page 25
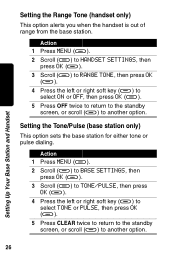
... press OK (a). 5 Press OFF twice to return to the standby screen, or scroll (a) to another option. Action 1 Press MENU (a). 2 Scroll (a) to BASE SETTINGS or HANDSET SETTINGS, then press OK (a). 3 Scroll (a) to CONTRAST, then press OK (a). 4 Press the left or right soft key (a) to select ON or OFF, then press OK... OFF twice to return to the standby screen, or scroll (a) to ON, the base station or handset beeps every time you press a key or button. Setting Up Your Base Station and Handset Setting the Keypad Tone This option turns the keypad tones on or off. Setting the Contrast This option...
... press OK (a). 5 Press OFF twice to return to the standby screen, or scroll (a) to another option. Action 1 Press MENU (a). 2 Scroll (a) to BASE SETTINGS or HANDSET SETTINGS, then press OK (a). 3 Scroll (a) to CONTRAST, then press OK (a). 4 Press the left or right soft key (a) to select ON or OFF, then press OK... OFF twice to return to the standby screen, or scroll (a) to ON, the base station or handset beeps every time you press a key or button. Setting Up Your Base Station and Handset Setting the Keypad Tone This option turns the keypad tones on or off. Setting the Contrast This option...

User Guide
Page 26
... soft keys, for example, MENU and REDIAL. The language setting is unique to another option. 24 Action 1 Press MENU (a). 2 Scroll (a) to BASE SETTINGS or HANDSET SETTINGS, then press OK (a). 3 Scroll (a) to LANGUAGE, then press OK (a). 4 Press the left or right soft key (a) to select ON or OFF, then... press OK (a). 5 Press CLEAR or OFF twice to return to the standby screen, or scroll (a) to the base station and handset. Changing the language on the other. Setting Up Your Base Station and Handset Setting the Language This option changes the language used in the options menu list.
... soft keys, for example, MENU and REDIAL. The language setting is unique to another option. 24 Action 1 Press MENU (a). 2 Scroll (a) to BASE SETTINGS or HANDSET SETTINGS, then press OK (a). 3 Scroll (a) to LANGUAGE, then press OK (a). 4 Press the left or right soft key (a) to select ON or OFF, then... press OK (a). 5 Press CLEAR or OFF twice to return to the standby screen, or scroll (a) to the base station and handset. Changing the language on the other. Setting Up Your Base Station and Handset Setting the Language This option changes the language used in the options menu list.

User Guide
Page 27
Setting Up Your Base Station and Handset Setting the Vibrate Control (handset only) This option causes your handset to another option. Action 1 Press MENU (a). 2 Scroll (a) to HANDSET SETTINGS, then press OK (a). 3 Scroll (a) to LOW BATT TONE, then press OK (a). 4 Press the left or right soft key (a)...press OK (a). 5 Press OFF twice to return to the standby screen, or scroll (a) to another option. 25 Action 1 Press MENU (a). 2 Scroll (a) to HANDSET SETTINGS, then press OK (a). 3 Scroll (a) to VIBRATE CONTROL, then press OK (a). 4 Press the left or right soft key (a) to select ON or ...
Setting Up Your Base Station and Handset Setting the Vibrate Control (handset only) This option causes your handset to another option. Action 1 Press MENU (a). 2 Scroll (a) to HANDSET SETTINGS, then press OK (a). 3 Scroll (a) to LOW BATT TONE, then press OK (a). 4 Press the left or right soft key (a)...press OK (a). 5 Press OFF twice to return to the standby screen, or scroll (a) to another option. 25 Action 1 Press MENU (a). 2 Scroll (a) to HANDSET SETTINGS, then press OK (a). 3 Scroll (a) to VIBRATE CONTROL, then press OK (a). 4 Press the left or right soft key (a) to select ON or ...
User Guide
Page 28
... station for either tone or pulse dialing. Setting Up Your Base Station and Handset Setting the Range Tone (handset only) This option alerts you when the handset is out of range from the base station. Action 1 Press MENU (a). 2 Scroll (a) to HANDSET SETTINGS, then press OK (a). 3 Scroll (a) to RANGE TONE, then press OK (a). 4 Press the...
... station for either tone or pulse dialing. Setting Up Your Base Station and Handset Setting the Range Tone (handset only) This option alerts you when the handset is out of range from the base station. Action 1 Press MENU (a). 2 Scroll (a) to HANDSET SETTINGS, then press OK (a). 3 Scroll (a) to RANGE TONE, then press OK (a). 4 Press the...
User Guide
Page 29
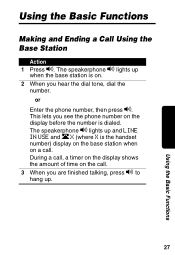
The speakerphone v lights up . 27 Using the Basic Functions This lets you see the phone number on the display before the number is on. 2 When you are finished talking, press v to hang up when the base station is dialed. During a ... amount of time on a call . 3 When you hear the dial tone, dial the number. or Enter the phone number, then press v. The speakerphone v lights up and LINE IN USE and jX (where X is the handset number) display on the base station when on the call . Using the Basic Functions Making and Ending...
The speakerphone v lights up . 27 Using the Basic Functions This lets you see the phone number on the display before the number is on. 2 When you are finished talking, press v to hang up when the base station is dialed. During a ... amount of time on a call . 3 When you hear the dial tone, dial the number. or Enter the phone number, then press v. The speakerphone v lights up and LINE IN USE and jX (where X is the handset number) display on the base station when on the call . Using the Basic Functions Making and Ending...

User Guide
Page 30
The keypad lights up the handset and press ON. or Enter the phone number, then press ON. This lets you see the phone number on the display before the number is on. 2 When you are finished talking, press OFF, or place the handset back on the base station to decrease volume. Volume Buttons ...Making and Ending a Call Using the Handset Action 1 Pick up when the handset is dialed. 3 When you...
The keypad lights up the handset and press ON. or Enter the phone number, then press ON. This lets you see the phone number on the display before the number is on. 2 When you are finished talking, press OFF, or place the handset back on the base station to decrease volume. Volume Buttons ...Making and Ending a Call Using the Handset Action 1 Pick up when the handset is dialed. 3 When you...
User Guide
Page 31
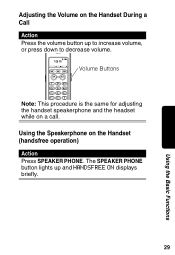
Using the Speakerphone on a call. Adjusting the Volume on the Handset During a Call Action Press the volume button up and HANDSFREE ON displays briefly. 29 Using the Basic Functions The SPEAKER PHONE button lights up to increase volume, or press down to decrease volume. Volume Buttons Note: This procedure is the same for adjusting the handset speakerphone and the headset while on the Handset (handsfree operation) Action Press SPEAKER PHONE.
Using the Speakerphone on a call. Adjusting the Volume on the Handset During a Call Action Press the volume button up and HANDSFREE ON displays briefly. 29 Using the Basic Functions The SPEAKER PHONE button lights up to increase volume, or press down to decrease volume. Volume Buttons Note: This procedure is the same for adjusting the handset speakerphone and the headset while on the Handset (handsfree operation) Action Press SPEAKER PHONE.


