

User Manual
Page 5
Base Station Controls Left soft key Speakerphone Scroll up or down on display Right soft key in use/ voice mail charge/ page page mute Page handsets Mute Soft Keys The left soft key while PHONEBK is displayed, opens your list of phone numbers and names. 3 For example, pressing the left and right soft keys perform the function displayed.
Base Station Controls Left soft key Speakerphone Scroll up or down on display Right soft key in use/ voice mail charge/ page page mute Page handsets Mute Soft Keys The left soft key while PHONEBK is displayed, opens your list of phone numbers and names. 3 For example, pressing the left and right soft keys perform the function displayed.
User Manual
Page 6
... connected to one line may not exceed 5. The abbreviation IC before the certification/ registration number only signifies that it is permissible to be extended by the certification/registration number found on the label on a Declaration of the base unit. The REN is useful in determining the maximum number of devices you should be installed using an acceptable method of a certified connector assembly (telephone extension cord...
... connected to one line may not exceed 5. The abbreviation IC before the certification/ registration number only signifies that it is permissible to be extended by the certification/registration number found on the label on a Declaration of the base unit. The REN is useful in determining the maximum number of devices you should be installed using an acceptable method of a certified connector assembly (telephone extension cord...
User Manual
Page 7
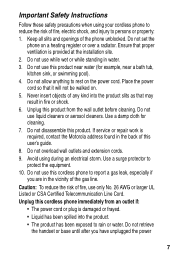
... when using this cordless phone or cause noise during operation. Hearing Aid Compatibility This telephone system meets Industry Canada standards for hearing aid compatibility. system, if present, are connected together. This precaution may void the limited warranty. Units without code access may interfere with Industry Canada's RSS-210. Repairs Repairs to request that may not cause harmful interference; Operation is subject to make such connections yourself...
... when using this cordless phone or cause noise during operation. Hearing Aid Compatibility This telephone system meets Industry Canada standards for hearing aid compatibility. system, if present, are connected together. This precaution may void the limited warranty. Units without code access may interfere with Industry Canada's RSS-210. Repairs Repairs to request that may not cause harmful interference; Operation is subject to make such connections yourself...
User Manual
Page 9
... wall outlets and extension cords. 9. Do not set the phone on the power cord. Unplug this cordless phone immediately from the wall outlet before cleaning. Ensure that proper ventilation is damaged or frayed. • Liquid has been spilled into the product slits as that it will not be walked on. 5. Do not allow anything to rain or water. If service or repair work...
... wall outlets and extension cords. 9. Do not set the phone on the power cord. Unplug this cordless phone immediately from the wall outlet before cleaning. Ensure that proper ventilation is damaged or frayed. • Liquid has been spilled into the product slits as that it will not be walked on. 5. Do not allow anything to rain or water. If service or repair work...
User Manual
Page 10
..., place the base unit at least one phone in performance. Because cordless phones operate on electricity, you are covered by the unplugged cords. • The product has been dropped or the cabinet has been damaged. • The product exhibits a distinct change in your home goes out. 10. This product may damage the unit. 9. Then retrieve the unit by the operating instructions. and phone from nearby persons...
..., place the base unit at least one phone in performance. Because cordless phones operate on electricity, you are covered by the unplugged cords. • The product has been dropped or the cabinet has been damaged. • The product exhibits a distinct change in your home goes out. 10. This product may damage the unit. 9. Then retrieve the unit by the operating instructions. and phone from nearby persons...
User Manual
Page 12
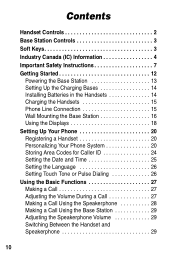
... Powering the Base Station 13 Setting Up the Charging Bases 14 Installing Batteries in the Handsets 14 Charging the Handsets 15 Phone Line Connection 15 Wall Mounting the Base Station 16 Using the Displays 18 Setting Up Your Phone 20 Registering a Handset 20 Personalizing Your Phone System 20 Storing Area Codes for Caller ID 24 Setting the Date and Time 25 Setting the Language 26 Setting Touch Tone or Pulse Dialing 26 Using the Basic Functions 27 Making a Call 27 Adjusting the Volume During a Call 27 Making a Call Using the Speakerphone 28 Making a Call Using the Base Station...
... Powering the Base Station 13 Setting Up the Charging Bases 14 Installing Batteries in the Handsets 14 Charging the Handsets 15 Phone Line Connection 15 Wall Mounting the Base Station 16 Using the Displays 18 Setting Up Your Phone 20 Registering a Handset 20 Personalizing Your Phone System 20 Storing Area Codes for Caller ID 24 Setting the Date and Time 25 Setting the Language 26 Setting Touch Tone or Pulse Dialing 26 Using the Basic Functions 27 Making a Call 27 Adjusting the Volume During a Call 27 Making a Call Using the Speakerphone 28 Making a Call Using the Base Station...
User Manual
Page 14
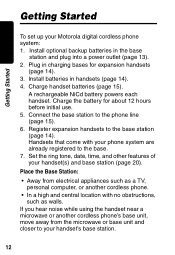
... base station (page 14). Getting Started Getting Started To set up your handset(s) and base station (page 20). A rechargeable NiCd battery powers each handset. Register expansion handsets to the phone line (page 15). 6. Plug in handsets (page 14). 4. Install optional backup batteries in the base station and plug into a power outlet (page 13). 2. Handsets that come with no obstructions, such as walls. Charge the battery for expansion handsets (page 14). 3. Set the ring tone, date, time, and other features of your Motorola digital cordless phone...
... base station (page 14). Getting Started Getting Started To set up your handset(s) and base station (page 20). A rechargeable NiCd battery powers each handset. Register expansion handsets to the phone line (page 15). 6. Plug in handsets (page 14). 4. Install optional backup batteries in the base station and plug into a power outlet (page 13). 2. Handsets that come with no obstructions, such as walls. Charge the battery for expansion handsets (page 14). 3. Set the ring tone, date, time, and other features of your Motorola digital cordless phone...

User Manual
Page 16
.... Installing Batteries in the Handsets Important: Before installing or handling batteries, read the Battery Safety Instructions on the recess and sliding down and off the handset. 2. Slide and snap the battery cover back into the compartment. 4. Black Red 14 Plug the connector into a phone line. Getting Started Setting Up the Charging Bases If you want to be plugged into the receptacle. 3. Simply plug the power cord into...
.... Installing Batteries in the Handsets Important: Before installing or handling batteries, read the Battery Safety Instructions on the recess and sliding down and off the handset. 2. Slide and snap the battery cover back into the compartment. 4. Black Red 14 Plug the connector into a phone line. Getting Started Setting Up the Charging Bases If you want to be plugged into the receptacle. 3. Simply plug the power cord into...
User Manual
Page 20
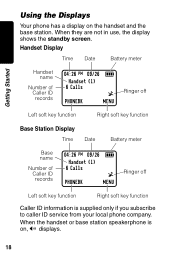
... standby screen. Handset Display Time Date Battery meter Handset name Number of Caller ID records 04:26 PM 09/26 9 Handset (1) 6 Calls ^ PHONEBK MENU Ringer off Left soft key function Right soft key function Base Station Display Time Date Battery meter Base name Number of Caller ID records 04:26 PM 09/26 9 Handset (1) 6 Calls ^ PHONEBK MENU Ringer off Left soft key function Right soft key function Caller ID information is on the handset and the base station. Getting Started Using the Displays Your phone has a display on , V displays...
... standby screen. Handset Display Time Date Battery meter Handset name Number of Caller ID records 04:26 PM 09/26 9 Handset (1) 6 Calls ^ PHONEBK MENU Ringer off Left soft key function Right soft key function Base Station Display Time Date Battery meter Base name Number of Caller ID records 04:26 PM 09/26 9 Handset (1) 6 Calls ^ PHONEBK MENU Ringer off Left soft key function Right soft key function Caller ID information is on the handset and the base station. Getting Started Using the Displays Your phone has a display on , V displays...

User Manual
Page 22
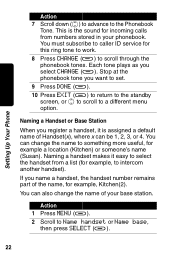
... You can personalize each handset and base station by setting unique ring tones, adjusting the ring tone volume for example, Handset(2). To register a new expansion handset that come with your phone system. Setting Up Your Phone Setting Up Your Phone Registering a Handset You can have up to 4 handsets registered to a base station.If you try to register a 5th handset, Unable to a base station before: Action 1 Press OK (a). 2 Press and hold PAGE on the base station for at least 6 seconds or until you...
... You can personalize each handset and base station by setting unique ring tones, adjusting the ring tone volume for example, Handset(2). To register a new expansion handset that come with your phone system. Setting Up Your Phone Setting Up Your Phone Registering a Handset You can have up to 4 handsets registered to a base station.If you try to register a 5th handset, Unable to a base station before: Action 1 Press OK (a). 2 Press and hold PAGE on the base station for at least 6 seconds or until you...

User Manual
Page 23
... caller ID service. This is the ring sound for incoming calls. 6 Press CHANGE (a) to scroll through the ring tones. Stop at the ring tone you want to set. 21 Stop at the volume level you want to set. 5 Scroll down (c) to advance to the Night Volume. This is the ringer volume from numbers that are stored in the phonebook, and a different ring tone for other incoming calls. Setting Up Your Phone Setting the Ring Tone and Ring Volume Your can set a ring tone...
... caller ID service. This is the ring sound for incoming calls. 6 Press CHANGE (a) to scroll through the ring tones. Stop at the ring tone you want to set. 21 Stop at the volume level you want to set. 5 Scroll down (c) to advance to the Night Volume. This is the ringer volume from numbers that are stored in the phonebook, and a different ring tone for other incoming calls. Setting Up Your Phone Setting the Ring Tone and Ring Volume Your can set a ring tone...
User Manual
Page 24
... Tone. Stop at the phonebook tone you name a handset, the handset number remains part of Handset(x), where x can also change the name to scroll through the phonebook tones. Naming a Handset or Base Station When you select CHANGE (a). This is assigned a default name of the name, for example a location (Kitchen) or someone's name (Susan). You must subscribe to caller ID service for this ring tone to work. 8 Press CHANGE (a) to something more useful...
... Tone. Stop at the phonebook tone you name a handset, the handset number remains part of Handset(x), where x can also change the name to scroll through the phonebook tones. Naming a Handset or Base Station When you select CHANGE (a). This is assigned a default name of the name, for example a location (Kitchen) or someone's name (Susan). You must subscribe to caller ID service for this ring tone to work. 8 Press CHANGE (a) to something more useful...
User Manual
Page 26
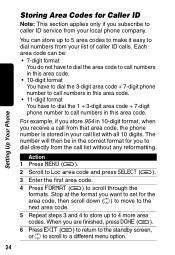
... to dial the 3-digit area code + 7-digit phone number to call numbers in this area code. • 11-digit format You have to dial the 1 + 3-digit area code + 7-digit phone number to call numbers in the correct format for you subscribe to caller ID service from your list of caller ID calls. Setting Up Your Phone Storing Area Codes for Caller ID Note: This section applies only if you to dial directly from the call list without any reformatting. Stop...
... to dial the 3-digit area code + 7-digit phone number to call numbers in this area code. • 11-digit format You have to dial the 1 + 3-digit area code + 7-digit phone number to call numbers in the correct format for you subscribe to caller ID service from your list of caller ID calls. Setting Up Your Phone Storing Area Codes for Caller ID Note: This section applies only if you to dial directly from the call list without any reformatting. Stop...
User Manual
Page 30
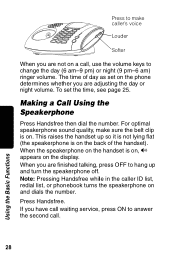
The time of the handset). If you have call waiting service, press ON to answer the second call , use the volume keys to change the day (6 am-9 pm) or night (9 pm-6 am) ringer volume. Press Handsfree. When the speakerphone on the handset is on the back of day as set the time, see page 25. When you are adjusting the day or night volume. To set on the phone determines whether...
The time of the handset). If you have call waiting service, press ON to answer the second call , use the volume keys to change the day (6 am-9 pm) or night (9 pm-6 am) ringer volume. Press Handsfree. When the speakerphone on the handset is on the back of day as set the time, see page 25. When you are adjusting the day or night volume. To set on the phone determines whether...

User Manual
Page 33
... accessible by other handsets. Shared Phonebooks The shared phonebook is unique to (New Entry) and press SELECT (a). For example, if SHARED is the default. Each private phonebook stores up to the left of the blinking cursor. To change phonebooks, press the right soft key (a). Press DELETE (a) to backspace and erase characters to 50 names and numbers. The private phonebook is displayed...
... accessible by other handsets. Shared Phonebooks The shared phonebook is unique to (New Entry) and press SELECT (a). For example, if SHARED is the default. Each private phonebook stores up to the left of the blinking cursor. To change phonebooks, press the right soft key (a). Press DELETE (a) to backspace and erase characters to 50 names and numbers. The private phonebook is displayed...

User Manual
Page 39
... base station. You can expand your phone system by adding cordless handsets (up to a phone line. Expansion handsets do not require connection to a total of the advanced features, you can place the handset and its charging base anywhere a standard electrical outlet is available. You can : • Conference call • Talk handset to handset on the intercom • Set up handsets to automatically answer intercom calls • Transfer calls from one handset to another • Monitor a room • Use 2 handsets...
... base station. You can expand your phone system by adding cordless handsets (up to a phone line. Expansion handsets do not require connection to a total of the advanced features, you can place the handset and its charging base anywhere a standard electrical outlet is available. You can : • Conference call • Talk handset to handset on the intercom • Set up handsets to automatically answer intercom calls • Transfer calls from one handset to another • Monitor a room • Use 2 handsets...

User Manual
Page 40
Advanced Features Conference Calling If one handset is added to the call, the display on all handsets shows On conference. To join a conference call at the same time. Action To connect a second handset to the same base station shows Line in use. To disconnect from the base station. A maximum of 2 handsets can be on other handsets registered to a call , press OFF on the second handset. Once a second handset is already on a call, the display on a conference call , press ON from the conference call , press ON or Handsfree on either or both handsets. 38
Advanced Features Conference Calling If one handset is added to the call, the display on all handsets shows On conference. To join a conference call at the same time. Action To connect a second handset to the same base station shows Line in use. To disconnect from the base station. A maximum of 2 handsets can be on other handsets registered to a call , press OFF on the second handset. Once a second handset is already on a call, the display on a conference call , press ON from the conference call , press ON or Handsfree on either or both handsets. 38

User Manual
Page 41
... the factory. Advanced Features Using the Intercom Intercom Setup You can set to one of the answering options and press SELECT (a): No Auto Answer - All handsets are set up a handset or base station so it automatically answers an intercom page after 1 or 3 rings. 4 Press SELECT (a). 5 Press EXIT(a) to return to the standby screen, or c to scroll to change this setting. the handset does not automatically answer an intercom page. the handset automatically answers and turns...
... the factory. Advanced Features Using the Intercom Intercom Setup You can set to one of the answering options and press SELECT (a): No Auto Answer - All handsets are set up a handset or base station so it automatically answers an intercom page after 1 or 3 rings. 4 Press SELECT (a). 5 Press EXIT(a) to return to the standby screen, or c to scroll to change this setting. the handset does not automatically answer an intercom page. the handset automatically answers and turns...

User Manual
Page 45
... the handsets registered to listen from, press Intercom. The handset that handset is turned on, and the speaker is turned off monitoring, press CANCEL (a) or OFF on and press PAGE (a). The handset you are monitoring from the base station. To turn off . 43 Note: If you answer an incoming call, monitoring is turned off. The display shows Ready to monitor room. 4 On the handset you want to the base station...
... the handsets registered to listen from, press Intercom. The handset that handset is turned on, and the speaker is turned off monitoring, press CANCEL (a) or OFF on and press PAGE (a). The handset you are monitoring from the base station. To turn off . 43 Note: If you answer an incoming call, monitoring is turned off. The display shows Ready to monitor room. 4 On the handset you want to the base station...

User Manual
Page 48
or (d) nonconforming or non-Motorola housings, or parts, are excluded from the date of purchase. CD-ROM, or floppy disk). Software NOT Embodied in Physical Media. Motorola, at its option, will be uninterrupted or error free, or that all defects in the software products will at no charge repair, replace or refund the purchase price of the software products will be...
or (d) nonconforming or non-Motorola housings, or parts, are excluded from the date of purchase. CD-ROM, or floppy disk). Software NOT Embodied in Physical Media. Motorola, at its option, will be uninterrupted or error free, or that all defects in the software products will at no charge repair, replace or refund the purchase price of the software products will be...


