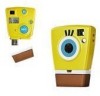
Memorex NDC6005-SB - Npower Flash Micro SpongeBob Digital Camera Support and Manuals
Get Help and Manuals for this Memorex item
View All Support Options Below
Free Memorex NDC6005-SB manuals!
Problems with Memorex NDC6005-SB?
Ask a Question
Free Memorex NDC6005-SB manuals!
Problems with Memorex NDC6005-SB?
Ask a Question
Most Recent Memorex NDC6005-SB Questions

Memorex Ndc6005-sb Driver Download Required
Sir, I lost the driver CD, I need the driver now. please let me know how to down
Sir, I lost the driver CD, I need the driver now. please let me know how to down
(Posted by venkatachalammuthu 8 years ago)

Where Can I Find The Driver For Ndc6005sb Spongebob Camera?
(Posted by pmiteff 11 years ago)


How The Heck Do I Down Load The Driver To Upload These Pictures On My Mac
(Posted by ndlmartha 13 years ago)
Popular Memorex NDC6005-SB Manual Pages
User Guide - Page 2
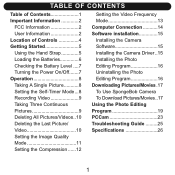
... Connection ...........14 Software installation 15 Installing the Camera Software 15 Installing the Camera Driver ..15 Installing the Photo Editing Program 16 Uninstalling the Photo Editing Program 16 Downloading Pictures/Movies .17 To Use SpongeBob Camera To Download Pictures/Movies..17 Using the Photo Editing Program 19 PCCam 23 Troubleshooting Guide .........25 Specifications 26
1
User Guide - Page 4

...when it
get into the camera, immediately turn
the power off and contact your own repairs. Never use re-chargeable batteries. • Do not leave the camera in places subject to ... camera may have to reset the unit. • Use Alkaline batteries for best results;
Always leave service to a personal computer. • In an environment with Canadian ICES-003. This Class B digital ...
User Guide - Page 5
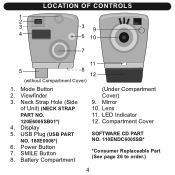
... Indicator 12. Mode Button 2. Lens 11. Display 5. LOCATION OF CONTROLS
1
2
3
39
4
6 10
7
11
5
8 12
(without Compartment Cover)
1. SMILE Button 8. USB Plug (USB PART
NO. 180E0008*) 6. Mirror 10. Viewfinder 3. Compartment Cover
SOFTWARE CD PART NO. 110ENDC6005SB*
*Consumer Replaceable Part (See page 26 to order.)
4 Battery Compartment
(Under Compartment Cover) 9.
User Guide - Page 9
...
1
2
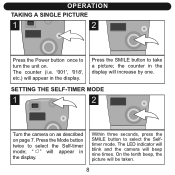
Press the Power button once to select the Selftimer mode. SETTING THE SELF-TIMER MODE
1
2
Turn the camera on as described on .
Within three seconds, press the SMILE button to turn the unit on page 7.
The LED indicator will blink and the camera will be taken.
8 On the tenth beep, the picture will...
User Guide - Page 12
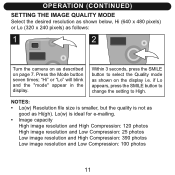
... select the Quality mode as Hi(gh). OPERATION (CONTINUED)
SETTING THE IMAGE QUALITY MODE Select the desired resolution as shown below, Hi (640 x 480 pixels) or Lo (320 x 240 pixels) as follows:
1
2
Turn the camera on as described on the display i.e.
Press the Mode button seven times; Within 3 seconds, press the SMILE...
User Guide - Page 13

... (Ld means Low compression): this
option will slightly compress the pictures.
2a
2b
TO SET TO Hd (High Compression) If "Ld" appears in the display, then the pictures ...compression): this
option will compress the pictures, allowing
more pictures to Ld.
12 TO SET TO Ld (Low Compression) If "Hd" appears in the camera. If "Hd" appears, then press the SMILE button to change to be stored in...
User Guide - Page 14
...change to 50.
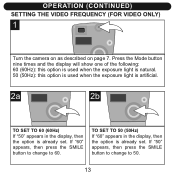
13 OPERATION (CONTINUED) SETTING THE VIDEO FREQUENCY (FOR VIDEO ONLY)
1
Turn the camera on as described on page 7. TO SET TO 50 (50Hz) If "60" appears in the display, then the option is already set . If "60" appears, then ... (50Hz): this option is used when the exposure light is artificial.
2a
2b
TO SET TO 60 (60Hz) If "50" appears in the display, then the option is already...
User Guide - Page 16
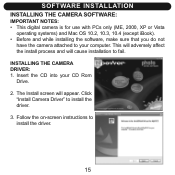
INSTALLING THE CAMERA DRIVER: 1. Click "Install Camera Driver" to install the driver.
15 Insert the CD into your computer. Follow the on-screen instructions to install the driver.
3. The Install screen will cause installation to fail.
SOFTWARE INSTALLATION INSTALLING THE CAMERA SOFTWARE:
IMPORTANT NOTES: • This digital camera is for use with PCs only (ME, 2000, XP or Vista
...
User Guide - Page 17

... Photo Editing Program" to exit the installation program.
16 UNINSTALLING THE PHOTO EDITING SOFTWARE: 1. Insert the CD into your CD Rom
Drive.
2.
Click "Install Photo Editing Program" to use the Photo Editing software. See the next page(s) to upload pictures and to install the software.
3. To uninstall the "Photo Editing Program" software, insert the CD
and, at the bottom of...
User Guide - Page 18
... the Desktop
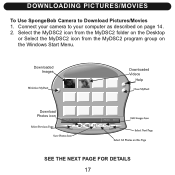
or Select the MyDSC2 icon from the MyDSC2 program group on page 14. 2.
Connect your computer as described on the Windows Start Menu. Downloaded Images
Downloaded Videos
Help
Download Photos icon
SEE THE NEXT PAGE FOR DETAILS 17 DOWNLOADING PICTURES/MOVIES
To Use SpongeBob Camera to your camera to Download Pictures/Movies 1.
User Guide - Page 19

... this , a "SAVE AS" pop-up window will appear, follow the instructions to view other pages. After this Page" icon (to select all images on each page, click the "Select Previous/Next Page" icon to save your selected images. VIEW PICTURES/MOVIES: SpongeBob Camera shows 12 pictures/movies on the current page). Click the...
User Guide - Page 24
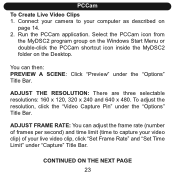
... THE NEXT PAGE
23
ADJUST FRAME RATE: You can then: PREVIEW A SCENE: Click "Preview" under the "Options" Title Bar. Run the PCCam application. Connect your camera to capture your video clip) of frames per second) and time limit (time to your live video clip, click...
User Guide - Page 25
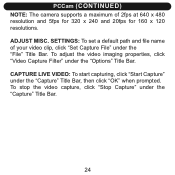
... capture, click "Stop Capture" under the "File" Title Bar. SETTINGS: To set a default path and file name of 2fps at 640 x 480 resolution and 5fps for 320 x 240 and 20fps for 160 x 120 resolutions. PCCam (CONTINUED)
NOTE: The camera supports a maximum of your video clip, click "Set Capture File" under the "Capture" Title Bar.
24
User Guide - Page 26

....
Take picture in this manual. Move subject further away.
Unit shuts off . Wrong frequency setting.
Lens is off. Subject or camera moved as described in better lighting.
Power is dirty. TROUBLESHOOTING GUIDE
Symptom
Display is not on . Poor lighting.
Turn power on .
Securely connect to Hi(gh). Select the correct frequency.
25 Replace battery. Subject too close...
User Guide - Page 27
..." size x 1 battery (not included)
FOR ADDITIONAL SET-UP OR OPERATING ASSISTANCE, PLEASE VISIT OUR WEBSITE AT
www.memorexelectronics.com/npower OR CONTACT CUSTOMER SERVICE AT 1-866-830-5434. PLEASE KEEP ALL PACKAGING MATERIAL FOR AT LEAST 90 DAYS IN CASE YOU NEED TO RETURN THIS PRODUCT TO YOUR PLACE OF PURCHASE OR TO MEMOREX.
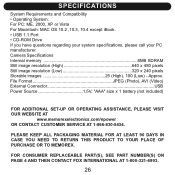
Camera Specifications Internal...
Memorex NDC6005-SB Reviews
We have not received any reviews for Memorex yet.