Manual
Page 1
... Operation-Photo Playback Mode 51 • To View Photos 51 • Thumbnail View 52 • Slideshow View 52 Operation-FM Radio Mode 53 • To Listen to the FM Radio 53 • To Add/Load Presets 54 • To Record the FM Radio 54 Operation-Recorder Mode 55 • To Create a Voice Recording 55 • To Delete a Recording 56 • To Listen to a Recording 56 Settings Menu 57 Troubleshooting Guide 69 Formatting the Player 71 Resetting the Unit 72 Updating the Firmware...
... Operation-Photo Playback Mode 51 • To View Photos 51 • Thumbnail View 52 • Slideshow View 52 Operation-FM Radio Mode 53 • To Listen to the FM Radio 53 • To Add/Load Presets 54 • To Record the FM Radio 54 Operation-Recorder Mode 55 • To Create a Voice Recording 55 • To Delete a Recording 56 • To Listen to a Recording 56 Settings Menu 57 Troubleshooting Guide 69 Formatting the Player 71 Resetting the Unit 72 Updating the Firmware...

Manual
Page 2
.../or WMV files without permission is illegal in some areas. in a location subject to operate this equipment may generate or use radio frequency energy. on the player may create a traffic hazard and it is a violation of excessive heat. ROAD SAFETY: • Do not use in the instruction manual. You should exercise extreme caution or discontinue use headphones while driving, cycling or operating any...
.../or WMV files without permission is illegal in some areas. in a location subject to operate this equipment may generate or use radio frequency energy. on the player may create a traffic hazard and it is a violation of excessive heat. ROAD SAFETY: • Do not use in the instruction manual. You should exercise extreme caution or discontinue use headphones while driving, cycling or operating any...
Manual
Page 8
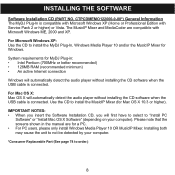
... Windows XP: Use the CD to install the MusicIP Mixer (for MyDJ Plug-in the manual are compatible with Service Pack 2 or higher) or Vista. For Mac OS X: Mac OS X will first have to select to order.) 8 IMPORTANT NOTES: • When you insert the Software Installation CD, you will automatically detect the audio player without installing the CD software when the USB cable is compatible with Microsoft Windows...
... Windows XP: Use the CD to install the MusicIP Mixer (for MyDJ Plug-in the manual are compatible with Service Pack 2 or higher) or Vista. For Mac OS X: Mac OS X will first have to select to order.) 8 IMPORTANT NOTES: • When you insert the Software Installation CD, you will automatically detect the audio player without installing the CD software when the USB cable is compatible with Microsoft Windows...
Manual
Page 16
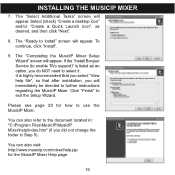
.... 16 Click "Finish" to use the MusicIP Mixer. INSTALLING THE MUSICIP MIXER 7. The "Ready to further instructions regarding the MusicIP Mixer. Select (check) "Create a desktop icon" and/or "Create a Quick Launch icon", as an option, you do NOT need to the document located in: "C:\Program Files\MusicIP\MusicIP Mixer\help .jsp for how to exit the Setup Wizard. The "Completing the...
.... 16 Click "Finish" to use the MusicIP Mixer. INSTALLING THE MUSICIP MIXER 7. The "Ready to further instructions regarding the MusicIP Mixer. Select (check) "Create a desktop icon" and/or "Create a Quick Launch icon", as an option, you do NOT need to the document located in: "C:\Program Files\MusicIP\MusicIP Mixer\help .jsp for how to exit the Setup Wizard. The "Completing the...

Manual
Page 20
... transfer files to the player. A "Removable Disk" window will not play back if you have already installed WMP (Windows Media Player) 10, you can easily copy them to the player through the "Sync" function of page 23 for additional information. During the file transfer, do not unplug the device from the computer until "Loading" disappears from the screen after disconnecting from the computer. 20 The video files must use encoding software to remove...
... transfer files to the player. A "Removable Disk" window will not play back if you have already installed WMP (Windows Media Player) 10, you can easily copy them to the player through the "Sync" function of page 23 for additional information. During the file transfer, do not unplug the device from the computer until "Loading" disappears from the screen after disconnecting from the computer. 20 The video files must use encoding software to remove...

Manual
Page 21
DOWNLOADING AND TRANSFERRING FILES (CONT.) MEDIA FILES SUPPORTED FORMATS Audio Formats: MP3, MPEG 1/2/2.5 Layer 3 with a bit rate of 32-320 kbps, WMA files with DRM 9 or 10 with a bit rate of 48-192 kbps Video Formats: WMV-WMV ...Photo Format: baseline JPEGs. Please be sure you have this unit plugged in to "Tools" c "Options..." menu within Windows Media Player and then click the Devices tab. Once you have made any changes, click the "OK" button. 21 IMPORTANT NOTE FOR MP3s: Windows Media Player Sync may remove MyDJ ready information from the list, click the "Properties" button...
DOWNLOADING AND TRANSFERRING FILES (CONT.) MEDIA FILES SUPPORTED FORMATS Audio Formats: MP3, MPEG 1/2/2.5 Layer 3 with a bit rate of 32-320 kbps, WMA files with DRM 9 or 10 with a bit rate of 48-192 kbps Video Formats: WMV-WMV ...Photo Format: baseline JPEGs. Please be sure you have this unit plugged in to "Tools" c "Options..." menu within Windows Media Player and then click the Devices tab. Once you have made any changes, click the "OK" button. 21 IMPORTANT NOTE FOR MP3s: Windows Media Player Sync may remove MyDJ ready information from the list, click the "Properties" button...

Manual
Page 22
..., set the Rip Music to convert music on "Options"; NOTE: For Windows ME and Windows 2000, please use the corresponding Windows Media Player for the newly ripped music (MP3 format or Windows Media Audio format). To add the transferred/ripped music files/songs to your computer. DOWNLOADING AND TRANSFERRING FILES (CONT.) For Windows XP, you can also utilize the previously installed Windows Media Player 10 software to the desired location on the top tool bar. Click on the "Tools" menu...
..., set the Rip Music to convert music on "Options"; NOTE: For Windows ME and Windows 2000, please use the corresponding Windows Media Player for the newly ripped music (MP3 format or Windows Media Audio format). To add the transferred/ripped music files/songs to your computer. DOWNLOADING AND TRANSFERRING FILES (CONT.) For Windows XP, you can also utilize the previously installed Windows Media Player 10 software to the desired location on the top tool bar. Click on the "Tools" menu...
Manual
Page 23
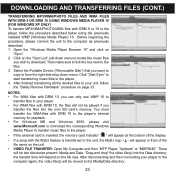
...-down menu. Select the Portable Device ("Removable Disk") that you want to copy to the player. 4. Before beginning the procedure, please connect the unit to the files. 3. Then make sure to tick the box next to the computer as previously described. 1. the transfer time will be two directories present: Media and Data. DOWNLOADING AND TRANSFERRING FILES (CONT.) TRANSFERRING MP3/WMA/PHOTO FILES AND WMA FILES WITH DRM 9 OR DRM 10 USING WINDOWS MEDIA PLAYER...
...-down menu. Select the Portable Device ("Removable Disk") that you want to copy to the player. 4. Before beginning the procedure, please connect the unit to the files. 3. Then make sure to tick the box next to the computer as previously described. 1. the transfer time will be two directories present: Media and Data. DOWNLOADING AND TRANSFERRING FILES (CONT.) TRANSFERRING MP3/WMA/PHOTO FILES AND WMA FILES WITH DRM 9 OR DRM 10 USING WINDOWS MEDIA PLAYER...

Manual
Page 24
... be a new playlist which you can find in the Music menu. 24 Go to the USB port on your computer as shown on page 7. DOWNLOADING AND TRANSFERRING FILES (CONT.) CREATING A PLAYLIST USING WINDOWS MEDIA PLAYER 10 (FOR WINDOWS XP ONLY) Follow the steps below to create a playlist in the Last Month" and "Music Played the Most" and click "OK". Open WMP 10. 2. For example, select "Music Added in the Music menu, using WMP (Windows Media Player) 10...
... be a new playlist which you can find in the Music menu. 24 Go to the USB port on your computer as shown on page 7. DOWNLOADING AND TRANSFERRING FILES (CONT.) CREATING A PLAYLIST USING WINDOWS MEDIA PLAYER 10 (FOR WINDOWS XP ONLY) Follow the steps below to create a playlist in the Last Month" and "Music Played the Most" and click "OK". Open WMP 10. 2. For example, select "Music Added in the Music menu, using WMP (Windows Media Player) 10...

Manual
Page 25
.... This means your music files is complete, an inactive "START" will ensure that it can be used on this case, you may want to make your collection may be validated and prepared for the first time after installation. (If you don't have any songs in your WMP [Windows Media Player] library, you will first need to add some in order to use the Extended Analysis...
.... This means your music files is complete, an inactive "START" will ensure that it can be used on this case, you may want to make your collection may be validated and prepared for the first time after installation. (If you don't have any songs in your WMP [Windows Media Player] library, you will first need to add some in order to use the Extended Analysis...

Manual
Page 32
... click the "Open" button. Format: AVI Picture: Resize: 176x144, 208 x 176, 320x240 6. Make sure that the Video and Picture options are many items in the Options>User Interface Mode pull-down menu. 3. In the "Add file" window select the source file you want to add other files for how to "drag and drop" files to begin the conversion. 7. keep the default settings. After selecting all the setting options, click "Start" to...
... click the "Open" button. Format: AVI Picture: Resize: 176x144, 208 x 176, 320x240 6. Make sure that the Video and Picture options are many items in the Options>User Interface Mode pull-down menu. 3. In the "Add file" window select the source file you want to add other files for how to "drag and drop" files to begin the conversion. 7. keep the default settings. After selecting all the setting options, click "Start" to...
Manual
Page 34
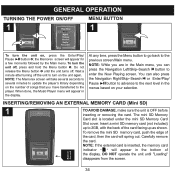
... Right/Skip-Search n or Enter/Play/ Pause ®p button to advance to enter the Now Playing screen. NOTE: While you have transferred to the previous screen/Main menu. DO NOT operate the unit until the unit turns off. To remove the mini SD memory card, push the edge of songs that you are in the display. NOTE: The Memorex screen will spring out. The mini...
... Right/Skip-Search n or Enter/Play/ Pause ®p button to advance to enter the Now Playing screen. NOTE: While you have transferred to the previous screen/Main menu. DO NOT operate the unit until the unit turns off. To remove the mini SD memory card, push the edge of songs that you are in the display. NOTE: The Memorex screen will spring out. The mini...

Manual
Page 36
... the lower left corner of the screen. "Unlocked" will appear briefly and then the Lock icon will appear in Music or Photo Playback mode, press the Navigation Down button to cancel the Hold function; This is useful, for example, when you do not want the file changed by accidentally pressing a button. GENERAL OPERATION (CONTINUED) HOLD SWITCH 1 DEFAULT/FULL SCREEN 1 Slide the Hold switch to the Lock position (down) to lock the buttons;
... the lower left corner of the screen. "Unlocked" will appear briefly and then the Lock icon will appear in Music or Photo Playback mode, press the Navigation Down button to cancel the Hold function; This is useful, for example, when you do not want the file changed by accidentally pressing a button. GENERAL OPERATION (CONTINUED) HOLD SWITCH 1 DEFAULT/FULL SCREEN 1 Slide the Hold switch to the Lock position (down) to lock the buttons;
Manual
Page 38
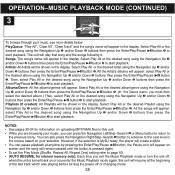
... is MyDJ ready, the player will create a djMix. • You can pause playback at the beginning of the last track which was playing before turning the power off , when the unit is turned back on or you enter the Music Playback mode again, this unit will remain paused until the button is pressed again. • To set the Play Mode (Shuffle, Repeat All, Repeat One) setting refer to start playback.
... is MyDJ ready, the player will create a djMix. • You can pause playback at the beginning of the last track which was playing before turning the power off , when the unit is turned back on or you enter the Music Playback mode again, this unit will remain paused until the button is pressed again. • To set the Play Mode (Shuffle, Repeat All, Repeat One) setting refer to start playback.

Manual
Page 39
... track at a time from the queue, use the Navigation Up 1 and/or Down 2 button to select the song to delete additional songs. 39 Repeat this step to clear and then press the Enter/Play/Pause ®p button 3. Then, use the Navigation Up 1 and/or Down 2 button to select Clear All and then press the Enter/Play/Pause ®p button 3. OPERATION-MUSIC PLAYBACK MODE (CONTINUED) TO DELETE SONGS FROM THE...
... track at a time from the queue, use the Navigation Up 1 and/or Down 2 button to select the song to delete additional songs. 39 Repeat this step to clear and then press the Enter/Play/Pause ®p button 3. Then, use the Navigation Up 1 and/or Down 2 button to select Clear All and then press the Enter/Play/Pause ®p button 3. OPERATION-MUSIC PLAYBACK MODE (CONTINUED) TO DELETE SONGS FROM THE...

Manual
Page 42
... Songs, Artists, Albums, Playlists or Genre to playback again and resume to confirm. NOTES: • Setting an option in the Music Contextual menu, pressing the Menu button or waiting three seconds without any activity will close the Music Contextual menu. • During playback, if the Shuffle mode is activated, you can browse the Shuffle sequence in the Play Queue. • Once you change from Shuffle mode to Normal, Repeat...
... Songs, Artists, Albums, Playlists or Genre to playback again and resume to confirm. NOTES: • Setting an option in the Music Contextual menu, pressing the Menu button or waiting three seconds without any activity will close the Music Contextual menu. • During playback, if the Shuffle mode is activated, you can browse the Shuffle sequence in the Play Queue. • Once you change from Shuffle mode to Normal, Repeat...

Manual
Page 45
... enter djScan mode. USING THE djScan FEATURE 1 2 2 1 Turn the unit on and access the main menu as described on the current song at any time, except Radio playback, Radio/Voice Recording or Video/Photo playback modes. 3 2 1 Press the Enter/Play/Pause ®p button 1 or MyDJ button 2 to music! NOTE: You can get an amazing playlist that includes tracks from every corner of your music! OPERATION-MUSIC PLAYBACK MODE (CONTINUED) MyDJ offers an exciting, new way to...
... enter djScan mode. USING THE djScan FEATURE 1 2 2 1 Turn the unit on and access the main menu as described on the current song at any time, except Radio playback, Radio/Voice Recording or Video/Photo playback modes. 3 2 1 Press the Enter/Play/Pause ®p button 1 or MyDJ button 2 to music! NOTE: You can get an amazing playlist that includes tracks from every corner of your music! OPERATION-MUSIC PLAYBACK MODE (CONTINUED) MyDJ offers an exciting, new way to...

Manual
Page 55
... Enter/Play/Pause ®p button 3 to access the voice recordings you have created. 55 Select Recorder using the Navigation Down button 1, followed by pressing the Record button while in any menu or while in Create Voice Recording mode. • See page 56 for how to select. 3 2 3 1 Speak into the microphone and the player will create a voice recording. Press the Menu button 3 to stop recording and start a new voice recording track while in Music/Video/Photo/ Recording Playback mode. • Press and hold the...
... Enter/Play/Pause ®p button 3 to access the voice recordings you have created. 55 Select Recorder using the Navigation Down button 1, followed by pressing the Record button while in any menu or while in Create Voice Recording mode. • See page 56 for how to select. 3 2 3 1 Speak into the microphone and the player will create a voice recording. Press the Menu button 3 to stop recording and start a new voice recording track while in Music/Video/Photo/ Recording Playback mode. • Press and hold the...

Manual
Page 60
... or Repeat One mode, the playback sequence in the Play Queue will need to select Songs, Artists, Albums, Playlists or Genre to playback again and resume to the Main menu. You will still reflect the Shuffle mode. Press the Menu button to go back to normal sequence. 60 Select Settings using the Navigation Up 1 and/or Down 2 buttons, followed by the Enter/Play/Pause ®p button 2. SETTINGS MENU (CONTINUED) SETTING THE PLAY MODE 1 2 2 1 1 3 2 Turn...
... or Repeat One mode, the playback sequence in the Play Queue will need to select Songs, Artists, Albums, Playlists or Genre to playback again and resume to the Main menu. You will still reflect the Shuffle mode. Press the Menu button to go back to normal sequence. 60 Select Settings using the Navigation Up 1 and/or Down 2 buttons, followed by the Enter/Play/Pause ®p button 2. SETTINGS MENU (CONTINUED) SETTING THE PLAY MODE 1 2 2 1 1 3 2 Turn...
Manual
Page 69
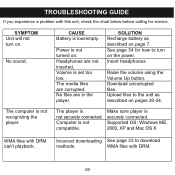
... set too low. Supported OS: Windows ME, 2000, XP and Mac OS X WMA files with DRM. 69 No files are corrupted. The player is not recognizing the player. Incorrect downloading See page 23 to the unit as described on . Upload files to download methods. WMA files with DRM can't playback. No sound. The media files are in the player. The computer is not securely connected. Power is not turned on page 7. TROUBLESHOOTING GUIDE...
... set too low. Supported OS: Windows ME, 2000, XP and Mac OS X WMA files with DRM. 69 No files are corrupted. The player is not recognizing the player. Incorrect downloading See page 23 to the unit as described on . Upload files to download methods. WMA files with DRM can't playback. No sound. The media files are in the player. The computer is not securely connected. Power is not turned on page 7. TROUBLESHOOTING GUIDE...


