
User Guide
Page 2
... Battery 7 Installing the Software 8 • Installing Windows Media Player 10 9 • Installing Windows Media Player 11 12 Downloading and Transferring Files 14 Operation 18 • Turning the Power On/Off 18 • Hold Switch 18 • Headphones Jack 18 • To Listen to MP3s/WMAs 19 • To Pause Playback 20 • To Select/Browse Through the Files 20 • Forward/Reverse Skip 21 • High-Speed Music Search 21 Settings Menu 22 Troubleshooting Guide 29 Formatting...
... Battery 7 Installing the Software 8 • Installing Windows Media Player 10 9 • Installing Windows Media Player 11 12 Downloading and Transferring Files 14 Operation 18 • Turning the Power On/Off 18 • Hold Switch 18 • Headphones Jack 18 • To Listen to MP3s/WMAs 19 • To Pause Playback 20 • To Select/Browse Through the Files 20 • Forward/Reverse Skip 21 • High-Speed Music Search 21 Settings Menu 22 Troubleshooting Guide 29 Formatting...

User Guide
Page 3
... in a car with the windows closed during walking or exercising will not affect the player. Changes or modifications to direct sunlight, excessive dust, sand, moisture, rain or mechanical shock; on the player may generate or use headphones while driving, cycling or operating any liquid onto or into the player. • Do not leave the player in potentially hazardous situations...
... in a car with the windows closed during walking or exercising will not affect the player. Changes or modifications to direct sunlight, excessive dust, sand, moisture, rain or mechanical shock; on the player may generate or use headphones while driving, cycling or operating any liquid onto or into the player. • Do not leave the player in potentially hazardous situations...
User Guide
Page 4
.... 3 Shield cable must be determined by the party responsible for compliance could void the user's authority to radio communications. If this unit not expressly approved by turning the equipment off and on a circuit different from that may cause harmful interference to operate the equipment. FCC DECLARATION This device complies with the instructions, may cause undesired operation. Warning: Changes or...
.... 3 Shield cable must be determined by the party responsible for compliance could void the user's authority to radio communications. If this unit not expressly approved by turning the equipment off and on a circuit different from that may cause harmful interference to operate the equipment. FCC DECLARATION This device complies with the instructions, may cause undesired operation. Warning: Changes or...

User Guide
Page 5
... be loud and harmful to higher volumes of sound. To establish a safe level: • Start your volume control at a safe level BEFORE your hearing adapts. We Want You Listening For A Lifetime Used wisely, your protection. 4 This list of sound levels is included for a lifetime. So what sounds "normal" can maximize the fun and excitement your musical enjoyment. Taking a minute to do...
... be loud and harmful to higher volumes of sound. To establish a safe level: • Start your volume control at a safe level BEFORE your hearing adapts. We Want You Listening For A Lifetime Used wisely, your protection. 4 This list of sound levels is included for a lifetime. So what sounds "normal" can maximize the fun and excitement your musical enjoyment. Taking a minute to do...
User Guide
Page 7
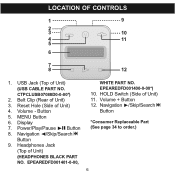
... 1. CTPCLUSB07088D0-0-00*) 2. Headphones Jack (Top of Unit) (USB CABLE PART NO. USB Jack (Top of Unit) (HEADPHONES BLACK PART NO. Volume - Button 5. HOLD Switch (Side of Unit) 4. Reset Hole (Side of Unit) 11. Navigation √/Skip/Search o Button 9. MENU Button 6. Display 7. Volume + Button 12. EPEAREDFD001401-0-00, WHITE PART NO. Navigation ®/Skip/Search n Button *Consumer Replaceable Part (See page 34 to order.) 6 EPEAREDFD001400-0-00*) 10. Belt Clip (Rear of Unit) 3. Power/Play/Pause ®...
... 1. CTPCLUSB07088D0-0-00*) 2. Headphones Jack (Top of Unit) (USB CABLE PART NO. USB Jack (Top of Unit) (HEADPHONES BLACK PART NO. Volume - Button 5. HOLD Switch (Side of Unit) 4. Reset Hole (Side of Unit) 11. Navigation √/Skip/Search o Button 9. MENU Button 6. Display 7. Volume + Button 12. EPEAREDFD001401-0-00, WHITE PART NO. Navigation ®/Skip/Search n Button *Consumer Replaceable Part (See page 34 to order.) 6 EPEAREDFD001400-0-00*) 10. Belt Clip (Rear of Unit) 3. Power/Play/Pause ®...
User Guide
Page 8
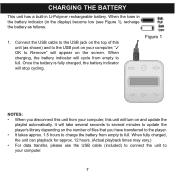
.... 7 When charging, the battery indicator will turn on the top of files that you disconnect this unit from empty to the USB port on the number of this unit will cycle from empty to your computer; When fully charged, the unit can playback for approx. 12 hours. (Actual playback times may vary.) • For data transfer, please use the USB cable (included) to connect the unit...
.... 7 When charging, the battery indicator will turn on the top of files that you disconnect this unit from empty to the USB port on the number of this unit will cycle from empty to your computer; When fully charged, the unit can playback for approx. 12 hours. (Actual playback times may vary.) • For data transfer, please use the USB cable (included) to connect the unit...
User Guide
Page 9
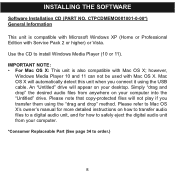
... when you transfer them using the USB cable. Simply "drag and drop" the desired audio files from anywhere on how to transfer audio files to a digital audio unit, and for more detailed instructions on your computer into the "Untitled" drive. however, Windows Media Player 10 and 11 can not be used with Mac OS X; INSTALLING THE SOFTWARE Software Installation CD (PART NO. Please note that copy-protected files will appear on your computer. *Consumer Replaceable Part (See...
... when you transfer them using the USB cable. Simply "drag and drop" the desired audio files from anywhere on how to transfer audio files to a digital audio unit, and for more detailed instructions on your computer into the "Untitled" drive. however, Windows Media Player 10 and 11 can not be used with Mac OS X; INSTALLING THE SOFTWARE Software Installation CD (PART NO. Please note that copy-protected files will appear on your computer. *Consumer Replaceable Part (See...

User Guide
Page 10
... use with DRM 9 or 10 to run "MP10Setup.exe". WINDOWS MEDIA PLAYER 10 INSTALLATION Windows Media Player 10 is for use Windows Media Player 11.) Once you have installed Windows Media Player 10, you can transfer MP3 files, WMA files and WMA files with Windows XP only. At the pop-up window, click "Run" to your computer. 3. Insert the installation CD-Rom into the CD Drive, then the installation screen will be detected by your player using the "Sync...
... use with DRM 9 or 10 to run "MP10Setup.exe". WINDOWS MEDIA PLAYER 10 INSTALLATION Windows Media Player 10 is for use Windows Media Player 11.) Once you have installed Windows Media Player 10, you can transfer MP3 files, WMA files and WMA files with Windows XP only. At the pop-up window, click "Run" to your computer. 3. Insert the installation CD-Rom into the CD Drive, then the installation screen will be detected by your player using the "Sync...

User Guide
Page 15
... your player. Connect your player to the USB port on page 7. MEDIA FILES SUPPORTED FORMATS Audio Formats: MP3, MPEG 1/2/2.5 Layer 3 with a bit rate of 32-320 kbps, WMA files with DRM 9 or 10 with DRM 9 or 10) to the player through the "Sync" function of 48-192 kbps 14 DOWNLOADING AND TRANSFERRING FILES TRANSFERRING FILES You can download digital music files from the Internet or use encoding software to convert music that you can transfer music files (MP3...
... your player. Connect your player to the USB port on page 7. MEDIA FILES SUPPORTED FORMATS Audio Formats: MP3, MPEG 1/2/2.5 Layer 3 with a bit rate of 32-320 kbps, WMA files with DRM 9 or 10 with DRM 9 or 10) to the player through the "Sync" function of 48-192 kbps 14 DOWNLOADING AND TRANSFERRING FILES TRANSFERRING FILES You can download digital music files from the Internet or use encoding software to convert music that you can transfer music files (MP3...
User Guide
Page 16
... ripped music (MP3 format or Windows Media Audio format). Open the Windows Media Player 10 Browser, then click on the "Rip" icon on the "Rip Music" icon to start ripping the music to your computer. the Option setting menu will appear. Then, set the Rip Music to the desired location on "Options"; DOWNLOADING AND TRANSFERRING FILES (CONT.) For Windows XP, you can also utilize the previously installed Windows Media Player 10 software to convert music on an audio...
... ripped music (MP3 format or Windows Media Audio format). Open the Windows Media Player 10 Browser, then click on the "Rip" icon on the "Rip Music" icon to start ripping the music to your computer. the Option setting menu will appear. Then, set the Rip Music to the desired location on "Options"; DOWNLOADING AND TRANSFERRING FILES (CONT.) For Windows XP, you can also utilize the previously installed Windows Media Player 10 software to convert music on an audio...
User Guide
Page 17
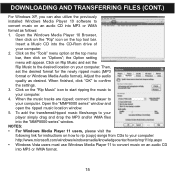
.../howto/mp11/sync.aspx • Windows Vista users must use Windows Media Player 11 to transfer music files to the player. • If you can remove the player from the right side drop-down menu to locate the music files you want to copy to the player. 4. Then make sure to tick the box next to the player, follow the instructions below using the previously installed WMP (Windows Media Player) 10. Then you have any problem with...
.../howto/mp11/sync.aspx • Windows Vista users must use Windows Media Player 11 to transfer music files to the player. • If you can remove the player from the right side drop-down menu to locate the music files you want to copy to the player. 4. Then make sure to tick the box next to the player, follow the instructions below using the previously installed WMP (Windows Media Player) 10. Then you have any problem with...
User Guide
Page 18
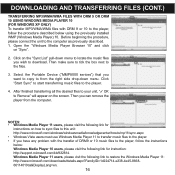
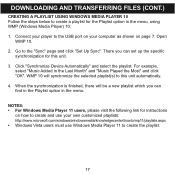
... "Music Added in the menu, using WMP (Windows Media Player) 10: 1. There you can set up the specific synchronization for this unit automatically. 4. NOTES: • For Windows Media Player 11 users, please visit the following link for instructions on page 7. WMP 10 will be a new playlist which you can find in the Playlist option in the menu. Click "Synchronize Device Automatically" and select the playlist. Go to the "Sync" page...
... "Music Added in the menu, using WMP (Windows Media Player) 10: 1. There you can set up the specific synchronization for this unit automatically. 4. NOTES: • For Windows Media Player 11 users, please visit the following link for instructions on page 7. WMP 10 will be a new playlist which you can find in the Playlist option in the menu. Click "Synchronize Device Automatically" and select the playlist. Go to the "Sync" page...
User Guide
Page 19
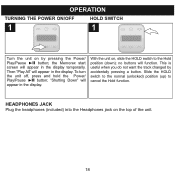
the Memorex start screen will appear in the display temporarily. Slide the HOLD switch to the normal (unlocked) position (up) to the Hold position (down); Then "Play All" will appear in the display. This is useful when you do not want the track changed by pressing the Power/ Play/Pause ®p button; "Shutting Down" will function. With the unit on the top of the unit. 18 HEADPHONES...
the Memorex start screen will appear in the display temporarily. Slide the HOLD switch to the normal (unlocked) position (up) to the Hold position (down); Then "Play All" will appear in the display. This is useful when you do not want the track changed by pressing the Power/ Play/Pause ®p button; "Shutting Down" will function. With the unit on the top of the unit. 18 HEADPHONES...
User Guide
Page 20
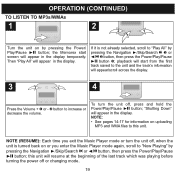
playback will start screen will appear in the display temporarily. NOTE: • See pages 14-17 for information on uploading MP3 and WMA files to this unit will appear/scroll across the display. 3 2 1 4 Press the Volume + 1 or - 2 button to "Play All" by pressing the Power/ Play/Pause ®p button; If it is turned back on or you exit the Music Player mode or turn the unit off , when...
playback will start screen will appear in the display temporarily. NOTE: • See pages 14-17 for information on uploading MP3 and WMA files to this unit will appear/scroll across the display. 3 2 1 4 Press the Volume + 1 or - 2 button to "Play All" by pressing the Power/ Play/Pause ®p button; If it is turned back on or you exit the Music Player mode or turn the unit off , when...
User Guide
Page 21
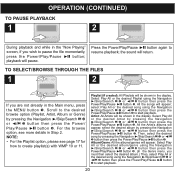
... Play All or the desired song using the Navigation ®/Skip/Search n 1 or √/o 2 button then press the Power/Play/Pause ®p button 3 to pause the file momentarily, press the Power/Play/Pause ®p button; NOTE: • For the Playlist option, please see more details in the Main menu, press the MENU button 1. Playlist (if created): All Playlists will be shown in the "Now Playing" screen, if you wish to start playback...
... Play All or the desired song using the Navigation ®/Skip/Search n 1 or √/o 2 button then press the Power/Play/Pause ®p button 3 to pause the file momentarily, press the Power/Play/Pause ®p button; NOTE: • For the Playlist option, please see more details in the Main menu, press the MENU button 1. Playlist (if created): All Playlists will be shown in the "Now Playing" screen, if you wish to start playback...
User Guide
Page 24
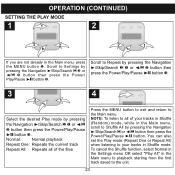
... Navigation ®/Skip/Search n 1 or √/o 2 button then press the Power/Play/Pause ®p button 3. Normal: Normal playback Repeat One: Repeats the current track Repeat All: Repeats all of the files 4 Press the MENU button to exit and return to the Main menu. To cancel the Shuffle function, select Normal in the Settings menu OR select "Play All" in Shuffle mode. OPERATION (CONTINUED) SETTING THE PLAY MODE 1 1 2 3 2 4 2 1 3 If you are not already in...
... Navigation ®/Skip/Search n 1 or √/o 2 button then press the Power/Play/Pause ®p button 3. Normal: Normal playback Repeat One: Repeats the current track Repeat All: Repeats all of the files 4 Press the MENU button to exit and return to the Main menu. To cancel the Shuffle function, select Normal in the Settings menu OR select "Play All" in Shuffle mode. OPERATION (CONTINUED) SETTING THE PLAY MODE 1 1 2 3 2 4 2 1 3 If you are not already in...
User Guide
Page 30
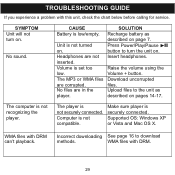
... not turned Press Power/Play/Pause ®p on pages 14-17. inserted. described on . WMA files with DRM can't playback. Volume is securely connected. Make sure player is set too Raise the volume using the low. The computer is low/empty. Supported OS: Windows XP or Vista and Mac OS X. CAUSE SOLUTION Battery is not recognizing the player. Recharge battery as player. button to turn on. No files are not Insert headphones. Incorrect downloading...
... not turned Press Power/Play/Pause ®p on pages 14-17. inserted. described on . WMA files with DRM can't playback. Volume is securely connected. Make sure player is set too Raise the volume using the low. The computer is low/empty. Supported OS: Windows XP or Vista and Mac OS X. CAUSE SOLUTION Battery is not recognizing the player. Recharge battery as player. button to turn on. No files are not Insert headphones. Incorrect downloading...
User Guide
Page 31
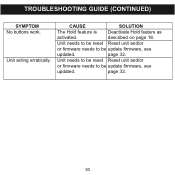
described on page 18. page 32. Unit needs to be reset Reset unit and/or or firmware needs to be update firmware, see updated. CAUSE SOLUTION The Hold feature is Deactivate Hold feature as activated. TROUBLESHOOTING GUIDE (CONTINUED) SYMPTOM No buttons work. Unit acting erratically. Unit needs to be reset Reset unit and/or or firmware needs to be update firmware, see updated. page 32. 30
described on page 18. page 32. Unit needs to be reset Reset unit and/or or firmware needs to be update firmware, see updated. CAUSE SOLUTION The Hold feature is Deactivate Hold feature as activated. TROUBLESHOOTING GUIDE (CONTINUED) SYMPTOM No buttons work. Unit acting erratically. Unit needs to be reset Reset unit and/or or firmware needs to be update firmware, see updated. page 32. 30
User Guide
Page 32
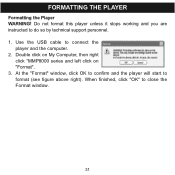
When finished, click "OK" to format (see figure above right). At the "Format" window, click OK to confirm and the player will start to close the Format window. 31 Double click on My Computer, then right click "MMP8000 series and left click on "Format". 3. FORMATTING THE PLAYER Formatting the Player WARNING! Use the USB cable to do so by technical support personnel. 1. Do not format this player unless it stops working and you are instructed to connect the player and the computer. 2.
When finished, click "OK" to format (see figure above right). At the "Format" window, click OK to confirm and the player will start to close the Format window. 31 Double click on My Computer, then right click "MMP8000 series and left click on "Format". 3. FORMATTING THE PLAYER Formatting the Player WARNING! Use the USB cable to do so by technical support personnel. 1. Do not format this player unless it stops working and you are instructed to connect the player and the computer. 2.
User Guide
Page 33
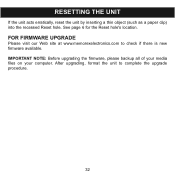
IMPORTANT NOTE: Before upgrading the firmware, please backup all of your media files on your computer. After upgrading, format the unit to check if there is new firmware available. FOR FIRMWARE UPGRADE Please visit our Web site at www.memorexelectronics.com to complete the upgrade procedure. 32 See page 6 for the Reset hole's location. RESETTING THE UNIT If the unit acts erratically, reset the unit by inserting a thin object (such as a paper clip) into the recessed Reset hole.
IMPORTANT NOTE: Before upgrading the firmware, please backup all of your media files on your computer. After upgrading, format the unit to check if there is new firmware available. FOR FIRMWARE UPGRADE Please visit our Web site at www.memorexelectronics.com to complete the upgrade procedure. 32 See page 6 for the Reset hole's location. RESETTING THE UNIT If the unit acts erratically, reset the unit by inserting a thin object (such as a paper clip) into the recessed Reset hole.


