Manual
Page 6
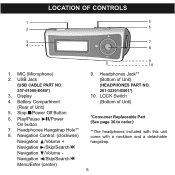
... 4. LOCATION OF CONTROLS 1 5 2 6 3 7 4 8 1. Navigation Control: (clockwise) Navigation π/Volume + Navigation ®/Skip/Search n Navigation †/Volume Navigation √/Skip/Search o Menu/Enter (center) 9 10 9. USB Jack (USB CABLE PART NO. 337-01000-E050*) 3. Stop s/Power Off Button 6. LOCK Switch (Bottom of Unit) *Consumer Replaceable Part (See page 36 to order.) **The headphones...
... 4. LOCATION OF CONTROLS 1 5 2 6 3 7 4 8 1. Navigation Control: (clockwise) Navigation π/Volume + Navigation ®/Skip/Search n Navigation †/Volume Navigation √/Skip/Search o Menu/Enter (center) 9 10 9. USB Jack (USB CABLE PART NO. 337-01000-E050*) 3. Stop s/Power Off Button 6. LOCK Switch (Bottom of Unit) *Consumer Replaceable Part (See page 36 to order.) **The headphones...
Manual
Page 10
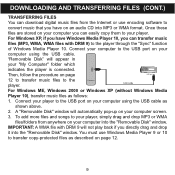
...window. Then, follow the procedure on your computer using the USB cable. To add more files and songs to your player, simply drag and drop MP3 or WMA files/folders from the Internet or use Windows Media Player 9 or 10 to transfer copy-protected files as follows: ...files are stored on your player. A "Removable Disk" window will appear in your computer screen. 3. Connect your player to the USB port on your "My Computer" folder which indicates the player is connected. DOWNLOADING AND TRANSFERRING FILES (CONT.) TRANSFERRING FILES You can download digital music files from anywhere on ...
...window. Then, follow the procedure on your computer using the USB cable. To add more files and songs to your player, simply drag and drop MP3 or WMA files/folders from the Internet or use Windows Media Player 9 or 10 to transfer copy-protected files as follows: ...files are stored on your player. A "Removable Disk" window will appear in your computer screen. 3. Connect your player to the USB port on your "My Computer" folder which indicates the player is connected. DOWNLOADING AND TRANSFERRING FILES (CONT.) TRANSFERRING FILES You can download digital music files from anywhere on ...

Manual
Page 11
...computer's hard drive. Connect the smaller end of the cable to the USB jack on the player and the larger end of the cable to the USB port on your digital audio player. 3. After you transferred. 10 Your player is ready to play the files you have finished your transfer, put away... the digital audio player hard disk icon(s) by selecting the digital audio player hard disk icon and pressing the Command-E ...
...computer's hard drive. Connect the smaller end of the cable to the USB jack on the player and the larger end of the cable to the USB port on your digital audio player. 3. After you transferred. 10 Your player is ready to play the files you have finished your transfer, put away... the digital audio player hard disk icon(s) by selecting the digital audio player hard disk icon and pressing the Command-E ...

Manual
Page 14
... computer. Right-click on "Removable Disk" and left-click on My Computer. When the "Safe to Remove Hardware" window is displayed, you may remove the player from the USB cable or remove the USB cable from the computer. • If you are using Windows XP and the Windows Media... REMOVE HARDWARE SAFELY REMOVING YOUR PLAYER FROM THE COMPUTER (FOR WINDOWS ME OR 2000) NOTE: To avoid damage to your player or data loss, always follow the above "Safely Remove Hardware" procedure. 13 Using your mouse, double click the "Safely Remove Hardware" icon on your player from the USB port on the task bar...
... computer. Right-click on "Removable Disk" and left-click on My Computer. When the "Safe to Remove Hardware" window is displayed, you may remove the player from the USB cable or remove the USB cable from the computer. • If you are using Windows XP and the Windows Media... REMOVE HARDWARE SAFELY REMOVING YOUR PLAYER FROM THE COMPUTER (FOR WINDOWS ME OR 2000) NOTE: To avoid damage to your player or data loss, always follow the above "Safely Remove Hardware" procedure. 13 Using your mouse, double click the "Safely Remove Hardware" icon on your player from the USB port on the task bar...
Manual
Page 34
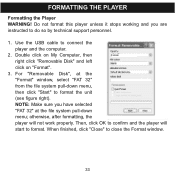
... support personnel. 1. NOTE: Make sure you are instructed to format the unit (see figure right). otherwise, after formatting, the player will start to confirm and the player will not work properly. Then, click OK to format. Use the USB cable to close the Format window. 33 When finished, click "Close" to connect the...
... support personnel. 1. NOTE: Make sure you are instructed to format the unit (see figure right). otherwise, after formatting, the player will start to confirm and the player will not work properly. Then, click OK to format. Use the USB cable to close the Format window. 33 When finished, click "Close" to connect the...
Manual
Page 36
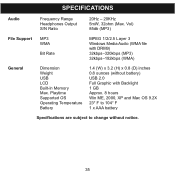
... Output S/N Ratio 20Hz - 20KHz 5mW, 32ohm (Max. Vol) 85db (MP3) File Support MP3 WMA Bit Rate MPEG 1/2/2.5 Layer 3 Windows Media Audio (WMA file with Backlight 1 GB Approx. 8 hours Win ME, 2000, XP and Mac OS 9.2X 23° F to 104° F 1 x AAA battery Specifications are subject to change without battery...
... Output S/N Ratio 20Hz - 20KHz 5mW, 32ohm (Max. Vol) 85db (MP3) File Support MP3 WMA Bit Rate MPEG 1/2/2.5 Layer 3 Windows Media Audio (WMA file with Backlight 1 GB Approx. 8 hours Win ME, 2000, XP and Mac OS 9.2X 23° F to 104° F 1 x AAA battery Specifications are subject to change without battery...

