Manual
Page 2
... with the windows closed during walking or exercising will not affect the player. It can be potentially dangerous to direct sunlight, excessive dust, sand, moisture, rain or mechanical shock; in potentially hazardous situations. It may generate or use in a location subject to play your headset at a high volume while walking, especially at pedestrian crossings. The user could lose...
... with the windows closed during walking or exercising will not affect the player. It can be potentially dangerous to direct sunlight, excessive dust, sand, moisture, rain or mechanical shock; in potentially hazardous situations. It may generate or use in a location subject to play your headset at a high volume while walking, especially at pedestrian crossings. The user could lose...

Manual
Page 3
.... Operation is connected. • Consult the dealer or an experienced radio/TV technician for help. This equipment generates, uses and can be used in a residential installation. These limits are designed to ensure compliance with the instructions, may not cause interference, and 2) This device must be determined by turning the equipment off and on a circuit different from that may cause undesired operation. Warning: Changes...
.... Operation is connected. • Consult the dealer or an experienced radio/TV technician for help. This equipment generates, uses and can be used in a residential installation. These limits are designed to ensure compliance with the instructions, may not cause interference, and 2) This device must be determined by turning the equipment off and on a circuit different from that may cause undesired operation. Warning: Changes...

Manual
Page 4
... clear without affecting your equipment at a low setting. • Slowly increase the sound until it is too late, this now will provide a lifetime of sound. Over time your musical enjoyment. To establish a safe level: • Start your volume control at a safe level BEFORE your new sound equipment will help to higher volumes of fun and enjoyment. Sound can actually be deceiving. Taking a minute...
... clear without affecting your equipment at a low setting. • Slowly increase the sound until it is too late, this now will provide a lifetime of sound. Over time your musical enjoyment. To establish a safe level: • Start your volume control at a safe level BEFORE your new sound equipment will help to higher volumes of fun and enjoyment. Sound can actually be deceiving. Taking a minute...
Manual
Page 9
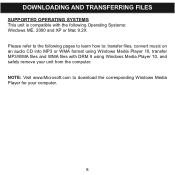
NOTE: Visit www.Microsoft.com to : transfer files, convert music on an audio CD into MP3 or WMA format using Windows Media Player 10, transfer MP3/WMA files and WMA files with DRM 9 using Windows Media Player 10, and safely remove your computer. 8 DOWNLOADING AND TRANSFERRING FILES SUPPORTED OPERATING SYSTEMS This unit is compatible with the following Operating Systems: Windows ME, 2000 and XP or Mac 9.2X Please refer to the following pages to learn how to download the corresponding Windows Media Player for your unit from the computer.
NOTE: Visit www.Microsoft.com to : transfer files, convert music on an audio CD into MP3 or WMA format using Windows Media Player 10, transfer MP3/WMA files and WMA files with DRM 9 using Windows Media Player 10, and safely remove your computer. 8 DOWNLOADING AND TRANSFERRING FILES SUPPORTED OPERATING SYSTEMS This unit is compatible with the following Operating Systems: Windows ME, 2000 and XP or Mac 9.2X Please refer to the following pages to learn how to download the corresponding Windows Media Player for your unit from the computer.
Manual
Page 10
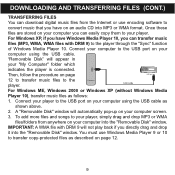
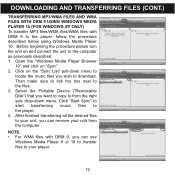
... format. A "Removable Disk" window will not play back if you can download digital music files from anywhere on your computer into the "Removable Disk" window. IMPORTANT: A WMA file with DRM 9) to the player through the "Sync" function of Windows Media Player 10. DOWNLOADING AND TRANSFERRING FILES (CONT.) TRANSFERRING FILES You can easily copy them to your player. For Windows ME, Windows 2000 or Windows XP (without Windows Media Player 10), transfer music files as described on your computer using the USB cable. To add more files and songs...
... format. A "Removable Disk" window will not play back if you can download digital music files from anywhere on your computer into the "Removable Disk" window. IMPORTANT: A WMA file with DRM 9) to the player through the "Sync" function of Windows Media Player 10. DOWNLOADING AND TRANSFERRING FILES (CONT.) TRANSFERRING FILES You can easily copy them to your player. For Windows ME, Windows 2000 or Windows XP (without Windows Media Player 10), transfer music files as described on your computer using the USB cable. To add more files and songs...

Manual
Page 11
... the cable to the USB jack on your screen. Simply drag and drop the audio files onto the mounted hard disk drive icon of 9.2X to transfer audio files. 1. Turn on your computer. 2. Connect the smaller end of the cable to the USB port on the player and the larger end of your Macintosh. 4. You can also use a Macintosh computer with an operating system of your digital audio player located...
... the cable to the USB jack on your screen. Simply drag and drop the audio files onto the mounted hard disk drive icon of 9.2X to transfer audio files. 1. Turn on your computer. 2. Connect the smaller end of the cable to the USB port on the player and the larger end of your Macintosh. 4. You can also use a Macintosh computer with an operating system of your digital audio player located...

Manual
Page 12
... Windows Media Player for the newly ripped music (MP3 format or Windows Media Audio format). connect the player to your computer. Click on the "Tools" menu option at the top menu bar, then click on an audio CD into MP3 or WMA format as desired. Adjust the audio quality as follows: 1. Open the "Removable Disk" window and open the ripped music location window. 5. DOWNLOADING AND TRANSFERRING FILES (CONT.) For Windows XP, you can also utilize Windows Media Player 10 software...
... Windows Media Player for the newly ripped music (MP3 format or Windows Media Audio format). connect the player to your computer. Click on the "Tools" menu option at the top menu bar, then click on an audio CD into MP3 or WMA format as desired. Adjust the audio quality as follows: 1. Open the "Removable Disk" window and open the ripped music location window. 5. DOWNLOADING AND TRANSFERRING FILES (CONT.) For Windows XP, you can also utilize Windows Media Player 10 software...
Manual
Page 13
... 9 to your unit, you can remove your unit from the right side drop-down menu to locate the music files you wish to your player. 12 Select the Portable Device ("Removable Disk") that you want to copy to from the computer. After finished transferring all the desired files to the player, follow the procedure described below using Windows Media Player 10. Click on the "Sync List" pull-down menu.
... 9 to your unit, you can remove your unit from the right side drop-down menu to locate the music files you wish to your player. 12 Select the Portable Device ("Removable Disk") that you want to copy to from the computer. After finished transferring all the desired files to the player, follow the procedure described below using Windows Media Player 10. Click on the "Sync List" pull-down menu.
Manual
Page 15
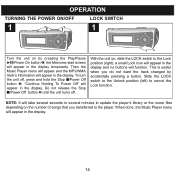
... the display temporarily. the Memorex start screen will function. With the unit on the number of songs that you do not want the track changed by pressing the Play/Pause ®p/Power On button 1; Slide the LOCK switch to the Unloc2k position1(left) to the player. Do not release the Stop s/Power Off button 2 until the unit turns off , press and hold the Stop s/Power Off button 2; This is useful...
... the display temporarily. the Memorex start screen will function. With the unit on the number of songs that you do not want the track changed by pressing the Play/Pause ®p/Power On button 1; Slide the LOCK switch to the Unloc2k position1(left) to the player. Do not release the Stop s/Power Off button 2 until the unit turns off , press and hold the Stop s/Power Off button 2; This is useful...
Manual
Page 16
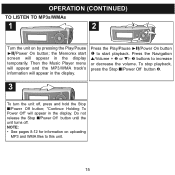
... Music Player menu will appear and the MP3/WMA track's information will appear in the display. 2 1 Press the Play/Pause ®p/Power On button 1 to start screen will appear in the display temporarily. NOTE: • See pages 8-12 for information on by pressing the Play/Pause ®p/Power On button; OPERATION (CONTINUED) TO LISTEN TO MP3s/WMAs 1 2 4 1 2 3 Turn the unit on uploading MP3 and WMA files...
... Music Player menu will appear and the MP3/WMA track's information will appear in the display. 2 1 Press the Play/Pause ®p/Power On button 1 to start screen will appear in the display temporarily. NOTE: • See pages 8-12 for information on by pressing the Play/Pause ®p/Power On button; OPERATION (CONTINUED) TO LISTEN TO MP3s/WMAs 1 2 4 1 2 3 Turn the unit on uploading MP3 and WMA files...

Manual
Page 17
... desired folder/file by pressing the Navigation ®/Skip/ Search n or √/o button then press the Menu/Enter button. 16 NOTE: In the last sub-folder, the "Enter" option will start counting again. playback will pause and the timer will appear. the sound will return and the timer will change to resume playback; Press the Play/Pause ®p/Power On button again to a "Delete" option...
... desired folder/file by pressing the Navigation ®/Skip/ Search n or √/o button then press the Menu/Enter button. 16 NOTE: In the last sub-folder, the "Enter" option will start counting again. playback will pause and the timer will appear. the sound will return and the timer will change to resume playback; Press the Play/Pause ®p/Power On button again to a "Delete" option...

Manual
Page 19
... the Play/Pause ®p/Power On button to pause recording, and press again to resume recording. 2 1 3 Press the Stop s/Power Off button to stop recording and go to access the voice recordings you have created. • See page 25 for how to the Voice Player menu. Speak into the microphone and the player will appear. NOTES: • See the next page for ho2w to1view the Recorder settings...
... the Play/Pause ®p/Power On button to pause recording, and press again to resume recording. 2 1 3 Press the Stop s/Power Off button to stop recording and go to access the voice recordings you have created. • See page 25 for how to the Voice Player menu. Speak into the microphone and the player will appear. NOTES: • See the next page for ho2w to1view the Recorder settings...

Manual
Page 20
14 OPERATION (CONTINUED) TO LISTEN TO A RECORDING 1 2 3 Press the Menu/Enter button 1; Select the desired recording by selecting the VOICE folder. 19 NOTE: You can also select/browse through the recordings as described on page 16 by pressing the Navigation ®/Skip/Search n or √/o 3 button then press the Play/Pause ®p/Power On button 4. Scroll to Voice by pressing the Navigation v/Volume + or w/- 2 button then press the Menu/Enter button 1. the Main menu will appear.
14 OPERATION (CONTINUED) TO LISTEN TO A RECORDING 1 2 3 Press the Menu/Enter button 1; Select the desired recording by selecting the VOICE folder. 19 NOTE: You can also select/browse through the recordings as described on page 16 by pressing the Navigation ®/Skip/Search n or √/o 3 button then press the Play/Pause ®p/Power On button 4. Scroll to Voice by pressing the Navigation v/Volume + or w/- 2 button then press the Menu/Enter button 1. the Main menu will appear.
Manual
Page 22
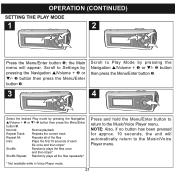
... the Navigation v/Volume + 2 or w/- 3 button then press the Menu/Enter button 1. Normal: Normal playback Repeat Track: Repeats the current track Repeat All: Repeats all of the files Intro: Plays the first 15 seconds of each file once and then stops* Shuffle: Randomly plays the files once and then stops* Shuffle Repeat: Randomly plays all the files repeatedly* Press and hold the Menu/Enter button to return to the Music/Voice Player menu. * Not available while in Voice Player mode. 21...
... the Navigation v/Volume + 2 or w/- 3 button then press the Menu/Enter button 1. Normal: Normal playback Repeat Track: Repeats the current track Repeat All: Repeats all of the files Intro: Plays the first 15 seconds of each file once and then stops* Shuffle: Randomly plays the files once and then stops* Shuffle Repeat: Randomly plays all the files repeatedly* Press and hold the Menu/Enter button to return to the Music/Voice Player menu. * Not available while in Voice Player mode. 21...

Manual
Page 25
OPERATION (CONTINUED) SETTING THE POWER SAVINGS 1 2 21 3 13 2 Press the Menu/Enter button 1; NOTE: Select Disable to the Music/Voice Player menu. Scroll to Power Savings by pressing the Navigation v/Volume + 1 or w/- 2 button then press the Menu/Enter button 3. 3 4 3 2 1 Select the desired Power Savings (time the unit will automatically return to the Music/Voice Player menu. 24 NOTE: Also, if no button has been pressed for approx. 10 seconds, the unit will...
OPERATION (CONTINUED) SETTING THE POWER SAVINGS 1 2 21 3 13 2 Press the Menu/Enter button 1; NOTE: Select Disable to the Music/Voice Player menu. Scroll to Power Savings by pressing the Navigation v/Volume + 1 or w/- 2 button then press the Menu/Enter button 3. 3 4 3 2 1 Select the desired Power Savings (time the unit will automatically return to the Music/Voice Player menu. 24 NOTE: Also, if no button has been pressed for approx. 10 seconds, the unit will...

Manual
Page 29
... time, the unit will appear. OPERATION (CONTINUED) SETTING THE SLEEP TIME 1 2 21 3 13 2 Press the Menu/Enter button 1; NOTE: Also, if no button has been pressed for approx. 10 seconds, the unit will automatically return to the Music/Voice Player menu. Scroll to Sleep Time by pressing the Navigation v/Volume + 2 or w/- 3 button then press the Menu/Enter button 1. Press and hold the Menu/Enter button to return to the Music/Voice Player menu...
... time, the unit will appear. OPERATION (CONTINUED) SETTING THE SLEEP TIME 1 2 21 3 13 2 Press the Menu/Enter button 1; NOTE: Also, if no button has been pressed for approx. 10 seconds, the unit will automatically return to the Music/Voice Player menu. Scroll to Sleep Time by pressing the Navigation v/Volume + 2 or w/- 3 button then press the Menu/Enter button 1. Press and hold the Menu/Enter button to return to the Music/Voice Player menu...
Manual
Page 32
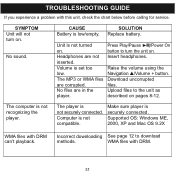
... the player. The player is low/empty. TROUBLESHOOTING GUIDE If you experience a problem with DRM can't playback. CAUSE SOLUTION Battery is not securely connected. Volume is not recognizing the player. No files are corrupted. The computer is set too low. Make sure player is not compatible. Supported OS: Windows ME, 2000, XP and Mac OS 9.2X WMA files with this unit, check the chart below before calling for service. Upload files to...
... the player. The player is low/empty. TROUBLESHOOTING GUIDE If you experience a problem with DRM can't playback. CAUSE SOLUTION Battery is not securely connected. Volume is not recognizing the player. No files are corrupted. The computer is set too low. Make sure player is not compatible. Supported OS: Windows ME, 2000, XP and Mac OS 9.2X WMA files with this unit, check the chart below before calling for service. Upload files to...

Manual
Page 33
described on page 14. Unit needs to be reset Reset unit and/or or firmware needs to be update firmware, see updated. page 34. Unit needs to be reset Reset unit and/or or firmware needs to be update firmware, see updated. CAUSE SOLUTION The Lock feature is Deactivate Lock feature as activated. Unit acting erratically. page 34. 32 TROUBLESHOOTING GUIDE (CONTINUED) SYMPTOM No buttons work.
described on page 14. Unit needs to be reset Reset unit and/or or firmware needs to be update firmware, see updated. page 34. Unit needs to be reset Reset unit and/or or firmware needs to be update firmware, see updated. CAUSE SOLUTION The Lock feature is Deactivate Lock feature as activated. Unit acting erratically. page 34. 32 TROUBLESHOOTING GUIDE (CONTINUED) SYMPTOM No buttons work.
Manual
Page 34
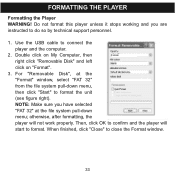
... selected "FAT 32" at the "Format" window, select "FAT 32" from the file system pull-down menu; NOTE: Make sure you are instructed to format. Use the USB cable to close the Format window. 33 otherwise, after formatting, the player will start to do so by technical support personnel. 1. Double click on My Computer, then 949MB right click "Removable Disk" and left click on "Format". 3. FORMATTING THE PLAYER Formatting the Player WARNING!
... selected "FAT 32" at the "Format" window, select "FAT 32" from the file system pull-down menu; NOTE: Make sure you are instructed to format. Use the USB cable to close the Format window. 33 otherwise, after formatting, the player will start to do so by technical support personnel. 1. Double click on My Computer, then 949MB right click "Removable Disk" and left click on "Format". 3. FORMATTING THE PLAYER Formatting the Player WARNING!
Manual
Page 35
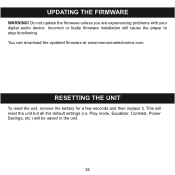
Do not update the firmware unless you are experiencing problems with your digital audio device. You can download the updated firmware at www.memorexelectronics.com. RESETTING THE UNIT To reset the unit, remove the battery for a few seconds and then replace it. This will cause the player to stop functioning. Incorrect or faulty firmware installation will reset the unit but all the default settings (i.e. UPDATING THE FIRMWARE WARNING! Play mode, Equalizer, Contrast, Power Savings, etc.) will be saved in the unit. 34
Do not update the firmware unless you are experiencing problems with your digital audio device. You can download the updated firmware at www.memorexelectronics.com. RESETTING THE UNIT To reset the unit, remove the battery for a few seconds and then replace it. This will cause the player to stop functioning. Incorrect or faulty firmware installation will reset the unit but all the default settings (i.e. UPDATING THE FIRMWARE WARNING! Play mode, Equalizer, Contrast, Power Savings, etc.) will be saved in the unit. 34


