User Guide
Page 6
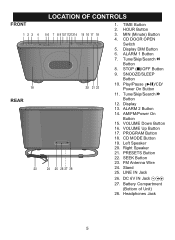
... Display DIM Button 6. STOP (s)/OFF Button 9. Tune/Skip/Search l Button 12. ALARM 2 Button 14. Stand 25. CD DOOR OPEN Switch 5. Play/Pause (®p)/CD/ Power On Button 11. CD MODE Button 19. FM Antenna Wire 24. DC 6V IN Jack Z 27. Battery Compartment (Bottom of Unit) 28. Tune/Skip/Search m Button... 8. AM/FM/Power On Button 15. VOLUME Up Button 17. LINE IN Jack 26. Headphones Jack 5 MIN (...
... Display DIM Button 6. STOP (s)/OFF Button 9. Tune/Skip/Search l Button 12. ALARM 2 Button 14. Stand 25. CD DOOR OPEN Switch 5. Play/Pause (®p)/CD/ Power On Button 11. CD MODE Button 19. FM Antenna Wire 24. DC 6V IN Jack Z 27. Battery Compartment (Bottom of Unit) 28. Tune/Skip/Search m Button... 8. AM/FM/Power On Button 15. VOLUME Up Button 17. LINE IN Jack 26. Headphones Jack 5 MIN (...

User Guide
Page 10
... automatically seek through all of the radio stations and program the first 9 strong stations. Repeatedly press the AM/FM/Power On button to turn the unit on the first preset. When done, it clicks. The maximum time is the maximum time for a CD in this unit? the unit will... to select a preset station. INSERTING A CD 1 Slide the CD DOOR OPEN switch to the right and the CD door will then seek through the radio stations and program the first 9 strong stations, perform the steps as follows: 1 2 21 Press the AM/FM/Power On button to select1AM or FM. Press the SEEK button 1;
... automatically seek through all of the radio stations and program the first 9 strong stations. Repeatedly press the AM/FM/Power On button to turn the unit on the first preset. When done, it clicks. The maximum time is the maximum time for a CD in this unit? the unit will... to select a preset station. INSERTING A CD 1 Slide the CD DOOR OPEN switch to the right and the CD door will then seek through the radio stations and program the first 9 strong stations, perform the steps as follows: 1 2 21 Press the AM/FM/Power On button to select1AM or FM. Press the SEEK button 1;
User Guide
Page 14
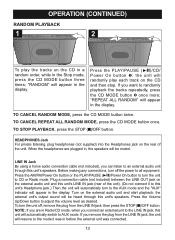
...display. When the headphones are in before the external unit was connected. 13 Press the AM/FM/Power On button or the PLAY/PAUSE (®p)/Power On button to turn the unit off the...this unit's speakers. Press the Volume Up/Down button to randomly playback the tracks repeatedly, press the CD MODE button 2 once more; NOTE: If you can listen to all equipment. the unit will ...Headphones jack on the rear of the unit). (Do not connect it was in Radio/CD mode, when you connect an external unit to CD or Radio mode. LINE IN Jack By using a home audio connection cable (not included),...
...display. When the headphones are in before the external unit was connected. 13 Press the AM/FM/Power On button or the PLAY/PAUSE (®p)/Power On button to turn the unit off the...this unit's speakers. Press the Volume Up/Down button to randomly playback the tracks repeatedly, press the CD MODE button 2 once more; NOTE: If you can listen to all equipment. the unit will ...Headphones jack on the rear of the unit). (Do not connect it was in Radio/CD mode, when you connect an external unit to CD or Radio mode. LINE IN Jack By using a home audio connection cable (not included),...
User Guide
Page 16
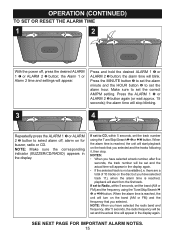
...is not available (i.e. the alarm time will appear. the alarm time will appear in the display again. NOTE: Make sure the corresponding indicator (BUZZER/CD/RADIO) appears in the display again. • If the selected track is reached, playback will start playback on the disc but you have selected a track...or FM) and the frequency using the Tune/Skip/Search l 1 or m 2 button. When the alarm time is reached, the unit will start from the first track. the Alarm 1 or Alarm 2 time and settings will blink. When the alarm time is reached, the unit will turn on for buzzer, radio or CD. ...
...is not available (i.e. the alarm time will appear. the alarm time will appear in the display again. NOTE: Make sure the corresponding indicator (BUZZER/CD/RADIO) appears in the display again. • If the selected track is reached, playback will start playback on the disc but you have selected a track...or FM) and the frequency using the Tune/Skip/Search l 1 or m 2 button. When the alarm time is reached, the unit will start from the first track. the Alarm 1 or Alarm 2 time and settings will blink. When the alarm time is reached, the unit will turn on for buzzer, radio or CD. ...
User Guide
Page 20
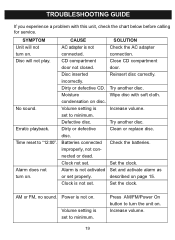
... is not activated or set properly. Alarm is not connected. Close CD compartment door. Try another disc. Check the batteries. Set the clock. No sound. CD compartment door not closed. Dirty or defective CD. Defective disc. Clock not set to minimum. 19 Press AM/FM/Power On button to minimum. Try another disc. Power is not...
... is not activated or set properly. Alarm is not connected. Close CD compartment door. Try another disc. Check the batteries. Set the clock. No sound. CD compartment door not closed. Dirty or defective CD. Defective disc. Clock not set to minimum. 19 Press AM/FM/Power On button to minimum. Try another disc. Power is not...
User Guide
Page 21
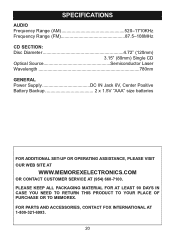
... DAYS IN CASE YOU NEED TO RETURN THIS PRODUCT TO YOUR PLACE OF PURCHASE OR TO MEMOREX. SPECIFICATIONS AUDIO Frequency Range (AM 520-1710KHz Frequency Range (FM 87.5-108MHz CD SECTION: Disc Diameter 4.72" (120mm) 3.15" (80mm) Single CD Optical Source Semiconductor Laser Wavelength 780nm GENERAL Power Supply DC IN Jack 6V, Center Positive...
... DAYS IN CASE YOU NEED TO RETURN THIS PRODUCT TO YOUR PLACE OF PURCHASE OR TO MEMOREX. SPECIFICATIONS AUDIO Frequency Range (AM 520-1710KHz Frequency Range (FM 87.5-108MHz CD SECTION: Disc Diameter 4.72" (120mm) 3.15" (80mm) Single CD Optical Source Semiconductor Laser Wavelength 780nm GENERAL Power Supply DC IN Jack 6V, Center Positive...


