
User Guide
Page 2
... use radio frequency energy. DANGEROUS VOLTAGE: The lightning flash with arrowhead symbol within an equilateral triangle is intended to alert the user to the presence of uninsulated dangerous voltage within an equilateral triangle is made. The user could lose the authority to constitute a risk of important operating and maintenance (servicing) instructions in the literature accompanying the appliance. iPod and iPhone...
... use radio frequency energy. DANGEROUS VOLTAGE: The lightning flash with arrowhead symbol within an equilateral triangle is intended to alert the user to the presence of uninsulated dangerous voltage within an equilateral triangle is made. The user could lose the authority to constitute a risk of important operating and maintenance (servicing) instructions in the literature accompanying the appliance. iPod and iPhone...
User Guide
Page 3
... the instructions, may cause harmful interference to which can radiate radio frequency energy and, if not installed and used in a particular installation. Do not place liquid objects such as vases on a circuit different from the electrical outlet. If this product. Only use . Lightning and power surges ARE NOT covered under warranty for AC connection. Do not expose the product to...
... the instructions, may cause harmful interference to which can radiate radio frequency energy and, if not installed and used in a particular installation. Do not place liquid objects such as vases on a circuit different from the electrical outlet. If this product. Only use . Lightning and power surges ARE NOT covered under warranty for AC connection. Do not expose the product to...
User Guide
Page 4
...replacement of fire or electric shock, do not expose this apparatus near any heat sources such as power-supply cord or plug is used , use attachments/accessories specified by the manufacturer, or sold with the Manufacturer's instructions. 8. In order to rain or moisture. IMPORTANT SAFETY INSTRUCTIONS 1. Read these Instructions. 3. Follow all Warnings. 4. Use...of time. 14. Protect the power cord from being walked on the apparatus. 16. Do not install near water. 6. Do not place objects filled with a dry cloth. 7. Heed all instructions. 5. A polarized plug ...
...replacement of fire or electric shock, do not expose this apparatus near any heat sources such as power-supply cord or plug is used , use attachments/accessories specified by the manufacturer, or sold with the Manufacturer's instructions. 8. In order to rain or moisture. IMPORTANT SAFETY INSTRUCTIONS 1. Read these Instructions. 3. Follow all Warnings. 4. Use...of time. 14. Protect the power cord from being walked on the apparatus. 16. Do not install near water. 6. Do not place objects filled with a dry cloth. 7. Heed all instructions. 5. A polarized plug ...

User Guide
Page 5
LOCATION OF CONTROLS FRONT/TOP 1 2 8 3 4 9 5 6 10 11 12 7 13 14 1. Play/Pause (®p)/ RECALL STATION Button 3. Dock Release Button 12. VOLUME Down (-) Button 13. iPod/iPhone Compartment with Connector 4 ALARM 1/2 Button 10. SOURCE Button 2. SET Button 9. Display 8. TUNING/Skip/Search Down (o) Button 6. Power/ALARM RESET Button 4. TUNING/Skip/Search Up (n) Button 5. iPod Dock Close Button (rear of compartment) 14. SNOOZE/DIMMER Button 7. VOLUME Up (+) Button 11.
LOCATION OF CONTROLS FRONT/TOP 1 2 8 3 4 9 5 6 10 11 12 7 13 14 1. Play/Pause (®p)/ RECALL STATION Button 3. Dock Release Button 12. VOLUME Down (-) Button 13. iPod/iPhone Compartment with Connector 4 ALARM 1/2 Button 10. SOURCE Button 2. SET Button 9. Display 8. TUNING/Skip/Search Down (o) Button 6. Power/ALARM RESET Button 4. TUNING/Skip/Search Up (n) Button 5. iPod Dock Close Button (rear of compartment) 14. SNOOZE/DIMMER Button 7. VOLUME Up (+) Button 11.
User Guide
Page 6
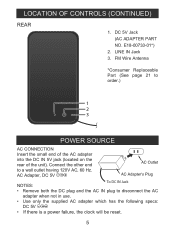
FM Wire Antenna *Consumer Replaceable Part (See page 21 to disconnect the AC adapter when not in use. • Use only the supplied AC adapter which has the following specs: DC 5V Z • If there is a power failure, the clock will be reset. 5 DC 5V Jack (AC ADAPTER PART NO. AC Adapter, DC 5V Z NOTES: To DC IN Jack • Remove both the DC plug and the AC IN...
FM Wire Antenna *Consumer Replaceable Part (See page 21 to disconnect the AC adapter when not in use. • Use only the supplied AC adapter which has the following specs: DC 5V Z • If there is a power failure, the clock will be reset. 5 DC 5V Jack (AC ADAPTER PART NO. AC Adapter, DC 5V Z NOTES: To DC IN Jack • Remove both the DC plug and the AC IN...
User Guide
Page 8
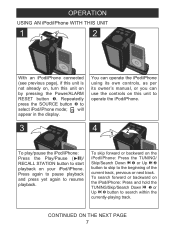
... use the controls on by pressing the Power/ALARM RESET button 1. Press again to pause playback and press yet again to resume playback. OPERATION USING AN iPod/iPhone WITH THIS UNIT 1 12 2 With an iPod/iPhone connected (see previous page), if this unit is not already on, turn this unit on this unit to operate the iPod/iPhone. 3 412 To play/pause the iPod/iPhone: Press the Play/Pause (®p)/ RECALL STATION button...
... use the controls on by pressing the Power/ALARM RESET button 1. Press again to pause playback and press yet again to resume playback. OPERATION USING AN iPod/iPhone WITH THIS UNIT 1 12 2 With an iPod/iPhone connected (see previous page), if this unit is not already on, turn this unit on this unit to operate the iPod/iPhone. 3 412 To play/pause the iPod/iPhone: Press the Play/Pause (®p)/ RECALL STATION button...

User Guide
Page 9
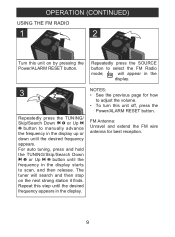
With the power off , press the Power/ALARM RESET button. • While there is an incoming call , the music will pause. NOTES: • After you have adjusted the volume setting, if you turn this unit off , press the SOURCE button 1 and then press and hold the TUNING/Skip/Search Down o 2 button until the region abbreviation (e.g. USING THE FM RADIO - Press the TUNING/ Skip/Search Down...
With the power off , press the Power/ALARM RESET button. • While there is an incoming call , the music will pause. NOTES: • After you have adjusted the volume setting, if you turn this unit off , press the SOURCE button 1 and then press and hold the TUNING/Skip/Search Down o 2 button until the region abbreviation (e.g. USING THE FM RADIO - Press the TUNING/ Skip/Search Down...
User Guide
Page 10
... Up n 2 button to adjust the volume. • To turn this unit off, press the Power/ALARM RESET button. FM Antenna: Unravel and extend the FM wire antenna for how to manually advance the frequency in the display starts to select the FM Radio mode; will search and then stop on by pressing the Power/ALARM RESET button. Repeatedly press the SOURCE button to scan, and then release. OPERATION (CONTINUED) USING THE FM RADIO 1 2 Turn this...
... Up n 2 button to adjust the volume. • To turn this unit off, press the Power/ALARM RESET button. FM Antenna: Unravel and extend the FM wire antenna for how to manually advance the frequency in the display starts to select the FM Radio mode; will search and then stop on by pressing the Power/ALARM RESET button. Repeatedly press the SOURCE button to scan, and then release. OPERATION (CONTINUED) USING THE FM RADIO 1 2 Turn this...
User Guide
Page 11
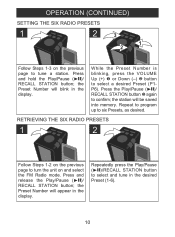
... select a desired Preset (P1P6). the station will appear in the display. the Preset Number will blink in the display. Press and release the Play/Pause (®p)/ RECALL STATION button; the Preset Number will be saved into memory. Press and hold the Play/Pause (®p)/ RECALL STATION button; Press the Play/Pause (®p)/ RECALL STATION button 3 again to six Presets, as desired. Repeat to program up to confirm; OPERATION (CONTINUED) SETTING THE SIX RADIO PRESETS 1 23 2 1 Follow...
... select a desired Preset (P1P6). the station will appear in the display. the Preset Number will blink in the display. Press and release the Play/Pause (®p)/ RECALL STATION button; the Preset Number will be saved into memory. Press and hold the Play/Pause (®p)/ RECALL STATION button; Press the Play/Pause (®p)/ RECALL STATION button 3 again to six Presets, as desired. Repeat to program up to confirm; OPERATION (CONTINUED) SETTING THE SIX RADIO PRESETS 1 23 2 1 Follow...
User Guide
Page 12
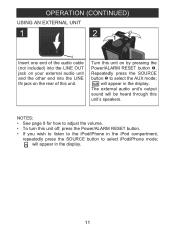
... off, press the Power/ALARM RESET button. • If you wish to listen to the iPod/iPhone in the iPod compartment, repeatedly press the SOURCE button to select iPod/iPhone mode; The external audio unit's output sound will appear in the display. 11 Repeatedly press the SOURCE button 2 to adjust the volume. • To turn this unit's speakers. NOTES: • See page 8 for how to select the AUX mode; Turn this unit on the...
... off, press the Power/ALARM RESET button. • If you wish to listen to the iPod/iPhone in the iPod compartment, repeatedly press the SOURCE button to select iPod/iPhone mode; The external audio unit's output sound will appear in the display. 11 Repeatedly press the SOURCE button 2 to adjust the volume. • To turn this unit's speakers. NOTES: • See page 8 for how to select the AUX mode; Turn this unit on the...
User Guide
Page 13
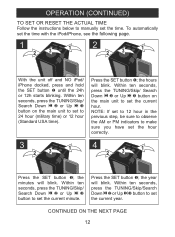
... NEXT PAGE 12 the hours will blink. OPERATION (CONTINUED) TO SET OR RESET THE ACTUAL TIME Follow the instructions below to make sure you have set the hour correctly. 3 2 3 1 4 23 1 Press the SET button 1; the minutes will blink. Press the SET button 1; To automatically set the time with the iPod/iPhone, see the following page. 1 2 3 1 2 23 1 With the unit off and NO iPod/ iPhone docked, press and hold the SET button 1 until the 24h or...
... NEXT PAGE 12 the hours will blink. OPERATION (CONTINUED) TO SET OR RESET THE ACTUAL TIME Follow the instructions below to make sure you have set the hour correctly. 3 2 3 1 4 23 1 Press the SET button 1; the minutes will blink. Press the SET button 1; To automatically set the time with the iPod/iPhone, see the following page. 1 2 3 1 2 23 1 With the unit off and NO iPod/ iPhone docked, press and hold the SET button 1 until the 24h or...
User Guide
Page 14
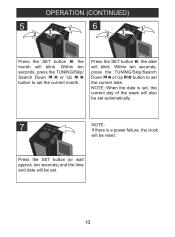
... seconds) and the time and date will be set. 13 the date will blink. OPERATION (CONTINUED) 5 2 3 1 6 23 1 Press the SET button 1; NOTE: When the date is set, the correct day of the week will also be set automatically. 7 NOTE: If there is a power failure, the clock will be reset. Within ten seconds, press the TUNING/Skip/Search Down o 2 or Up n 3 button to set the current date. Within ten seconds...
... seconds) and the time and date will be set. 13 the date will blink. OPERATION (CONTINUED) 5 2 3 1 6 23 1 Press the SET button 1; NOTE: When the date is set, the correct day of the week will also be set automatically. 7 NOTE: If there is a power failure, the clock will be reset. Within ten seconds, press the TUNING/Skip/Search Down o 2 or Up n 3 button to set the current date. Within ten seconds...
User Guide
Page 15
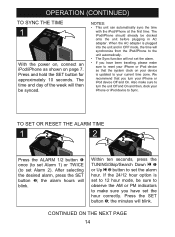
..., please make sure to reset your iPhone or iPod device so that you have set to 12 hour mode, be synced. If the 24/12 hour option is set the hour correctly. the minutes will blink. Press the SET button 3; OPERATION (CONTINUED) TO SYNC THE TIME 1 With the power on, connect an iPod/iPhone as shown on your device is updated to your current time zone. When the AC adapter is plugged into the...
..., please make sure to reset your iPhone or iPod device so that you have set to 12 hour mode, be synced. If the 24/12 hour option is set the hour correctly. the minutes will blink. Press the SET button 3; OPERATION (CONTINUED) TO SYNC THE TIME 1 With the power on, connect an iPod/iPhone as shown on your device is updated to your current time zone. When the AC adapter is plugged into the...

User Guide
Page 16
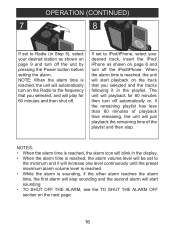
.../Skip/Search Down o 1 or Up n 2 button to set the alarm minute. Press the SET button 3; Press the SET button 3; OPERATION (CONTINUED) 3 12 3 4 12 3 Within ten seconds, press the TUNING/Skip/Search Down o 1 or Up n 2 button to set the maximum alarm volume. the volume level will blink. 5 12 3 6 12 3 Within ten seconds, press the TUNING/Skip/Search Down o 1 or Up n 2 button to set the source (iPod/iPhone, FM Radio or Buzzer).
.../Skip/Search Down o 1 or Up n 2 button to set the alarm minute. Press the SET button 3; Press the SET button 3; OPERATION (CONTINUED) 3 12 3 4 12 3 Within ten seconds, press the TUNING/Skip/Search Down o 1 or Up n 2 button to set the maximum alarm volume. the volume level will blink. 5 12 3 6 12 3 Within ten seconds, press the TUNING/Skip/Search Down o 1 or Up n 2 button to set the source (iPod/iPhone, FM Radio or Buzzer).
User Guide
Page 17
OPERATION (CONTINUED) 7 8 If set to Radio (in the playlist. The unit will playback for 60 minutes and then shut off the unit by pressing the Power button before setting the alarm. NOTES: • When the alarm time is reached, the alarm icon will blink in the display. • When the alarm time is reached, the alarm volume level will be set to iPod/iPhone, select your desired station as shown on the...
OPERATION (CONTINUED) 7 8 If set to Radio (in the playlist. The unit will playback for 60 minutes and then shut off the unit by pressing the Power button before setting the alarm. NOTES: • When the alarm time is reached, the alarm icon will blink in the display. • When the alarm time is reached, the alarm volume level will be set to iPod/iPhone, select your desired station as shown on the...
User Guide
Page 18
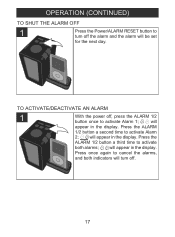
will appear in the display. Press once again to cancel the alarms, and both alarms; OPERATION (CONTINUED) TO SHUT THE ALARM OFF 1 Press the Power/ALARM RESET button to turn off. 17 Press the ALARM 1/2 button a second time to activate Alarm 1; Press the ALARM 1/2 button a third time to activate both indicators will appear in the display. will turn off , press the ALARM 1/2 button once to activate Alarm 2; TO ACTIVATE/DEACTIVATE AN ALARM 1 With the power off the alarm and the alarm will appear in the display. will be set for the next day.
will appear in the display. Press once again to cancel the alarms, and both alarms; OPERATION (CONTINUED) TO SHUT THE ALARM OFF 1 Press the Power/ALARM RESET button to turn off. 17 Press the ALARM 1/2 button a second time to activate Alarm 1; Press the ALARM 1/2 button a third time to activate both indicators will appear in the display. will turn off , press the ALARM 1/2 button once to activate Alarm 2; TO ACTIVATE/DEACTIVATE AN ALARM 1 With the power off the alarm and the alarm will appear in the display. will be set for the next day.
User Guide
Page 19
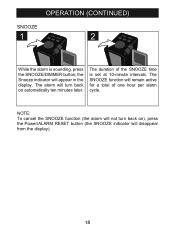
The SNOOZE function will turn back on automatically ten minutes later. The alarm will remain active for a total of the SNOOZE time is sounding, press the SNOOZE/DIMMER button; NOTE: To cancel the SNOOZE function (the alarm will not turn back on ), press the Power/ALARM RESET button (the SNOOZE indicator will appear in the display. The duration of one hour per alarm cycle. the Snooze indicator will disappear from the display). 18 OPERATION (CONTINUED) SNOOZE 1 2 While the alarm is set at 10-minute intervals.
The SNOOZE function will turn back on automatically ten minutes later. The alarm will remain active for a total of the SNOOZE time is sounding, press the SNOOZE/DIMMER button; NOTE: To cancel the SNOOZE function (the alarm will not turn back on ), press the Power/ALARM RESET button (the SNOOZE indicator will appear in the display. The duration of one hour per alarm cycle. the Snooze indicator will disappear from the display). 18 OPERATION (CONTINUED) SNOOZE 1 2 While the alarm is set at 10-minute intervals.
User Guide
Page 20
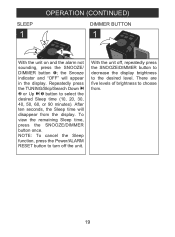
... 90 minutes). NOTE: To cancel the Sleep function, press the Power/ALARM RESET button to turn off , repeatedly press the SNOOZE/DIMMER button to decrease the display brightness to the desired level. With the unit off the unit. After ten seconds, the Sleep time will appear in the display. OPERATION (CONTINUED) SLEEP 1 3 2 1 DIMMER BUTTON 1 With the unit on and the alarm not sounding, press the SNOOZE/ DIMMER button 1; Repeatedly press the TUNING/Skip/Search Down o 2 or...
... 90 minutes). NOTE: To cancel the Sleep function, press the Power/ALARM RESET button to turn off , repeatedly press the SNOOZE/DIMMER button to decrease the display brightness to the desired level. With the unit off the unit. After ten seconds, the Sleep time will appear in the display. OPERATION (CONTINUED) SLEEP 1 3 2 1 DIMMER BUTTON 1 With the unit on and the alarm not sounding, press the SNOOZE/ DIMMER button 1; Repeatedly press the TUNING/Skip/Search Down o 2 or...
User Guide
Page 21
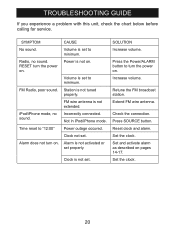
.... iPod/iPhone mode, no sound. SOLUTION Increase volume. Extend FM wire antenna. Power is set properly. Check the connection. Radio, no sound. Volume is not on . Station is not activated or set to turn on . Alarm is not tuned properly. Increase volume. Press SOURCE button. Incorrectly connected. Clock not set to "12:00" Power outage occured. Set and activate alarm as described on . Set the clock. Time reset to minimum. FM Radio, poor sound. Volume is set . Set the clock. 20 TROUBLESHOOTING GUIDE If you experience a problem...
.... iPod/iPhone mode, no sound. SOLUTION Increase volume. Extend FM wire antenna. Power is set properly. Check the connection. Radio, no sound. Volume is not on . Station is not activated or set to turn on . Alarm is not tuned properly. Increase volume. Press SOURCE button. Incorrectly connected. Clock not set to "12:00" Power outage occured. Set and activate alarm as described on . Set the clock. Time reset to minimum. FM Radio, poor sound. Volume is set . Set the clock. 20 TROUBLESHOOTING GUIDE If you experience a problem...
User Guide
Page 22
FOR ADDITIONAL SET-UP OR OPERATING ASSISTANCE, PLEASE VISIT OUR WEBSITE AT: WWW.MEMOREX.COM FOR CONSUMER REPLACEABLE PART(S), VERIFY PART NUMBER(S) ON PAGE 5, AND THEN CONTACT OUR PARTS AND ACCESSORIES FULFILLMENT CENTER AT 1-800-379-8439. 21 SPECIFICATIONS GENERAL: Power Source DC 5V Adapter (Center Positive) Speaker 4 ohms Output Power 2W Weight 0.8 lbs Dimensions 2.6 (L) x 3.2 (W) x 4.9 (H) inches RADIO SECTION: Frequency Range (FM) Region 1 (USA 87.5MHz to...
FOR ADDITIONAL SET-UP OR OPERATING ASSISTANCE, PLEASE VISIT OUR WEBSITE AT: WWW.MEMOREX.COM FOR CONSUMER REPLACEABLE PART(S), VERIFY PART NUMBER(S) ON PAGE 5, AND THEN CONTACT OUR PARTS AND ACCESSORIES FULFILLMENT CENTER AT 1-800-379-8439. 21 SPECIFICATIONS GENERAL: Power Source DC 5V Adapter (Center Positive) Speaker 4 ohms Output Power 2W Weight 0.8 lbs Dimensions 2.6 (L) x 3.2 (W) x 4.9 (H) inches RADIO SECTION: Frequency Range (FM) Region 1 (USA 87.5MHz to...


