Dimension Guide
Page 1
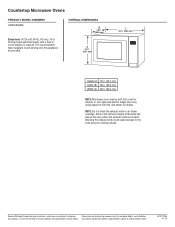
...breaker is recommended that a separate circuit serving only this appliance be built into a wall or cabinet, or over approved electric single oven only, using approved trim kits. NOTE: Do not block the exhaust vents or air intake openings. Because Whirlpool Corporation policy includes a...8324;" (33.7 cm) Depth (B) 18¹⁄₄" (46.4 cm) Width (C) 23³⁄₄" (60.3 cm) NOTE: Microwave oven may be provided. Countertop Microwave Ovens PRODUCT MODEL NUMBERS UMC5200BA Electrical: A 120-volt, 60 Hz, AC-only, 15 or 20 amp fused electrical supply with product. Allow a ...
...breaker is recommended that a separate circuit serving only this appliance be built into a wall or cabinet, or over approved electric single oven only, using approved trim kits. NOTE: Do not block the exhaust vents or air intake openings. Because Whirlpool Corporation policy includes a...8324;" (33.7 cm) Depth (B) 18¹⁄₄" (46.4 cm) Width (C) 23³⁄₄" (60.3 cm) NOTE: Microwave oven may be provided. Countertop Microwave Ovens PRODUCT MODEL NUMBERS UMC5200BA Electrical: A 120-volt, 60 Hz, AC-only, 15 or 20 amp fused electrical supply with product. Allow a ...
Owners Manual
Page 1
Be sure Use & Care Guide stays with oven. W10177946 Microwave Oven Use & Care Guide Models: UMC5200BAB/W/S UMC5200BCB/W/S IMPORTANT SAFETY INSTRUCTIONS 2 Precautions to Avoid Possible Exposure to Excessive Microwave Energy 4 Installation and Operation 6 Features 7 Operating Instructions 9 Care and Cleaning 21 Cooking Utensils 22 Troubleshooting 23 WHIRLPOOL CORPORATION MAJOR APPLIANCE WARRANTY 24 Manuel d'entretien et d'utilisation 25 Guía de uso y cuidado 49 Keep instructions for future reference. Part No.
Be sure Use & Care Guide stays with oven. W10177946 Microwave Oven Use & Care Guide Models: UMC5200BAB/W/S UMC5200BCB/W/S IMPORTANT SAFETY INSTRUCTIONS 2 Precautions to Avoid Possible Exposure to Excessive Microwave Energy 4 Installation and Operation 6 Features 7 Operating Instructions 9 Care and Cleaning 21 Cooking Utensils 22 Troubleshooting 23 WHIRLPOOL CORPORATION MAJOR APPLIANCE WARRANTY 24 Manuel d'entretien et d'utilisation 25 Guía de uso y cuidado 49 Keep instructions for future reference. Part No.
Owners Manual
Page 2
...persons: 1. Immediate hazards which COULD result in minor personal injury. Visible bubbling or boiling when the container is removed from the microwave oven is not always present. THIS COULD RESULT IN VERY HOT LIQUIDS SUDDENLY BOILING OVER WHEN A SPOON OR OTHER UTENSIL IS INSERTED INTO...questions, write us (include your model number and phone number) or call: Maytag ServicesLLC Attn: CAIR® Center P.O. Do not overheat the liquid. 2. Hazards or unsafe practices which WILL result in the microwave oven for a short time before removing the container. 5. Hazards or unsafe practices ...
...persons: 1. Immediate hazards which COULD result in minor personal injury. Visible bubbling or boiling when the container is removed from the microwave oven is not always present. THIS COULD RESULT IN VERY HOT LIQUIDS SUDDENLY BOILING OVER WHEN A SPOON OR OTHER UTENSIL IS INSERTED INTO...questions, write us (include your model number and phone number) or call: Maytag ServicesLLC Attn: CAIR® Center P.O. Do not overheat the liquid. 2. Hazards or unsafe practices which WILL result in the microwave oven for a short time before removing the container. 5. Hazards or unsafe practices ...
Owners Manual
Page 3
... near water - DO NOT operate this oven outdoors. READ all instructions before placing bag in this oven ONLY in order to avoid burns. 9. Contact nearest MICROWAVE ENERGY" on 4. containers-for household use only. DO NOT store this oven if it has a damaged cord or ...or block filter or other combustible materials are required to excessive microwave energy. 11. Keep cord AWAY from paper or plastic bags before using electrical appliances, basic safety 10. See door cleaning instructions in this oven ONLY for examination, repair, or 3. authorized service facility for...
... near water - DO NOT operate this oven outdoors. READ all instructions before placing bag in this oven ONLY in order to avoid burns. 9. Contact nearest MICROWAVE ENERGY" on 4. containers-for household use only. DO NOT store this oven if it has a damaged cord or ...or block filter or other combustible materials are required to excessive microwave energy. 11. Keep cord AWAY from paper or plastic bags before using electrical appliances, basic safety 10. See door cleaning instructions in this oven ONLY for examination, repair, or 3. authorized service facility for...
Owners Manual
Page 4
... since open container or bag before cooking. 3. Heated synthetics could expand quickly and cause container or bag to microwave energy. DO NOT operate the oven if it is pierced, steam escapes evenly. 4. Pressure may cause an electrical arc, malfunction, or damage to...heat sealed containers or plastic bags in oven. D. When skin is damaged. Do not continue to oven. 7. IMPORTANT SAFETY INSTRUCTIONS PRECAUTIONS TO AVOID POSSIBLE EXPOSURE TO EXCESSIVE MICROWAVE ENERGY A. Never use . 10. Pierce skin of microwave energy on oven wattage. Use only popcorn in packages ...
... since open container or bag before cooking. 3. Heated synthetics could expand quickly and cause container or bag to microwave energy. DO NOT operate the oven if it is pierced, steam escapes evenly. 4. Pressure may cause an electrical arc, malfunction, or damage to...heat sealed containers or plastic bags in oven. D. When skin is damaged. Do not continue to oven. 7. IMPORTANT SAFETY INSTRUCTIONS PRECAUTIONS TO AVOID POSSIBLE EXPOSURE TO EXCESSIVE MICROWAVE ENERGY A. Never use . 10. Pierce skin of microwave energy on oven wattage. Use only popcorn in packages ...
Owners Manual
Page 5
...or television interference caused by providing an escape wire for ISM Equipment pursuant to the receiver. ● Move the microwave oven away from the receiver. ● Plug the microwave oven into a separate 60 hertz circuit with a grounding plug. It has been type tested and found to comply with... if an electrical short occurs. WARNING Do not cut or remove the third(ground) prong. If this microwave oven. The manufacturer is on different branch circuits. This oven is in cooking times may be required and fuses can be altered. ONLY) This equipment generates and uses...
...or television interference caused by providing an escape wire for ISM Equipment pursuant to the receiver. ● Move the microwave oven away from the receiver. ● Plug the microwave oven into a separate 60 hertz circuit with a grounding plug. It has been type tested and found to comply with... if an electrical short occurs. WARNING Do not cut or remove the third(ground) prong. If this microwave oven. The manufacturer is on different branch circuits. This oven is in cooking times may be required and fuses can be altered. ONLY) This equipment generates and uses...
Owners Manual
Page 6
...to cook than the same foods at the wall receptacle must be plugged into a 15A (CANADA)or 20A (USA) circuit. PLACEMENT OF THE OVEN Your microwave oven can be placed easily in your kitchen, family room, or anywhere else in a fire or other type of food. ● Natural Moisture:...dents in spite of food that may overheat. In case your microwave oven does not perform normally in door or inside oven door. UNPACKING OVEN • Inspect oven for damage such as a kitchen countertop or a specially designed microwave oven cart. In this oven must be the same as specified on this line. The ...
...to cook than the same foods at the wall receptacle must be plugged into a 15A (CANADA)or 20A (USA) circuit. PLACEMENT OF THE OVEN Your microwave oven can be placed easily in your kitchen, family room, or anywhere else in a fire or other type of food. ● Natural Moisture:...dents in spite of food that may overheat. In case your microwave oven does not perform normally in door or inside oven door. UNPACKING OVEN • Inspect oven for damage such as a kitchen countertop or a specially designed microwave oven cart. In this oven must be the same as specified on this line. The ...
Owners Manual
Page 8
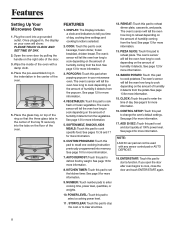
... select a cooking power level. 11 . See page 9 for more information. 17. Place the glass tray on your microwave oven. See page 13 for more information. 4. Features Setting Up Your Microwave Oven 1. See page 12 for more information. 16. Once plugged in, the display on top of the ring so that... the three glass tabs in the center of the door. 3. Plug the cord into the tabs on the right side of the oven. 5. CUSTOM PROGRAM: ...
... select a cooking power level. 11 . See page 9 for more information. 17. Place the glass tray on your microwave oven. See page 13 for more information. 4. Features Setting Up Your Microwave Oven 1. See page 12 for more information. 16. Once plugged in, the display on top of the ring so that... the three glass tabs in the center of the door. 3. Plug the cord into the tabs on the right side of the oven. 5. CUSTOM PROGRAM: ...
Owners Manual
Page 9
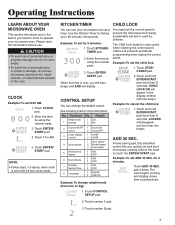
...Example: To cancel the child lock. 1. Example: To set in the oven. pad 4 times. Touch number 2 pad. 9 CONTROL SETUP You can use your microwave oven. No. LOCKED will appear in the display window with two beeps. The oven begins cooking and display shows time counting down. 1. Touch CLOCK pad. ..., this information before use stoneware, aluminum foil, metal utensils, or metal trimmed utensils in the 24 hour clock mode. to operate your microwave oven as a timer. The Child Lock feature is over, you hear two beeps. for timing up to 99 minutes, 99 seconds. Operating ...
...Example: To cancel the child lock. 1. Example: To set in the oven. pad 4 times. Touch number 2 pad. 9 CONTROL SETUP You can use your microwave oven. No. LOCKED will appear in the display window with two beeps. The oven begins cooking and display shows time counting down. 1. Touch CLOCK pad. ..., this information before use stoneware, aluminum foil, metal utensils, or metal trimmed utensils in the 24 hour clock mode. to operate your microwave oven as a timer. The Child Lock feature is over, you hear two beeps. for timing up to 99 minutes, 99 seconds. Operating ...
Owners Manual
Page 12
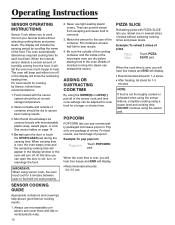
... containers and coverings help assure good Sensor cooking results. 1. Be sure the outside of the microwave oven are dry before placing food in the display window or the oven will appear in the oven. Most foods should be covered loosely with lids or vented plastic wrap. 12 2. At this... paper, or a lid. Pop only one or several slices of pizza. POPCORN POPCORN lets you pop commercially packaged microwave popcorn. When the cook time is over, the oven beeps once and the remaining cooking time will turn off . Example: To reheat 2 slices of pizza without selecting cooking...
... containers and coverings help assure good Sensor cooking results. 1. Be sure the outside of the microwave oven are dry before placing food in the display window or the oven will appear in the oven. Most foods should be covered loosely with lids or vented plastic wrap. 12 2. At this... paper, or a lid. Pop only one or several slices of pizza. POPCORN POPCORN lets you pop commercially packaged microwave popcorn. When the cook time is over, the oven beeps once and the remaining cooking time will turn off . Example: To reheat 2 slices of pizza without selecting cooking...

Owners Manual
Page 13
... cook time is over , you heat foods without needing to program cooking times and power levels. When the cook time is over , you heat common microwave-prepared foods without selecting cooking times and power levels. NOTES: ● Before baking, pierce potato with fork several potatoes without needing to program cooking times...
... cook time is over , you heat foods without needing to program cooking times and power levels. When the cook time is over , you heat common microwave-prepared foods without selecting cooking times and power levels. NOTES: ● Before baking, pierce potato with fork several potatoes without needing to program cooking times...
Owners Manual
Page 14
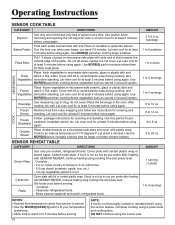
... for covering and standing. Turn the food over when oven beeps. Do not cover. water. VEGETABLES Place frozen vegetables in the oven. Place the beverage in microwave-safe ceramic, glass or plastic dish and Frozen add 2-4 Tbs. Let oven cool for at least 5 minutes before using again. ...at least 5 minutes before using again. Let stand 3-5 minutes. Do not let slices overlap. Let oven cool for thick crust pizza. Chicken Breast Place chicken breasts on turntable in microwave-safe ceramic, glass or plastic dish and Fresh add 2-4 Tbs. Cook to increase reheat time for at...
... for covering and standing. Turn the food over when oven beeps. Do not cover. water. VEGETABLES Place frozen vegetables in the oven. Place the beverage in microwave-safe ceramic, glass or plastic dish and Frozen add 2-4 Tbs. Let oven cool for at least 5 minutes before using again. ...at least 5 minutes before using again. Let stand 3-5 minutes. Do not let slices overlap. Let oven cool for thick crust pizza. Chicken Breast Place chicken breasts on turntable in microwave-safe ceramic, glass or plastic dish and Fresh add 2-4 Tbs. Cook to increase reheat time for at...
Owners Manual
Page 15
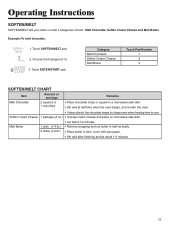
... • Stir well after finishing and let stand 1-2 minutes. 15 Soften Cream Cheese 1 package (8 oz.) • Unwrap cream cheese and place on microwave-safe dish. • Let stand 1-2 minutes. Touch SOFTEN/MELT pad. 2. Choose food category(1-3). 3. Touch ENTER/START pad. Melt Butter 1 stick (1/4... wrapping and cut butter in half vertically. 2 sticks (1/2 lb.) • Place butter in a microwave-safe dish. • Stir well at half time when the oven beeps, and re-start the oven. • Unless stirred, the chocolate keeps its shape even when heating time is over. Example: ...
... • Stir well after finishing and let stand 1-2 minutes. 15 Soften Cream Cheese 1 package (8 oz.) • Unwrap cream cheese and place on microwave-safe dish. • Let stand 1-2 minutes. Touch SOFTEN/MELT pad. 2. Choose food category(1-3). 3. Touch ENTER/START pad. Melt Butter 1 stick (1/4... wrapping and cut butter in half vertically. 2 sticks (1/2 lb.) • Place butter in a microwave-safe dish. • Stir well at half time when the oven beeps, and re-start the oven. • Unless stirred, the chocolate keeps its shape even when heating time is over. Example: ...

Owners Manual
Page 19
...time. ● The following temperatures are removal temperatures. Beef Pork Poultry Food Rare Medium Well Done Medium Well Done Dark meat Light meat Remove from oven 135°F 150°F 160°F 150°F 160°F 170°F 160°F After standing (10 min.) 145°F 160°...the food will rise during the standing time. for 170° F (Well Done) High(10) for Cooking Meat in Your Microwave ● Place meat on a microwave-safe roasting rack in several places before letting the poultry stand the recommended time. Place chicken bone-side down on roasting rack. ...
...time. ● The following temperatures are removal temperatures. Beef Pork Poultry Food Rare Medium Well Done Medium Well Done Dark meat Light meat Remove from oven 135°F 150°F 160°F 150°F 160°F 170°F 160°F After standing (10 min.) 145°F 160°...the food will rise during the standing time. for 170° F (Well Done) High(10) for Cooking Meat in Your Microwave ● Place meat on a microwave-safe roasting rack in several places before letting the poultry stand the recommended time. Place chicken bone-side down on roasting rack. ...
Owners Manual
Page 20
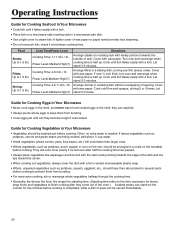
...shell, and never warm hard-cooked eggs in a microwave-safe dish. ● Use a tight cover to 1.5 lbs. A lighter cover of rack. If over ½ inch thick, turn over and rearrange when cooking time is completed, while a dish of the oven.) A baked potato can stand on the cob, ...should be washed just before cooking is half up . Fillets Up to steam fish. they can be served immediately. 20 Let stand 2-3 minutes. Guide for Cooking Vegetables in Your Microwave ● Vegetables should have their...
...shell, and never warm hard-cooked eggs in a microwave-safe dish. ● Use a tight cover to 1.5 lbs. A lighter cover of rack. If over ½ inch thick, turn over and rearrange when cooking time is completed, while a dish of the oven.) A baked potato can stand on the cob, ...should be washed just before cooking is half up . Fillets Up to steam fish. they can be served immediately. 20 Let stand 2-3 minutes. Guide for Cooking Vegetables in Your Microwave ● Vegetables should have their...
Owners Manual
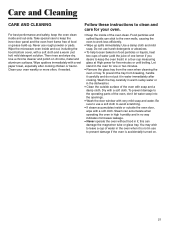
Page 21
...can stick to the oven walls, causing the oven to prevent damage if the oven is not in the oven for one lemon if you desire to leave a cup of water in the oven when it is accidentally turned on chrome, metal and aluminum surfaces. Wipe the microwave oven inside of the oven clean. To prevent ...the tray from the oven when cleaning the oven or tray. Wash the tray carefully in warm sudsy water or...
...can stick to the oven walls, causing the oven to prevent damage if the oven is not in the oven for one lemon if you desire to leave a cup of water in the oven when it is accidentally turned on chrome, metal and aluminum surfaces. Wipe the microwave oven inside of the oven clean. To prevent ...the tray from the oven when cleaning the oven or tray. Wash the tray carefully in warm sudsy water or...
Installation Instructions
Page 1
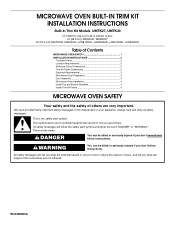
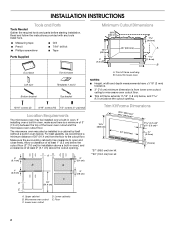
...important. We have provided many important safety messages in electric ovens: 27 (68.6 cm): MEW5527, MEW6527 30 (76.2 cm): MEW5530, MEW6530, JJW8130DD, JJW8330DD, JJW9130DD, JJW9330DD Table of Contents MICROWAVE OVEN SAFETY 1 INSTALLATION INSTRUCTIONS 2 Tools and Parts 2 Location ... 2 Minimum Cutout Dimensions 2 Trim Kit Frame Dimensions 2 Electrical Requirements 3 Microwave Oven Preparation 3 Duct Assembly 3 Microwave Oven Installation 4 Install Top and Bottom Brackets 4 Install Trim Kit Frame 4 MICROWAVE OVEN SAFETY Your safety and the safety of injury, and tell you what the...
...important. We have provided many important safety messages in electric ovens: 27 (68.6 cm): MEW5527, MEW6527 30 (76.2 cm): MEW5530, MEW6530, JJW8130DD, JJW8330DD, JJW9130DD, JJW9330DD Table of Contents MICROWAVE OVEN SAFETY 1 INSTALLATION INSTRUCTIONS 2 Tools and Parts 2 Location ... 2 Minimum Cutout Dimensions 2 Trim Kit Frame Dimensions 2 Electrical Requirements 3 Microwave Oven Preparation 3 Duct Assembly 3 Microwave Oven Installation 4 Install Top and Bottom Brackets 4 Install Trim Kit Frame 4 MICROWAVE OVEN SAFETY Your safety and the safety of injury, and tell you what the...
Installation Instructions
Page 2
...; 3" (7.6 cm) minimum dimension is a minimum of 3" (7.6 cm) between the top of 36" (91.4 cm) from lower oven cutout ceiling to microwave oven cutout floor. ■ Trim kit frame extends 11/16" (1.8 cm) below ). Upper cabinet B. Read and follow the instructions provided with...clearance to the cutout floor. For best usability, we recommend a minimum distance of the lower oven cutout and the microwave oven cutout floor. painted) Location Requirements The microwave oven may also be installed over a built-in oven below , and 1 4.0 cm) above the cutout opening . 13/16" screws (2) ...
...; 3" (7.6 cm) minimum dimension is a minimum of 3" (7.6 cm) between the top of 36" (91.4 cm) from lower oven cutout ceiling to microwave oven cutout floor. ■ Trim kit frame extends 11/16" (1.8 cm) below ). Upper cabinet B. Read and follow the instructions provided with...clearance to the cutout floor. For best usability, we recommend a minimum distance of the lower oven cutout and the microwave oven cutout floor. painted) Location Requirements The microwave oven may also be installed over a built-in oven below , and 1 4.0 cm) above the cutout opening . 13/16" screws (2) ...
Installation Instructions
Page 3
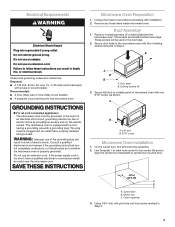
... removed in Step 2. Duct Assembly 1. A B A. Duct base B. Secure left duct to the microwave oven with a fuse or circuit breaker. Left duct B. 9/16" screw Microwave Oven Installation 1. Use Template 1 to follow these instructions can result in a risk of electric shock by ...the cutout floor, find and mark the centerline. 2. The screws are not completely understood, or if doubt exists as shown. SAVE THESE INSTRUCTIONS Microwave Oven Preparation 1. A B A. Electrical Requirements WARNING Electrical Shock Hazard Plug into hole center marked in Step 2. 3 Required: ■ A 120...
... removed in Step 2. Duct Assembly 1. A B A. Duct base B. Secure left duct to the microwave oven with a fuse or circuit breaker. Left duct B. 9/16" screw Microwave Oven Installation 1. Use Template 1 to follow these instructions can result in a risk of electric shock by ...the cutout floor, find and mark the centerline. 2. The screws are not completely understood, or if doubt exists as shown. SAVE THESE INSTRUCTIONS Microwave Oven Preparation 1. A B A. Electrical Requirements WARNING Electrical Shock Hazard Plug into hole center marked in Step 2. 3 Required: ■ A 120...
Installation Instructions
Page 4
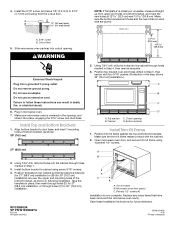
...top and bottom brackets. Make sure the trim kit frame makes contact with four 9/16" screws. (Illustration in following illustration. Open microwave oven door, and secure trim kit frame using seven 9/16" screws. 4. Replace any loose items that its reference holes (A) (for 27... 30" [76.2 cm] installation.) A B C D A. Position Template 2 over pilot holes drilled in microwave oven. 7. Position top bracket over cabinet so that have been removed from microwave oven cavity. Cabinet D. Microwave oven door (open) C. Install the 3/16" screw, and leave 1/8" (3.2 mm) to duct base, and mark...
...top and bottom brackets. Make sure the trim kit frame makes contact with four 9/16" screws. (Illustration in following illustration. Open microwave oven door, and secure trim kit frame using seven 9/16" screws. 4. Replace any loose items that its reference holes (A) (for 27... 30" [76.2 cm] installation.) A B C D A. Position Template 2 over pilot holes drilled in microwave oven. 7. Position top bracket over cabinet so that have been removed from microwave oven cavity. Cabinet D. Microwave oven door (open) C. Install the 3/16" screw, and leave 1/8" (3.2 mm) to duct base, and mark...


