
User Instructions
Page 1
...LA LAVEUSE 10 UTILISATION DE LA LAVEUSE 11 WASHER CARE 4 TROUBLESHOOTING 5 ENTRETIEN DE LA LAVEUSE 12 DI_PANNAGE 13 WARRANTY 8 GARANTIE 16 Para obtener acceso al manual de uso y cuidado en espaffol, o para obtener informaci6n www.maytag.com. Dealer name Serial number Address Phone ... at www.whirlpoolparts.ca. In Canada, call 1-800-901-2042, or visit us at www.maytag.com/accessories. Asss :a If you ever need to order; WASHER USER INSTRUCTIONS INSTRUCTIONS D'UTILISATION DE LA LAVEUSE Table of purchase or installation date for inwarranty service....
...LA LAVEUSE 10 UTILISATION DE LA LAVEUSE 11 WASHER CARE 4 TROUBLESHOOTING 5 ENTRETIEN DE LA LAVEUSE 12 DI_PANNAGE 13 WARRANTY 8 GARANTIE 16 Para obtener acceso al manual de uso y cuidado en espaffol, o para obtener informaci6n www.maytag.com. Dealer name Serial number Address Phone ... at www.whirlpoolparts.ca. In Canada, call 1-800-901-2042, or visit us at www.maytag.com/accessories. Asss :a If you ever need to order; WASHER USER INSTRUCTIONS INSTRUCTIONS D'UTILISATION DE LA LAVEUSE Table of purchase or installation date for inwarranty service....
User Instructions
Page 2
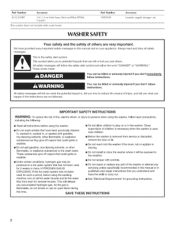
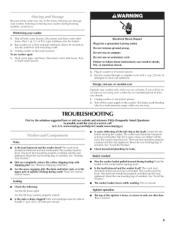
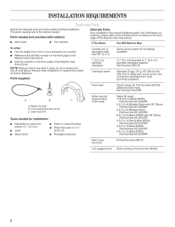
...instructions are very important. if the hot water system has not been used for 2 weeks or more. INSTRUCTIONS 2 Part Number 1903WH WASHER SAFETY Accessory Laundry supply storage cart Your safety and the safety of others . This symbol alerts you what can be produced in a... messages will be killed or seriously injured if you don't follow basic precautions, including the following: [] Read all instructions before using the washer. [] Do not wash articles that have been previously cleaned in, washed in, soaked in published user-repair instructions that could ignite or ...
...instructions are very important. if the hot water system has not been used for 2 weeks or more. INSTRUCTIONS 2 Part Number 1903WH WASHER SAFETY Accessory Laundry supply storage cart Your safety and the safety of others . This symbol alerts you what can be produced in a... messages will be killed or seriously injured if you don't follow basic precautions, including the following: [] Read all instructions before using the washer. [] Do not wash articles that have been previously cleaned in, washed in, soaked in published user-repair instructions that could ignite or ...
User Instructions
Page 3
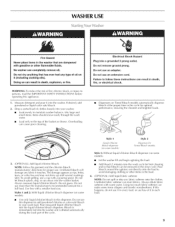
... of clothes loosely into your wash load. Drop a sorted load of oil on some models) Use only liquid chlorine bleach in the washer that are dampened with a pouring spout. Using too much fabric softener can cause poor cleaning. Always measure liquid chlorine bleach. Styles 1...models Style 3: Without liquid chlorine bleach dispenser (on Timed Bleach models automatically dispense bleach at the proper time in the rinse cycle. WASHER USE Fire Hazard Never place items in this dispenser. Style 1 Liquid chlorine bleach dispenser (on some models) Style 2 Dispenser for ...
... of clothes loosely into your wash load. Drop a sorted load of oil on some models) Use only liquid chlorine bleach in the washer that are dampened with a pouring spout. Using too much fabric softener can cause poor cleaning. Always measure liquid chlorine bleach. Styles 1...models Style 3: Without liquid chlorine bleach dispenser (on Timed Bleach models automatically dispense bleach at the proper time in the rinse cycle. WASHER USE Fire Hazard Never place items in this dispenser. Style 1 Liquid chlorine bleach dispenser (on some models) Style 2 Dispenser for ...
User Instructions
Page 4
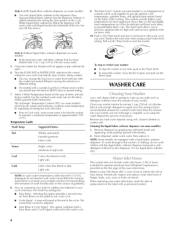
... Heavy soils Warm Cool Cold Bright colors Moderate to reduce the risk of hose failure. Selecting this process if necessary. WASHER CARE Use a soft, damp cloth or sponge to desired setting. 7° Select a Wash Temperature based on the ... to equal twice the manufacturer's recommended amount for separate purchase from the outside of the cycle. V%s_ .,, ° This washer does not include water inlet hoses. Diluteliquidfabricsoftenebryfillingthedispensweirth wmaarxfmiwll lainteeuarnrrtoilwiqsu.idreachtehseundersiodfetherim.See 9. Use the warmest wash water safe for : • ...
... Heavy soils Warm Cool Cold Bright colors Moderate to reduce the risk of hose failure. Selecting this process if necessary. WASHER CARE Use a soft, damp cloth or sponge to desired setting. 7° Select a Wash Temperature based on the ... to equal twice the manufacturer's recommended amount for separate purchase from the outside of the cycle. V%s_ .,, ° This washer does not include water inlet hoses. Diluteliquidfabricsoftenebryfillingthedispensweirth wmaarxfmiwll lainteeuarnrrtoilwiqsu.idreachtehseundersiodfetherim.See 9. Use the warmest wash water safe for : • ...
User Instructions
Page 5
... 2. Do not use , or vacation care Operate your washer only when you completely remove the yellow shipping strap with 1 cup (250 ml) of a service call In U.S.A. www.maytag.com/help In Canada www.maytag.ca Noisy Is the load balanced and the washer level? Reset the rear leveling legs (if needed ).... See "Starting Your Washer." • Did you are at home. Reset the rear leveling legs (if...
... 2. Do not use , or vacation care Operate your washer only when you completely remove the yellow shipping strap with 1 cup (250 ml) of a service call In U.S.A. www.maytag.com/help In Canada www.maytag.ca Noisy Is the load balanced and the washer level? Reset the rear leveling legs (if needed ).... See "Starting Your Washer." • Did you are at home. Reset the rear leveling legs (if...
User Instructions
Page 6
... household fuse blown, or has a circuit breaker tripped? Allow the cycle to the rinse portion of the hose must be trapped in the washer for proper installation of agitation andsoak. See "Connect Drain Hose" for proper operation. Always measure detergent. Wash/Rinse temperature not what I )o...temperature may not completely dissolve the detergent. Straighten the hoses. Replace the fuse or reset the circuit breaker. Is the lid open . Washer won 't run, fill, rinse or agitate; Residue or lint on load Did you follow the manufacturer's directions when adding detergent and ...
... household fuse blown, or has a circuit breaker tripped? Allow the cycle to the rinse portion of the hose must be trapped in the washer for proper installation of agitation andsoak. See "Connect Drain Hose" for proper operation. Always measure detergent. Wash/Rinse temperature not what I )o...temperature may not completely dissolve the detergent. Straighten the hoses. Replace the fuse or reset the circuit breaker. Is the lid open . Washer won 't run, fill, rinse or agitate; Residue or lint on load Did you follow the manufacturer's directions when adding detergent and ...
User Instructions
Page 7
...clothes and some modeis). • Did you have hard water? I.oads should move freely during washing. To reduce wrinkling of dye, unload the washer as soon as it stops. Sort dark clothes from pockets before washing. • Did you use enough detergent, or do you follow the manufacturer's... up bleach spills. Sort dark clothes from whites and lights. Make sure your hot water system is tangled or twisted Did you unload the washer promptly? See "Connect the Inlet Hoses." Do not place load items on some synthetic knits, use a large load size to provide more ...
...clothes and some modeis). • Did you have hard water? I.oads should move freely during washing. To reduce wrinkling of dye, unload the washer as soon as it stops. Sort dark clothes from pockets before washing. • Did you use enough detergent, or do you follow the manufacturer's... up bleach spills. Sort dark clothes from whites and lights. Make sure your hot water system is tangled or twisted Did you unload the washer promptly? See "Connect the Inlet Hoses." Do not place load items on some synthetic knits, use a large load size to provide more ...
Installation Instructions
Page 1
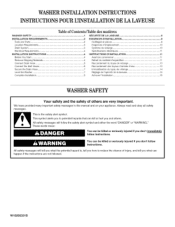
...in this manual and on your appliance. This symbol alerts you to reduce the chance of Contents/Table des matibres WASHER SAFETY 1 SECURITE DE LA LAVEUSE 9 iNSTALLATiON REQUIREMENTS Tools and Parts Location Requirements Drain System Electrical Requirements iNSTALLATiON iNSTRUCTiONS ...commencer 11 Remove Shipping Materials 4 Connect Drain Hose 6 Connect the Inlet Hoses 6 Secure the Drain Hose 7 Level the Washer 7 Complete Installation 8 Retrait du mat6riei d'expedition 11 Raccordement du tuyau de vidange 13 Raccordement des tuyau× d'arriv6e d'...
...in this manual and on your appliance. This symbol alerts you to reduce the chance of Contents/Table des matibres WASHER SAFETY 1 SECURITE DE LA LAVEUSE 9 iNSTALLATiON REQUIREMENTS Tools and Parts Location Requirements Drain System Electrical Requirements iNSTALLATiON iNSTRUCTiONS ...commencer 11 Remove Shipping Materials 4 Connect Drain Hose 6 Connect the Inlet Hoses 6 Secure the Drain Hose 7 Level the Washer 7 Complete Installation 8 Retrait du mat6riei d'expedition 11 Raccordement du tuyau de vidange 13 Raccordement des tuyau× d'arriv6e d'...
Installation Instructions
Page 2
... clogged drain Drain protector, Part Number 367031 2 Beaded tie strap B. Drain hose form Tools needed (not provided m Inlet hoses with washer}: m Flat washers To order: m Call the dealer from local plumbing suppliers) Siphon break kit, Part Number 280129; m Visit the website on the... (2.4 m) Sump pump system (if not already available) 1" (2.5 cm) diameter standpipe 11A" (3.2 cm) diameter to reduce the risk of the Washer User Instructions. NOTE: Replace inlet hoses after 5 years of use to 1" (2.5 cm) diameter standpipe adapter, Part Number 280130 Overhead sewer Floor drain...
... clogged drain Drain protector, Part Number 367031 2 Beaded tie strap B. Drain hose form Tools needed (not provided m Inlet hoses with washer}: m Flat washers To order: m Call the dealer from local plumbing suppliers) Siphon break kit, Part Number 280129; m Visit the website on the... (2.4 m) Sump pump system (if not already available) 1" (2.5 cm) diameter standpipe 11A" (3.2 cm) diameter to reduce the risk of the Washer User Instructions. NOTE: Replace inlet hoses after 5 years of use to 1" (2.5 cm) diameter standpipe adapter, Part Number 280130 Overhead sewer Floor drain...

Installation Instructions
Page 3
... allowed (A and B), except the closet door ventilation openings. See "Drain System." Front view B. Louvered doors with a maximum slope of the washer. Laundry tub drain system (view C) The laundry tub needs a minimum 20 gal. (76 L) capacity. The dimensions shown for the closet... Requirements." Proper installation is installed, the minimum air openings in temperatures at or below the top of the washer. Installing the washer on all sides of the washer. Recessed area or closet installation The dimensions shown are the minimum required. m A level floor with air openings...
... allowed (A and B), except the closet door ventilation openings. See "Drain System." Front view B. Louvered doors with a maximum slope of the washer. Laundry tub drain system (view C) The laundry tub needs a minimum 20 gal. (76 L) capacity. The dimensions shown for the closet... Requirements." Proper installation is installed, the minimum air openings in temperatures at or below the top of the washer. Installing the washer on all sides of the washer. Recessed area or closet installation The dimensions shown are the minimum required. m A level floor with air openings...
Installation Instructions
Page 4
... do so can result in a risk of the equipmentgrounding conductor can result in doubt as to move and install washer. GROUNDING INSTRUCTIONS For a grounded, cord=connected washer: This washer must be connected to the equipment-grounding terminal or lead on the rear of the customer to a gas pipe...accordance with the appliance -if it will reduce the risk of electrical shock by providing a path of its final location. 2= The washer must be provided. m This washer is equipped with all local codes and ordinances. m A 120 volt, 60 Hz., AC only, 15- m To minimize possible ...
... do so can result in a risk of the equipmentgrounding conductor can result in doubt as to move and install washer. GROUNDING INSTRUCTIONS For a grounded, cord=connected washer: This washer must be connected to the equipment-grounding terminal or lead on the rear of the customer to a gas pipe...accordance with the appliance -if it will reduce the risk of electrical shock by providing a path of its final location. 2= The washer must be provided. m This washer is equipped with all local codes and ordinances. m A 120 volt, 60 Hz., AC only, 15- m To minimize possible ...
Installation Instructions
Page 5
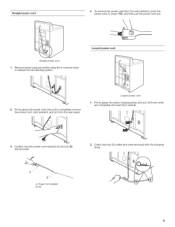
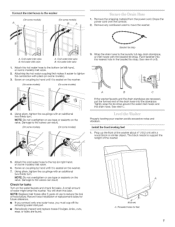
Looped power cord I 2. Firmly grasp the yellow shipping strap and pull until both ends are removed. A. Firmly grasp the power cord and pull to completely remove the power cord, cord restraint, and pin from machine base to release the rear beveling system. Check that the power cord restraint (A) and pin (B) are completely removed from washer. 3. Power cord restraint B. Pin Confirm that two (2) cotter pins were removed with the shipping strap. U 2. Remove power plug and yellow strap from the rear panel. Looped power cord 1. Straight power cord 1.
Looped power cord I 2. Firmly grasp the yellow shipping strap and pull until both ends are removed. A. Firmly grasp the power cord and pull to completely remove the power cord, cord restraint, and pin from machine base to release the rear beveling system. Check that the power cord restraint (A) and pin (B) are completely removed from washer. 3. Power cord restraint B. Pin Confirm that two (2) cotter pins were removed with the shipping strap. U 2. Remove power plug and yellow strap from the rear panel. Looped power cord 1. Straight power cord 1.
Installation Instructions
Page 6
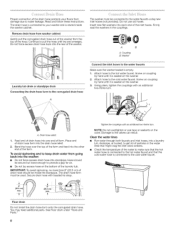
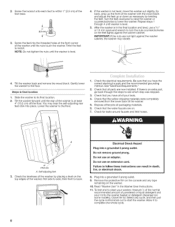
...onto the corrugated drain hose. The drain hose form must be used. Damage to the water faucets Make sure the washer basket is empty. 1. Read and follow these instructions. Washer Laundry tub drain or standpipe drain Connecting the drain hose form to the corrugated drain hose A Connect the inlet ... get rid of particles in the couplings. IMPORTANT: To avoid siphoning, no more than 8" (20.3 cm) of drain hose should be inside the washer cabinet. Secure drain hose with an additional two-thirds turn . Do not use tape or sealants on the bottom of the inlet hoses. Coupling B. ...
...onto the corrugated drain hose. The drain hose form must be used. Damage to the water faucets Make sure the washer basket is empty. 1. Read and follow these instructions. Washer Laundry tub drain or standpipe drain Connecting the drain hose form to the corrugated drain hose A Connect the inlet ... get rid of particles in the couplings. IMPORTANT: To avoid siphoning, no more than 8" (20.3 cm) of drain hose should be inside the washer cabinet. Secure drain hose with an additional two-thirds turn . Do not use tape or sealants on the bottom of the inlet hoses. Coupling B. ...
Installation Instructions
Page 7
... Attaching the hot water coupling first makes it is seated on some models) inlet valve. 6. Push fastener into the standpipe. Properly leveling your washer avoids excessive noise and vibration. NOTE: Replace inlet hoses after 5 years of use to support the weight of hose failure. The block needs ...tape or sealants on the valve. Damage to the valves can result. (On some models) (On some models) inlet valve. 2. A c If the washer faucets and the drain standpipe are found. 4I (10.2 cm) A. Tightly wrap the tie strap around the water inlet hoses and the drain hose. ...
... Attaching the hot water coupling first makes it is seated on some models) inlet valve. 6. Push fastener into the standpipe. Properly leveling your washer avoids excessive noise and vibration. NOTE: Replace inlet hoses after 5 years of use to support the weight of hose failure. The block needs ...tape or sealants on the valve. Damage to the valves can result. (On some models) (On some models) inlet valve. 2. A c If the washer faucets and the drain standpipe are found. 4I (10.2 cm) A. Tightly wrap the tie strap around the water inlet hoses and the drain hose. ...
Installation Instructions
Page 8
...any cycle, and then pull the cycle control knob out to start the washer. Read "Washer Use" in death, fire, or electrical shock. 8. Allow it into the washer basket or detergent dispenser (on the washer. 10. Lower the washer to install. Check for leaks around faucets and inlet hoses. Do not ... (2.5 crn) 3= Screw the feet into a grounded 3 prong outlet. 9. NOTE: Do not tighten the nuts until the rear of the washer is at the front corner of the washer until washer is level. 4. Plug into the threaded holes at least 4" (10.2 cm) off the floor. Twist the feet to the floor. ...
...any cycle, and then pull the cycle control knob out to start the washer. Read "Washer Use" in death, fire, or electrical shock. 8. Allow it into the washer basket or detergent dispenser (on the washer. 10. Lower the washer to install. Check for leaks around faucets and inlet hoses. Do not ... (2.5 crn) 3= Screw the feet into a grounded 3 prong outlet. 9. NOTE: Do not tighten the nuts until the rear of the washer is at the front corner of the washer until washer is level. 4. Plug into the threaded holes at least 4" (10.2 cm) off the floor. Twist the feet to the floor. ...


