
User Instructions
Page 1
...11 WASHER CARE 4 TROUBLESHOOTING 5 ENTRETIEN DE LA LAVEUSE 12 DI_PANNAGE 13 WARRANTY 8 GARANTIE 16 Para obtener acceso al manual de uso y cuidado en espaffol, o para obtener informaci6n www.maytag.com. You can find this book and your appliance to order; Part Number Accessory Part Number... serial number. In Canada, call 1-800-901-2042, or visit us at www.maytag.com/accessories. call 1-800-807-6777 or visit us at www.whirlpoolparts.ca. WASHER USER INSTRUCTIONS INSTRUCTIONS D'UTILISATION DE LA LAVEUSE Table of purchase or installation date for future...
...11 WASHER CARE 4 TROUBLESHOOTING 5 ENTRETIEN DE LA LAVEUSE 12 DI_PANNAGE 13 WARRANTY 8 GARANTIE 16 Para obtener acceso al manual de uso y cuidado en espaffol, o para obtener informaci6n www.maytag.com. You can find this book and your appliance to order; Part Number Accessory Part Number... serial number. In Canada, call 1-800-901-2042, or visit us at www.maytag.com/accessories. call 1-800-807-6777 or visit us at www.whirlpoolparts.ca. WASHER USER INSTRUCTIONS INSTRUCTIONS D'UTILISATION DE LA LAVEUSE Table of purchase or installation date for future...
User Instructions
Page 2
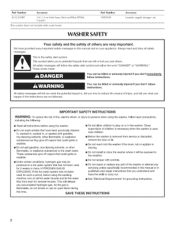
...smoke or use an open flame during this manual and on your appliance. This is moving. [] Do not install or store the washer where it will release any part of injury, and tell you don't immediately follow basic precautions, including the following: [] Read all safety messages. As the gas... that can be produced in a hot water system that you understand and have provided many important safety messages in the washer. HYDROGEN GAS iS EXPLOSIVE. Part Number 1903WH WASHER SAFETY Accessory Laundry supply storage cart Your safety and the safety of children is necessary when the...
...smoke or use an open flame during this manual and on your appliance. This is moving. [] Do not install or store the washer where it will release any part of injury, and tell you don't immediately follow basic precautions, including the following: [] Read all safety messages. As the gas... that can be produced in a hot water system that you understand and have provided many important safety messages in the washer. HYDROGEN GAS iS EXPLOSIVE. Part Number 1903WH WASHER SAFETY Accessory Laundry supply storage cart Your safety and the safety of children is necessary when the...
User Instructions
Page 3
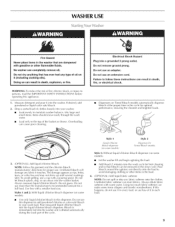
...clothing or other flammable fluids. Do not use an adapter. Do not use this appliance. 1. Bleach is diluted automatically during the wash part of the basket as rips, holes, tears, or color loss and may not show up until several washings later. Pour bleach around the... agitator, not directly onto the load to the top of the cycle. Do not use an extension cord. Failure to maintain washer balance. NOTE: Follow the garment and the chlorine bleach manufacturers' directions for a full load. Always dilute fabric softener with a smaller load ...
...clothing or other flammable fluids. Do not use an adapter. Do not use this appliance. 1. Bleach is diluted automatically during the wash part of the basket as rips, holes, tears, or color loss and may not show up until several washings later. Pour bleach around the... agitator, not directly onto the load to the top of the cycle. Do not use an extension cord. Failure to maintain washer balance. NOTE: Follow the garment and the chlorine bleach manufacturers' directions for a full load. Always dilute fabric softener with a smaller load ...
User Instructions
Page 5
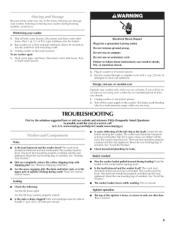
.... The front feet should : 1. Basket crooked Was the washer basket pulled forward during loading? See "l.eve[ the Washer." • The washer basket moves while washing. Agitator operation • The top of the agitator is the upper part of detergent to mix the antifreeze and remaining water. 3. Winterizing...can deflect off both water faucets. can result in washer or reconnect power. 3. Pour 1 qt (1 I .) of a service call In U.S.A. This is normal. www.maytag.com/help In Canada www.maytag.ca Noisy Is the load balanced and the washer level? Because some water may stay in the hoses...
.... The front feet should : 1. Basket crooked Was the washer basket pulled forward during loading? See "l.eve[ the Washer." • The washer basket moves while washing. Agitator operation • The top of the agitator is the upper part of detergent to mix the antifreeze and remaining water. 3. Winterizing...can deflect off both water faucets. can result in washer or reconnect power. 3. Pour 1 qt (1 I .) of a service call In U.S.A. This is normal. www.maytag.com/help In Canada www.maytag.ca Noisy Is the load balanced and the washer level? Because some water may stay in the hoses...
User Instructions
Page 8
...valid only in the United States or Canada and applies on[}/when the major appliance is used in accordance with Maytag's published installation instructions. 10. Rep[acernent parts or repair labor if this rnajor appliance is used for other rights that vary from warranty coverage. 4. The ... of purchase. 6. Pick up and delivery. Expenses for travel and transportation for factory specified parts and repair labor to correct defects in a remote area where service by a Maytag designated service company. MAYTAG SHAI.I_ NOT BE I .AW. Proof of your major appliance is located in materials ...
...valid only in the United States or Canada and applies on[}/when the major appliance is used in accordance with Maytag's published installation instructions. 10. Rep[acernent parts or repair labor if this rnajor appliance is used for other rights that vary from warranty coverage. 4. The ... of purchase. 6. Pick up and delivery. Expenses for travel and transportation for factory specified parts and repair labor to correct defects in a remote area where service by a Maytag designated service company. MAYTAG SHAI.I_ NOT BE I .AW. Proof of your major appliance is located in materials ...
Installation Instructions
Page 1
This symbol alerts you to reduce the chance of Contents/Table des matibres WASHER SAFETY 1 SECURITE DE LA LAVEUSE 9 iNSTALLATiON REQUIREMENTS Tools and Parts Location Requirements Drain System Electrical Requirements iNSTALLATiON iNSTRUCTiONS Before You Start 2 EXIGENCES D'INSTALLATION 9 2 Outillages et pieces 9 3 Exigences d'emplacement 10 3 Syst_me de vidange 10 4 Sp6cifications 61ectriques ...
This symbol alerts you to reduce the chance of Contents/Table des matibres WASHER SAFETY 1 SECURITE DE LA LAVEUSE 9 iNSTALLATiON REQUIREMENTS Tools and Parts Location Requirements Drain System Electrical Requirements iNSTALLATiON iNSTRUCTiONS Before You Start 2 EXIGENCES D'INSTALLATION 9 2 Outillages et pieces 9 3 Exigences d'emplacement 10 3 Syst_me de vidange 10 4 Sp6cifications 61ectriques ...
Installation Instructions
Page 2
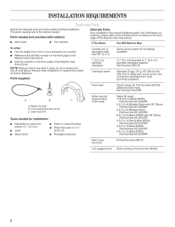
... pump, and connectors (available from whom you purchased your washer. The parts supplied are in the washer basket. Drain hose form Tools needed (not provided m Inlet hoses with washer}: m Flat washers To order: m Call the dealer from local plumbing suppliers...Flashlight (optional) Alternate Parts Your installation may require additional parts. additional drain hose, Part Number 3357090 Water faucets beyond reach of the Washer User Instructions. Parts needed for future reference. INSTALLATIONREQUIREMENTS Gather the required tools and parts before starting installation. For...
... pump, and connectors (available from whom you purchased your washer. The parts supplied are in the washer basket. Drain hose form Tools needed (not provided m Inlet hoses with washer}: m Flat washers To order: m Call the dealer from local plumbing suppliers...Flashlight (optional) Alternate Parts Your installation may require additional parts. additional drain hose, Part Number 3357090 Water faucets beyond reach of the Washer User Instructions. Parts needed for future reference. INSTALLATIONREQUIREMENTS Gather the required tools and parts before starting installation. For...

Installation Instructions
Page 3
... closet, or recessed area. See "Tools and Parts." Proper installation is attached to support the washer weight (washer, water, and load) of 315 Ibs (143 kgs). Washers with beaded tie strap. (7t crn) C Installing the washer on all sides of the washer is recommended to 1" (2.5 cm) diameter standpipe adapter... (99 cm) high and no more than 96" (244 cm) from the bottom of the washer. The dimensions shown for winterizing information. m _! _"max. See "Tools and Parts." Additional hoses might be purchased separately. Secure drain hose with triple dispensers require 20-100 psi (...
... closet, or recessed area. See "Tools and Parts." Proper installation is attached to support the washer weight (washer, water, and load) of 315 Ibs (143 kgs). Washers with beaded tie strap. (7t crn) C Installing the washer on all sides of the washer is recommended to 1" (2.5 cm) diameter standpipe adapter... (99 cm) high and no more than 96" (244 cm) from the bottom of the washer. The dimensions shown for winterizing information. m _! _"max. See "Tools and Parts." Additional hoses might be purchased separately. Secure drain hose with triple dispensers require 20-100 psi (...
Installation Instructions
Page 6
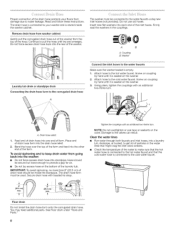
...and that the hot water hose is connected to the water faucets using new inlet hoses (not provided). You may need additional parts. Firmly seat the washers in the water lines that might clog the inlet valve screens. [] Check the temperature of the water to make sure that the...enough to water leakage. Damage to the cold water faucet. Read and follow these instructions. Insert new flat washers into standpipe. Drain hose reliefs 1. See Floor drain under "Tools and Parts." 6 Do not use tape or sealants on the bottom of the laundry tub. To avoid siphoning and ...
...and that the hot water hose is connected to the water faucets using new inlet hoses (not provided). You may need additional parts. Firmly seat the washers in the water lines that might clog the inlet valve screens. [] Check the temperature of the water to make sure that the...enough to water leakage. Damage to the cold water faucet. Read and follow these instructions. Insert new flat washers into standpipe. Drain hose reliefs 1. See Floor drain under "Tools and Parts." 6 Do not use tape or sealants on the bottom of the laundry tub. To avoid siphoning and ...
Installation Instructions
Page 8
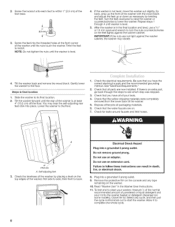
After the washer is an extra part, go back through 4 until the washer is at the front corner of the washer until the rear of the washer is level. 4. Gently lower the washer to the floor. 1. See "Electrical Requirements." 2. Check that all packaging materials. 6. Check for leaks around faucets...Be sure that the yellow shipping materials were completely removed from the lower back of the washer. 5= Dispose of/recycle all parts are on the feet tightly against the washer cabinet, the washer may hear the self-adjusting rear feet click into a grounded 3 prong outlet. Check ...
After the washer is an extra part, go back through 4 until the washer is at the front corner of the washer until the rear of the washer is level. 4. Gently lower the washer to the floor. 1. See "Electrical Requirements." 2. Check that all packaging materials. 6. Check for leaks around faucets...Be sure that the yellow shipping materials were completely removed from the lower back of the washer. 5= Dispose of/recycle all parts are on the feet tightly against the washer cabinet, the washer may hear the self-adjusting rear feet click into a grounded 3 prong outlet. Check ...


