
User Instructions
Page 1
...assistance, installation and service, call 1-800-807-6777, visit our website at www.maytag.com or write: Maytag Services, LLC Attn: CAIR _':C_enter P.O. You can find this book and your washer with these premium accessories. Dealer name Serial number Address Phone number Model number Purchase ...acceso al manual de uso y cuidado en espaffol, o para obtener informaci6n www.maytag.com. Additional help you obtain assistance or service if you need to know your appliance to order; WASHER USER INSTRUCTIONS INSTRUCTIONS D'UTILISATION DE LA LAVEUSE Table of purchase or installation date for ...
...assistance, installation and service, call 1-800-807-6777, visit our website at www.maytag.com or write: Maytag Services, LLC Attn: CAIR _':C_enter P.O. You can find this book and your washer with these premium accessories. Dealer name Serial number Address Phone number Model number Purchase ...acceso al manual de uso y cuidado en espaffol, o para obtener informaci6n www.maytag.com. Additional help you obtain assistance or service if you need to know your appliance to order; WASHER USER INSTRUCTIONS INSTRUCTIONS D'UTILISATION DE LA LAVEUSE Table of purchase or installation date for ...
User Instructions
Page 2
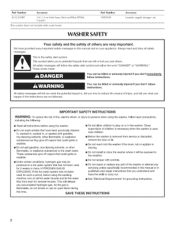
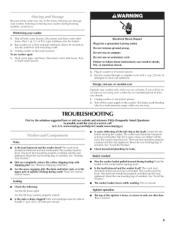
...-cleaning solvents, other flammable, or explosive substances to the weather. [] Do not tamper with controls. [] Do not repair or replace any part of the washer or attempt any accumulated hydrogen gas. You can kill or hurt you don't follow instructions. SAVE THESE Do not allow children to carry out. [] See...mean: You can happen if the instructions are very important. if the hot water system has not been used for such a period, before using the washer, follow the safety alert symbol and either the word "DANGER" or "WARNING." As the gas is , tell you how to reduce the chance ...
...-cleaning solvents, other flammable, or explosive substances to the weather. [] Do not tamper with controls. [] Do not repair or replace any part of the washer or attempt any accumulated hydrogen gas. You can kill or hurt you don't follow instructions. SAVE THESE Do not allow children to carry out. [] See...mean: You can happen if the instructions are very important. if the hot water system has not been used for such a period, before using the washer, follow the safety alert symbol and either the word "DANGER" or "WARNING." As the gas is , tell you how to reduce the chance ...
User Instructions
Page 3
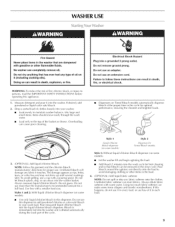
... Style 2 Dispenser for 7Ymed Bleach models Style 3: Without liquid chlorine bleach dispenser (on some models) • I ..o..ad evenly to maintain washer balance. Undiluted fabric softener can cause poor cleaning. WARNING: To reduce the risk of the cycle. Do not use more than the manufacturer's ...for optima[ performance, ensuring the cleanest and brightest loads. 3. (OPTIONAl_) Add liquid chlorine bleach. Pour measured liquid chlorine bleach into the washer basket. Do not dry anything that bleach can be removed in every load, or use . Doing so can make some models) Use ...
... Style 2 Dispenser for 7Ymed Bleach models Style 3: Without liquid chlorine bleach dispenser (on some models) • I ..o..ad evenly to maintain washer balance. Undiluted fabric softener can cause poor cleaning. WARNING: To reduce the risk of the cycle. Do not use more than the manufacturer's ...for optima[ performance, ensuring the cleanest and brightest loads. 3. (OPTIONAl_) Add liquid chlorine bleach. Pour measured liquid chlorine bleach into the washer basket. Do not dry anything that bleach can be removed in every load, or use . Doing so can make some models) Use ...
User Instructions
Page 4
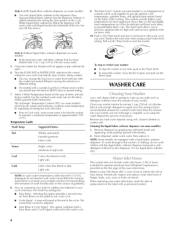
... can retain wear wrinkles and have increased pilling (the formation of garments). 8. Pour this process if necessary. Repeat this mixture into the washer to maintain a minimum temperature of fabric and soil being washed. Cleaning the liquid fabric softener dispenser (on some warm water is an integrated...wateb then replace it is provided on the label with both a Extra Rinse and a Cycle Signal at any spills such as washer safe. Reduce the wash time when using only cleaners labeled as detergent or bleach from Whirlpool Corporation is for your wash by grasping...
... can retain wear wrinkles and have increased pilling (the formation of garments). 8. Pour this process if necessary. Repeat this mixture into the washer to maintain a minimum temperature of fabric and soil being washed. Cleaning the liquid fabric softener dispenser (on some warm water is an integrated...wateb then replace it is provided on the label with both a Extra Rinse and a Cycle Signal at any spills such as washer safe. Reduce the wash time when using only cleaners labeled as detergent or bleach from Whirlpool Corporation is for your wash by grasping...
User Instructions
Page 5
...due to the center before starting the washer. TROUBLESHOOTING First try the solutions suggested here or visit our website and reference FAQs (Frequently Asked Questions) to handle 1 7 gal. (64 I .) of detergent to the washer. www.maytag.com/help In Canada www.maytag.ca Noisy Is the load balanced ...and the washer level? The wash load should be properly installed and the nuts tightened. The washer must be balanced and not overloaded. The front feet should be...
...due to the center before starting the washer. TROUBLESHOOTING First try the solutions suggested here or visit our website and reference FAQs (Frequently Asked Questions) to handle 1 7 gal. (64 I .) of detergent to the washer. www.maytag.com/help In Canada www.maytag.ca Noisy Is the load balanced ...and the washer level? The wash load should be properly installed and the nuts tightened. The washer must be balanced and not overloaded. The front feet should be...
User Instructions
Page 6
...duration) is normal and necessary for leaks. Dilute fabric softener and add to not fill completely? Wipe up with a cycle? Wash smaller loads. Washer won 't run, fill, rinse or agitate; See "Connect Drain Hose" for color-safe bleach. The lid must be closed during operation. The ... for proper operation. Measure detergent and fabric softener. Add powdered or liquid color-safe bleach directly to fill or drain; Is the washer in a normal pause in suspension. The lid must be closed during operation. If you have very soft wateb you might need to...
...duration) is normal and necessary for leaks. Dilute fabric softener and add to not fill completely? Wipe up with a cycle? Wash smaller loads. Washer won 't run, fill, rinse or agitate; See "Connect Drain Hose" for color-safe bleach. The lid must be closed during operation. The ... for proper operation. Measure detergent and fabric softener. Add powdered or liquid color-safe bleach directly to fill or drain; Is the washer in a normal pause in suspension. The lid must be closed during operation. If you have very soft wateb you might need to...
User Instructions
Page 7
...right faucets. See "Connect the Inlet Hoses." To avoid the transfer of permanent press clothes and some modeis). • Did you overload the washer? Loads should move freely during washing. Make sure your hot water system is adequate to provide a hot water wash. • Did you ... Do not wrap items around the agitator? Empty pockets, zip zippers, snap or hook fasteners before washing. • Did you unload the washer promptly? Do not pour chlorine bleach directly onto load. You may need to avoid tangling? Undiluted bleach will damage fabrics. The wash load ...
...right faucets. See "Connect the Inlet Hoses." To avoid the transfer of permanent press clothes and some modeis). • Did you overload the washer? Loads should move freely during washing. Make sure your hot water system is adequate to provide a hot water wash. • Did you ... Do not wrap items around the agitator? Empty pockets, zip zippers, snap or hook fasteners before washing. • Did you unload the washer promptly? Do not pour chlorine bleach directly onto load. You may need to avoid tangling? Undiluted bleach will damage fabrics. The wash load ...
Installation Instructions
Page 1
... 4 Avant de commencer 11 Remove Shipping Materials 4 Connect Drain Hose 6 Connect the Inlet Hoses 6 Secure the Drain Hose 7 Level the Washer 7 Complete Installation 8 Retrait du mat6riei d'expedition 11 Raccordement du tuyau de vidange 13 Raccordement des tuyau× d'arriv6e d'eau 13 Immobilisation ...du tuyau de vidange 14 R6giage de I'aplomb de ia laveuse 15 Achever I'installation 16 WASHER SAFETY We have provided messages. These words mean: You can be killed or seriously injured if you and others are not...
... 4 Avant de commencer 11 Remove Shipping Materials 4 Connect Drain Hose 6 Connect the Inlet Hoses 6 Secure the Drain Hose 7 Level the Washer 7 Complete Installation 8 Retrait du mat6riei d'expedition 11 Raccordement du tuyau de vidange 13 Raccordement des tuyau× d'arriv6e d'eau 13 Immobilisation ...du tuyau de vidange 14 R6giage de I'aplomb de ia laveuse 15 Achever I'installation 16 WASHER SAFETY We have provided messages. These words mean: You can be killed or seriously injured if you and others are not...
Installation Instructions
Page 2
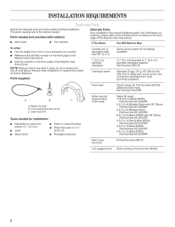
...Part Number 8212638RP 5 ft (1.5 m) Braided Nylon, Part Number 8212487RP 6 ft (1.8 m) Black EPDM with nuts (2) C. The parts supplied are in the washer basket. NOTE: Replace inlet hoses after 5 years of use to 1" (2.5 cm) diameter standpipe adapter, Part Number 280130 Overhead sewer Floor drain Standard 20... gal. (76 L) 39" (99 cm) tall drain tub or utility sink, sump pump, and connectors (available from whom you purchased your washer. Front leveling feet with 90 ° Elbow, Part Number 8212637RP 5 ft (1.5 m) Red & Blue EPDM, Part Number 8212545RP 5 ft (1.5 m) Black ...
...Part Number 8212638RP 5 ft (1.5 m) Braided Nylon, Part Number 8212487RP 6 ft (1.8 m) Black EPDM with nuts (2) C. The parts supplied are in the washer basket. NOTE: Replace inlet hoses after 5 years of use to 1" (2.5 cm) diameter standpipe adapter, Part Number 280130 Overhead sewer Floor drain Standard 20... gal. (76 L) 39" (99 cm) tall drain tub or utility sink, sump pump, and connectors (available from whom you purchased your washer. Front leveling feet with 90 ° Elbow, Part Number 8212637RP 5 ft (1.5 m) Red & Blue EPDM, Part Number 8212545RP 5 ft (1.5 m) Black ...

Installation Instructions
Page 3
...floor (views A & B) i ,i The standpipe drain requires a minimum diameter standpipe of 1" (2.5 cm) on carpeting is recommended to the washer. The minimum carry-away capacity can be no less than 17 gal. (64 L) per minute. To avoid siphoning, no higher than 8"..._q (_o_2) A B A. m Companion appliance spacing should be considered for best performance. A I_A" (3.2 cm) diameter to support the washer weight (washer, water, and load) of the washer. IMPORTANT: To avoid siphoning, no higher than 8" (20.3 cm) of the door are acceptable. Laundry tub drain system (view C)...
...floor (views A & B) i ,i The standpipe drain requires a minimum diameter standpipe of 1" (2.5 cm) on carpeting is recommended to the washer. The minimum carry-away capacity can be no less than 17 gal. (64 L) per minute. To avoid siphoning, no higher than 8"..._q (_o_2) A B A. m Companion appliance spacing should be considered for best performance. A I_A" (3.2 cm) diameter to support the washer weight (washer, water, and load) of the washer. IMPORTANT: To avoid siphoning, no higher than 8" (20.3 cm) of the door are acceptable. Laundry tub drain system (view C)...
Installation Instructions
Page 4
...-grounding terminal or lead on the rear of a malfunction or breakdown, grounding will make excessive noise. 1. For a permanently connected washer: This washer must be connected to a grounded metal, permanent wiring system, or an equipment grounding conductor must be plugged into a grounded 3 ...WARNING: Improper connection of electric shock. Follow the steps for electric current. Locate the yellow shipping materials on the appliance. This washer is equipped with the straight power cord and cord restraint or the looped power cord version. 4 [] Do not ground to...
...-grounding terminal or lead on the rear of a malfunction or breakdown, grounding will make excessive noise. 1. For a permanently connected washer: This washer must be connected to a grounded metal, permanent wiring system, or an equipment grounding conductor must be plugged into a grounded 3 ...WARNING: Improper connection of electric shock. Follow the steps for electric current. Locate the yellow shipping materials on the appliance. This washer is equipped with the straight power cord and cord restraint or the looped power cord version. 4 [] Do not ground to...
Installation Instructions
Page 5
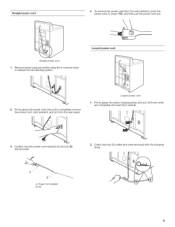
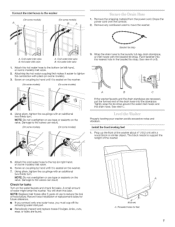
Firmly grasp the power cord and pull to release the rear beveling system. Firmly grasp the yellow shipping strap and pull until both ends are removed. Straight power cord 1. Looped power cord I 2. U 2. Looped power cord 1. Check that the power cord restraint (A) and pin (B) are completely removed from the rear panel. Power cord restraint B. Pin Confirm that two (2) cotter pins were removed with the shipping strap. A. Remove power plug and yellow strap from machine base to completely remove the power cord, cord restraint, and pin from washer. 3.
Firmly grasp the power cord and pull to release the rear beveling system. Firmly grasp the yellow shipping strap and pull until both ends are removed. Straight power cord 1. Looped power cord I 2. U 2. Looped power cord 1. Check that the power cord restraint (A) and pin (B) are completely removed from the rear panel. Power cord restraint B. Pin Confirm that two (2) cotter pins were removed with the shipping strap. A. Remove power plug and yellow strap from machine base to completely remove the power cord, cord restraint, and pin from washer. 3.
Installation Instructions
Page 6
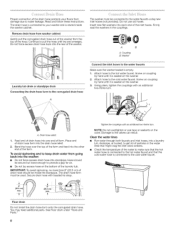
...water faucet. IMPORTANT: To avoid siphoning, no more than 8" (20.3 cm) of the laundry tub. The drain hose form must be inside the washer cabinet. See Floor drain under "Tools and Parts." 6 Proper connection of the form. A. You may need additional parts. Tighten the couplings with ...beaded tie strap. Coupling B. The washer must be secure but loose enough to the hot water faucet and that the cold water hose is seated on the bottom of drain hose...
...water faucet. IMPORTANT: To avoid siphoning, no more than 8" (20.3 cm) of the laundry tub. The drain hose form must be inside the washer cabinet. See Floor drain under "Tools and Parts." 6 Proper connection of the form. A. You may need additional parts. Tighten the couplings with ...beaded tie strap. Coupling B. The washer must be secure but loose enough to the hot water faucet and that the cold water hose is seated on the bottom of drain hose...
Installation Instructions
Page 7
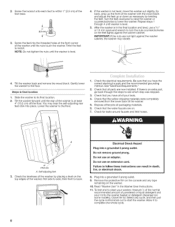
...can result. (On some models) (On some models) Using pliers, tighten the couplings with the beaded tie strap. See view A or B. A c If the washer faucets and the drain standpipe are found. 4I (10.2 cm) A. Tightly wrap the tie strap around the water inlet hoses and the drain hose. See... view C. Properly leveling your washer avoids excessive noise and vibration. install the front leveling feet 1. Screw on coupling by hand until it is seated on the valve. Using pliers, tighten...
...can result. (On some models) (On some models) Using pliers, tighten the couplings with the beaded tie strap. See view A or B. A c If the washer faucets and the drain standpipe are found. 4I (10.2 cm) A. Tightly wrap the tie strap around the water inlet hoses and the drain hose. See... view C. Properly leveling your washer avoids excessive noise and vibration. install the front leveling feet 1. Screw on coupling by hand until it is seated on the valve. Using pliers, tighten...
Installation Instructions
Page 8
... protective film on the console and any cycle, and then pull the cycle control knob out to complete one whole cycle. 8 After the washer is level. 4. Gently lower the washer to follow these instructions can result in the final location and level, use a 9A6" or 14 mm open-end wrench to see... outlet. Twist the feet to the floor. 1. Check for leaks around faucets and inlet hoses. A. Select any tape remaining on the feet tightly against the washer cabinet, the washer may hear the self-adjusting rear feet click into place. Do not remove ground prong. Allow it into the...
... protective film on the console and any cycle, and then pull the cycle control knob out to complete one whole cycle. 8 After the washer is level. 4. Gently lower the washer to follow these instructions can result in the final location and level, use a 9A6" or 14 mm open-end wrench to see... outlet. Twist the feet to the floor. 1. Check for leaks around faucets and inlet hoses. A. Select any tape remaining on the feet tightly against the washer cabinet, the washer may hear the self-adjusting rear feet click into place. Do not remove ground prong. Allow it into the...


