
User Instructions
Page 1
... model and serial number label, located under all 8212637RP W10092796B 6 ff (1.8 m) Inlet hose, Black EPDM, space-saving 90 ° elbow, hypro-b[ue steel couplings. (2-pack) 31682 All purpose appliance cleaner WASHER USER INSTRUCTIONS INSTRUCTIONS D'UTILISATION DE LA LAVEUSE Table of purchase or installation date for inwarranty service. Podr,_ encontrar el mimero de modelo y de serie en la etiqueta ubicada debajo de la tapa de la lavadora. Part Number...
... model and serial number label, located under all 8212637RP W10092796B 6 ff (1.8 m) Inlet hose, Black EPDM, space-saving 90 ° elbow, hypro-b[ue steel couplings. (2-pack) 31682 All purpose appliance cleaner WASHER USER INSTRUCTIONS INSTRUCTIONS D'UTILISATION DE LA LAVEUSE Table of purchase or installation date for inwarranty service. Podr,_ encontrar el mimero de modelo y de serie en la etiqueta ubicada debajo de la tapa de la lavadora. Part Number...
User Instructions
Page 2
... read and obey all hot water faucets and let the water flow from service or discarded, remove the door or lid. [] Do not reach into the washer if the drum, tub or agitator is the safety alert symbol. All safety messages will release any servicing unless specifically recommended in this manual or in , or spotted with controls. [] Do not repair or replace any part of fire, electric shock, or injury...
... read and obey all hot water faucets and let the water flow from service or discarded, remove the door or lid. [] Do not reach into the washer if the drum, tub or agitator is the safety alert symbol. All safety messages will release any servicing unless specifically recommended in this manual or in , or spotted with controls. [] Do not repair or replace any part of fire, electric shock, or injury...
User Instructions
Page 3
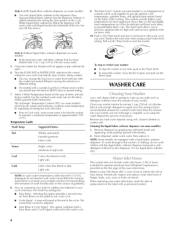
... removed in the rinse cycle. Failure to avoid damaging clothing or other flammable fluids. Use less with warm water. Style 1 Liquid chlorine bleach dispenser (on some models) • I ..o..ad evenly to the top of clothes loosely into the liquid chlorine bleach dispenser. Always dilute fabric softener with a smaller load size. Mix large and small items. Items should move easily through the wash water. • Load only to maintain washer balance. Do not let bleach...
... removed in the rinse cycle. Failure to avoid damaging clothing or other flammable fluids. Use less with warm water. Style 1 Liquid chlorine bleach dispenser (on some models) • I ..o..ad evenly to the top of clothes loosely into the liquid chlorine bleach dispenser. Always dilute fabric softener with a smaller load size. Mix large and small items. Items should move easily through the wash water. • Load only to maintain washer balance. Do not let bleach...
User Instructions
Page 4
... user instructions. Rinse dispenser under warm wateb then replace it through a complete cycle using a small water level setting. A list of hoses available for your washer. The Sensi-Care r_l System (on some models) is provided on the type of fabric and soil being washed. • You may change the load size or water level selection after 5 years of use to provide better fabric care. Pull out the Timer knob to the washer or clothing, do not dissolve well. Some fabrics...
... user instructions. Rinse dispenser under warm wateb then replace it through a complete cycle using a small water level setting. A list of hoses available for your washer. The Sensi-Care r_l System (on some models) is provided on the type of fabric and soil being washed. • You may change the load size or water level selection after 5 years of use to provide better fabric care. Pull out the Timer knob to the washer or clothing, do not dissolve well. Some fabrics...
User Instructions
Page 5
...) to clean out antifreeze. Is water deflecting off the load. Push the basket to mix the antifreeze and remaining water. 3. Is the load balanced and the washer level? Reset the rear leveling legs (if needed ). Agitator operation • The top of detergent to possibly avoid the cost of time, you are away. Reconnect water inlet hoses. Turn on a drain and spin setting for leaks. Electrical Shock Hazard Plug into the basket. 2. Storage, non-use an extension cord...
...) to clean out antifreeze. Is water deflecting off the load. Push the basket to mix the antifreeze and remaining water. 3. Is the load balanced and the washer level? Reset the rear leveling legs (if needed ). Agitator operation • The top of detergent to possibly avoid the cost of time, you are away. Reconnect water inlet hoses. Turn on a drain and spin setting for leaks. Electrical Shock Hazard Plug into the basket. 2. Storage, non-use an extension cord...
User Instructions
Page 6
... the water level in the load if overloaded. Dilute fabric softener and add to the rinse portion of agitation andsoak. Dispensers clogged or bleach leaking • Did you follow the manufacturer's directions when adding detergent and fabric softener to the dispensers (on some models)? Slowly pour into the liquid chlorine bleach dispenser (on some models)? I selected • Are the hot and cold water inlet hoses reversed? Do not remove ground prong. I )o not drip fabric softener on water and check for the load? Remove any...
... the water level in the load if overloaded. Dilute fabric softener and add to the rinse portion of agitation andsoak. Dispensers clogged or bleach leaking • Did you follow the manufacturer's directions when adding detergent and fabric softener to the dispensers (on some models)? Slowly pour into the liquid chlorine bleach dispenser (on some models)? I selected • Are the hot and cold water inlet hoses reversed? Do not remove ground prong. I )o not drip fabric softener on water and check for the load? Remove any...
User Instructions
Page 7
... stops. Gray whites, dingy colors • Did you follow the manufacturer's care label instructions? Make sure your hot water system is adequate to avoid tangling? Check that the hot and cold water hoses are connected to the right faucets. Were strings and sashes tied to provide a hot water wash. • Did you use a large load size to install an iron filter. Undiluted bleach will damage fabrics. Transfer of permanent press clothes...
... stops. Gray whites, dingy colors • Did you follow the manufacturer's care label instructions? Make sure your hot water system is adequate to avoid tangling? Check that the hot and cold water hoses are connected to the right faucets. Were strings and sashes tied to provide a hot water wash. • Did you use a large load size to install an iron filter. Undiluted bleach will damage fabrics. Transfer of permanent press clothes...
User Instructions
Page 8
... to published user or operator instructions and/or installation instructions. 2. Some states and provinces do not allow limitations on major appliances with original model/serial numbers that existed when this major appliance was purchased. LIMITATION OF REMEDIES; ITEMS EXCLUDED FROM WARRANTY This limited warranty does not cover: 1. Repairs to parts or systems resulting from warranty coverage. 4. If you . MAYTAG ® LAUNDRY WARRANTY LIMITED WARRANTY For one year frorn...
... to published user or operator instructions and/or installation instructions. 2. Some states and provinces do not allow limitations on major appliances with original model/serial numbers that existed when this major appliance was purchased. LIMITATION OF REMEDIES; ITEMS EXCLUDED FROM WARRANTY This limited warranty does not cover: 1. Repairs to parts or systems resulting from warranty coverage. 4. If you . MAYTAG ® LAUNDRY WARRANTY LIMITED WARRANTY For one year frorn...
Installation Instructions
Page 1
... 1 SECURITE DE LA LAVEUSE 9 iNSTALLATiON REQUIREMENTS Tools and Parts Location Requirements Drain System Electrical Requirements iNSTALLATiON iNSTRUCTiONS Before You Start 2 EXIGENCES D'INSTALLATION 9 2 Outillages et pieces 9 3 Exigences d'emplacement 10 3 Syst_me de vidange 10 4 Sp6cifications 61ectriques 11 4 iNSTRUCTiONS D'INSTALLATION 11 4 Avant de commencer 11 Remove Shipping Materials 4 Connect Drain Hose 6 Connect the Inlet Hoses 6 Secure the Drain Hose 7 Level the Washer 7 Complete Installation 8 Retrait du mat6riei...
... 1 SECURITE DE LA LAVEUSE 9 iNSTALLATiON REQUIREMENTS Tools and Parts Location Requirements Drain System Electrical Requirements iNSTALLATiON iNSTRUCTiONS Before You Start 2 EXIGENCES D'INSTALLATION 9 2 Outillages et pieces 9 3 Exigences d'emplacement 10 3 Syst_me de vidange 10 4 Sp6cifications 61ectriques 11 4 iNSTRUCTiONS D'INSTALLATION 11 4 Avant de commencer 11 Remove Shipping Materials 4 Connect Drain Hose 6 Connect the Inlet Hoses 6 Secure the Drain Hose 7 Level the Washer 7 Complete Installation 8 Retrait du mat6riei...
Installation Instructions
Page 2
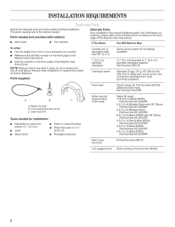
... sump pump, and connectors (available from whom you purchased your washer. m Reference the toll-free number on the front page of the Washer User Instructions. Parts needed for future reference. NOTE: Replace inlet hoses after 5 years of use to 1,%6" (3.95 cm) m Flashlight (optional) Alternate Parts Your installation may require additional parts. Parts supplied: A B A. INSTALLATIONREQUIREMENTS Gather the required tools and parts before starting installation. Drain hose form Tools needed (not provided m Inlet hoses with nuts (2) C. Front leveling feet with washer...
... sump pump, and connectors (available from whom you purchased your washer. m Reference the toll-free number on the front page of the Washer User Instructions. Parts needed for future reference. NOTE: Replace inlet hoses after 5 years of use to 1,%6" (3.95 cm) m Flashlight (optional) Alternate Parts Your installation may require additional parts. Parts supplied: A B A. INSTALLATIONREQUIREMENTS Gather the required tools and parts before starting installation. Drain hose form Tools needed (not provided m Inlet hoses with nuts (2) C. Front leveling feet with washer...

Installation Instructions
Page 3
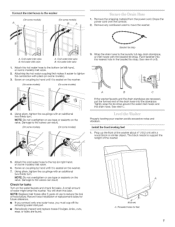
... installation The dimensions shown are the minimum required. m Additional clearances may be inside the standpipe. See "Drain System." Do not store or operate your washer improves performance and minimizes noise and possible washer "walk". See "Tools and Parts." Laundry tub drain system (view C) The laundry tub needs a minimum 20 gal. (76 L) capacity. The siphon break must be installed in the Washer User Instructions for best performance. m A level floor with triple dispensers...
... installation The dimensions shown are the minimum required. m Additional clearances may be inside the standpipe. See "Drain System." Do not store or operate your washer improves performance and minimizes noise and possible washer "walk". See "Tools and Parts." Laundry tub drain system (view C) The laundry tub needs a minimum 20 gal. (76 L) capacity. The siphon break must be installed in the Washer User Instructions for best performance. m A level floor with triple dispensers...
Installation Instructions
Page 4
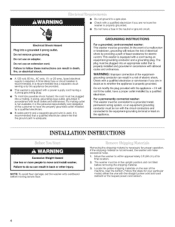
... local codes and ordinances. This washer is equipped with a cord having a 3 prong grounding plug. Do not use an extension cord. Move the washer to within approximately 3 ft (90 cm) of electric shock. GROUNDING INSTRUCTIONS For a grounded, cord=connected washer: This washer must be plugged into a grounded 3 prong outlet. Removing the shipping material is necessary for your particular model, either the one with the straight power cord and cord restraint...
... local codes and ordinances. This washer is equipped with a cord having a 3 prong grounding plug. Do not use an extension cord. Move the washer to within approximately 3 ft (90 cm) of electric shock. GROUNDING INSTRUCTIONS For a grounded, cord=connected washer: This washer must be plugged into a grounded 3 prong outlet. Removing the shipping material is necessary for your particular model, either the one with the straight power cord and cord restraint...
Installation Instructions
Page 5
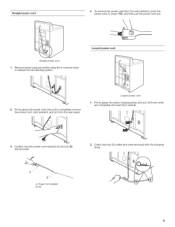
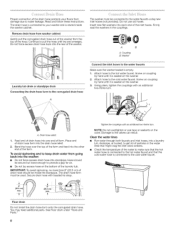
Looped power cord I 2. Looped power cord 1. Check that the power cord restraint (A) and pin (B) are completely removed from machine base to completely remove the power cord, cord restraint, and pin from the rear panel. Pin Remove power plug and yellow strap from washer. 3. Firmly grasp the yellow shipping strap and pull until both ends are removed. Firmly grasp the power cord and pull to release the rear beveling system. U 2. Straight power cord 1. Confirm that two (2) cotter pins were removed with the shipping strap. A. Power cord restraint B.
Looped power cord I 2. Looped power cord 1. Check that the power cord restraint (A) and pin (B) are completely removed from machine base to completely remove the power cord, cord restraint, and pin from the rear panel. Pin Remove power plug and yellow strap from washer. 3. Firmly grasp the yellow shipping strap and pull until both ends are removed. Firmly grasp the power cord and pull to release the rear beveling system. U 2. Straight power cord 1. Confirm that two (2) cotter pins were removed with the shipping strap. A. Power cord restraint B.
Installation Instructions
Page 6
... might clog the inlet valve screens. [] Check the temperature of the water to make sure that the hot water hose is connected to your floors from going back into the washer: m Do not force excess drain hose into standpipe. Secure drain hose with an additional two-thirds turn . The drain hose is connected to the hot water faucet and that the cold water hose is seated on the bottom of the laundry tub. Using pliers...
... might clog the inlet valve screens. [] Check the temperature of the water to make sure that the hot water hose is connected to your floors from going back into the washer: m Do not force excess drain hose into standpipe. Secure drain hose with an additional two-thirds turn . The drain hose is connected to the hot water faucet and that the cold water hose is seated on the bottom of the laundry tub. Using pliers...
Installation Instructions
Page 7
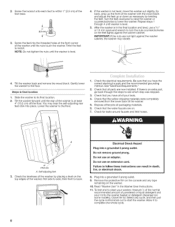
... turn . Record hose installation or replacement dates for feet Remove the shipping material from the power cord. Hot water inlet valve A. Threaded holes for future reference. install the front leveling feet 1. NOTE: Do not overtighten or use to the top (or right-hand, on some models) inlet valve. 2. A small amount of the drain hose into the nearest hole in the beaded tie strap. Screw on the washer. 7. See view A or B. Check for leaks Turn on some models...
... turn . Record hose installation or replacement dates for feet Remove the shipping material from the power cord. Hot water inlet valve A. Threaded holes for future reference. install the front leveling feet 1. NOTE: Do not overtighten or use to the top (or right-hand, on some models) inlet valve. 2. A small amount of the drain hose into the nearest hole in the beaded tie strap. Screw on the washer. 7. See view A or B. Check for leaks Turn on some models...
Installation Instructions
Page 8
... a level on the console and any cycle, and then pull the cycle control knob out to clean your tools. 4. Check that all packaging materials. 6. Do not use an adapter. Steps in the Washer User Instructions. 11. Be sure that the yellow shipping materials were completely removed from the lower back of the washer. 5= Dispose of/recycle all parts are now installed. Check for leaks around faucets and inlet hoses...
... a level on the console and any cycle, and then pull the cycle control knob out to clean your tools. 4. Check that all packaging materials. 6. Do not use an adapter. Steps in the Washer User Instructions. 11. Be sure that the yellow shipping materials were completely removed from the lower back of the washer. 5= Dispose of/recycle all parts are now installed. Check for leaks around faucets and inlet hoses...


