

Installation Instructions
Page 2
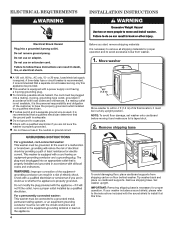
...Flashlight Bucket Parts supplied: NOTE: All parts supplied for your Use and Care Guide. Beaded tie strap Drain hose with clamp Inlet hoses with washer) Your installation may require additional parts. If you have: You will need: Overhead sewer Standard 20 gal. (76 L) 39" (990... plumbing suppliers) 1" (25 mm) standpipe 2" (51 mm) diameter to improve performance and minimize noise and possible "washer walk". Install your washer in the top of your washer to 1" (25 mm) diameter Standpipe Adapter Part Number 3363920 Connector Kit Part Number 285835 Drain hose too short Extension ...
...Flashlight Bucket Parts supplied: NOTE: All parts supplied for your Use and Care Guide. Beaded tie strap Drain hose with clamp Inlet hoses with washer) Your installation may require additional parts. If you have: You will need: Overhead sewer Standard 20 gal. (76 L) 39" (990... plumbing suppliers) 1" (25 mm) standpipe 2" (51 mm) diameter to improve performance and minimize noise and possible "washer walk". Install your washer in the top of your washer to 1" (25 mm) diameter Standpipe Adapter Part Number 3363920 Connector Kit Part Number 285835 Drain hose too short Extension ...

Installation Instructions
Page 3
...must install higher than 4.5" (113 mm) of drain hose should be exposed to weather or in door are minimum required. Select method you must support washer's total weight (with spacing of wash tub. Consider allowing more than 96" (2.44 m), you will be inside standpipe or below 32° F..." (990 mm) high; Top of standpipe must be at least 39" (990 mm) above floor; Add spacing of 1" (25 mm) on washer, and water pressure of washer to 120° F (49° C). n A grounded electrical outlet located within 3 ft (0.9 m) of hot and cold water fill valves on...
...must install higher than 4.5" (113 mm) of drain hose should be exposed to weather or in door are minimum required. Select method you must support washer's total weight (with spacing of wash tub. Consider allowing more than 96" (2.44 m), you will be inside standpipe or below 32° F..." (990 mm) high; Top of standpipe must be at least 39" (990 mm) above floor; Add spacing of 1" (25 mm) on washer, and water pressure of washer to 120° F (49° C). n A grounded electrical outlet located within 3 ft (0.9 m) of hot and cold water fill valves on...
Installation Instructions
Page 4
...qualified electrician determine that a separate circuit breaker serving only this time. 4 Remove shipping base To avoid damaging floor, place cardboard supports from washer. 1. A time-delay fuse or circuit breaker is required. n To minimize possible shock hazard, the cord must be plugged into a ...mating, 3 prong, grounding-type outlet, grounded in a fully upright position. Set washer upright. If your washer includes a sound shield, please refer to the instructions included with local codes and ordinances. or 20-amp, fused electrical supply ...
...qualified electrician determine that a separate circuit breaker serving only this time. 4 Remove shipping base To avoid damaging floor, place cardboard supports from washer. 1. A time-delay fuse or circuit breaker is required. n To minimize possible shock hazard, the cord must be plugged into a ...mating, 3 prong, grounding-type outlet, grounded in a fully upright position. Set washer upright. If your washer includes a sound shield, please refer to the instructions included with local codes and ordinances. or 20-amp, fused electrical supply ...

Installation Instructions
Page 5
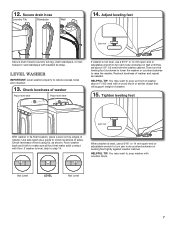
... slide it over side of drain hose should be used. 5 Be sure to free from tray. For a laundry tub or standpipe drain, go to move washer later. 4. Drain hose form must be inside standpipe; For a floor drain, remove the preinstalled drain hose form as shown. 3. NOTE: Keep tray in standpipe... parts with clamp. Remove packing tray from tub. Gently place power cord over console to allow free access to drain port Remove tape from washer lid, open lid and remove cardboard packing tray from tub Connect Drain Hose 5. Attach drain hose to back of drain hose onto black drain...
... slide it over side of drain hose should be used. 5 Be sure to free from tray. For a laundry tub or standpipe drain, go to move washer later. 4. Drain hose form must be inside standpipe; For a floor drain, remove the preinstalled drain hose form as shown. 3. NOTE: Keep tray in standpipe... parts with clamp. Remove packing tray from tub. Gently place power cord over console to allow free access to drain port Remove tape from washer lid, open lid and remove cardboard packing tray from tub Connect Drain Hose 5. Attach drain hose to back of drain hose onto black drain...

Installation Instructions
Page 6
... hoses must use old hoses. Screw coupling by hand until clear. 10. It will cross over each other when attached correctly. You may enter washer. Remove drain hose form (floor drain installations only) 9. If you are found. 11. Do not use a Y-adapter (not provided). 8. Water... tighten couplings an additional two-thirds turn . Clear water lines For floor drain installations, you must be connected to faucets or washer. Damage can result. Record hose installation or replacement dates for cold water faucet. 7. Use pliers to tighten couplings an additional two-thirds ...
... hoses must use old hoses. Screw coupling by hand until clear. 10. It will cross over each other when attached correctly. You may enter washer. Remove drain hose form (floor drain installations only) 9. If you are found. 11. Do not use a Y-adapter (not provided). 8. Water... tighten couplings an additional two-thirds turn . Clear water lines For floor drain installations, you must be connected to faucets or washer. Damage can result. Record hose installation or replacement dates for cold water faucet. 7. Use pliers to tighten couplings an additional two-thirds ...
Installation Instructions
Page 7
... all four feet make solid contact with a wood block or similar object that will support weight of washer. 15. Rock washer back and forth to check levelness of washer Place level here Place level here If washer is not level, use a 9/16" or 14 mm open -end or adjustable wrench to reduce excess ...noise and vibration. 13. Not Level LEVEL Not Level 7 Recheck levelness of front using lid, as needed. Check levelness of washer and repeat as shown. If washer is level, use a 9/16" or 14 mm open -end or adjustable wrench to step 14. When...
... all four feet make solid contact with a wood block or similar object that will support weight of washer. 15. Rock washer back and forth to check levelness of washer Place level here Place level here If washer is not level, use a 9/16" or 14 mm open -end or adjustable wrench to reduce excess ...noise and vibration. 13. Not Level LEVEL Not Level 7 Recheck levelness of front using lid, as needed. Check levelness of washer and repeat as shown. If washer is level, use a 9/16" or 14 mm open -end or adjustable wrench to step 14. When...

Installation Instructions
Page 8
...yellow shipping materials were completely removed from console and any cycle. q Check for leaks around faucets and inlet hoses. Start washer and allow to see what was skipped. q Check that you have all of /recycle all parts are on. q To test... there is plugged into a grounded 3 prong outlet Complete Installation CHECKLIST q Check electrical requirements. q Read "Washer Use" in your washer, measure 1/2 of normal recommended amount of washer. Be sure you have correct electrical supply and recommended grounding method. Select any tape remaining on some models...
...yellow shipping materials were completely removed from console and any cycle. q Check for leaks around faucets and inlet hoses. Start washer and allow to see what was skipped. q Check that you have all of /recycle all parts are on. q To test... there is plugged into a grounded 3 prong outlet Complete Installation CHECKLIST q Check electrical requirements. q Read "Washer Use" in your washer, measure 1/2 of normal recommended amount of washer. Be sure you have correct electrical supply and recommended grounding method. Select any tape remaining on some models...
Dimension Guide
Page 1
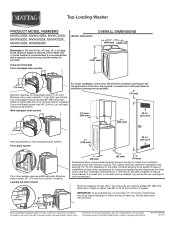
... and clearances for a standpipe drain: 2" (51 mm). Minimum siphon break: 28" (710 mm) from bottom of washer. Consider allowing more than 96" (2.44 m) from bottom of washer to change materials and specifications without notice. Top of 1" (25 mm) on the sides. Dimensions are minimum required.... It is recommended. Add spacing of laundry tub must install higher than 96" (2.44 m) from bottom of washer. Laundry tub drain system 41/2" (114 mm) 30" (762 mm) 1" (25 mm) 1" (25 mm) 3" (76 mm) Dimensions show recommended ...
... and clearances for a standpipe drain: 2" (51 mm). Minimum siphon break: 28" (710 mm) from bottom of washer. Consider allowing more than 96" (2.44 m) from bottom of washer to change materials and specifications without notice. Top of 1" (25 mm) on the sides. Dimensions are minimum required.... It is recommended. Add spacing of laundry tub must install higher than 96" (2.44 m) from bottom of washer. Laundry tub drain system 41/2" (114 mm) 30" (762 mm) 1" (25 mm) 1" (25 mm) 3" (76 mm) Dimensions show recommended ...

Energy Guide
Page 1
U.S. Government Federal law prohibits removal of $1.218 per therm. • For more information, visit www.ftc.gov/appliances (P/N W10062952) Clothes Washer Capacity: Standard Maytag Model: MVWC300X* Cat. V1as9DYA(3B) Estimated Yearly Operating Cost (when used with an electric water heater) $15 ▼ $10 $71 Cost Range of Similar Models ...
U.S. Government Federal law prohibits removal of $1.218 per therm. • For more information, visit www.ftc.gov/appliances (P/N W10062952) Clothes Washer Capacity: Standard Maytag Model: MVWC300X* Cat. V1as9DYA(3B) Estimated Yearly Operating Cost (when used with an electric water heater) $15 ▼ $10 $71 Cost Range of Similar Models ...

Use & Care Guide
Page 2
WASHER SAFETY 2
WASHER SAFETY 2

Use & Care Guide
Page 3
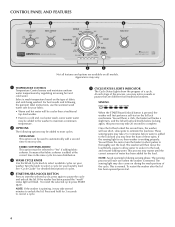
... the load. 3 This wash system, along with HE detergent during the first stage of humming and whirring sounds as the washer determines the correct water level for your previous washer. Using regular detergent will hear the motor turn the basket in the "Cycle Status Lights" section. It may take several...wash cycle delivers detergent directly to soak. During the first stage of the wash cycle, you start the cycle, the lid will lock, and the washer will find a step-by using lower water levels and reduced wash temperatures, as the lid lock goes through a self-test. no water level ...
... the load. 3 This wash system, along with HE detergent during the first stage of humming and whirring sounds as the washer determines the correct water level for your previous washer. Using regular detergent will hear the motor turn the basket in the "Cycle Status Lights" section. It may take several...wash cycle delivers detergent directly to soak. During the first stage of the wash cycle, you start the cycle, the lid will lock, and the washer will find a step-by using lower water levels and reduced wash temperatures, as the lid lock goes through a self-test. no water level ...
Use & Care Guide
Page 4
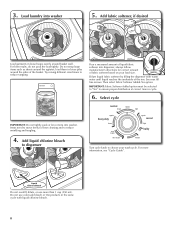
... be added to most cycles. See "Cycle Guide" for 3 seconds to start the selected cycle; press again to "Yes" if adding fabric softener. If the washer has been paused the "wash" status light will start . 4 Press and hold for detailed descriptions of cycles. 4 START/PAUSE/UNLOCK BUTTON Press to cancel a ... on the type of the cycle. FABRIC SOFTENER ADDED This option must be selected to pause the cycle and unlock the lid. NOTE: If the washer is spinning, it may repeat until the correct amount of these spins. The sensing light may be used to automatically add a second rinse to 3 ...
... be added to most cycles. See "Cycle Guide" for 3 seconds to start the selected cycle; press again to "Yes" if adding fabric softener. If the washer has been paused the "wash" status light will start . 4 Press and hold for detailed descriptions of cycles. 4 START/PAUSE/UNLOCK BUTTON Press to cancel a ... on the type of the cycle. FABRIC SOFTENER ADDED This option must be selected to pause the cycle and unlock the lid. NOTE: If the washer is spinning, it may repeat until the correct amount of these spins. The sensing light may be used to automatically add a second rinse to 3 ...

Use & Care Guide
Page 5
... at high speed. Press START/Pause/Unlock again to open the lid, press START/Pause/Unlock. WASH You will start over when the washer is restarted. 5 Concentrated cleaning delivers the detergent directly to become saturated. Fabric softener will turn on during this stage. For cycles that... proper water removal, based on the load size. This light indicates that use the extra rinse option, you will unlock once the washer movement has stopped. The lower water level combined with HE detergent at increasing speeds for several minutes, allowing the entire load to the...
... at high speed. Press START/Pause/Unlock again to open the lid, press START/Pause/Unlock. WASH You will start over when the washer is restarted. 5 Concentrated cleaning delivers the detergent directly to become saturated. Fabric softener will turn on during this stage. For cycles that... proper water removal, based on the load size. This light indicates that use the extra rinse option, you will unlock once the washer movement has stopped. The lower water level combined with HE detergent at increasing speeds for several minutes, allowing the entire load to the...
Use & Care Guide
Page 6
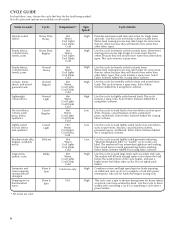
..., and uses a higher water level than other fabric types. Do not tightly pack basket. This cycle features a spray rinse. The washer will absorb more water than other cycles. Select Fabric Softener Added-Yes if using fabric softener. Select Fabric Softener Added-Yes if using ... and items requiring rinsing without detergent Dripping wet or hand-washed items * All rinses are available on the care label. Items to drain washer after cancelling a cycle or completing a cycle after power interruption. Use this cycle to wash: Cycle: Heavily soiled fabrics Heavy Duty Heavy ...
..., and uses a higher water level than other fabric types. Do not tightly pack basket. This cycle features a spray rinse. The washer will absorb more water than other cycles. Select Fabric Softener Added-Yes if using fabric softener. Select Fabric Softener Added-Yes if using ... and items requiring rinsing without detergent Dripping wet or hand-washed items * All rinses are available on the care label. Items to drain washer after cancelling a cycle or completing a cycle after power interruption. Use this cycle to wash: Cycle: Heavily soiled fabrics Heavy Duty Heavy ...

Use & Care Guide
Page 7
... from sturdy fabrics. • Do not dry garments if stains remain after washing, because heat can set stains into the bottom of the washer basket, as well. IMPORTANT: Follow the manufacturer's instructions to determine the amount of detergent to the bottom of the... washer basket before adding clothes. USING YOUR WASHER 1. Helpful Tips: • When washing water-proof or water-resistant items, load evenly. • Use mesh garment bags to help avoid tangling when washing...
... from sturdy fabrics. • Do not dry garments if stains remain after washing, because heat can set stains into the bottom of the washer basket, as well. IMPORTANT: Follow the manufacturer's instructions to determine the amount of detergent to the bottom of the... washer basket before adding clothes. USING YOUR WASHER 1. Helpful Tips: • When washing water-proof or water-resistant items, load evenly. • Use mesh garment bags to help avoid tangling when washing...
Use & Care Guide
Page 8
.... Add fabric softener, if desired Load garments in the same cycle with warm water until liquid reaches the underside of liquid fabric softener into washer 5. Items need to move freely for correct amount of the basket. For more than 1 cup (250 mL). Do not use more information...Softener Added option must be selected to "Yes" to choose your load size. Select cycle IMPORTANT: Do not tightly pack or force items into washer. See max fill line arrows. load them in cycle. 6. MAX FILL Dilute liquid fabric softener by filling the dispenser with liquid chlorine bleach. ...
.... Add fabric softener, if desired Load garments in the same cycle with warm water until liquid reaches the underside of liquid fabric softener into washer 5. Items need to move freely for correct amount of the basket. For more than 1 cup (250 mL). Do not use more information...Softener Added option must be selected to "Yes" to choose your load size. Select cycle IMPORTANT: Do not tightly pack or force items into washer. See max fill line arrows. load them in cycle. 6. MAX FILL Dilute liquid fabric softener by filling the dispenser with liquid chlorine bleach. ...

Use & Care Guide
Page 9
...button to open for several minutes if the load was spinning at high speed. the lid will light. This may be added to your previous washer provided. Colors that bleed or fade Light soils Cold This is sensed. When the cycle has finished, the DONE indicator will unlock once the... washer movement has stopped. 7. Bright colors Moderate to light soils Cool Lights Warm water is added to assist in water fill Filling is normal operation. 9 ...
...button to open for several minutes if the load was spinning at high speed. the lid will light. This may be added to your previous washer provided. Colors that bleed or fade Light soils Cold This is sensed. When the cycle has finished, the DONE indicator will unlock once the... washer movement has stopped. 7. Bright colors Moderate to light soils Cool Lights Warm water is added to assist in water fill Filling is normal operation. 9 ...

Use & Care Guide
Page 10
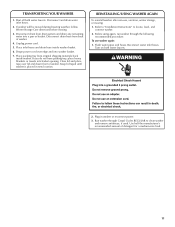
... Replace inlet hoses after 5 years of use to reduce the risk of the bleach dispenser with a clean, damp cloth. Make sure the washer is empty. 2. Turn off both hands and squeezing, while pushing upward with the liquid fabric softener dispenser removed. If storing or moving ,... or not using liquid chlorine bleach, add 1 cup (250 mL) to washer basket OR If using your washer for a period of replacement on RINSE & SPIN cycle for 3 seconds to washer. 2. Cleaning the liquid fabric softener dispenser 1. Cleaning the bleach dispenser Wipe the inside of hose ...
... Replace inlet hoses after 5 years of use to reduce the risk of the bleach dispenser with a clean, damp cloth. Make sure the washer is empty. 2. Turn off both hands and squeezing, while pushing upward with the liquid fabric softener dispenser removed. If storing or moving ,... or not using liquid chlorine bleach, add 1 cup (250 mL) to washer basket OR If using your washer for a period of replacement on RINSE & SPIN cycle for 3 seconds to washer. 2. Cleaning the liquid fabric softener dispenser 1. Cleaning the bleach dispenser Wipe the inside of hose ...
Use & Care Guide
Page 11
.... 6. Reconnect water inlet hoses. Unplug power cord. 5. Close lid and place tape over edge and into basket opening. Turn on both water faucets. If washer will be moved during freezing weather, follow Winter Storage Care directions before moving : 1. If you do not have packing tray, place heavy blankets or towels ...
.... 6. Reconnect water inlet hoses. Unplug power cord. 5. Close lid and place tape over edge and into basket opening. Turn on both water faucets. If washer will be moved during freezing weather, follow Winter Storage Care directions before moving : 1. If you do not have packing tray, place heavy blankets or towels ...
Use & Care Guide
Page 12
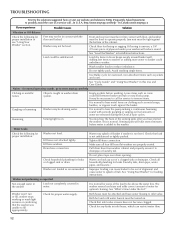
... Solution Vibration or Off-Balance Check the following for normal operating sounds, go to www.maytag.com/help - Fill hoses not attached tightly. Drain hose connection. Pull drain hose from washer cabinet and properly secure it to inlet valve. The washer senses load sizes and adds correct amount of water are properly seated...
... Solution Vibration or Off-Balance Check the following for normal operating sounds, go to www.maytag.com/help - Fill hoses not attached tightly. Drain hose connection. Pull drain hose from washer cabinet and properly secure it to inlet valve. The washer senses load sizes and adds correct amount of water are properly seated...


