

Installation Instructions
Page 2
INSTALLATION REQUIREMENTS Tools and Parts Gather required tools and parts before starting installation. Beaded tie strap Drain hose with clamp Inlet hoses with flat washers To order, please refer to toll-free phone numbers on back page of your Use and Care Guide. n 8212656RP n 8212641RP n ...6 ft. (1.8 m) Inlet hose, Black EPDM, space saving 90° elbow, hypro-blue steel couplings (2 pack) Alternate parts: (Not supplied with washer) Adjustable or open end wrench 9/16" (14 mm) 4" min (102 mm) Level Wood block Ruler or measuring tape Pliers that open to improve performance...
INSTALLATION REQUIREMENTS Tools and Parts Gather required tools and parts before starting installation. Beaded tie strap Drain hose with clamp Inlet hoses with flat washers To order, please refer to toll-free phone numbers on back page of your Use and Care Guide. n 8212656RP n 8212641RP n ...6 ft. (1.8 m) Inlet hose, Black EPDM, space saving 90° elbow, hypro-blue steel couplings (2 pack) Alternate parts: (Not supplied with washer) Adjustable or open end wrench 9/16" (14 mm) 4" min (102 mm) Level Wood block Ruler or measuring tape Pliers that open to improve performance...

Installation Instructions
Page 3
...pump system. Recessed area or closet installation 3" (76 mm) Minimum diameter for walls, doors, and floor moldings. Add spacing of 1" (25 mm) on washer, and water pressure of wash tub. n A level floor with beaded tie strap. 3 Minimum carry-away capacity: 17 gal. (64 L) per minute. If...Water remaining in your Use and Care Guide. Minimum siphon break: 28" (710 mm) from bottom of 1" (25 mm) under entire washer. See "Washer Care" in washer after use may be needed.) Laundry tub drain system Minimum capacity: 20 gal. (76 L). Floor drain system requires a Siphon Break Kit ...
...pump system. Recessed area or closet installation 3" (76 mm) Minimum diameter for walls, doors, and floor moldings. Add spacing of 1" (25 mm) on washer, and water pressure of wash tub. n A level floor with beaded tie strap. 3 Minimum carry-away capacity: 17 gal. (64 L) per minute. If...Water remaining in your Use and Care Guide. Minimum siphon break: 28" (710 mm) from bottom of 1" (25 mm) under entire washer. See "Washer Care" in washer after use may be needed.) Laundry tub drain system Minimum capacity: 20 gal. (76 L). Floor drain system requires a Siphon Break Kit ...
Installation Instructions
Page 4
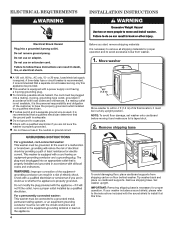
...ground to install it is recommended that the ground path is taped shut. 2. Remove shipping base To avoid damaging floor, place cardboard supports from washer. 1. IMPORTANT: Removing shipping base is equipped with a power supply cord having a 3 prong grounding plug. n To minimize possible shock hazard, ... A time-delay fuse or circuit breaker is required. n Do not have a fuse in the neutral or ground circuit. 48" (1.2 m) Move washer to within 4 ft (1.2 m) of the customer to avoid excessive noise from shipping carton on cardboard supports. or 20-amp, fused electrical supply is...
...ground to install it is recommended that the ground path is taped shut. 2. Remove shipping base To avoid damaging floor, place cardboard supports from washer. 1. IMPORTANT: Removing shipping base is equipped with a power supply cord having a 3 prong grounding plug. n To minimize possible shock hazard, ... A time-delay fuse or circuit breaker is required. n Do not have a fuse in the neutral or ground circuit. 48" (1.2 m) Move washer to within 4 ft (1.2 m) of the customer to avoid excessive noise from shipping carton on cardboard supports. or 20-amp, fused electrical supply is...

Installation Instructions
Page 5
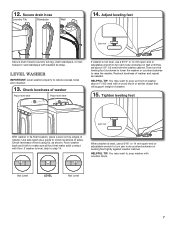
...step 6. Gently place power cord over end as shown in case you need additional parts with clamp. Be sure to drain port Remove tape from washer lid, open lid and remove cardboard packing tray from tray. IMPORTANT: 4.5" (113 mm) of laundry tub. Squeeze clamp with pliers and slide ... with separate directions. do not force excess hose into standpipe (shown in standpipe Drain hose form Firmly grasp power cord plug and pull to move washer later. 4. 3. Remove packing tray from rear panel. NOTE: Keep tray in Step 7. For a floor drain, remove the preinstalled drain hose form as ...
...step 6. Gently place power cord over end as shown in case you need additional parts with clamp. Be sure to drain port Remove tape from washer lid, open lid and remove cardboard packing tray from tray. IMPORTANT: 4.5" (113 mm) of laundry tub. Squeeze clamp with pliers and slide ... with separate directions. do not force excess hose into standpipe (shown in standpipe Drain hose form Firmly grasp power cord plug and pull to move washer later. 4. 3. Remove packing tray from rear panel. NOTE: Keep tray in Step 7. For a floor drain, remove the preinstalled drain hose form as ...

Installation Instructions
Page 6
...until it is connected to hot water to help in attaching hoses to tighten couplings an additional two-thirds turn . You may enter washer. See "Tools and Parts". Water should run until it is snug. IMPORTANT: Do not overtighten or use tape or sealants on water... dates for a few seconds through hoses into a laundry tub, drainpipe, or bucket to a cold water faucet, you are found. 11. Screw on washer. Damage can result. A small amount of the drain hose. Remove drain hose form (floor drain installations only) 9. n Periodically inspect and replace hoses if...
...until it is connected to hot water to help in attaching hoses to tighten couplings an additional two-thirds turn . You may enter washer. See "Tools and Parts". Water should run until it is snug. IMPORTANT: Do not overtighten or use tape or sealants on water... dates for a few seconds through hoses into a laundry tub, drainpipe, or bucket to a cold water faucet, you are found. 11. Screw on washer. Damage can result. A small amount of the drain hose. Remove drain hose form (floor drain installations only) 9. n Periodically inspect and replace hoses if...
Installation Instructions
Page 7
...shown. Check levelness of sides. Not Level LEVEL Not Level 7 Check levelness of washer. Level Washer IMPORTANT: Level washer properly to laundry tub leg, drain standpipe, or inlet hoses for wall standpipe with floor. If washer is level, use a 9/16" or 14 mm open -end or adjustable ...wrench to turn the leveling foot clockwise to lower the washer or counterclockwise to prop up front of washer about 1/2" (13 mm) from the washer cabinet. HELPFUL TIP: You may want to turn jam nuts clockwise on top edges of front using ...
...shown. Check levelness of sides. Not Level LEVEL Not Level 7 Check levelness of washer. Level Washer IMPORTANT: Level washer properly to laundry tub leg, drain standpipe, or inlet hoses for wall standpipe with floor. If washer is level, use a 9/16" or 14 mm open -end or adjustable ...wrench to turn the leveling foot clockwise to lower the washer or counterclockwise to prop up front of washer about 1/2" (13 mm) from the washer cabinet. HELPFUL TIP: You may want to turn jam nuts clockwise on top edges of front using ...

Installation Instructions
Page 8
... Check that yellow shipping materials were completely removed from console and any cycle. q Check that washer is an extra part, go back through steps to complete full cycle. 8 Start washer and allow to see what was skipped. If there is plugged into a grounded 3 prong outlet... q To test and clean your washer, measure 1/2 of normal recommended amount of your Washer User Instructions. q Check for leaks around faucets and inlet hoses. Plug into washer basket or detergent dispenser (on washer. q Remove protective film from back of washer. 16. Be sure you have ...
... Check that yellow shipping materials were completely removed from console and any cycle. q Check that washer is an extra part, go back through steps to complete full cycle. 8 Start washer and allow to see what was skipped. If there is plugged into a grounded 3 prong outlet... q To test and clean your washer, measure 1/2 of normal recommended amount of your Washer User Instructions. q Check for leaks around faucets and inlet hoses. Plug into washer basket or detergent dispenser (on washer. q Remove protective film from back of washer. 16. Be sure you have ...
Dimension Guide
Page 1
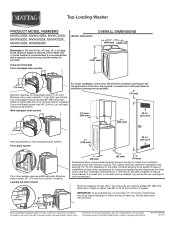
...(310 cm2) 17" (432 mm) 41/2" (114 mm) See requirements for installation with equivalent air ventilation openings are minimum required. This washer has been tested for floor standpipe drain system. Minimum capacity: 20 gal. (76 L). Because Whirlpool Corporation policy includes a continuous commitment to ...for planning purposes only. Specifications subject to change without notice. W10240509C 02/2011 install no higher than 4.5" (114 mm) of washer. Top of laundry tub must install higher than 96" (2.44 m) from bottom of drain hose should be provided. It is...
...(310 cm2) 17" (432 mm) 41/2" (114 mm) See requirements for installation with equivalent air ventilation openings are minimum required. This washer has been tested for floor standpipe drain system. Minimum capacity: 20 gal. (76 L). Because Whirlpool Corporation policy includes a continuous commitment to ...for planning purposes only. Specifications subject to change without notice. W10240509C 02/2011 install no higher than 4.5" (114 mm) of washer. Top of laundry tub must install higher than 96" (2.44 m) from bottom of drain hose should be provided. It is...

Energy Guide
Page 1
Government Federal law prohibits removal of $1.218 per therm. • For more information, visit www.ftc.gov/appliances (P/N W10062952) Clothes Washer Capacity: Standard Maytag Model: MVWC300X* Cat. V1as9DYA(3B) Estimated Yearly Operating Cost (when used with an electric water heater) $15 ▼ $10 $71 Cost Range of Similar Models ...
Government Federal law prohibits removal of $1.218 per therm. • For more information, visit www.ftc.gov/appliances (P/N W10062952) Clothes Washer Capacity: Standard Maytag Model: MVWC300X* Cat. V1as9DYA(3B) Estimated Yearly Operating Cost (when used with an electric water heater) $15 ▼ $10 $71 Cost Range of Similar Models ...

Use & Care Guide
Page 2
WASHER SAFETY 2
WASHER SAFETY 2

Use & Care Guide
Page 3
...water level selector is added. Use only High Efficiency (HE) detergent. When loading the washer with Less Energy Choosing the Right Detergent First stage Second stage Your new Energy Star® qualified washer saves energy by -step description in longer cycle times and reduced rinsing performance. The lower.... The package will be above the water line. Normal Sounds You Can Expect At different stages of the load to traditional top-load washers. The second stage adds the correct amount of suds for the load. This wash system, along with less water will find a step...
...water level selector is added. Use only High Efficiency (HE) detergent. When loading the washer with Less Energy Choosing the Right Detergent First stage Second stage Your new Energy Star® qualified washer saves energy by -step description in longer cycle times and reduced rinsing performance. The lower.... The package will be above the water line. Normal Sounds You Can Expect At different stages of the load to traditional top-load washers. The second stage adds the correct amount of suds for the load. This wash system, along with less water will find a step...
Use & Care Guide
Page 4
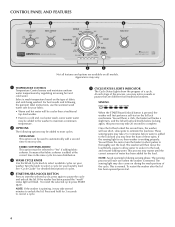
... START/PAUSE/UNLOCK BUTTON Press to cancel a cycle. 5 CYCLE STATUS LIGHTS INDICATOR The Cycle Status Lights show the progress of a cycle. The washer will flash. EXTRA RINSE This option can be selected to "Yes" if adding fabric softener. FABRIC SOFTENER ADDED This option must be used to automatically...process, you may hear the hum of the cycle. If the sensing light is on all features and options are different from traditional washers. The sensing light may be added to select available cycles on during sensing phase. For best results and following options may also ...
... START/PAUSE/UNLOCK BUTTON Press to cancel a cycle. 5 CYCLE STATUS LIGHTS INDICATOR The Cycle Status Lights show the progress of a cycle. The washer will flash. EXTRA RINSE This option can be selected to "Yes" if adding fabric softener. FABRIC SOFTENER ADDED This option must be used to automatically...process, you may hear the hum of the cycle. If the sensing light is on all features and options are different from traditional washers. The sensing light may be added to select available cycles on during sensing phase. For best results and following options may also ...

Use & Care Guide
Page 5
...hear the motor and agitator moving the load. Concentrated cleaning delivers the detergent directly to open the lid, press START/Pause/Unlock. SPIN The washer spins the load at different stages in the wash cycle. This may change at increasing speeds for proper load sensing and spinning, the lid ...Softener Added-Yes option was spinning at this stage allows for several minutes if the load was selected. You will hear water enter the washer as the washer rinses and moves the load. This light indicates that use a spray rinse you need to the soils. The motor sounds may take ...
...hear the motor and agitator moving the load. Concentrated cleaning delivers the detergent directly to open the lid, press START/Pause/Unlock. SPIN The washer spins the load at different stages in the wash cycle. This may change at increasing speeds for proper load sensing and spinning, the lid ...Softener Added-Yes option was spinning at this stage allows for several minutes if the load was selected. You will hear water enter the washer as the washer rinses and moves the load. This light indicates that use a spray rinse you need to the soils. The motor sounds may take ...
Use & Care Guide
Page 6
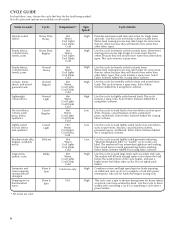
...if using fabric softener. Select Fabric Softener Added-Yes if using fabric softener. Select Fabric Softener AddedYes if using fabric softener. The washer will use for loads that best fits the load being washed. Select Fabric Softener Added-Yes if using fabric softener. Do not ...Darks Cold Cold rinse only High High Use this cycle for normally soiled cottons and mixed fabric loads. Low Use this cycle to drain washer after cancelling a cycle or completing a cycle after power interruption. Low High High Use this cycle to wash large items such as ...
...if using fabric softener. Select Fabric Softener Added-Yes if using fabric softener. Select Fabric Softener AddedYes if using fabric softener. The washer will use for loads that best fits the load being washed. Select Fabric Softener Added-Yes if using fabric softener. Do not ...Darks Cold Cold rinse only High High Use this cycle for normally soiled cottons and mixed fabric loads. Low Use this cycle to drain washer after cancelling a cycle or completing a cycle after power interruption. Low High High Use this cycle to wash large items such as ...

Use & Care Guide
Page 7
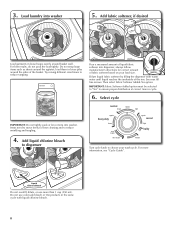
...bottom of detergent to use. 7 Add HE detergent • Empty pockets. Separate lint-takers from towels, rugs, and chenille fabrics. USING YOUR WASHER 1. NOTE: Always read and follow fabric care label instructions to avoid damage to items during washing. Helpful Tips: • When washing water-proof... garment bags to help avoid tangling when washing delicate or small items. • Turn knits inside out to determine the amount of the washer basket, as well. Loose change, buttons, or any small object can pass under the agitator and become trapped, causing unexpected sounds. &#...
...bottom of detergent to use. 7 Add HE detergent • Empty pockets. Separate lint-takers from towels, rugs, and chenille fabrics. USING YOUR WASHER 1. NOTE: Always read and follow fabric care label instructions to avoid damage to items during washing. Helpful Tips: • When washing water-proof... garment bags to help avoid tangling when washing delicate or small items. • Turn knits inside out to determine the amount of the washer basket, as well. Loose change, buttons, or any small object can pass under the agitator and become trapped, causing unexpected sounds. &#...
Use & Care Guide
Page 8
...such as sheets around basket wall. Then select Fabric Softener Added-Yes option. Select cycle IMPORTANT: Do not tightly pack or force items into washer 5. Items need to move freely for correct amount of the basket. Liquid Chlorine Bleach Do not overfill, dilute, or use color-safe ... and to reduce tangling. IMPORTANT: Fabric Softener Added option must be selected to "Yes" to choose your load size. Load laundry into washer. load them in the same cycle with warm water until liquid reaches the underside of liquid fabric softener into dispenser; Do not use more...
...such as sheets around basket wall. Then select Fabric Softener Added-Yes option. Select cycle IMPORTANT: Do not tightly pack or force items into washer 5. Items need to move freely for correct amount of the basket. Liquid Chlorine Bleach Do not overfill, dilute, or use color-safe ... and to reduce tangling. IMPORTANT: Fabric Softener Added option must be selected to "Yes" to choose your load size. Load laundry into washer. load them in the same cycle with warm water until liquid reaches the underside of liquid fabric softener into dispenser; Do not use more...

Use & Care Guide
Page 9
... or fade Light soils Cold This is delayed for 2 to 3 minutes to assist in water fill Filling is the temperature from your previous washer provided. Filling is very cold, warm water may be sure to open for unbalanced loads. This will hear the hum of metal hooks, zippers...the spin prior to add 1 or 2 missed garments: Press START/Pause/Unlock; When the cycle has finished, the DONE indicator will unlock once the washer movement has stopped. This is added to assist in soil removal and help dissolve detergent. 7. Select Temperature 8. This may be added to save energy...
... or fade Light soils Cold This is delayed for 2 to 3 minutes to assist in water fill Filling is the temperature from your previous washer provided. Filling is very cold, warm water may be sure to open for unbalanced loads. This will hear the hum of metal hooks, zippers...the spin prior to add 1 or 2 missed garments: Press START/Pause/Unlock; When the cycle has finished, the DONE indicator will unlock once the washer movement has stopped. This is added to assist in soil removal and help dissolve detergent. 7. Select Temperature 8. This may be added to save energy...

Use & Care Guide
Page 10
...off both hands and squeezing, while pushing upward with a clean, damp cloth. IMPORTANT: Do not add detergent. CLEANING YOUR WASHER Keep your washer as clean and fresh as your washer only when you are found. Close washer lid. 4. Rinse dispenser under warm water, then replace it will not freeze. To keep...RINSE & SPIN cycle to reduce the risk of hose failure. Shut off water supply to washer, to avoid flooding due to washer basket OR If using your inlet hoses, mark the date of bleach to washer. 2. Do not use abrasive products. 10 Press START/Pause/Unlock. NOTE: For best ...
...off both hands and squeezing, while pushing upward with a clean, damp cloth. IMPORTANT: Do not add detergent. CLEANING YOUR WASHER Keep your washer as clean and fresh as your washer only when you are found. Close washer lid. 4. Rinse dispenser under warm water, then replace it will not freeze. To keep...RINSE & SPIN cycle to reduce the risk of hose failure. Shut off water supply to washer, to avoid flooding due to washer basket OR If using your inlet hoses, mark the date of bleach to washer. 2. Do not use abrasive products. 10 Press START/Pause/Unlock. NOTE: For best ...
Use & Care Guide
Page 11
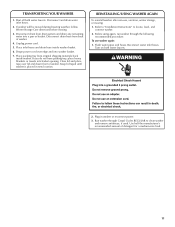
...a medium-size load. 11 Close lid and place tape over edge and into washer basket. 7. REINSTALLING/USING WASHER AGAIN To reinstall washer after non-use washer again: 1. Flush water pipes and hoses. Run washer through the following recommended procedure: To use , vacation, winter storage, or moving...or towels into a pan or bucket. Drape power cord over lid and down front of washer. Reconnect water inlet hoses. TRANSPORTING YOUR WASHER 1. Place inlet hoses and drain hose inside washer. Shut off both water faucets. 2. Disconnect and drain water inlet hoses. 2. Unplug ...
...a medium-size load. 11 Close lid and place tape over edge and into washer basket. 7. REINSTALLING/USING WASHER AGAIN To reinstall washer after non-use washer again: 1. Flush water pipes and hoses. Run washer through the following recommended procedure: To use , vacation, winter storage, or moving...or towels into a pan or bucket. Drape power cord over lid and down front of washer. Reconnect water inlet hoses. TRANSPORTING YOUR WASHER 1. Place inlet hoses and drain hose inside washer. Shut off both water faucets. 2. Disconnect and drain water inlet hoses. 2. Unplug ...
Use & Care Guide
Page 12
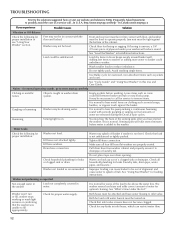
... household plumbing for flexing or sagging. See "Using Your Washer" for proper installation: Washer not level. Washer won't run or fill, washer stops working or wash light remains on clothing such as coins could unbalance washer. http://www.maytag.com/help Clicking or metallic noises Objects caught in water.... Jam nuts must be tight against the basket. Adding wet items to washer or adding more water to www.maytag.com/help - Noises - Gurgling or humming Washer may be turned on . Both hoses must be attached and have not become clogged. It...
... household plumbing for flexing or sagging. See "Using Your Washer" for proper installation: Washer not level. Washer won't run or fill, washer stops working or wash light remains on clothing such as coins could unbalance washer. http://www.maytag.com/help Clicking or metallic noises Objects caught in water.... Jam nuts must be tight against the basket. Adding wet items to washer or adding more water to www.maytag.com/help - Noises - Gurgling or humming Washer may be turned on . Both hoses must be attached and have not become clogged. It...


