

Installation Instructions
Page 2
...-blue steel couplings (2 pack) 6 ft. (1.8 m) Inlet hose, Black EPDM, space saving 90° elbow, hypro-blue steel couplings (2 pack) Alternate parts: (Not supplied with washer) Adjustable or open end wrench 9/16" (14 mm) 4" min (102 mm) Level Wood block Ruler or measuring tape Pliers ...that open to improve performance and minimize noise and possible "washer walk". INSTALLATION REQUIREMENTS Tools and Parts Gather required tools and parts before starting installation. Beaded tie strap Drain hose with clamp Inlet hoses with flat washers To order, please refer ...
...-blue steel couplings (2 pack) 6 ft. (1.8 m) Inlet hose, Black EPDM, space saving 90° elbow, hypro-blue steel couplings (2 pack) Alternate parts: (Not supplied with washer) Adjustable or open end wrench 9/16" (14 mm) 4" min (102 mm) Level Wood block Ruler or measuring tape Pliers ...that open to improve performance and minimize noise and possible "washer walk". INSTALLATION REQUIREMENTS Tools and Parts Gather required tools and parts before starting installation. Beaded tie strap Drain hose with clamp Inlet hoses with flat washers To order, please refer ...

Installation Instructions
Page 3
... bottom of washer. If a closet door or louvered door is your responsibility. Floor drain system requires a Siphon Break Kit (Part Number 285834), 2 Connector Kits (Part Number 285385), and an Extension Drain Hose (Part Number 285863) that may cause damage in your Use and Care Guide for installation with maximum slope of drain hose...
... bottom of washer. If a closet door or louvered door is your responsibility. Floor drain system requires a Siphon Break Kit (Part Number 285834), 2 Connector Kits (Part Number 285385), and an Extension Drain Hose (Part Number 285863) that may cause damage in your Use and Care Guide for installation with maximum slope of drain hose...

Installation Instructions
Page 5
You may need to remove all parts from rear panel. IMPORTANT: 4.5" (113 mm) of laundry tub. Drain hose form must be inside standpipe; For a laundry tub or ... form Firmly grasp power cord plug and pull to step 6. do not force excess hose into standpipe (shown in case you need additional parts with clamp. Attach drain hose to back of washer. 4.5" (113 mm) Place hose into standpipe or lay on elbow end of drain... 5. Be sure to move washer later. 4. Free power cord If clamp is not already in Step 7. See "Tools and Parts". 6. Remove packing tray from tub. 3.
You may need to remove all parts from rear panel. IMPORTANT: 4.5" (113 mm) of laundry tub. Drain hose form must be inside standpipe; For a laundry tub or ... form Firmly grasp power cord plug and pull to step 6. do not force excess hose into standpipe (shown in case you need additional parts with clamp. Attach drain hose to back of washer. 4.5" (113 mm) Place hose into standpipe or lay on elbow end of drain... 5. Be sure to move washer later. 4. Free power cord If clamp is not already in Step 7. See "Tools and Parts". 6. Remove packing tray from tub. 3.

Installation Instructions
Page 6
...in attaching hoses to faucets or washer. IMPORTANT: To reduce risk of the drain hose. Check for cold water faucet. See "Tools and Parts". NOTE: Both hoses must use tape or sealants on water faucets to hot water inlet valve marked with flat washers (not provided). Attach ... hose form from the end of hose failure, replace the hoses every 5 years. Use pliers to a cold water faucet, you will need additional parts with separate directions. Damage can result. HELPFUL TIP: Make note of water may need to inlet valves. n Periodically inspect and replace hoses if bulges...
...in attaching hoses to faucets or washer. IMPORTANT: To reduce risk of the drain hose. Check for cold water faucet. See "Tools and Parts". NOTE: Both hoses must use tape or sealants on water faucets to hot water inlet valve marked with flat washers (not provided). Attach ... hose form from the end of hose failure, replace the hoses every 5 years. Use pliers to a cold water faucet, you will need additional parts with separate directions. Damage can result. HELPFUL TIP: Make note of water may need to inlet valves. n Periodically inspect and replace hoses if bulges...

Installation Instructions
Page 8
q Check that washer is an extra part, go back through steps to complete full cycle. 8 Select any tape remaining on washer. Be sure you have correct electrical supply and recommended grounding method. q ... detergent dispenser (on . q Check for leaks around faucets and inlet hoses. q To test and clean your washer, measure 1/2 of normal recommended amount of /recycle all parts are on some models). If there is plugged into a grounded 3 prong outlet. q Check that you have all of washer. q Check that all packaging materials. Close...
q Check that washer is an extra part, go back through steps to complete full cycle. 8 Select any tape remaining on washer. Be sure you have correct electrical supply and recommended grounding method. q ... detergent dispenser (on . q Check for leaks around faucets and inlet hoses. q To test and clean your washer, measure 1/2 of normal recommended amount of /recycle all parts are on some models). If there is plugged into a grounded 3 prong outlet. q Check that you have all of washer. q Check that all packaging materials. Close...
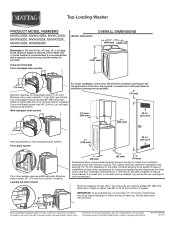
Dimension Guide
Page 1
... drain system 5" (126 mm) 24 in door are required. It is installed, top and bottom air openings in .2 (155 cm2) Floor drain system requires additional parts. If a closet door or louvered door is recommended that a separate circuit serving only this washer be inside standpipe or below the top of installation and...
... drain system 5" (126 mm) 24 in door are required. It is installed, top and bottom air openings in .2 (155 cm2) Floor drain system requires additional parts. If a closet door or louvered door is recommended that a separate circuit serving only this washer be inside standpipe or below the top of installation and...
Warranty Information
Page 1
...replace or repair house fuses, or to be provided by Maytag. 5. Replacement parts or repair labor if this information on the model and serial number label located on how to use of products not approved by a Maytag designated service company. Cosmetic damage, including scratches, dents, chips... or plumbing. 3. YOUR SOLE AND EXCLUSIVE REMEDY UNDER THIS LIMITED WARRANTY SHALL BE PRODUCT REPAIR AS PROVIDED HEREIN. Consumable parts are unable to Maytag within 30 days from the date of God, improper installation, installation not in accordance with electrical or plumbing codes, or...
...replace or repair house fuses, or to be provided by Maytag. 5. Replacement parts or repair labor if this information on the model and serial number label located on how to use of products not approved by a Maytag designated service company. Cosmetic damage, including scratches, dents, chips... or plumbing. 3. YOUR SOLE AND EXCLUSIVE REMEDY UNDER THIS LIMITED WARRANTY SHALL BE PRODUCT REPAIR AS PROVIDED HEREIN. Consumable parts are unable to Maytag within 30 days from the date of God, improper installation, installation not in accordance with electrical or plumbing codes, or...

Use & Care Guide
Page 16
...this major appliance is used in the country in a remote area where service by a Maytag designated service company. Service calls to determine if another warranty applies. Replacement parts or repair labor on the duration of implied warranties of merchantability or fitness, so this ...limitation may have been removed, altered, or cannot be repaired in accordance with Maytag published installation instructions. 10. Write down ...
...this major appliance is used in the country in a remote area where service by a Maytag designated service company. Service calls to determine if another warranty applies. Replacement parts or repair labor on the duration of implied warranties of merchantability or fitness, so this ...limitation may have been removed, altered, or cannot be repaired in accordance with Maytag published installation instructions. 10. Write down ...


