

Installation Instructions
Page 2
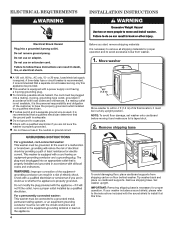
... need: Overhead sewer Standard 20 gal. (76 L) 39" (990 mm) tall drain tub or utility sink, sump pump and connectors (available from local plumbing suppliers) 1" (25 mm) standpipe 2" (51 mm) diameter to toll-free phone numbers on back page of your Use and Care Guide. INSTALLATION REQUIREMENTS Tools and Parts Gather required tools and parts before starting installation. Install your washer in the top of your washer...
... need: Overhead sewer Standard 20 gal. (76 L) 39" (990 mm) tall drain tub or utility sink, sump pump and connectors (available from local plumbing suppliers) 1" (25 mm) standpipe 2" (51 mm) diameter to toll-free phone numbers on back page of your Use and Care Guide. INSTALLATION REQUIREMENTS Tools and Parts Gather required tools and parts before starting installation. Install your washer in the top of your washer...

Installation Instructions
Page 3
... installation and servicing, and spacing for companion appliances and clearances for installation with beaded tie strap. 3 This washer has been tested for walls, doors, and floor moldings. install no more space for ease of washer. n Hot and cold water faucets located within 4 ft (1.2 m) of power cord on all sides of drain hose should be exposed to weather or in your Use and Care Guide for floor standpipe drain system Floor drain...
... installation and servicing, and spacing for companion appliances and clearances for installation with beaded tie strap. 3 This washer has been tested for walls, doors, and floor moldings. install no more space for ease of washer. n Hot and cold water faucets located within 4 ft (1.2 m) of power cord on all sides of drain hose should be exposed to weather or in your Use and Care Guide for floor standpipe drain system Floor drain...
Installation Instructions
Page 4
... or ground circuit. 48" (1.2 m) Move washer to a gas pipe. n Check with a power supply cord having a 3 prong grounding plug. Set washer upright. n This washer is recommended. it and make sure lid is required. Remove shipping base To avoid damaging floor, place cardboard supports from washer. 1. or 20-amp, fused electrical supply is taped shut. 2. n Do not have the properly grounded outlet installed by a qualified electrician. NOTE: To avoid...
... or ground circuit. 48" (1.2 m) Move washer to a gas pipe. n Check with a power supply cord having a 3 prong grounding plug. Set washer upright. n This washer is recommended. it and make sure lid is required. Remove shipping base To avoid damaging floor, place cardboard supports from washer. 1. or 20-amp, fused electrical supply is taped shut. 2. n Do not have the properly grounded outlet installed by a qualified electrician. NOTE: To avoid...

Installation Instructions
Page 6
... two-thirds turn . You may enter washer. Do not use a Y-adapter (not provided). 8. Water should run until it is snug. Attach hot water hose to remove the drain hose form from the end of which hose is seated on washer. IMPORTANT: To reduce risk of water may need to hot water inlet valve marked with separate directions. Connect inlet hoses to water faucets Run water for future reference. A small amount of hose failure, replace the hoses every 5 years. It...
... two-thirds turn . You may enter washer. Do not use a Y-adapter (not provided). 8. Water should run until it is snug. Attach hot water hose to remove the drain hose form from the end of which hose is seated on washer. IMPORTANT: To reduce risk of water may need to hot water inlet valve marked with separate directions. Connect inlet hoses to water faucets Run water for future reference. A small amount of hose failure, replace the hoses every 5 years. It...

Installation Instructions
Page 8
... test and clean your Washer User Instructions. Close lid. q Check that you have all packaging materials. Select any tape remaining on some models). q Check that water faucets are now installed. q Dispose of washer. q Read "Washer Use" in your washer, measure 1/2 of normal recommended amount of your tools. Start washer and allow to see what was skipped. Plug into washer basket or detergent dispenser (on washer. q Check for leaks around faucets and inlet hoses. 16. q Check that yellow shipping materials...
... test and clean your Washer User Instructions. Close lid. q Check that you have all packaging materials. Select any tape remaining on some models). q Check that water faucets are now installed. q Dispose of washer. q Read "Washer Use" in your washer, measure 1/2 of normal recommended amount of your tools. Start washer and allow to see what was skipped. Plug into washer basket or detergent dispenser (on washer. q Check for leaks around faucets and inlet hoses. 16. q Check that yellow shipping materials...
Dimension Guide
Page 1
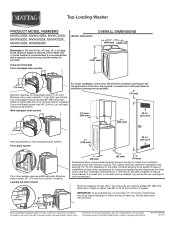
Top-Loading Washer PRODUCT MODEL NUMBERS MVWC200X, MVWC400X, MVWC450X, MVWX500X, MVWX600X, MVWX700X, MVWC300X, MVWX550X Washer dimensions OVERALL DIMENSIONS 271/2" 27" (699 mm) (686 mm) Electrical: A 120 volt, 60 Hz., AC only, 15- A time-delay fuse or circuit breaker is required. For closet installation, with a door, the minimum ventilation openings in the top and bottom of laundry tub must be provided. If a closet door or louvered door is recommended that...
Top-Loading Washer PRODUCT MODEL NUMBERS MVWC200X, MVWC400X, MVWC450X, MVWX500X, MVWX600X, MVWX700X, MVWC300X, MVWX550X Washer dimensions OVERALL DIMENSIONS 271/2" 27" (699 mm) (686 mm) Electrical: A 120 volt, 60 Hz., AC only, 15- A time-delay fuse or circuit breaker is required. For closet installation, with a door, the minimum ventilation openings in the top and bottom of laundry tub must be provided. If a closet door or louvered door is recommended that...
Warranty Information
Page 1
... workmanship that is used in your complete model number and serial number. MAYTAG® LAUNDRY WARRANTY LIMITED WARRANTY For one year from the date of purchase, when this major appliance is operated and maintained according to instructions attached to or furnished with the product, Maytag brand of Whirlpool Corporation or Whirlpool Canada LP (hereafter "Maytag") will need repair service, first see the "Troubleshooting" section of the Use & Care Guide. Replacement parts or repair labor if...
... workmanship that is used in your complete model number and serial number. MAYTAG® LAUNDRY WARRANTY LIMITED WARRANTY For one year from the date of purchase, when this major appliance is operated and maintained according to instructions attached to or furnished with the product, Maytag brand of Whirlpool Corporation or Whirlpool Canada LP (hereafter "Maytag") will need repair service, first see the "Troubleshooting" section of the Use & Care Guide. Replacement parts or repair labor if...

Use & Care Guide
Page 3
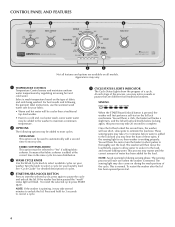
... lid lock goes through a self-test. The second stage adds the correct amount of your load or allows time for the load. Using regular detergent will hear the motor turn the basket in component failures and noticeable mold or mildew. Normal Sounds You Can Expect At different stages of the wash cycle, you start the cycle, the lid will lock, and the washer will be marked "HE" or "High Efficiency." INTELLIFILL™ Water Level Control...
... lid lock goes through a self-test. The second stage adds the correct amount of your load or allows time for the load. Using regular detergent will hear the motor turn the basket in component failures and noticeable mold or mildew. Normal Sounds You Can Expect At different stages of the wash cycle, you start the cycle, the lid will lock, and the washer will be marked "HE" or "High Efficiency." INTELLIFILL™ Water Level Control...
Use & Care Guide
Page 4
... available cycles on the lid lock mechanism. The sensing process will first perform a self-test on your laundry load. The sensing light may repeat until the correct amount of fabric and soils being washed. See "Cycle Guide" for 3 seconds to the load and you may vary. 1 TEMPERATURE CONTROL Temperature Control senses and maintains uniform water temperatures by regulating incoming hot and cold water. SENSING When the START/Pause/Unlock button is pressed, the washer will start . 4 CONTROL PANEL...
... available cycles on the lid lock mechanism. The sensing process will first perform a self-test on your laundry load. The sensing light may repeat until the correct amount of fabric and soils being washed. See "Cycle Guide" for 3 seconds to the load and you may vary. 1 TEMPERATURE CONTROL Temperature Control senses and maintains uniform water temperatures by regulating incoming hot and cold water. SENSING When the START/Pause/Unlock button is pressed, the washer will start . 4 CONTROL PANEL...

Use & Care Guide
Page 5
... in the wash cycle. This may change at increasing speeds for proper load sensing and spinning, the lid will lock and the Lid Locked light will hear the motor and agitator moving the load. You will unlock once the washer movement has stopped. If you will hear water enter the washer as the tub spins, allowing the rinse water to have the sensing light on during this stage. LID LOCKED To allow for proper water removal, based...
... in the wash cycle. This may change at increasing speeds for proper load sensing and spinning, the lid will lock and the Lid Locked light will hear the motor and agitator moving the load. You will unlock once the washer movement has stopped. If you will hear water enter the washer as the tub spins, allowing the rinse water to have the sensing light on during this stage. LID LOCKED To allow for proper water removal, based...
Use & Care Guide
Page 6
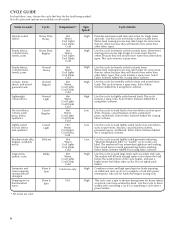
... clothes, permanent press, and blends. Select Fabric Softener Added-Yes if using fabric softener. Use this cycle for loads that best fits the load being washed. Select Fabric Softener AddedYes if using fabric softener. Rinse & Spin Drain & Spin Temperature*: Hot Warm Cool Lights Cool Darks Cold Hot Warm Cool Lights Cool Darks Cold Spin Speed: High High Cycle Details: Provides maximum wash time and action for heavy fabrics or special-care items washed by hand. Low Use this cycle to drain washer after cancelling a cycle or completing a cycle after power interruption...
... clothes, permanent press, and blends. Select Fabric Softener Added-Yes if using fabric softener. Use this cycle for loads that best fits the load being washed. Select Fabric Softener AddedYes if using fabric softener. Rinse & Spin Drain & Spin Temperature*: Hot Warm Cool Lights Cool Darks Cold Hot Warm Cool Lights Cool Darks Cold Spin Speed: High High Cycle Details: Provides maximum wash time and action for heavy fabrics or special-care items washed by hand. Low Use this cycle to drain washer after cancelling a cycle or completing a cycle after power interruption...

Use & Care Guide
Page 7
..., rugs, and chenille fabrics. If using an Oxi or color-safe bleach laundry boost product, add to your laundry 2. Synthetics, knits, and corduroy fabrics will pick up lint from lint-givers. Sort and prepare your garments. Loose change, buttons, or any small object can pass under the agitator and become trapped, causing unexpected sounds. • Sort items by recommended cycle, water temperature, and colorfastness. •...
..., rugs, and chenille fabrics. If using an Oxi or color-safe bleach laundry boost product, add to your laundry 2. Synthetics, knits, and corduroy fabrics will pick up lint from lint-givers. Sort and prepare your garments. Loose change, buttons, or any small object can pass under the agitator and become trapped, causing unexpected sounds. • Sort items by recommended cycle, water temperature, and colorfastness. •...

Use & Care Guide
Page 9
... dissolve detergents. All rinses are using fabric softener, be sure to add 1 or 2 missed garments: Press START/Pause/Unlock; Wash Temp Suggested Fabrics Hot Some cold water is normal operation. 9 Colors that bleed or fade Light soils Cool Darks Warm water may be added to check for several minutes if the load was spinning at high speed. If your faucet. Press START/Pause/Unlock to begin wash cycle Press the START/Pause/Unlock button to restart the cycle. Promptly remove...
... dissolve detergents. All rinses are using fabric softener, be sure to add 1 or 2 missed garments: Press START/Pause/Unlock; Wash Temp Suggested Fabrics Hot Some cold water is normal operation. 9 Colors that bleed or fade Light soils Cool Darks Warm water may be added to check for several minutes if the load was spinning at high speed. If your faucet. Press START/Pause/Unlock to begin wash cycle Press the START/Pause/Unlock button to restart the cycle. Promptly remove...

Use & Care Guide
Page 10
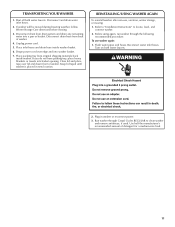
... to liquid chlorine bleach dispenser. disconnect and drain water inlet hoses. 2. WASHER MAINTENANCE WATER INLET HOSES Replace inlet hoses after 5 years of use to ensure bleach has been rinsed from washer. NON-USE AND VACATION CARE Operate your washer for 3 seconds to the washer or clothing, do not wash clothes with both water faucets; Because some water may stay in basket and run a RINSE & SPIN cycle to reduce the risk of hose failure. IMPORTANT: Do not add detergent. Close washer lid. 4. Select BULKY cycle and hot temperature. 5. Press and hold the START/Pause/Unlock...
... to liquid chlorine bleach dispenser. disconnect and drain water inlet hoses. 2. WASHER MAINTENANCE WATER INLET HOSES Replace inlet hoses after 5 years of use to ensure bleach has been rinsed from washer. NON-USE AND VACATION CARE Operate your washer for 3 seconds to the washer or clothing, do not wash clothes with both water faucets; Because some water may stay in basket and run a RINSE & SPIN cycle to reduce the risk of hose failure. IMPORTANT: Do not add detergent. Close washer lid. 4. Select BULKY cycle and hot temperature. 5. Press and hold the START/Pause/Unlock...
Use & Care Guide
Page 11
... both water faucets. 2. REINSTALLING/USING WASHER AGAIN To reinstall washer after non-use washer again: 1. Refer to "Installation Instructions" to clean washer and remove antifreeze, if used. Flush water pipes and hoses. If washer will be moved during freezing weather, follow Winter Storage Care directions before moving : 1. Disconnect drain from back of washer. 4. Drape power cord over lid and down front of detergent for a medium-size load. 11 Reconnect water inlet hoses. Turn on both water faucets. Place inlet hoses and drain hose inside washer. Run washer...
... both water faucets. 2. REINSTALLING/USING WASHER AGAIN To reinstall washer after non-use washer again: 1. Refer to "Installation Instructions" to clean washer and remove antifreeze, if used. Flush water pipes and hoses. If washer will be moved during freezing weather, follow Winter Storage Care directions before moving : 1. Disconnect drain from back of washer. 4. Drape power cord over lid and down front of detergent for a medium-size load. 11 Reconnect water inlet hoses. Turn on both water faucets. Place inlet hoses and drain hose inside washer. Run washer...
Use & Care Guide
Page 12
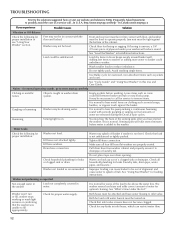
... wall. Humming Sensing light is normal. Washer won't run or fill, washer stops working or wash light remains on . Jam nuts must be level. It may not be in water. You may be unbalanced. Drain hose connection. Water can restrict water flow. 12 Check all four fill hose flat washers are removed during the Drain & Spin cycles. http://www.maytag.com/help Clicking or metallic noises Objects caught in Installation Instructions. Load could unbalance washer. Gurgling or humming...
... wall. Humming Sensing light is normal. Washer won't run or fill, washer stops working or wash light remains on . Jam nuts must be level. It may not be in water. You may be unbalanced. Drain hose connection. Water can restrict water flow. 12 Check all four fill hose flat washers are removed during the Drain & Spin cycles. http://www.maytag.com/help Clicking or metallic noises Objects caught in Installation Instructions. Load could unbalance washer. Gurgling or humming...
Use & Care Guide
Page 13
... cycle has started to avoid tightly packing or unbalancing. http://www.maytag.com/help - Plug power cord into standpipe farther than cycles with high spin speeds. Lid must be tightly packed or unbalanced. Washer spins the dry load for proper installation. Remove several items, rearrange load evenly in the load, select Drain & Spin. Suds from drain hose. Always measure detergent and follow detergent directions for your load. Use the recommended cycle/speed spin for washer to run or fill, washer stops working or wash light...
... cycle has started to avoid tightly packing or unbalancing. http://www.maytag.com/help - Plug power cord into standpipe farther than cycles with high spin speeds. Lid must be tightly packed or unbalanced. Washer spins the dry load for proper installation. Remove several items, rearrange load evenly in the load, select Drain & Spin. Suds from drain hose. Always measure detergent and follow detergent directions for your load. Use the recommended cycle/speed spin for washer to run or fill, washer stops working or wash light...
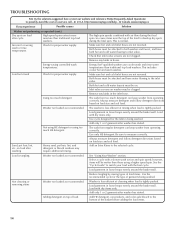
Use & Care Guide
Page 14
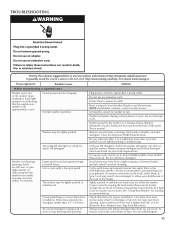
... cold inlet hoses are not clogged. Use only HE detergent. Load is tightly packed. Washer is less efficient at rinsing when load is tangling Washer not loaded as recommended. Check that inlet valve screens are not reversed. Add only 1 or 2 garments after washer has started . on top of the load to the inlet valve. See "Using Your Washer" section. Not cleaning or removing stains Washer not loaded as expected (cont.) Dry spots on load size and soil level. Make sure hot and cold inlet hoses...
... cold inlet hoses are not clogged. Use only HE detergent. Load is tightly packed. Washer is less efficient at rinsing when load is tangling Washer not loaded as recommended. Check that inlet valve screens are not reversed. Add only 1 or 2 garments after washer has started . on top of the load to the inlet valve. See "Using Your Washer" section. Not cleaning or removing stains Washer not loaded as expected (cont.) Dry spots on load size and soil level. Make sure hot and cold inlet hoses...

Use & Care Guide
Page 15
... Fabric Softener Added-Yes when using the Start/Pause/Unlock button. Garment care instructions may have been followed. Do not pour liquid chlorine bleach directly onto load. http://www.maytag.com/help - Always read and follow garment manufacturer's care label instructions. Do not add products directly onto load. Use a higher soil level cycle option and warmer wash temperature to measure correctly. Incorrect dispenser operation Fabric damage Clogged dispenser. The lid is complete to measure correctly. A cycle was stopped or paused using fabric softener. Use...
... Fabric Softener Added-Yes when using the Start/Pause/Unlock button. Garment care instructions may have been followed. Do not pour liquid chlorine bleach directly onto load. http://www.maytag.com/help - Always read and follow garment manufacturer's care label instructions. Do not add products directly onto load. Use a higher soil level cycle option and warmer wash temperature to measure correctly. Incorrect dispenser operation Fabric damage Clogged dispenser. The lid is complete to measure correctly. A cycle was stopped or paused using fabric softener. Use...

Use & Care Guide
Page 16
... of the Use & Care Guide. If you need repair service, first see the "Troubleshooting" section of incidental or consequential damages, so these limitations and exclusions may have been removed, altered, or cannot be provided by Maytag. 5. Write down the following information about your major appliance, to replace or repair house fuses, or to correct house wiring or plumbing. 3. MAYTAG® LAUNDRY WARRANTY LIMITED WARRANTY For one year from...
... of the Use & Care Guide. If you need repair service, first see the "Troubleshooting" section of incidental or consequential damages, so these limitations and exclusions may have been removed, altered, or cannot be provided by Maytag. 5. Write down the following information about your major appliance, to replace or repair house fuses, or to correct house wiring or plumbing. 3. MAYTAG® LAUNDRY WARRANTY LIMITED WARRANTY For one year from...


