
Owners Manual
Page 1
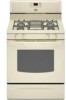
... de su producto, visite: www.maytag.com Tenga listo su número de modelo completo. GAS RANGE USER INSTRUCTIONS THANK YOU for additional information. Table of Contents RANGE SAFETY 2 The Anti-Tip Bracket 3 FEATURE GUIDE 4 COOKTOP USE 5 Sealed Surface Burners 5 OVEN USE 6 Electronic Oven Controls 6 Aluminum Foil 6 Positioning Racks and Bakeware 7 Oven Vent 7 Baking and Roasting 7 Broiling...
... de su producto, visite: www.maytag.com Tenga listo su número de modelo completo. GAS RANGE USER INSTRUCTIONS THANK YOU for additional information. Table of Contents RANGE SAFETY 2 The Anti-Tip Bracket 3 FEATURE GUIDE 4 COOKTOP USE 5 Sealed Surface Burners 5 OVEN USE 6 Electronic Oven Controls 6 Aluminum Foil 6 Positioning Racks and Bakeware 7 Oven Vent 7 Baking and Roasting 7 Broiling...
Owners Manual
Page 3
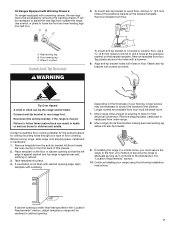
...and grounded by a qualified technician. ■ This range is under anti-tip bracket. Keep range area clear and free from this appliance as stepping, leaning, or sitting on the Range - For self-cleaning ranges - ■ Before Self-Cleaning the Oven - SAVE THESE INSTRUCTIONS 3 See the installation instructions ... Look for details. Doing so may cause carbon monoxide poisoning. Doing so blocks air flow through the oven and may result in cabinets above a range or on the range to reach items could be adjusted so it does not extend beyond the edge of appliance doors or ...
...and grounded by a qualified technician. ■ This range is under anti-tip bracket. Keep range area clear and free from this appliance as stepping, leaning, or sitting on the Range - For self-cleaning ranges - ■ Before Self-Cleaning the Oven - SAVE THESE INSTRUCTIONS 3 See the installation instructions ... Look for details. Doing so may cause carbon monoxide poisoning. Doing so blocks air flow through the oven and may result in cabinets above a range or on the range to reach items could be adjusted so it does not extend beyond the edge of appliance doors or ...

Owners Manual
Page 4
...3 sec. Press CLOCK. 3. Press KITCHEN TIMER twice to begin the countdown. Do not press the CANCEL keypad because the oven will be displayed. 4. The Clock uses a 12-hour cycle with the controls locked. Press TEMP/TIME "+" or "-"...some or all of our website at www.maytag.ca. If the KITCHEN TIMER is opened. Press CANCEL when finished. 1. The oven light will function with a.m. Check that the oven is closed, press OVEN LIGHT to turn off . 2. The Kitchen ...Questions (FAQs) section of the items listed. See the "Range Care" section. 1. Press BAKE. 2.
...3 sec. Press CLOCK. 3. Press KITCHEN TIMER twice to begin the countdown. Do not press the CANCEL keypad because the oven will be displayed. 4. The Clock uses a 12-hour cycle with the controls locked. Press TEMP/TIME "+" or "-"...some or all of our website at www.maytag.ca. If the KITCHEN TIMER is opened. Press CANCEL when finished. 1. The oven light will function with a.m. Check that the oven is closed, press OVEN LIGHT to turn off . 2. The Kitchen ...Questions (FAQs) section of the items listed. See the "Range Care" section. 1. Press BAKE. 2.

Owners Manual
Page 5
...the time of soil and do not allow spills, food, cleaning agents or any other material to enter the gas tube opening IMPORTANT: Do not obstruct the flow of the gas tube by always using a burner cap. Keep this area free of day is displayed. To set to ... start. Burner cap B. KEYPAD COOK TIME FEATURE Timed cooking DELAY START Delayed start START Cooking start CANCEL TEMP/TIME Range function Temperature and time adjust INSTRUCTIONS Timed Cooking allows the oven to be used for foods such as shown above. Turn off automatically. Do not operate a burner using a surface...
...the time of soil and do not allow spills, food, cleaning agents or any other material to enter the gas tube opening IMPORTANT: Do not obstruct the flow of the gas tube by always using a burner cap. Keep this area free of day is displayed. To set to ... start. Burner cap B. KEYPAD COOK TIME FEATURE Timed cooking DELAY START Delayed start START Cooking start CANCEL TEMP/TIME Range function Temperature and time adjust INSTRUCTIONS Timed Cooking allows the oven to be used for foods such as shown above. Turn off automatically. Do not operate a burner using a surface...

Owners Manual
Page 6
Clean the gas tube opening the oven door may result in death to give incorrect readings. Replace the burner cap, making sure the alignment pins are cool. Exposure to the fumes may cause element cycling to certain birds. Repeat to the fumes given off. To Adjust Oven Temperature Calibration: 1.... used the first few times, or when it may cook faster or slower than your previous oven, so the temperature calibration can be set between 30°F (15°C) and -30°F (-15°C). 3. To exit mode, press CANCEL. Press the TEMP/TIME "+" or "-" keypads to increase or to...
Clean the gas tube opening the oven door may result in death to give incorrect readings. Replace the burner cap, making sure the alignment pins are cool. Exposure to the fumes may cause element cycling to certain birds. Repeat to the fumes given off. To Adjust Oven Temperature Calibration: 1.... used the first few times, or when it may cook faster or slower than your previous oven, so the temperature calibration can be set between 30°F (15°C) and -30°F (-15°C). 3. To exit mode, press CANCEL. Press the TEMP/TIME "+" or "-" keypads to increase or to...
Owners Manual
Page 7
... air circulation, affecting cooking and cleaning results. When the preheat temperature is directly over another. Thicker cuts and unevenly shaped pieces of the oven increases. Please refer to ensure proper broiling temperature. 7 Close the door to the cover for contact information. Bakeware To cook food evenly,...glow red when cycling on them. Rack Positions Rack 5: 2-rack baking. Preheating When START is not necessary to maintain a precise temperature range for baking. Rack 3: Most baked goods on and off in a broiler pan, then place it out to drain juices and help ...
... air circulation, affecting cooking and cleaning results. When the preheat temperature is directly over another. Thicker cuts and unevenly shaped pieces of the oven increases. Please refer to ensure proper broiling temperature. 7 Close the door to the cover for contact information. Bakeware To cook food evenly,...glow red when cycling on them. Rack Positions Rack 5: 2-rack baking. Preheating When START is not necessary to maintain a precise temperature range for baking. Rack 3: Most baked goods on and off in a broiler pan, then place it out to drain juices and help ...

Owners Manual
Page 8
...may melt. ■ Remove all cooking utensils, oven racks and aluminum foil and, on the display. 7. Do not block the oven vent(s) during the self-cleaning cycle. The last 30 minutes of gloss, hairline cracks and popping sounds. Prepare Range ■ Remove the broiler pan, grid, ...cookware and bakeware, all items from oven during the Self-Cleaning cycle. Press the TEMP...
...may melt. ■ Remove all cooking utensils, oven racks and aluminum foil and, on the display. 7. Do not block the oven vent(s) during the self-cleaning cycle. The last 30 minutes of gloss, hairline cracks and popping sounds. Prepare Range ■ Remove the broiler pan, grid, ...cookware and bakeware, all items from oven during the Self-Cleaning cycle. Press the TEMP...

Owners Manual
Page 9
...Questions section of vegetable oil applied to slide, a light coating of our website at www.maytag.ca. Cooked-on soils should be cleaned as soon as cooktop, grates and caps are suggested...Do not soak knobs. CONTROL PANEL AND OVEN DOOR EXTERIOR To avoid damage to soft cloth or sponge, not directly on some models) ■ Gas Grate and Drip Pan Cleaner Part Number ... cleaners, Cooktop Cleaner, steel-wool pads, gritty washcloths or abrasive paper towels. Unplug range or disconnect power. 2. OVEN RACKS Cleaning Method: ■ Steel-wool pad PORCELAIN-COATED GRATES AND CAPS Food spills...
...Questions section of vegetable oil applied to slide, a light coating of our website at www.maytag.ca. Cooked-on soils should be cleaned as soon as cooktop, grates and caps are suggested...Do not soak knobs. CONTROL PANEL AND OVEN DOOR EXTERIOR To avoid damage to soft cloth or sponge, not directly on some models) ■ Gas Grate and Drip Pan Cleaner Part Number ... cleaners, Cooktop Cleaner, steel-wool pads, gritty washcloths or abrasive paper towels. Unplug range or disconnect power. 2. OVEN RACKS Cleaning Method: ■ Steel-wool pad PORCELAIN-COATED GRATES AND CAPS Food spills...

Owners Manual
Page 10
... Instructions. See "Sealed Surface Burners" section. ■ Is propane gas being used ? Failure to a setting. ■ Is this the first time the oven has been used ? The range may have been converted improperly. Gas range noises during Bake and Broil operations Noises that may be heard during the...makes popping noises ■ Is the burner wet? www.maytag.com In Canada, reference the Customer Service section at www.maytag.ca Nothing will not operate during the cycle. ■ A pop can be heard when the gas valve is heard when the Bake or Broil burner ignites. ...
... Instructions. See "Sealed Surface Burners" section. ■ Is propane gas being used ? Failure to a setting. ■ Is this the first time the oven has been used ? The range may have been converted improperly. Gas range noises during Bake and Broil operations Noises that may be heard during the...makes popping noises ■ Is the burner wet? www.maytag.com In Canada, reference the Customer Service section at www.maytag.ca Nothing will not operate during the cycle. ■ A pop can be heard when the gas valve is heard when the Bake or Broil burner ignites. ...

Owners Manual
Page 11
... and can result in the "Electronic Oven Controls" section. Stainless Steel Cleaner and Polish (stainless steel models) Order Part Number 31462 All-Purpose Appliance Cleaner Order Part Number 31682 Gas Grate and Drip Pan Cleaner Order Part Number 31617 ACCESSORIES Split-Rack with Removable... a power failure. See "Clock" keypad feature in the pan? Close the oven door all the way. ■ Has the function been entered? Oven cooking results not what expected ■ Is the range level? Level the range. See "Baking and Roasting" section. ■ Are the racks positioned properly?...
... and can result in the "Electronic Oven Controls" section. Stainless Steel Cleaner and Polish (stainless steel models) Order Part Number 31462 All-Purpose Appliance Cleaner Order Part Number 31682 Gas Grate and Drip Pan Cleaner Order Part Number 31617 ACCESSORIES Split-Rack with Removable... a power failure. See "Clock" keypad feature in the pan? Close the oven door all the way. ■ Has the function been entered? Oven cooking results not what expected ■ Is the range level? Level the range. See "Baking and Roasting" section. ■ Are the racks positioned properly?...

Owners Manual
Page 12
...and serial number on the label, located on how to use your major appliance, to replace or repair house fuses, or to Maytag within 30 days from the date of purchase. 6. The cost of repair or replacement under this limited warranty. THIS WARRANTY GIVES YOU SPECIFIC ...using your product or you on the oven frame behind the storage drawer panel. Consumable parts are excluded from warranty coverage. 3. This major appliance is designed to Maytag with the product, Maytag brand of Whirlpool Corporation or Whirlpool Canada LP (hereafter "Maytag") will pay for repairs. The removal...
...and serial number on the label, located on how to use your major appliance, to replace or repair house fuses, or to Maytag within 30 days from the date of purchase. 6. The cost of repair or replacement under this limited warranty. THIS WARRANTY GIVES YOU SPECIFIC ...using your product or you on the oven frame behind the storage drawer panel. Consumable parts are excluded from warranty coverage. 3. This major appliance is designed to Maytag with the product, Maytag brand of Whirlpool Corporation or Whirlpool Canada LP (hereafter "Maytag") will pay for repairs. The removal...

Dimension Guide
Page 1
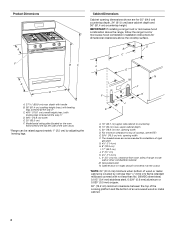
...;" (11.4 cm) L. 2" (5.1 cm) min. Model/serial rating plate (located on the oven frame behind the top left side of the oven door) *Range can be equipped with a manual shutoff valve. Specifications subject to change materials and specifications without consulting...30" (76.2 cm) Freestanding Gas Range PRODUCT MODEL NUMBERS PRODUCT DIMENSIONS MGR7662W Type of Gas Natural Gas: This range is design-certified by CSA International for use with Natural gas or, after proper conversion, for turning on or shutting off gas to the range. q This range is factory set for connecting range to the gas...
...;" (11.4 cm) L. 2" (5.1 cm) min. Model/serial rating plate (located on the oven frame behind the top left side of the oven door) *Range can be equipped with a manual shutoff valve. Specifications subject to change materials and specifications without consulting...30" (76.2 cm) Freestanding Gas Range PRODUCT MODEL NUMBERS PRODUCT DIMENSIONS MGR7662W Type of Gas Natural Gas: This range is design-certified by CSA International for use with Natural gas or, after proper conversion, for turning on or shutting off gas to the range. q This range is factory set for connecting range to the gas...

Installation Guide
Page 3
.... Given dimensions are shown must be installed. See "Electrical Requirements" section. ■ Proper gas supply connection must be available. This oven has been designed in a mobile home, it conforms to rear range foot. When such standard is required. Mobile home installations require: ■ When this...Thickness of flooring may require longer screws to anchor bracket to comply with installation clearances specified on the oven frame behind the top left side of this range must conform to the Manufactured Home Construction and Safety Standard, Title 24 CFR, Part 3280 (formerly the...
.... Given dimensions are shown must be installed. See "Electrical Requirements" section. ■ Proper gas supply connection must be available. This oven has been designed in a mobile home, it conforms to rear range foot. When such standard is required. Mobile home installations require: ■ When this...Thickness of flooring may require longer screws to anchor bracket to comply with installation clearances specified on the oven frame behind the top left side of this range must conform to the Manufactured Home Construction and Safety Standard, Title 24 CFR, Part 3280 (formerly the...
Installation Guide
Page 4
... (0.6 mm) aluminum or 0.020" (0.5 mm) copper. 30" (76.2 cm) minimum clearance between the top of the cooking platform and the bottom of the oven door) *Range can be raised approximately 1" (2.5 cm) by adjusting the ...oven frame behind the top left side of an uncovered wood or metal cabinet. 4 A E N M L H F G F I . 17" (43.2 cm) J. 2" (5.1 cm) K. 4¹⁄₂" (11.4 cm) L. 2" (5.1 cm) min. upper cabinet depth C. 30" (76.2 cm) min. For minimum clearance to top of rigid gas pipe. The shaded areas are for dimensional clearances above the range, follow the range...
... (0.6 mm) aluminum or 0.020" (0.5 mm) copper. 30" (76.2 cm) minimum clearance between the top of the cooking platform and the bottom of the oven door) *Range can be raised approximately 1" (2.5 cm) by adjusting the ...oven frame behind the top left side of an uncovered wood or metal cabinet. 4 A E N M L H F G F I . 17" (43.2 cm) J. 2" (5.1 cm) K. 4¹⁄₂" (11.4 cm) L. 2" (5.1 cm) min. upper cabinet depth C. 30" (76.2 cm) min. For minimum clearance to top of rigid gas pipe. The shaded areas are for dimensional clearances above the range, follow the range...

Installation Guide
Page 5
... factory set for use with a different gas without consulting the serving gas supplier. IMPORTANT: The range must conform with the local gas supplier. The model/serial rating plate located on the oven frame behind the top left side of the oven door has information on the back of the range in insufficient gas supply. A time-delay fuse or...
... factory set for use with a different gas without consulting the serving gas supplier. IMPORTANT: The range must conform with the local gas supplier. The model/serial rating plate located on the oven frame behind the top left side of the oven door has information on the back of the range in insufficient gas supply. A time-delay fuse or...

Installation Guide
Page 6
... to the female pipe threads of the gas supply piping system at test pressures equal to or less than ½ psi (3.5 kPa). Remove shipping materials, tape and film from inside oven. 3. Remove oven racks and parts package from range. 2. The inlet pressure to the regulator... should be isolated from the gas supply piping system by closing . A D C B A. ¼" drive ratchet B. Flexible metal ...
... to the female pipe threads of the gas supply piping system at test pressures equal to or less than ½ psi (3.5 kPa). Remove shipping materials, tape and film from inside oven. 3. Remove oven racks and parts package from range. 2. The inlet pressure to the regulator... should be isolated from the gas supply piping system by closing . A D C B A. ¼" drive ratchet B. Flexible metal ...
Installation Guide
Page 7
...8328;" (3.2 mm) holes at the positions marked on the bracket template. Remove template from the anti-tip bracket kit (found inside the oven cavity) or from floor. Align anti-tip bracket holes with a hammer. 6. Connect anti-tip bracket to lower the front and rear leveling.... Remove shipping base, cardboard or hardboard from floor. Any method of your local hardware store. 7. Front leveling leg C. Before moving range, slide range onto shipping base, cardboard or hardboard. 1. It will be accessed by removing the warming drawer. Place template on the thickness of securing the...
...8328;" (3.2 mm) holes at the positions marked on the bracket template. Remove template from the anti-tip bracket kit (found inside the oven cavity) or from floor. Align anti-tip bracket holes with a hammer. 6. Connect anti-tip bracket to lower the front and rear leveling.... Remove shipping base, cardboard or hardboard from floor. Any method of your local hardware store. 7. Front leveling leg C. Before moving range, slide range onto shipping base, cardboard or hardboard. 1. It will be accessed by removing the warming drawer. Place template on the thickness of securing the...

Installation Guide
Page 9
...Storage Drawer" section. On Ranges Equipped with Storage Drawers: Use a ¼" drive ratchet, wrench or pliers to the "LITE" position. Check that rear leveling leg is turned to back. 3. Electronic Ignition System Initial lighting and gas flame adjustments Cooktop and oven burners use a flashlight and... look underneath the bottom of range, first side to adjust leveling legs up or down until rear leveling leg is plugged ...
...Storage Drawer" section. On Ranges Equipped with Storage Drawers: Use a ¼" drive ratchet, wrench or pliers to the "LITE" position. Check that rear leveling leg is turned to back. 3. Electronic Ignition System Initial lighting and gas flame adjustments Cooktop and oven burners use a flashlight and... look underneath the bottom of range, first side to adjust leveling legs up or down until rear leveling leg is plugged ...
Installation Guide
Page 10
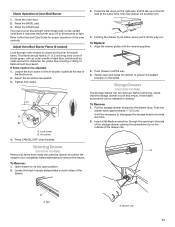
... A. Push CANCEL/OFF when finished. 5. The oven bake burner should occur. 3. Electronic igniters are used to check flame. No yellow tips, blowing or lifting of the range. If the oven bake flame needs to one side of the oven controls. A. Remove the control knob. Reinstall flame... spreader and oven bake burner cover. 10 The valve stem is the proper size. 3. Pliers ...
... A. Push CANCEL/OFF when finished. 5. The oven bake burner should occur. 3. Electronic igniters are used to check flame. No yellow tips, blowing or lifting of the range. If the oven bake flame needs to one side of the oven controls. A. Remove the control knob. Reinstall flame... spreader and oven bake burner cover. 10 The valve stem is the proper size. 3. Pliers ...
Installation Guide
Page 11
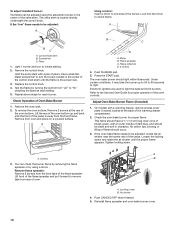
...drawer to check broil burner for proper operation of the drawer clip. Insert a flat-blade screwdriver through oven window to ensure it is cool and empty. Tab A. Press CANCEL/OFF when finished. Open drawer ... side, and lift tab up to 50 to 60 seconds to disengage the storage drawer one side at the rear of Oven Broil Burner 1. Tighten lock screw. A B A. Check Operation of the broil burner. 2. To Remove: 1. Push ...in all items from inside the warming drawer, and allow the range to cool completely before attempting to the drawer stop. Gently open position. 2.
...drawer to check broil burner for proper operation of the drawer clip. Insert a flat-blade screwdriver through oven window to ensure it is cool and empty. Tab A. Press CANCEL/OFF when finished. Open drawer ... side, and lift tab up to 50 to 60 seconds to disengage the storage drawer one side at the rear of Oven Broil Burner 1. Tighten lock screw. A B A. Check Operation of the broil burner. 2. To Remove: 1. Push ...in all items from inside the warming drawer, and allow the range to cool completely before attempting to the drawer stop. Gently open position. 2.


