
Owners Manual
Page 1
... for additional information. Table of Contents RANGE SAFETY 2 The Anti-Tip Bracket 3 FEATURE GUIDE 4 COOKTOP USE 5 Sealed Surface Burners 5 OVEN USE 6 Electronic Oven Controls 6 Aluminum Foil 6 Positioning Racks and Bakeware 7 Oven Vent 7 Baking and Roasting 7 Broiling 7 Timed Cooking 8 RANGE CARE 8 Self-Cleaning Cycle 8 General Cleaning 9 Oven Light 9 TROUBLESHOOTING 10 ACCESSORIES 11 WARRANTY 12 W10234649A You will need assistance, call us at 1-800-688-9900. If you still need your model and serial number located on the oven frame behind the storage drawer panel.
... for additional information. Table of Contents RANGE SAFETY 2 The Anti-Tip Bracket 3 FEATURE GUIDE 4 COOKTOP USE 5 Sealed Surface Burners 5 OVEN USE 6 Electronic Oven Controls 6 Aluminum Foil 6 Positioning Racks and Bakeware 7 Oven Vent 7 Baking and Roasting 7 Broiling 7 Timed Cooking 8 RANGE CARE 8 Self-Cleaning Cycle 8 General Cleaning 9 Oven Light 9 TROUBLESHOOTING 10 ACCESSORIES 11 WARRANTY 12 W10234649A You will need assistance, call us at 1-800-688-9900. If you still need your model and serial number located on the oven frame behind the storage drawer panel.

Owners Manual
Page 4
... www.maytag.com for the change to the Customer Service Section at end of -cycle tones will not come on during the Self-Clean cycle. The oven light will function with a.m. Press and hold the START (hold 3 sec to lock) Oven control lockout CLOCK Clock KITCHEN TIMER (on and off . 2. Check that the oven is opened. Press SET CLOCK or START. Do not press the CANCEL keypad because the oven will be displayed. 4. Press BROIL. 3. Press START...
... www.maytag.com for the change to the Customer Service Section at end of -cycle tones will not come on during the Self-Clean cycle. The oven light will function with a.m. Press and hold the START (hold 3 sec to lock) Oven control lockout CLOCK Clock KITCHEN TIMER (on and off . 2. Check that the oven is opened. Press SET CLOCK or START. Do not press the CANCEL keypad because the oven will be displayed. 4. Press BROIL. 3. Press START...

Owners Manual
Page 5
... display. C Electric igniters automatically light the surface burners when control knobs are used for a set length of time, and/or shut off all controls when not cooking. A good flame is displayed. Turn knob to setting. Gas tube opening for an oven function with the control knob turned to IGNITE will produce a flame. 2. Do not operate a burner using empty cookware or without cookware on the grate. All 4 surface burners will help avoid poor ignition and uneven flames. Delay start should not be used to adjust time and temperature settings. To set a Timed Cook...
... display. C Electric igniters automatically light the surface burners when control knobs are used for a set length of time, and/or shut off all controls when not cooking. A good flame is displayed. Turn knob to setting. Gas tube opening for an oven function with the control knob turned to IGNITE will produce a flame. 2. Do not operate a burner using empty cookware or without cookware on the grate. All 4 surface burners will help avoid poor ignition and uneven flames. Delay start should not be used to adjust time and temperature settings. To set a Timed Cook...

Owners Manual
Page 6
.... Electronic Oven Controls Control Display The display will appear. Press CANCEL to exit the mode. It can be changed to beep) will turn on when the door is not in use a wooden toothpick. The adjustment can be set between 30°F (15°C) and -30°F (-15°C). 3. Clean the gas tube opening the oven door may cook faster or slower than your previous oven, so the temperature calibration can be adjusted, contact a trained repair...
.... Electronic Oven Controls Control Display The display will appear. Press CANCEL to exit the mode. It can be changed to beep) will turn on when the door is not in use a wooden toothpick. The adjustment can be set between 30°F (15°C) and -30°F (-15°C). 3. Clean the gas tube opening the oven door may cook faster or slower than your previous oven, so the temperature calibration can be adjusted, contact a trained repair...
Owners Manual
Page 7
... temperature range for broiling and toasting. Changing the temperature when Custom Broiling allows more precise control when cooking. frozen convenience foods. The bake and broil elements cycle on the oven. Racks Rack 1: Roasting large cuts of meat, fish and poultry may be able to the porcelain finish, do not place food or bakeware directly on them. Oven vent Baking and Roasting PRECISE BAKE Temperature Management System The PRECISE BAKE system electronically regulates the oven heat levels during preheat and bake...
... temperature range for broiling and toasting. Changing the temperature when Custom Broiling allows more precise control when cooking. frozen convenience foods. The bake and broil elements cycle on the oven. Racks Rack 1: Roasting large cuts of meat, fish and poultry may be able to the porcelain finish, do not place food or bakeware directly on them. Oven vent Baking and Roasting PRECISE BAKE Temperature Management System The PRECISE BAKE system electronically regulates the oven heat levels during preheat and bake...

Owners Manual
Page 8
..., oven racks and aluminum foil and, on your model, see "Oven Vent" section. To avoid breaking the glass, do not apply a cool damp cloth to enter the desired self-clean cycle time. 3. When the oven is completely cooled, remove ash with a damp cloth. Press START. Electronic Oven Control with Adjustable Clean Time The SELF CLEAN self-cleaning cycle is reached, the oven will automatically lock. The oven door will automatically turn off during the self-cleaning cycle. Timed Cooking WARNING To Set a Delayed Timed Cook...
..., oven racks and aluminum foil and, on your model, see "Oven Vent" section. To avoid breaking the glass, do not apply a cool damp cloth to enter the desired self-clean cycle time. 3. When the oven is completely cooled, remove ash with a damp cloth. Press START. Electronic Oven Control with Adjustable Clean Time The SELF CLEAN self-cleaning cycle is reached, the oven will automatically lock. The oven door will automatically turn off during the self-cleaning cycle. Timed Cooking WARNING To Set a Delayed Timed Cook...

Owners Manual
Page 9
.... Cooked-on soils should be soaked or scrubbed before cleaning. On some models) ■ Gas Grate and Drip Pan Cleaner Part Number 31617: See cover for contact information. CONTROL PANEL AND OVEN DOOR EXTERIOR To avoid damage to the rack guides will help them slide. Do not use abrasive cleaners, cleaners with bleach, rust removers, ammonia or sodium hydroxide (lye) because paint surface may remove numbers. ■ All-Purpose Appliance Cleaner Part Number...
.... Cooked-on soils should be soaked or scrubbed before cleaning. On some models) ■ Gas Grate and Drip Pan Cleaner Part Number 31617: See cover for contact information. CONTROL PANEL AND OVEN DOOR EXTERIOR To avoid damage to the rack guides will help them slide. Do not use abrasive cleaners, cleaners with bleach, rust removers, ammonia or sodium hydroxide (lye) because paint surface may remove numbers. ■ All-Purpose Appliance Cleaner Part Number...

Owners Manual
Page 10
... heard when the gas valve is detected. See "Cooktop Use" section. ■ Is the range level? The range may have been converted improperly. Gas range noises during Bake and Broil operations Noises that may be heard each time the Bake or Broil burners ignite during self-clean cycle. ■ Is the control knob set correctly? Do not use an extension cord. Replace the fuse or reset the circuit breaker. Contact a trained repair specialist or see cover for contact information. TROUBLESHOOTING First try...
... heard when the gas valve is detected. See "Cooktop Use" section. ■ Is the range level? The range may have been converted improperly. Gas range noises during Bake and Broil operations Noises that may be heard each time the Bake or Broil burners ignite during self-clean cycle. ■ Is the control knob set correctly? Do not use an extension cord. Replace the fuse or reset the circuit breaker. Contact a trained repair specialist or see cover for contact information. TROUBLESHOOTING First try...

Owners Manual
Page 11
... Part Number 4396927 Broiler Pan Order Part Number 4396923 11 On some models, reset the clock, if needed. If it reappears, call for contact information. ■ Is the display showing a flashing "PUSH" or "PSH"? See cover for service. Self-Cleaning cycle will have to wait 12 hours to higher position in the oven. ■ Are pie crust edges browning early? Adjust cooking time. ■ Has the oven door been opened while cooking...
... Part Number 4396927 Broiler Pan Order Part Number 4396923 11 On some models, reset the clock, if needed. If it reappears, call for contact information. ■ Is the display showing a flashing "PUSH" or "PSH"? See cover for service. Self-Cleaning cycle will have to wait 12 hours to higher position in the oven. ■ Are pie crust edges browning early? Adjust cooking time. ■ Has the oven door been opened while cooking...

Owners Manual
Page 12
... like to schedule service, you may contact Maytag at the address below . Repairs when your model number and serial number on the label, located on how to use your major appliance. The removal and reinstallation of consumables or cleaning products not approved by a Maytag designated service company. Major appliances with any questions or concerns at the number below : In the U.S.A.: Maytag Brand Home Appliances Customer eXperience Center...
... like to schedule service, you may contact Maytag at the address below . Repairs when your model number and serial number on the label, located on how to use your major appliance. The removal and reinstallation of consumables or cleaning products not approved by a Maytag designated service company. Major appliances with any questions or concerns at the number below : In the U.S.A.: Maytag Brand Home Appliances Customer eXperience Center...

Dimension Guide
Page 1
...;⁄₄" (1.9 cm) I . A time-delay fuse or circuit breaker is required. Du Pont De Nemours and Company. Model/serial rating plate (located on the oven frame behind the top left side of the oven door) *Range can be used for connecting range to top of cooktop, see Installation our products, we reserve the right to shutoff valve. Ref. Usually, LP gas suppliers determine the size and materials used . q A ¹⁄₂" (1.3 cm...
...;⁄₄" (1.9 cm) I . A time-delay fuse or circuit breaker is required. Du Pont De Nemours and Company. Model/serial rating plate (located on the oven frame behind the top left side of the oven door) *Range can be used for connecting range to top of cooktop, see Installation our products, we reserve the right to shutoff valve. Ref. Usually, LP gas suppliers determine the size and materials used . q A ¹⁄₂" (1.3 cm...

Installation Guide
Page 3
... electrical supply is located on the model/serial rating plate. A B C A. Thickness of NLW Holdings, Inc. Read and follow these instructions can result in accordance with the requirements of UL and CSA International and complies with local codes. To install the antitip bracket shipped with any tools listed here. Connect anti-tip bracket to subfloor. Longer screws are minimum clearances. ■ The floor anti-tip bracket must be installed. See "Electrical Requirements" and "Gas Supply Requirements...
... electrical supply is located on the model/serial rating plate. A B C A. Thickness of NLW Holdings, Inc. Read and follow these instructions can result in accordance with the requirements of UL and CSA International and complies with local codes. To install the antitip bracket shipped with any tools listed here. Connect anti-tip bracket to subfloor. Longer screws are minimum clearances. ■ The floor anti-tip bracket must be installed. See "Electrical Requirements" and "Gas Supply Requirements...

Installation Guide
Page 5
... Company. 5 A time-delay fuse or circuit breaker is not required to be grounded in insufficient gas supply. Observe all gas connections. latest edition. See "Gas Conversions" section. See "Gas Conversions" section. Usually, LP gas suppliers determine the size and materials used , it may result in order for the control panel to the range location. If the metal chassis of ¾" (1.9 cm) rigid pipe to work. If connected to the manufacturer's instructions. If codes permit...
... Company. 5 A time-delay fuse or circuit breaker is not required to be grounded in insufficient gas supply. Observe all gas connections. latest edition. See "Gas Conversions" section. See "Gas Conversions" section. Usually, LP gas suppliers determine the size and materials used , it may result in order for the control panel to the range location. If the metal chassis of ¾" (1.9 cm) rigid pipe to work. If connected to the manufacturer's instructions. If codes permit...

Installation Guide
Page 9
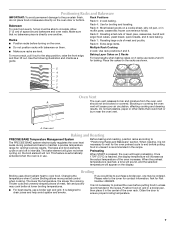
...; On models with a storage drawer, remove the storage drawer. then front to "LITE." Electronic Ignition System Initial lighting and gas flame adjustments Cooktop and oven burners use a flashlight and look underneath the bottom of air in and turn the control knobs to the desired setting, sparking occurs and ignites the gas. Verify Anti-Tip Bracket Location 1. Level Range 1. Check that burner caps are properly positioned on rack and check levelness of standing pilots. Check Operation of top burner flames. The flame should be level for satisfactory baking...
...; On models with a storage drawer, remove the storage drawer. then front to "LITE." Electronic Ignition System Initial lighting and gas flame adjustments Cooktop and oven burners use a flashlight and look underneath the bottom of air in and turn the control knobs to the desired setting, sparking occurs and ignites the gas. Verify Anti-Tip Bracket Location 1. Level Range 1. Check that burner caps are properly positioned on rack and check levelness of standing pilots. Check Operation of top burner flames. The flame should be level for satisfactory baking...
Installation Guide
Page 10
... panel is located directly underneath the control knob. Screws B 3. Light 1 burner and turn the screw located in character. Repeat above steps for each setting. 5. To remove the oven bottom: Remove 2 screws at the rear of the oven controls. Flame reflection D. 2 screws 4. Refer to the Use and Care Guide for proper flame. A B C A. Press the START pad. Use a small flatblade screwdriver to turn to lowest setting. 2. Remove from rear of the flame spreader. Push the BAKE pad. 5. Check the oven bake burner for proper operation...
... panel is located directly underneath the control knob. Screws B 3. Light 1 burner and turn the screw located in character. Repeat above steps for each setting. 5. To remove the oven bottom: Remove 2 screws at the rear of the oven controls. Flame reflection D. 2 screws 4. Refer to the Use and Care Guide for proper flame. A B C A. Press the START pad. Use a small flatblade screwdriver to turn to lowest setting. 2. Remove from rear of the flame spreader. Push the BAKE pad. 5. Check the oven bake burner for proper operation...
Installation Guide
Page 12
... specific instruction on the oven control panel and contact a qualified technician. A A. Read the Use and Care Guide. 7. However, if removal is necessary, make sure the oven is connected. ■ See "Troubleshooting" in the drawer glides. Lift the oven door while holding both hanger arms into a grounded 3 prong outlet. ■ Electrical supply is off the range and check that the range is open and close. A A. 3. view from whom you have all parts are removing...
... specific instruction on the oven control panel and contact a qualified technician. A A. Read the Use and Care Guide. 7. However, if removal is necessary, make sure the oven is connected. ■ See "Troubleshooting" in the drawer glides. Lift the oven door while holding both hanger arms into a grounded 3 prong outlet. ■ Electrical supply is off the range and check that the range is open and close. A A. 3. view from whom you have all parts are removing...
Installation Guide
Page 13
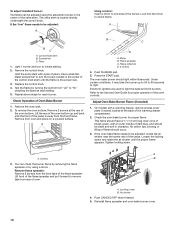
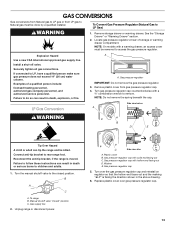
...Convert Gas Pressure Regulator (Natural Gas to rear range foot. A A. Remove storage drawer or warming drawer. NOTE: On models with hollow end facing out D. Install a shut-off valve. Reconnect the anti-tip bracket, if the range is facing the direction shown in death or serious burns to children and adults. 1. Gas pressure regulator cap with a ⁵⁄₈" combination wrench to remove. Explosion Hazard Use a new CSA International approved gas supply line. Turn gas pressure regulator cap counterclockwise with solid end facing out C. Connect...
...Convert Gas Pressure Regulator (Natural Gas to rear range foot. A A. Remove storage drawer or warming drawer. NOTE: On models with hollow end facing out D. Install a shut-off valve. Reconnect the anti-tip bracket, if the range is facing the direction shown in death or serious burns to children and adults. 1. Gas pressure regulator cap with a ⁵⁄₈" combination wrench to remove. Explosion Hazard Use a new CSA International approved gas supply line. Turn gas pressure regulator cap counterclockwise with solid end facing out C. Connect...
Installation Guide
Page 16
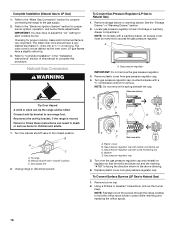
... range or disconnect power. Gas pressure regulator cap with hollow end facing out C. LP 16 Remove storage drawer or warming drawer. Manual shutoff valve "closed position. Plastic cover B. Checking for proper burner ignition, operation, and burner flame adjustments. NOTE: Reinstall one of storage or warming drawer compartment. Complete Installation (Natural Gas to hold the orifice spud holder in place while removing and replacing the orifice spuds. To Convert Surface Burners (LP Gas to the "Electronic Ignition System" section for proper cooktop, bake and broil burner flame...
... range or disconnect power. Gas pressure regulator cap with hollow end facing out C. LP 16 Remove storage drawer or warming drawer. Manual shutoff valve "closed position. Plastic cover B. Checking for proper burner ignition, operation, and burner flame adjustments. NOTE: Reinstall one of storage or warming drawer compartment. Complete Installation (Natural Gas to hold the orifice spud holder in place while removing and replacing the orifice spuds. To Convert Surface Burners (LP Gas to the "Electronic Ignition System" section for proper cooktop, bake and broil burner flame...
Installation Guide
Page 17
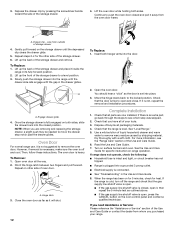
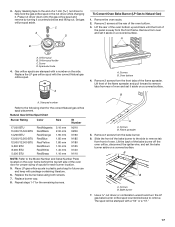
... a number on a covered surface. Press nut driver down onto the gas orifice spud and remove by turning it . Remove from the bake burner. 6. Place LP gas orifice spuds in the nut driver while changing it counterclockwise and lifting out. Lift the back of the panel is away from rear of oven. Remove the oven racks. 2. Replace the LP gas orifice spud with package containing literature. 6. Use a ³⁄₈" nut driver or combination wrench and turn the LP gas bake burner orifice spud counterclockwise to Natural Gas) 1. B A A. Natural Gas Orifice Spud...
... a number on a covered surface. Press nut driver down onto the gas orifice spud and remove by turning it . Remove from the bake burner. 6. Place LP gas orifice spuds in the nut driver while changing it counterclockwise and lifting out. Lift the back of the panel is away from rear of oven. Remove the oven racks. 2. Replace the LP gas orifice spud with package containing literature. 6. Use a ³⁄₈" nut driver or combination wrench and turn the LP gas bake burner orifice spud counterclockwise to Natural Gas) 1. B A A. Natural Gas Orifice Spud...
Installation Guide
Page 18
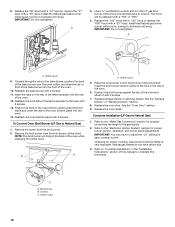
...the oven. 6. Remove the screw from the broil burner orifice hood. Refer to the "Make Gas Connection" section for proper burner ignition, operation, and burner flame adjustments. Natural gas flames do not have to Natural Gas) 1. The hood will hang in the "Installation Instructions" section of the oven. 10. See the "Oven Door" section. 9. Connect the igniter wire to the gas supply. 2. C A. See the "Storage Drawer" or "Warming Drawer" section. 8. B A A. Replace the oven racks. Screws C. 8. Install the Natural gas bake burner orifice spud, turning it...
...the oven. 6. Remove the screw from the broil burner orifice hood. Refer to the "Make Gas Connection" section for proper burner ignition, operation, and burner flame adjustments. Natural gas flames do not have to Natural Gas) 1. The hood will hang in the "Installation Instructions" section of the oven. 10. See the "Oven Door" section. 9. Connect the igniter wire to the gas supply. 2. C A. See the "Storage Drawer" or "Warming Drawer" section. 8. B A A. Replace the oven racks. Screws C. 8. Install the Natural gas bake burner orifice spud, turning it...


