Installation Guide
Page 5
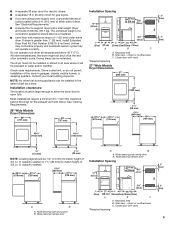
... Kit, Part Number 279810. If not level, clothes may not tumble properly and automatic sensor cycles may not operate correctly. See "Venting Requirements." 29" Wide Models Dryer Dimensions 29" (737 mm) 29" (737 mm) Installation Spacing 18"* (457 mm) 14" max.* (356 mm) 48 in.2* (310 cm )2 ...quarters. closet or confined area C. The combined weight of a companion appliance should also be considered. ■■ Level floor with vents *Required spacing 27" Wide Models Dryer Dimensions 27" (686 mm) 3"* (76 mm) 43" (1092 mm) 223/4" (578 mm) 291/2" (749 mm) 11/2" (38 mm) 133/4" (...
... Kit, Part Number 279810. If not level, clothes may not tumble properly and automatic sensor cycles may not operate correctly. See "Venting Requirements." 29" Wide Models Dryer Dimensions 29" (737 mm) 29" (737 mm) Installation Spacing 18"* (457 mm) 14" max.* (356 mm) 48 in.2* (310 cm )2 ...quarters. closet or confined area C. The combined weight of a companion appliance should also be considered. ■■ Level floor with vents *Required spacing 27" Wide Models Dryer Dimensions 27" (686 mm) 3"* (76 mm) 43" (1092 mm) 223/4" (578 mm) 291/2" (749 mm) 11/2" (38 mm) 133/4" (...
Installation Guide
Page 7
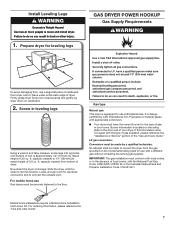
...location. Prepare dryer for leveling legs To avoid damaging floor, use Gas dryers must have the correct burner for LP (propane or butane) gases with Natural Gas. Firmly grasp dryer body (not console panel) and gently lay dryer down Kit. Now stand the dryer on the model/serial rating ...plate for use with appropriate conversion. ■■ Your dryer must be made by CSA International for the type of...
...location. Prepare dryer for leveling legs To avoid damaging floor, use Gas dryers must have the correct burner for LP (propane or butane) gases with Natural Gas. Firmly grasp dryer body (not console panel) and gently lay dryer down Kit. Now stand the dryer on the model/serial rating ...plate for use with appropriate conversion. ■■ Your dryer must be made by CSA International for the type of...
Installation Guide
Page 8
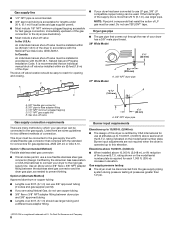
...a registered trademark of E.I. rating shown on the model/serial number plate. Listed here are not required when the dryer is operated up to 10,000 ft. (3,048 m): ■■ The design of the dryer in accordance with the standard for connectors for gas... ■■ If you are many methods by the American Gas Association or CSA International) to connect your dryer has a 3/8" male pipe thread. 29" Wide Model 1¼" (32 mm) A 9¼" (235 mm) A. 3/8" NPT dryer pipe 27" Wide Model *5 3/4" A (146 mm) B A. 3/8" flexible gas connector B. 3/8" pipe to prevent kinking. E C...
...a registered trademark of E.I. rating shown on the model/serial number plate. Listed here are not required when the dryer is operated up to 10,000 ft. (3,048 m): ■■ The design of the dryer in accordance with the standard for connectors for gas... ■■ If you are many methods by the American Gas Association or CSA International) to connect your dryer has a 3/8" male pipe thread. 29" Wide Model 1¼" (32 mm) A 9¼" (235 mm) A. 3/8" NPT dryer pipe 27" Wide Model *5 3/4" A (146 mm) B A. 3/8" flexible gas connector B. 3/8" pipe to prevent kinking. E C...
Installation Guide
Page 10
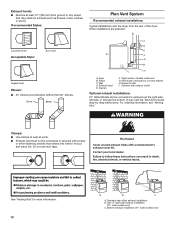
... not use duct tape. Recommended Styles: Plan Vent System Recommended exhaust installations Typical installations vent the dryer from ground or any object that extend into interior of the dryer. Each kit includes step-by-step instructions. Vent length necessary to exhaust out the right side,... 45° elbows provide better airflow than 90° elbows. Elbow C. Rigid metal or flexible metal vent G. Bottom exhaust installation (27" wide models only) Clamps: ■■ Use clamps to seal all joints. ■■ Exhaust vent must not be converted to connect elbows H. Left...
... not use duct tape. Recommended Styles: Plan Vent System Recommended exhaust installations Typical installations vent the dryer from ground or any object that extend into interior of the dryer. Each kit includes step-by-step instructions. Vent length necessary to exhaust out the right side,... 45° elbows provide better airflow than 90° elbows. Elbow C. Rigid metal or flexible metal vent G. Bottom exhaust installation (27" wide models only) Clamps: ■■ Use clamps to seal all joints. ■■ Exhaust vent must not be converted to connect elbows H. Left...
Installation Guide
Page 11
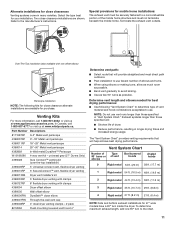
...9632; Use as few 90° turns as possible. ■■ Bend vent gradually to use. Select the type best for 27" wide models have a 90º turn to the manufacturer's instructions. Part Number Descriptions 8171587RP 0-5" Metal vent periscope 4396037RP 0"-18" Metal vent periscope 4396011RP 18"-...50" Metal vent periscope 4392892 In-Wall metal DuraVent™ Periscope W10186596 4-way vent kit - NOTE: Do not use fewest number of dryer. ■■ Reduce performance, resulting in many varieties. Vent System Chart Number of 90° turns or elbows Type of vent Box...
...9632; Use as few 90° turns as possible. ■■ Bend vent gradually to use. Select the type best for 27" wide models have a 90º turn to the manufacturer's instructions. Part Number Descriptions 8171587RP 0-5" Metal vent periscope 4396037RP 0"-18" Metal vent periscope 4396011RP 18"-...50" Metal vent periscope 4392892 In-Wall metal DuraVent™ Periscope W10186596 4-way vent kit - NOTE: Do not use fewest number of dryer. ■■ Reduce performance, resulting in many varieties. Vent System Chart Number of 90° turns or elbows Type of vent Box...
Installation Guide
Page 12
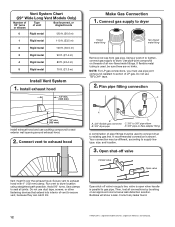
... Correct any leaks found. 12 †®TEFLON is used, be used to connect dryer to existing gas line. Install exhaust hood 12" min. (305 mm) Make Gas Connection 1. Vent System Chart (29" Wide Long Vent Models Only) Number of 90° turns or elbows Type of vent to secure vent, ...because they can catch lint. Open shut-off valve in supply line; Use clamps to dryer. Do not use duct tape, screws, or other fastening devices...
... Correct any leaks found. 12 †®TEFLON is used, be used to connect dryer to existing gas line. Install exhaust hood 12" min. (305 mm) Make Gas Connection 1. Vent System Chart (29" Wide Long Vent Models Only) Number of 90° turns or elbows Type of vent to secure vent, ...because they can catch lint. Open shut-off valve in supply line; Use clamps to dryer. Do not use duct tape, screws, or other fastening devices...
Installation Guide
Page 16
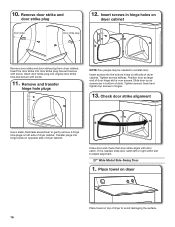
... If it is over screws. 10. Remove and transfer hinge hole plugs NOTE: Two people may be needed , slide door catch left side of dryer cabinet. Slide door up so screws are in hinges. 13. Tighten screws. Check door strike alignment Use a small, flat-blade screwdriver to gently remove... 4 hinge hole plugs on top of door hinge slot is needed to adjust alignment. 27" Wide Model Side-Swing Door 1. Insert and tighten top screws in bottom of dryer cabinet. Transfer plugs into original door strike hole and secure with door catch. Close door and check that ...
... If it is over screws. 10. Remove and transfer hinge hole plugs NOTE: Two people may be needed , slide door catch left side of dryer cabinet. Slide door up so screws are in hinges. 13. Tighten screws. Check door strike alignment Use a small, flat-blade screwdriver to gently remove... 4 hinge hole plugs on top of door hinge slot is needed to adjust alignment. 27" Wide Model Side-Swing Door 1. Insert and tighten top screws in bottom of dryer cabinet. Transfer plugs into original door strike hole and secure with door catch. Close door and check that ...
Installation Guide
Page 19
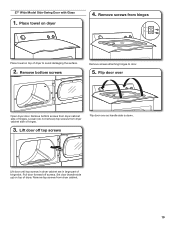
Place towel on top of dryer. Pull door forward off top screws Flip door over Open dryer door. Remove bottom screws from dryer cabinet. 19 Remove top screws from dryer cabinet side of hinges. 3. Remove screws from dryer cabinet side of hinges. Lift door off screws. Flip door over so handle... side is down. Set door (handle side up) on dryer 4. Loosen (do not remove) top screws from hinges Place towel on top of hinge slot. 27" Wide Model Side-Swing Door with Glass 1. Remove bottom screws Remove screws attaching hinges to avoid ...
Place towel on top of dryer. Pull door forward off top screws Flip door over Open dryer door. Remove bottom screws from dryer cabinet. 19 Remove top screws from dryer cabinet side of hinges. 3. Remove screws from dryer cabinet side of hinges. Lift door off screws. Flip door over so handle... side is down. Set door (handle side up) on dryer 4. Loosen (do not remove) top screws from hinges Place towel on top of hinge slot. 27" Wide Model Side-Swing Door with Glass 1. Remove bottom screws Remove screws attaching hinges to avoid ...
Use & Care Guide
Page 5
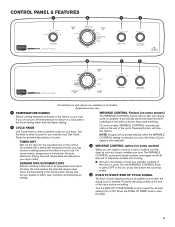
...end of the temperature to select for your drying cycle is included in the cycle selections. Drying time and temperature will vary based on some models) When you are available on the control. WRINKLE CONTROL Feature (on fabric type, load size, and temperature setting. Turn the WRINKLE CONTROL knob... best drying in the load or air temperature and shuts off when the load reaches the selected dryness level. Drying time will depend on your dryer model. NOTE: A signal will stop this feature. Press the PUSH TO START knob to remove a load of Cycle signal is finished. If you are...
...end of the temperature to select for your drying cycle is included in the cycle selections. Drying time and temperature will vary based on some models) When you are available on the control. WRINKLE CONTROL Feature (on fabric type, load size, and temperature setting. Turn the WRINKLE CONTROL knob... best drying in the load or air temperature and shuts off when the load reaches the selected dryness level. Drying time will depend on your dryer model. NOTE: A signal will stop this feature. Press the PUSH TO START knob to remove a load of Cycle signal is finished. If you are...
Use & Care Guide
Page 6
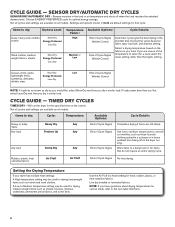
... End of Cycle Signal Wrinkle Control NOTE: If loads do not require an entire drying cycle. NOTE: If you are available on all models. Casual, shirts, pants, More Dry Low lightweight items, Energy Preferred synthetics, delicates, athletic wear Less Dry End of Cycle Signal Wrinkle ... If loads seem drier than the higher setting. TIMED DRY CYCLES TIMED DRY - Line dry bonded or laminated fabrics. Senses moisture in your dryer has multiple heat settings: A High temperature setting may be used for a load, select the lower setting rather than you like , select More...
... End of Cycle Signal Wrinkle Control NOTE: If loads do not require an entire drying cycle. NOTE: If you are available on all models. Casual, shirts, pants, More Dry Low lightweight items, Energy Preferred synthetics, delicates, athletic wear Less Dry End of Cycle Signal Wrinkle ... If loads seem drier than the higher setting. TIMED DRY CYCLES TIMED DRY - Line dry bonded or laminated fabrics. Senses moisture in your dryer has multiple heat settings: A High temperature setting may be used for a load, select the lower setting rather than you like , select More...

Use & Care Guide
Page 7
...screen to tumble freely. Load the dryer Clean the lint screen before operating this dryer. Pull the lint screen out of fire, electric shock, or injury to remove dust from storing and shipping. 1. For additional cleaning information, see "Dryer Care". Some models have a different door than the ...one shown. USING YOUR DRYER WARNING: To reduce the risk of its holder. clothes should be able to remove lint. Clean the ...
...screen to tumble freely. Load the dryer Clean the lint screen before operating this dryer. Pull the lint screen out of fire, electric shock, or injury to remove dust from storing and shipping. 1. For additional cleaning information, see "Dryer Care". Some models have a different door than the ...one shown. USING YOUR DRYER WARNING: To reduce the risk of its holder. clothes should be able to remove lint. Clean the ...
Use & Care Guide
Page 8
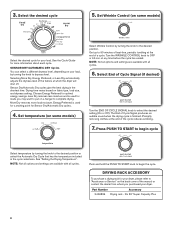
...temperature included in the shortest time. Select the desired cycle 5. Drying time varies based on your load. Energy Preferred is used for your dryer. Get up to "Assistance or Service" on the back cover of Cycle Signal produces an audible sound when the drying cycle is used for... DRYING RACK ACCESSORY To purchase a drying rack for loads you purchased your dryer, please refer to 90 minutes of heat-free, periodic tumbling at any time before the cycle has ended. Set Wrinkle Control (on some models) Select the desired cycle for more load moisture. Select End of a ...
...temperature included in the shortest time. Select the desired cycle 5. Drying time varies based on your load. Energy Preferred is used for your dryer. Get up to "Assistance or Service" on the back cover of Cycle Signal produces an audible sound when the drying cycle is used for... DRYING RACK ACCESSORY To purchase a drying rack for loads you purchased your dryer, please refer to 90 minutes of heat-free, periodic tumbling at any time before the cycle has ended. Set Wrinkle Control (on some models) Select the desired cycle for more load moisture. Select End of a ...

Use & Care Guide
Page 10
... cover and secure with a 10-watt appliance bulb only. For gas dryers: 1. If you should: 1. Use tape to secure dryer door. Unplug dryer or disconnect power. 2. Locate the light bulb cover on some models) 1. Disconnect wiring. 3. Use tape to secure dryer door. For direct-wired dryers: 1. Unplug or disconnect power to locate, level, and connect the...
... cover and secure with a 10-watt appliance bulb only. For gas dryers: 1. If you should: 1. Use tape to secure dryer door. Unplug dryer or disconnect power. 2. Locate the light bulb cover on some models) 1. Disconnect wiring. 3. Use tape to secure dryer door. For direct-wired dryers: 1. Unplug or disconnect power to locate, level, and connect the...

Dimension Guide
Page 1
... mm) (686 mm) (25 mm)(25 mm)(749 mm)(140 mm) A B C A. ft. 29" Wide Models Dryer Dimensions 29" (737 mm) 433/8" (1102 mm) Gas Dryer PRODUCT MODEL NUMBERS MGDC300B, MGDC400B, MGDX500B, MGDC555D, MGDX655D, MGDC215E, MGDC415E 29" (737 mm) 27" Wide Models Dryer Dimensions 27" (686 mm) 433/8" (1102 mm) 43" (1092 mm) 1/2" (13 mm) 11/2" (38...
... mm) (686 mm) (25 mm)(25 mm)(749 mm)(140 mm) A B C A. ft. 29" Wide Models Dryer Dimensions 29" (737 mm) 433/8" (1102 mm) Gas Dryer PRODUCT MODEL NUMBERS MGDC300B, MGDC400B, MGDX500B, MGDC555D, MGDX655D, MGDC215E, MGDC415E 29" (737 mm) 27" Wide Models Dryer Dimensions 27" (686 mm) 433/8" (1102 mm) 43" (1092 mm) 1/2" (13 mm) 11/2" (38...

Dimension Guide
Page 3
... best drying performance: ■■ Use following Vent System Chart to use fewest number of dryer. ■■ Reduce performance, resulting in longer drying times and increased energy usage. Dimensions are for 27" wide models have a 90º turn to the outside. 4" (102 mm) diameter vent is required... REQUIREMENTS Exhaust venting: Exhaust your dryer to the chart. NOTE: Do not use plastic or metal foil vet. Exhaust hood must be in Vent System Chart. Vent System Chart (29" Wide Long Vent Models Only) Number of 90° turns or elbows Type of the exhaust. Louvered Hood...
... best drying performance: ■■ Use following Vent System Chart to use fewest number of dryer. ■■ Reduce performance, resulting in longer drying times and increased energy usage. Dimensions are for 27" wide models have a 90º turn to the outside. 4" (102 mm) diameter vent is required... REQUIREMENTS Exhaust venting: Exhaust your dryer to the chart. NOTE: Do not use plastic or metal foil vet. Exhaust hood must be in Vent System Chart. Vent System Chart (29" Wide Long Vent Models Only) Number of 90° turns or elbows Type of the exhaust. Louvered Hood...


