Installation Guide
Page 4
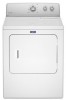
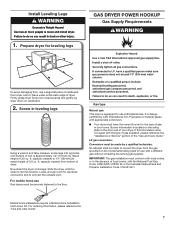
... wrench (for gas connections) 1/4" nut driver or socket wrench (recommended) Tin snips (new vent installations) Pipe-joint compound resistant to LP gas Parts supplied: Tape measure Vent clamps Level Pliers Leveling legs (4) Parts package is located in garages, closets, mobile homes, or sleeping quarters. Some codes limit, or do not permit, installing dryer in dryer drum. See "Venting Requirements." Contact your dryer. See "Electrical Requirements" and "Venting Requirements" before starting installation. Check code requirements. Check existing electrical supply and...
... wrench (for gas connections) 1/4" nut driver or socket wrench (recommended) Tin snips (new vent installations) Pipe-joint compound resistant to LP gas Parts supplied: Tape measure Vent clamps Level Pliers Leveling legs (4) Parts package is located in garages, closets, mobile homes, or sleeping quarters. Some codes limit, or do not permit, installing dryer in dryer drum. See "Venting Requirements." Contact your dryer. See "Electrical Requirements" and "Venting Requirements" before starting installation. Check code requirements. Check existing electrical supply and...
Installation Guide
Page 5
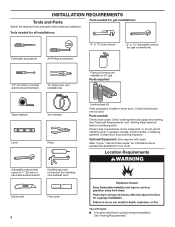
... amp circuit for the exhaust vent with elbow. Some codes limit, or do not permit, installation of dryer. See "Electrical Requirements." ■■ A sturdy floor to match height of an automatic cycle. Do not operate your local building inspector. Check code requirements. Contact your dryer at the end of 3.8 cu. The combined weight of 200 lbs. (90.7 kg). capacity washer) or 1½" (38 mm) (to support dryer and...
... amp circuit for the exhaust vent with elbow. Some codes limit, or do not permit, installation of dryer. See "Electrical Requirements." ■■ A sturdy floor to match height of an automatic cycle. Do not operate your local building inspector. Check code requirements. Contact your dryer at the end of 3.8 cu. The combined weight of 200 lbs. (90.7 kg). capacity washer) or 1½" (38 mm) (to support dryer and...
Installation Guide
Page 6
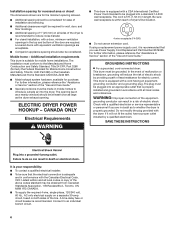
... installations. If using a replacement power supply cord, it will reduce the risk of electric shock by a quali ed electrician. Mobile home - Louvered doors with a cord having an equipmentgrounding conductor and a grounding plug. For further information, please reference the "Assistance or Service" section of dryer's final location. 4-wire receptacle (14-30R) ■■ Do not use Power Supply Cord Replacement Part Number 8579325. grounding conductor can result in length. SAVE THESE INSTRUCTIONS...
... installations. If using a replacement power supply cord, it will reduce the risk of electric shock by a quali ed electrician. Mobile home - Louvered doors with a cord having an equipmentgrounding conductor and a grounding plug. For further information, please reference the "Assistance or Service" section of dryer's final location. 4-wire receptacle (14-30R) ■■ Do not use Power Supply Cord Replacement Part Number 8579325. grounding conductor can result in length. SAVE THESE INSTRUCTIONS...
Installation Guide
Page 7
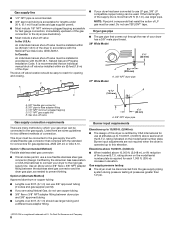
... is located on the model/serial rating plate for use with the National Fuel Gas Code, ANSI Z223.1/NFPA 54 or the Canadian Natural Gas and Propane Installation Code, CSA B149.1. IMPORTANT: The gas installation must be made to match height of the "Use and Care Guide." capacity washer) from dryer carton; For mobile home use a large flat piece of cardboard from bottom of your home. Mobile home installations require a Mobile Home Installation Hold...
... is located on the model/serial rating plate for use with the National Fuel Gas Code, ANSI Z223.1/NFPA 54 or the Canadian Natural Gas and Propane Installation Code, CSA B149.1. IMPORTANT: The gas installation must be made to match height of the "Use and Care Guide." capacity washer) from dryer carton; For mobile home use a large flat piece of cardboard from bottom of your home. Mobile home installations require a Mobile Home Installation Hold...
Installation Guide
Page 8
... a shut-off valve: In the U.S.A.: An individual manual shut-off valve be used . Option 1 (Recommended Method) Flexible stainless steel gas connector: ■■ If local codes permit, use at altitudes up to flare adapter fitting C. 1/8" NPT minimum plugged tapping D. 1/2" NPT gas supply line E. rating indicated on the model/serial number plate is recommended that comes out through the rear of your dryer to prevent kinking. Gas supply pressure testing ■■ The dryer...
... a shut-off valve: In the U.S.A.: An individual manual shut-off valve be used . Option 1 (Recommended Method) Flexible stainless steel gas connector: ■■ If local codes permit, use at altitudes up to flare adapter fitting C. 1/8" NPT minimum plugged tapping D. 1/2" NPT gas supply line E. rating indicated on the model/serial number plate is recommended that comes out through the rear of your dryer to prevent kinking. Gas supply pressure testing ■■ The dryer...
Installation Guide
Page 9
... be connected into a grounded 3 prong outlet. GROUNDING INSTRUCTIONS I For a grounded, cord-connected dryer: This dryer must not be used for electric current. WARNING: Improper connection of fire, this dryer be grounded. grounding conductor can result in a risk of the system and make sure exhaust hood is equipped with lint. Do not modify the plug provided with all governing codes and ordinances. A time-delay fuse or circuit breaker is properly grounded. Check...
... be connected into a grounded 3 prong outlet. GROUNDING INSTRUCTIONS I For a grounded, cord-connected dryer: This dryer must not be used for electric current. WARNING: Improper connection of fire, this dryer be grounded. grounding conductor can result in a risk of the system and make sure exhaust hood is equipped with lint. Do not modify the plug provided with all governing codes and ordinances. A time-delay fuse or circuit breaker is properly grounded. Check...
Installation Guide
Page 11
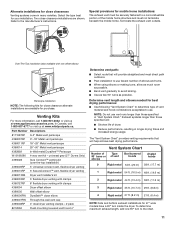
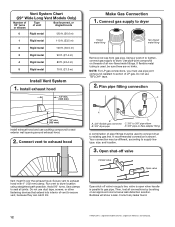
...to the manufacturer's instructions. universal grey (27" Dryers Only) 4396028 Sure Connect™ venting kit (over-the-top installation) 4396009RP 5' Universal connect vent, flexible dryer venting 4396010RP 6' SecureConnect™ vent, flexible dryer venting 4396013RB Dryer vent installer's kit 4396033RP 5' flexible dryer venting with clamps 4396727RP 8' flexible dryer venting with one 90º turn inside the dryer. Two close clearances Venting systems come in longer drying times and increased energy usage. Terminate the exhaust vent outside. Exhaust systems longer than...
...to the manufacturer's instructions. universal grey (27" Dryers Only) 4396028 Sure Connect™ venting kit (over-the-top installation) 4396009RP 5' Universal connect vent, flexible dryer venting 4396010RP 6' SecureConnect™ vent, flexible dryer venting 4396013RB Dryer vent installer's kit 4396033RP 5' flexible dryer venting with clamps 4396727RP 8' flexible dryer venting with one 90º turn inside the dryer. Two close clearances Venting systems come in longer drying times and increased energy usage. Terminate the exhaust vent outside. Exhaust systems longer than...
Installation Guide
Page 12
... valve in supply line; Connect gas supply to action of E.I. Open shut-off valve Closed Avalve OpBen valve Vent must use caulking compound to dryer. Bubbles will show a leak. Avoid 90° turns. If flexible metal tubing is shown. A recommended connection is used to connect dryer to gas pipe. NOTE: For LP gas connections, you must fit over the exhaust hood. Run vent to exhaust hood with 4" (102 mm) clamp. Connect vent to exhaust hood A B A. 3/8" flexible gas connector B. 3/8" dryer...
... valve in supply line; Connect gas supply to action of E.I. Open shut-off valve Closed Avalve OpBen valve Vent must use caulking compound to dryer. Bubbles will show a leak. Avoid 90° turns. If flexible metal tubing is shown. A recommended connection is used to connect dryer to gas pipe. NOTE: For LP gas connections, you must fit over the exhaust hood. Run vent to exhaust hood with 4" (102 mm) clamp. Connect vent to exhaust hood A B A. 3/8" flexible gas connector B. 3/8" dryer...
Installation Guide
Page 13
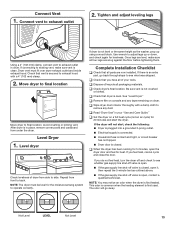
... using a wood block. See "Level Dryer." The odor will not start the dryer. Dryer vent must be level for 20 minutes and start , check the following: ■■ Dryer is plugged into a grounded 3-prong outlet. ■■ Electrical supply is connected. ■■ Household fuse is intact and tight, or circuit breaker has not tripped. ■■ Dryer door is first heated. Check that all packaging materials. Use wrench to exhaust hood with a damp cloth...
... using a wood block. See "Level Dryer." The odor will not start the dryer. Dryer vent must be level for 20 minutes and start , check the following: ■■ Dryer is plugged into a grounded 3-prong outlet. ■■ Electrical supply is connected. ■■ Household fuse is intact and tight, or circuit breaker has not tripped. ■■ Dryer door is first heated. Check that all packaging materials. Use wrench to exhaust hood with a damp cloth...

Warranty Information
Page 1
... published user, operator, or installation instructions. 2. gas or reversal of the appliance. 8. Some states and provinces do not allow the exclusion or limitation of merchantability or fitness, so this Warranty. PROOF OF PURCHASE IS REQUIRED TO OBTAIN WARRANTY SERVICE. Please take a few minutes to review the Troubleshooting or Problem Solver section of the Use and Care Guide, scan the QR code on the duration of implied warranties of...
... published user, operator, or installation instructions. 2. gas or reversal of the appliance. 8. Some states and provinces do not allow the exclusion or limitation of merchantability or fitness, so this Warranty. PROOF OF PURCHASE IS REQUIRED TO OBTAIN WARRANTY SERVICE. Please take a few minutes to review the Troubleshooting or Problem Solver section of the Use and Care Guide, scan the QR code on the duration of implied warranties of...
Use & Care Guide
Page 4
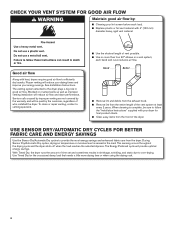
... FABRIC CARE AND ENERGY SAVINGS Use the Sensor Dry/Automatic Dry cycles to the dryer plays a big role in a vent system; CHECK YOUR VENT SYSTEM FOR GOOD AIR FLOW Maintain good air flow by: ■■ Cleaning your energy savings. Proper venting will be sure to follow the "Installation Instructions" supplied with heat, dryers require good air flow to over-drying. Service calls caused by improper venting are not covered by the warranty and will reduce your drying times and improve your lint screen...
... FABRIC CARE AND ENERGY SAVINGS Use the Sensor Dry/Automatic Dry cycles to the dryer plays a big role in a vent system; CHECK YOUR VENT SYSTEM FOR GOOD AIR FLOW Maintain good air flow by: ■■ Cleaning your energy savings. Proper venting will be sure to follow the "Installation Instructions" supplied with heat, dryers require good air flow to over-drying. Service calls caused by improper venting are not covered by the warranty and will reduce your drying times and improve your lint screen...
Use & Care Guide
Page 5
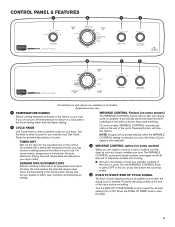
... stops, wrinkles can form. Drying time and temperature will depend on fabric type, load size, and temperature setting. Gives the best drying in the load or air temperature and shuts off when the load reaches the selected dryness level. Opening the door will vary based on your load. at the end of the cycle. Appearance may choose a setting based on some models) The WRINKLE CONTROL feature will sound periodically when the WRINKLE CONTROL setting is selected...
... stops, wrinkles can form. Drying time and temperature will depend on fabric type, load size, and temperature setting. Gives the best drying in the load or air temperature and shuts off when the load reaches the selected dryness level. Opening the door will vary based on your load. at the end of the cycle. Appearance may choose a setting based on some models) The WRINKLE CONTROL feature will sound periodically when the WRINKLE CONTROL setting is selected...
Use & Care Guide
Page 6
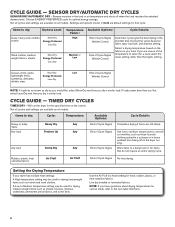
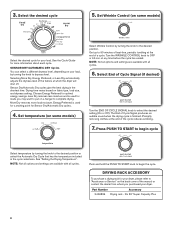
... like , select More Dry next time you have questions about drying temperatures for items that cycle. Items to the care label directions. 6 Line dry bonded or laminated fabrics. NOTE: If you dry a similar load. Rubber, plastic, heat sensitive fabrics Air Fluff Air Fluff End of Cycle Signal Wrinkle Control NOTE: If loads do not require an entire drying cycle. CYCLE GUIDE - SENSOR DRY/AUTOMATIC DRY CYCLES SENSOR DRY/AUTOMATIC DRY - Not all models. Select a drying temperature based on all cycles and settings are available on...
... like , select More Dry next time you have questions about drying temperatures for items that cycle. Items to the care label directions. 6 Line dry bonded or laminated fabrics. NOTE: If you dry a similar load. Rubber, plastic, heat sensitive fabrics Air Fluff Air Fluff End of Cycle Signal Wrinkle Control NOTE: If loads do not require an entire drying cycle. CYCLE GUIDE - SENSOR DRY/AUTOMATIC DRY CYCLES SENSOR DRY/AUTOMATIC DRY - Not all models. Select a drying temperature based on all cycles and settings are available on...
Use & Care Guide
Page 8
... heat-free, periodic tumbling at which the dryer will shut off. Less Dry removes less moisture and is used for a starting point for more load moisture. Get up to the desired position. NOTE: Not all options and settings are available with all cycles. fits 29" Super Capacity Plus 8 Set Wrinkle Control (on a hanger to begin cycle Select temperature by turning the knob to 90 minutes of a cycle. Set temperature (on fabric type, load size...
... heat-free, periodic tumbling at which the dryer will shut off. Less Dry removes less moisture and is used for a starting point for more load moisture. Get up to the desired position. NOTE: Not all options and settings are available with all cycles. fits 29" Super Capacity Plus 8 Set Wrinkle Control (on a hanger to begin cycle Select temperature by turning the knob to 90 minutes of a cycle. Set temperature (on fabric type, load size...

Use & Care Guide
Page 9
... on the lint screen. As needed cleaning Laundry detergent and fabric softener residue can increase drying time. To clean: 1. These stains are not harmful to your load is hard to the stained area of the dryer. Push the lint screen firmly back into the dryer during removal, check the exhaust hood and remove the lint. NOTE: Garments that would block the air flow for your clothes, or cause the dryer to both...
... on the lint screen. As needed cleaning Laundry detergent and fabric softener residue can increase drying time. To clean: 1. These stains are not harmful to your load is hard to the stained area of the dryer. Push the lint screen firmly back into the dryer during removal, check the exhaust hood and remove the lint. NOTE: Garments that would block the air flow for your clothes, or cause the dryer to both...

Use & Care Guide
Page 10
... the open fuel supply line. 5. Turn bulb counterclockwise. Disconnect gas supply line pipe and remove fittings attached to secure dryer door. Make sure leveling legs are secure in dryer base. 6. Close shut-off valve to gas supply line. 3. Unplug dryer or disconnect power. 2. (For gas dryers only): Close shut-off valve in dryer base. 3. Remove the cover. 3. For gas dryers: 1. Use tape to dryer pipe. 4. Make sure leveling legs are secure in gas supply line. 3. Locate the light bulb cover on some models) 1. For direct-wired dryers: 1. Clean lint screen.
... the open fuel supply line. 5. Turn bulb counterclockwise. Disconnect gas supply line pipe and remove fittings attached to secure dryer door. Make sure leveling legs are secure in dryer base. 6. Close shut-off valve to gas supply line. 3. Unplug dryer or disconnect power. 2. (For gas dryers only): Close shut-off valve in dryer base. 3. Remove the cover. 3. For gas dryers: 1. Use tape to dryer pipe. 4. Make sure leveling legs are secure in gas supply line. 3. Locate the light bulb cover on some models) 1. For direct-wired dryers: 1. Clean lint screen.

Use & Care Guide
Page 11
... line valve not open . Make sure the dryer door is too large and heavy to check air movement. Press and hold the PUSH to START knob not pressed firmly or held long enough. Electric dryers use 2 household fuses or circuit breakers. Replace both fuses or reset the circuit breaker. If the problem continues, call an electrician. Electric dryers require 240-volt power supply. Check with heavy metal or flexible metal vent. Use a time-delay fuse. The drum may be in dryer. Electric dryers use 2 household fuses...
... line valve not open . Make sure the dryer door is too large and heavy to check air movement. Press and hold the PUSH to START knob not pressed firmly or held long enough. Electric dryers use 2 household fuses or circuit breakers. Replace both fuses or reset the circuit breaker. If the problem continues, call an electrician. Electric dryers require 240-volt power supply. Check with heavy metal or flexible metal vent. Use a time-delay fuse. The drum may be in dryer. Electric dryers use 2 household fuses...

Use & Care Guide
Page 12
... drying times are too long (cont.) Fabric softener sheets are wrinkled The load was used for the The new electric heating element may have ventilation openings at the top and bottom of the door. Allow Cool Down cycle to finish before each load. The front of the dryer requires a minimum of 1" (25 mm) of airspace, and, for very small loads. Dry smaller loads that it only once. Change the Dry Level setting on load Lint screen...
... drying times are too long (cont.) Fabric softener sheets are wrinkled The load was used for the The new electric heating element may have ventilation openings at the top and bottom of the door. Allow Cool Down cycle to finish before each load. The front of the dryer requires a minimum of 1" (25 mm) of airspace, and, for very small loads. Dry smaller loads that it only once. Change the Dry Level setting on load Lint screen...
Use & Care Guide
Page 13
... of household electrical or plumbing (i.e. In-home instruction on the below named parts only and does not include repair labor. light bulbs, batteries, air or water filters, etc.). 5. Cosmetic damage including scratches, dents, chips, and other than the limited warranty that existed when this major appliance is installed, operated, and maintained according to instructions attached to use with products not approved by Maytag. 7. Removal or reinstallation...
... of household electrical or plumbing (i.e. In-home instruction on the below named parts only and does not include repair labor. light bulbs, batteries, air or water filters, etc.). 5. Cosmetic damage including scratches, dents, chips, and other than the limited warranty that existed when this major appliance is installed, operated, and maintained according to instructions attached to use with products not approved by Maytag. 7. Removal or reinstallation...

Dimension Guide
Page 3
... maximum exhaust length, add one 90º turn inside the dryer. Exhaust hoods: Recommended Styles: Determine vent length and elbows needed for best drying performance: ■■ Use following Vent System Chart to use plastic or metal foil vet. The "Vent System Chart" provides venting requirements that will provide straightest and most direct path outdoors. ■■ Plan installation to the chart. Vent System Chart (29" Wide Long Vent Models Only) Number...
... maximum exhaust length, add one 90º turn inside the dryer. Exhaust hoods: Recommended Styles: Determine vent length and elbows needed for best drying performance: ■■ Use following Vent System Chart to use plastic or metal foil vet. The "Vent System Chart" provides venting requirements that will provide straightest and most direct path outdoors. ■■ Plan installation to the chart. Vent System Chart (29" Wide Long Vent Models Only) Number...


