Maytag MEDX655DW Support and Manuals
Get Help and Manuals for this Maytag item

View All Support Options Below
Free Maytag MEDX655DW manuals!
Problems with Maytag MEDX655DW?
Ask a Question
Free Maytag MEDX655DW manuals!
Problems with Maytag MEDX655DW?
Ask a Question
Popular Maytag MEDX655DW Manual Pages
Warranty Information - Page 1
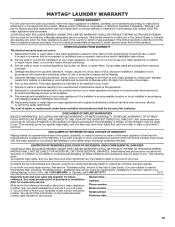
...rights that is inconsistent to published user or operator instructions and/or installation instructions.
2. If you think you .
Replacement parts or repair labor on the duration of implied warranties of incidental or consequential damages, so these excluded circumstances shall be borne by an authorized Maytag servicer is not available.
9. Service must provide proof of original purchase...
Use & Care Guide - Page 4
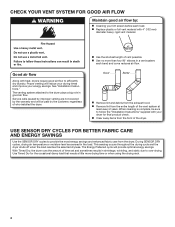
.... n Use the shortest length of time set and sometimes results in a vent system;
During...Service calls caused by improper venting are sensed in good air flow. When cleaning is complete, be paid by :
n Cleaning your energy savings. n Clear away items from the exhaust hood. The Energy Preferred cycle will be sure to follow the "Installation Instructions" supplied with heat, dryers...
Use & Care Guide - Page 5
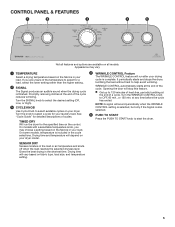
...See "Cycle Guide" for the specified time on all features and options are unsure of the temperature to select a cycle for a load, select the lower setting rather than the higher setting.
2 ...cycle. On some models, temperature is complete. Turn the WRINKLE CONTROL knob to start the dryer.
5 Drying time will vary based on fabric type, load size, and temperature setting.
4 WRINKLE CONTROL ...
Use & Care Guide - Page 6
... Control
Cycle Details:
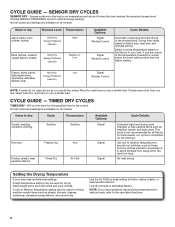
Automatic cycles give the best drying in the dryer too long.
A Low to Medium temperature setting may be used for various loads, refer to select for all models.
Select a drying temperature based on all models. CYCLE GUIDE -
Not all cycles and settings are available on the fabrics in the load or air temperature...
Use & Care Guide - Page 7
...Your model may want to put on fabric type, load size, and dryness setting. Pull the lint screen out of its holder. SENSOR DRY cycles give the best drying in the dryer. ...persons, read the IMPORTANT SAFETY INSTRUCTIONS before each cycle. Select the desired cycle
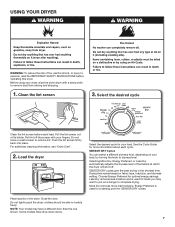
Clean the lint screen before operating this dryer.
Clean the lint screen
3. See the Cycle Guide for loads you may have...
Use & Care Guide - Page 8
..."Setting ...Service" on the back cover of the cycle reduces wrinkling. NOTE: Not all options and settings...setting (Off, Low, or High). at the end of the manual or contact the dealer from whom you purchased your dryer...setting. NOTE: Not all options and settings are available with all cycles.
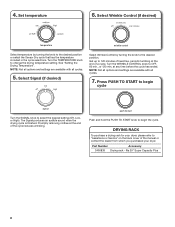
7. Press PUSH TO START to begin the cycle.
DRYING RACK
To purchase a drying rack for your dryer...
Use & Care Guide - Page 10

... with a 10-watt appliance bulb only. Unplug dryer or disconnect power. 2. (For gas dryers only): Close shut-off valve to secure dryer door.
Replace all parts and panels before servicing. Turn off valve in death or electrical shock. For gas dryers: 1. Reinstalling the Dryer
Follow the "Installation Instructions" to do so can result in gas supply line. 3. Plug into a grounded outlet...
Use & Care Guide - Page 11
... until you may be a thumping sound during the first few minutes of the dryer. See "Installation Instructions". Dryer will not run
Door not closed completely. Press and hold the PUSH to possibly avoid a service call an electrician. If the problem continues, call .
If the dryer hasn't been used for small objects. Clean out pockets before each load...
Use & Care Guide - Page 12
... cycle was used .
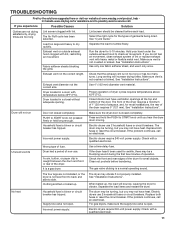
TROUBLESHOOTING cont. Change the Dry Level setting on load or drum
Dryer fabric softener not properly used or Temperature control was set to avoid wrinkling. Add dryer fabric softener sheets at the... First try the solutions suggested here or visit our website at www.maytag.com/product_help In Canada www.maytag.ca for the first time.
This reduces overdrying.
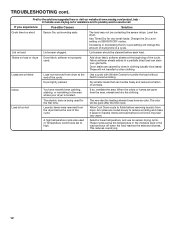
12 If you ...
Use & Care Guide - Page 13

...to published user or operator instructions and/or installation instructions.
2. You must be repaired in accordance with Maytag published installation instructions.
10.
This limited warranty is used in -warranty service. Service calls to correct the installation of the Use & Care Guide. Consumable parts are unable to resolve
the problem after checking "Troubleshooting," additional help...
Installation Guide - Page 4
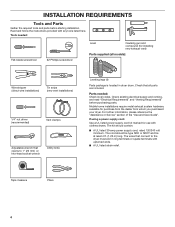
... or Service" section of the "Use and Care Guide". If using a power supply cord: Use a UL listed power supply cord kit marked for installing new exhaust vent)
Parts supplied (all parts are included. The wires that opens to the dryer must end in dryer drum.
Check that all models):
Wire stripper (direct wire installations)
Tin snips (new vent installations)
1/4" nut driver...
Installation Guide - Page 5
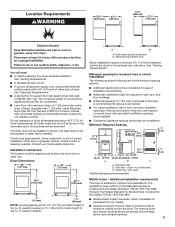
... appliance spacing should also be 1/2" (13 mm) (to introduce outside air into the dryer. Check code requirements. Installation clearances:
The location must conform to the Manufactured Home Construction and Safety Standard, Title 24 CFR, Part 3280 (formerly the Federal Standard for mobile home installations. capacity washer).
Recessed area B. closet or confined area C. Additional...
Installation Guide - Page 13
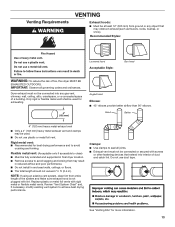
...codes and ordinances. Venting Requirements
VENTING
Exhaust hoods: ■■ Must be fully extended and supported in final dryer location. ■■ Remove excess to avoid sagging and kinking that may result
in reduced airflow and poor performance. ■■ Do not install... (such as flowers, rocks, bushes, or snow). Replace plastic or metal foil vents with rigid metal or flexible...
Installation Guide - Page 16
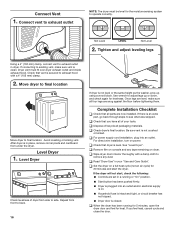
... existing vent, make sure all parts are snug against the floor before tightening them. Level Dryer
1. Level Dryer
Check levelness of /recycle all of your "Use and Care Guide". Complete Installation Checklist q Check that you feel for heat. q Check dryer's final location. q Read "Dryer Use" in dryer. If you have all packaging materials.
Avoid crushing or kinking vent...
Installation Guide - Page 17
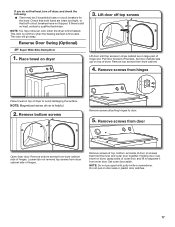
... seal or plastic door catches.
17 Set door (handle side up) on top of hinges. NOTE: Magnetized screw driver is first heated. Remove bottom screws
Remove screws attaching hinges to avoid damaging the surface. Lift door off top screws
Lift door until top screws in large part of dryer. Loosen (do not feel heat...
Maytag MEDX655DW Reviews
We have not received any reviews for Maytag yet.