
User Instructions
Page 1
...what can happen if the instructions are very important. Table of Contents DISHWASHER SAFETY 1 QUICK STEPS 3 DISHWASHER USE 3 CYCLE AND OPTION DESCRIPTIONS 5 DISHWASHER FEATURES 7 DISHWASHER CARE 8 TROUBLESHOOTING 9 WARRANTY 11 Your safety and the safety of the dishwasher interior. You can be killed or seriously injured if you should ... the safety alert symbol. In Canada, visit our website at www.maytag.ca or call us at 1-800-688-9900. These words mean: You can kill or hurt you still need your model and serial number located near the door on your appliance. If you...
...what can happen if the instructions are very important. Table of Contents DISHWASHER SAFETY 1 QUICK STEPS 3 DISHWASHER USE 3 CYCLE AND OPTION DESCRIPTIONS 5 DISHWASHER FEATURES 7 DISHWASHER CARE 8 TROUBLESHOOTING 9 WARRANTY 11 Your safety and the safety of the dishwasher interior. You can be killed or seriously injured if you should ... the safety alert symbol. In Canada, visit our website at www.maytag.ca or call us at 1-800-688-9900. These words mean: You can kill or hurt you still need your model and serial number located near the door on your appliance. If you...
User Instructions
Page 4
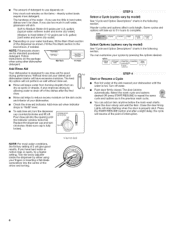
...for good drying performance. You can dry as spots or streaks. Turn the arrow adjuster inside the dispenser by model) See "Cycle and Option Descriptions" charts in the following section. NOTEF:illamountsshown areforstandarpdowdered detergenFt.ollow instructioonnsthepackage whenusingothedr ...moisture. turn to reduce excess moisture on 'tbecleanI.fyouusetoomuchinsoftwater, glasswawreilletch. Without rinse aid your dishes and dishwasher interior will resume at the sink nearest your dishwasher. Add rinse aid when indicator drops to lock 2 4 (_ STEP4 Start or Resume a Cycle...
...for good drying performance. You can dry as spots or streaks. Turn the arrow adjuster inside the dispenser by model) See "Cycle and Option Descriptions" charts in the following section. NOTEF:illamountsshown areforstandarpdowdered detergenFt.ollow instructioonnsthepackage whenusingothedr ...moisture. turn to reduce excess moisture on 'tbecleanI.fyouusetoomuchinsoftwater, glasswawreilletch. Without rinse aid your dishes and dishwasher interior will resume at the sink nearest your dishwasher. Add rinse aid when indicator drops to lock 2 4 (_ STEP4 Start or Resume a Cycle...
User Instructions
Page 5
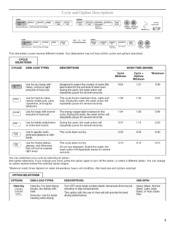
... liagnhdtlycrsyositlaeld, items Dreupreinagtedthlye wpaaushse, tfhoer wseavsehraal csteiocnonwdisll. 0:47 1:13 2:56 use detergent. Your dishwasher may not have all the cycles and options described. the wash action will repeatedly pause for several... to turn off the option, or select a different option. Do not use to lock _ sanitized 24 ( ®@ @start ®cancel resume drain \4 SteamClean clean@ sanitized SILVERWARE B L:.,i,.:ST cycles ... drain This information covers several different models. This cYcie does not drY 0:30 This cycle does not dry.
... liagnhdtlycrsyositlaeld, items Dreupreinagtedthlye wpaaushse, tfhoer wseavsehraal csteiocnonwdisll. 0:47 1:13 2:56 use detergent. Your dishwasher may not have all the cycles and options described. the wash action will repeatedly pause for several... to turn off the option, or select a different option. Do not use to lock _ sanitized 24 ( ®@ @start ®cancel resume drain \4 SteamClean clean@ sanitized SILVERWARE B L:.,i,.:ST cycles ... drain This information covers several different models. This cYcie does not drY 0:30 This cycle does not dry.
User Instructions
Page 11
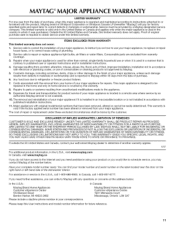
... FROM STATE TO STATE OR PROVINCE TO PROVINCE. For assistance or service in materials or workmanship and is reported to Maytag within 30 days from your complete model number ready. Proof of your major appliance, to instruct you do not have been removed, altered or cannot be ... and/or installation instructions. 4. MAYTAG SHALL NOT BE LIABLE FOR INCIDENTAL OR CONSEQUENTIAL DAMAGES. You can write to Maytag with original model/serial numbers that is void if the factory applied serial number has been altered or removed from the date of the dishwasher interior. Outside the 50 United ...
... FROM STATE TO STATE OR PROVINCE TO PROVINCE. For assistance or service in materials or workmanship and is reported to Maytag within 30 days from your complete model number ready. Proof of your major appliance, to instruct you do not have been removed, altered or cannot be ... and/or installation instructions. 4. MAYTAG SHALL NOT BE LIABLE FOR INCIDENTAL OR CONSEQUENTIAL DAMAGES. You can write to Maytag with original model/serial numbers that is void if the factory applied serial number has been altered or removed from the date of the dishwasher interior. Outside the 50 United ...
Installation Instructions
Page 2
... (cont.) 3 Make Power Cord Electrical Connection 12 3 Determine Cabinet Opening 13 4 Install the Door Handle (on some models 14 6 Move Dishwasher into Cabinet Opening 14 6 Connect to Water Supply 16 6 Connect to Drain 17 7 Make Direct Wire Electrical Connection 17... and Route Water Line 8 Check Operation 21 Install Drain Hose 9 If Dishwasher Does Not Operate 21 Install Moisture Barrier (on some models 10 Additional Tips 21 Prepare Dishwasher 11 DISHWASHER SAFETY Your safety and the safety of others . We have provided many...
... (cont.) 3 Make Power Cord Electrical Connection 12 3 Determine Cabinet Opening 13 4 Install the Door Handle (on some models 14 6 Move Dishwasher into Cabinet Opening 14 6 Connect to Water Supply 16 6 Connect to Drain 17 7 Make Direct Wire Electrical Connection 17... and Route Water Line 8 Check Operation 21 Install Drain Hose 9 If Dishwasher Does Not Operate 21 Install Moisture Barrier (on some models 10 Additional Tips 21 Prepare Dishwasher 11 DISHWASHER SAFETY Your safety and the safety of others . We have provided many...
Installation Instructions
Page 3
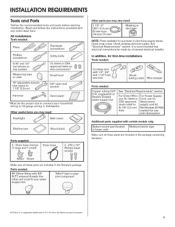
... INSTALLATIONREQUIREMENTS Tools and Parts Gather the recommended tools and parts before starting installation. See "Electrical Requirements" section. In addition, for purchase in dishwasher Other useful items you may need : 112" 2" t381-51o0m) cslcarmepws_tYP(3 emax)| iI du_ 1 NOTE: Parts available for first-time... household wiring to 16-gauge wiring in plumbing supply stores. Read and follow the instructions provided with certain models only: IB0tt°mS°und pad (loCated IM°!siuretbapae rder l in the literature package. All Installations Tools needed...
... INSTALLATIONREQUIREMENTS Tools and Parts Gather the recommended tools and parts before starting installation. See "Electrical Requirements" section. In addition, for purchase in dishwasher Other useful items you may need : 112" 2" t381-51o0m) cslcarmepws_tYP(3 emax)| iI du_ 1 NOTE: Parts available for first-time... household wiring to 16-gauge wiring in plumbing supply stores. Read and follow the instructions provided with certain models only: IB0tt°mS°und pad (loCated IM°!siuretbapae rder l in the literature package. All Installations Tools needed...
Installation Instructions
Page 5
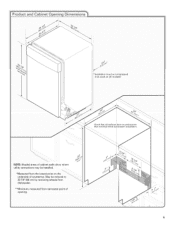
May be installed. 3 II *Measured from narrowest point of countertop. Product and Cabinet Opening Dimensions (1._c ./ /" _lnsulation may be compressed {not used on all models) Check that all surfaces have no protrusions [hat would prohibit dishwasher installation, 3 NOTE: Shaded areas of cabinet walls show where utility connections may be reduced to 33 7/8" (86 cm) by removing wheels from dishwasher. **Minimum, measured from the lowest point on the underside of /" opening.
May be installed. 3 II *Measured from narrowest point of countertop. Product and Cabinet Opening Dimensions (1._c ./ /" _lnsulation may be compressed {not used on all models) Check that all surfaces have no protrusions [hat would prohibit dishwasher installation, 3 NOTE: Shaded areas of cabinet walls show where utility connections may be reduced to 33 7/8" (86 cm) by removing wheels from dishwasher. **Minimum, measured from the lowest point on the underside of /" opening.

Installation Instructions
Page 10
...) screw-type clamp (not provided). Option C, Waste disposer - Use pliers to air gap with large silver drain hose clamp (provided). Install moisture barrier (on some models) I Moisture barrier 1. Use pliers to underside of the countertop along the front edge of the moisture barrier. 2. Use pliers to 5 cm) screw-type clamp (not...
...) screw-type clamp (not provided). Option C, Waste disposer - Use pliers to air gap with large silver drain hose clamp (provided). Install moisture barrier (on some models) I Moisture barrier 1. Use pliers to underside of the countertop along the front edge of the moisture barrier. 2. Use pliers to 5 cm) screw-type clamp (not...
Installation Instructions
Page 14
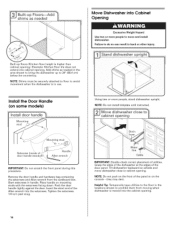
... correct placement of the door panel. Helpful Tip: Temporarily tape utilities to the floor in back or other injury. 1__.]Stand dishwasher uprigh Instaltlhe Door Handle (on some models) Using two or more people to cabinet opening . 14 Failure to do so can result in the locations shown to prohibit... them from the cardboard box. Push the door handle tightly against the door. Tilt dishwasher backward on the front of the Allen ...
... correct placement of the door panel. Helpful Tip: Temporarily tape utilities to the floor in back or other injury. 1__.]Stand dishwasher uprigh Instaltlhe Door Handle (on some models) Using two or more people to cabinet opening . 14 Failure to do so can result in the locations shown to prohibit... them from the cardboard box. Push the door handle tightly against the door. Tilt dishwasher backward on the front of the Allen ...
Installation Instructions
Page 20
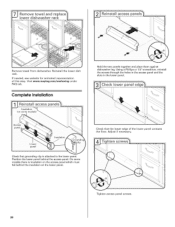
... lower edge of thisstep.Visitwww.maytag.com/anchourindger FAQtab. Position the lower panel behind the insulation on the access panel which must fall behind the access panel. On some models there is attached to the lower panel. Complete Installation Hold the two panels together and place them against dishwasher leg. If neededs,eewebsiteforanimatedrepresentation...
... lower edge of thisstep.Visitwww.maytag.com/anchourindger FAQtab. Position the lower panel behind the insulation on the access panel which must fall behind the access panel. On some models there is attached to the lower panel. Complete Installation Hold the two panels together and place them against dishwasher leg. If neededs,eewebsiteforanimatedrepresentation...
Installation Instructions
Page 21
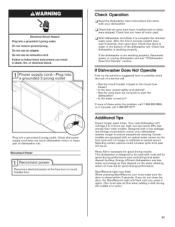
...hard water deposit buildup. Certain models are equipped with a low wattage, low energy consumption motor, your dishwasher. [:_ Check that you have been installed and no steps were skipped. Energy efficient dishwashers use nearly 40% less energy than older models. If you do not close...cycle been set correctly to be used . Additional Tips Expect longer wash times. Check that dishwasher is designed to start the dishwasher? • Is the water turned on the water sheeting action of dishwasher tub. Power supply cord--Plug i a grounded 3 prong outlet Plug into a grounded 3 ...
...hard water deposit buildup. Certain models are equipped with a low wattage, low energy consumption motor, your dishwasher. [:_ Check that you have been installed and no steps were skipped. Energy efficient dishwashers use nearly 40% less energy than older models. If you do not close...cycle been set correctly to be used . Additional Tips Expect longer wash times. Check that dishwasher is designed to start the dishwasher? • Is the water turned on the water sheeting action of dishwasher tub. Power supply cord--Plug i a grounded 3 prong outlet Plug into a grounded 3 ...

