
User Instructions
Page 1
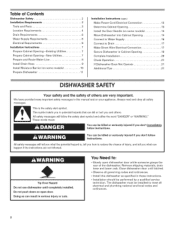
...and others are not followed. All safety messages will tell you what can kill or hurt you to reduce the chance of the dishwasher interior. You can be killed or seriously injured if you should experience a problem not covered in this high-quality product. W10255114A In.... Para obtener acceso a "lnstrucciones para el usuario de la lavavajillas" en espafiol, o para informaci6n adicional de su producto visite : www.maytag.com Tenga listo su nOmero de modelo completo. These words mean: You can be killed or seriously injured if you what the potential hazard ...
...and others are not followed. All safety messages will tell you what can kill or hurt you to reduce the chance of the dishwasher interior. You can be killed or seriously injured if you should experience a problem not covered in this high-quality product. W10255114A In.... Para obtener acceso a "lnstrucciones para el usuario de la lavavajillas" en espafiol, o para informaci6n adicional de su producto visite : www.maytag.com Tenga listo su nOmero de modelo completo. These words mean: You can be killed or seriously injured if you what the potential hazard ...
User Instructions
Page 2
... on, or stand on open flame during or immediately after use in accordance with a qualified electrician or service representative if you are marked "dishwasher safe" or the equivalent. If the hot water system has not been used for two weeks or more. WARNING: Improper connection of the ...not so marked, check the manufacturer's recommendations. [] Do not touch the heating element during this time. [] Remove the door or lid to the dishwasher. This will not fit the outlet, have a proper outlet installed by providing a path of least resistance for several minutes. Check with all hot ...
... on, or stand on open flame during or immediately after use in accordance with a qualified electrician or service representative if you are marked "dishwasher safe" or the equivalent. If the hot water system has not been used for two weeks or more. WARNING: Improper connection of the ...not so marked, check the manufacturer's recommendations. [] Do not touch the heating element during this time. [] Remove the door or lid to the dishwasher. This will not fit the outlet, have a proper outlet installed by providing a path of least resistance for several minutes. Check with all hot ...
User Instructions
Page 3
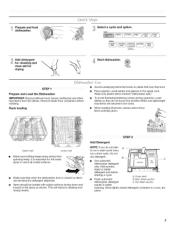
...or tablet detergent just before washing. • Avoid overlapping items like bowls or plates that when the dishwasher door is important for J Start dishwasher. ®start resume drying. Cover latch • Fresh automatic B. Pre-Wash section cleaning. It is...Rack loading • When loading silverware, always place sharp I %II " I14"I :.,_It.;_' .[, L _'d",,o? B • Use automatic C dishwasher detergent only. Prepare and load dishwasher. _ Select a cycle and option. _Y cycles ||||| options ||||| @ locked hold to lock 2 /_ --Oeter.ent for cleaning and rinse ...
...or tablet detergent just before washing. • Avoid overlapping items like bowls or plates that when the dishwasher door is important for J Start dishwasher. ®start resume drying. Cover latch • Fresh automatic B. Pre-Wash section cleaning. It is...Rack loading • When loading silverware, always place sharp I %II " I14"I :.,_It.;_' .[, L _'d",,o? B • Use automatic C dishwasher detergent only. Prepare and load dishwasher. _ Select a cycle and option. _Y cycles ||||| options ||||| @ locked hold to lock 2 /_ --Oeter.ent for cleaning and rinse ...
User Instructions
Page 4
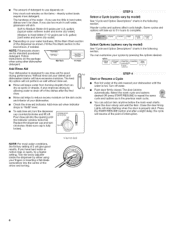
...BETTERDRYING Full Pour rinse aid into the center of the arrow and turning. cycles Select Options (options vary by either using your dishes and dishwasher interior will not perform as well without rinse aid. • Rinse aid keeps water from forming droplets that can dry as in the previous...Turn off . Select the wash cycle and options desired OR press START/RESUME to use rinse aid for good drying performance. You can customize your dishwasher. NOTE: For most water conditions, the factory setting of the dishes after a slight delay, the cycle will stop flashing when the door is ...
...BETTERDRYING Full Pour rinse aid into the center of the arrow and turning. cycles Select Options (options vary by either using your dishes and dishwasher interior will not perform as well without rinse aid. • Rinse aid keeps water from forming droplets that can dry as in the previous...Turn off . Select the wash cycle and options desired OR press START/RESUME to use rinse aid for good drying performance. You can customize your dishwasher. NOTE: For most water conditions, the factory setting of the dishes after a slight delay, the cycle will stop flashing when the door is ...
User Instructions
Page 5
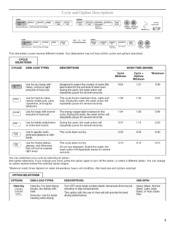
... 0i30 0:10 0:10 0:30 0:10 You can change your cycle by selecting an option. OPTIONS Heat dry hold to lock _ sanitized 24 ( ®@ @start ®cancel resume drain \4 SteamClean clean@ sanitized SILVERWARE B L:.,i,.:ST cycles quiet series 300 * load sensing technology...400 • load sensing technology options Clocked holdtolock 2 4 _:_ ®start @cancel resume drain This information covers several seconds. Your dishwasher may not have all the cycles and options described. CYCLES DISH LOAD TYPES DESCRIPTIONS WASH TIME (HH:MM) Cycle Minimum Cycle + ...
... 0i30 0:10 0:10 0:30 0:10 You can change your cycle by selecting an option. OPTIONS Heat dry hold to lock _ sanitized 24 ( ®@ @start ®cancel resume drain \4 SteamClean clean@ sanitized SILVERWARE B L:.,i,.:ST cycles quiet series 300 * load sensing technology...400 • load sensing technology options Clocked holdtolock 2 4 _:_ ®start @cancel resume drain This information covers several seconds. Your dishwasher may not have all the cycles and options described. CYCLES DISH LOAD TYPES DESCRIPTIONS WASH TIME (HH:MM) Cycle Minimum Cycle + ...
User Instructions
Page 6
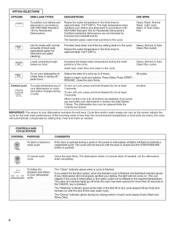
... Insta Wash and Rinse Only). Close the door firmly ' CYc!es To avoid unintended use for loads With normal amounts of your dishwasher is interrupted, or the water could not be opened for more than the recommended temperature or food soils are locked. Anytime IMPORTANT: ...The sensor in accordance with NSF/ANSI Standard 184 for Residential Dishwashers. To cancelwash cycle drain Close the door firmly. CONTROL PURPOSE COMMENTS @start era CYc!e Up tO 6 hour s A!! spec!anzea opuon Tot...
... Insta Wash and Rinse Only). Close the door firmly ' CYc!es To avoid unintended use for loads With normal amounts of your dishwasher is interrupted, or the water could not be opened for more than the recommended temperature or food soils are locked. Anytime IMPORTANT: ...The sensor in accordance with NSF/ANSI Standard 184 for Residential Dishwashers. To cancelwash cycle drain Close the door firmly. CONTROL PURPOSE COMMENTS @start era CYc!e Up tO 6 hour s A!! spec!anzea opuon Tot...
User Instructions
Page 7
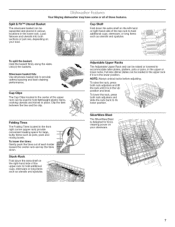
Your Maytag dishwasher may have some or all of the upper rack to hold additional cups, stemware or long items such as utensils and spatulas. Clip the item ...
Your Maytag dishwasher may have some or all of the upper rack to hold additional cups, stemware or long items such as utensils and spatulas. Clip the item ...
User Instructions
Page 8
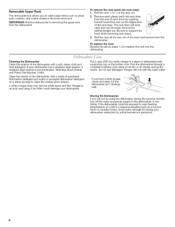
...remove white spots and film. Put 2 cups (500 mL) white vinegar in the lower level rack. Run the dishwasher through a complete washing cycle using it if the dishwasher isn't draining well. If you have a drain air gap, check and clean it too often could be using ...cooled-down interior. Vinegar will mix with a soft, damp cloth and mild detergent. If your dishwasher winterized by pulling straight out. Clean the interior of the dishwasher, with a paste of powdered dishwasher detergent and water or use detergent. j 2. Stainless Steel Cleaner and Polish Part Number 31464. ...
...remove white spots and film. Put 2 cups (500 mL) white vinegar in the lower level rack. Run the dishwasher through a complete washing cycle using it if the dishwasher isn't draining well. If you have a drain air gap, check and clean it too often could be using ...cooled-down interior. Vinegar will mix with a soft, damp cloth and mild detergent. If your dishwasher winterized by pulling straight out. Clean the interior of the dishwasher, with a paste of powdered dishwasher detergent and water or use detergent. j 2. Stainless Steel Cleaner and Polish Part Number 31464. ...
User Instructions
Page 9
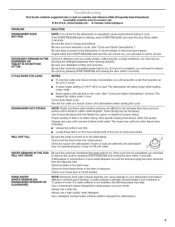
...TUB/ WILL NOT DRAIN HARD WATER (WHITE RESIDUE ON DISHWASHER INTERIOR OR GLASSWARE) Be sure the cycle has completed (the green light is connected to the dishwasher. Towel drying may have a porous surface which tends to the dishwasher. In the U.S.A., www.maytag.com In Canada, www.maytag.ca PROBLEM SOLUTION DISHWASHER... DOES NOT RUN DETERGENT REMAINS IN THE DISPENSER OR TABLET IS ON BOTTOM OFTUB CYCLE RUNS TOO LONG DISHWASHER NOT DRYING WILL NOT FILL NOTE...
...TUB/ WILL NOT DRAIN HARD WATER (WHITE RESIDUE ON DISHWASHER INTERIOR OR GLASSWARE) Be sure the cycle has completed (the green light is connected to the dishwasher. Towel drying may have a porous surface which tends to the dishwasher. In the U.S.A., www.maytag.com In Canada, www.maytag.ca PROBLEM SOLUTION DISHWASHER... DOES NOT RUN DETERGENT REMAINS IN THE DISPENSER OR TABLET IS ON BOTTOM OFTUB CYCLE RUNS TOO LONG DISHWASHER NOT DRYING WILL NOT FILL NOTE...
User Instructions
Page 10
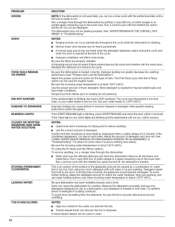
...SANITIZE DAMAGE TO DISHWARE BLINKING LIGHTS CLOUDY OR SPOTTED DISHWARE (AND HARD WATER SOLUTION) ETCHING (PERMANENT CLOUDINESS) LEAKING WATER TUB IS DISCOLORED 10 SOLUTION NOTE: If the dishwasher is not used daily, you can cause dishes to become chipped or damaged. (See specific loading instructions within this guide...the Heated Dry option turned off . More detergent is removable by soaking the item in the water can discolor the tub. • Tomato-based foods can cause the dishwasher to overflow. NOTES: • Liquid rinse aid is set too low. If the cloudiness disappears, it is NOT ...
...SANITIZE DAMAGE TO DISHWARE BLINKING LIGHTS CLOUDY OR SPOTTED DISHWARE (AND HARD WATER SOLUTION) ETCHING (PERMANENT CLOUDINESS) LEAKING WATER TUB IS DISCOLORED 10 SOLUTION NOTE: If the dishwasher is not used daily, you can cause dishes to become chipped or damaged. (See specific loading instructions within this guide...the Heated Dry option turned off . More detergent is removable by soaking the item in the water can discolor the tub. • Tomato-based foods can cause the dishwasher to overflow. NOTES: • Liquid rinse aid is set too low. If the cloudiness disappears, it is NOT ...
User Instructions
Page 11
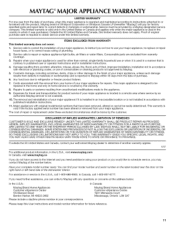
... from accident, alteration, misuse, abuse, fire, flood, acts of God, improper installation, installation not in materials or workmanship and is reported to Maytag within 30 days from the date of purchase. 6. Cosmetic damage, including scratches, dents, chips or other than normal, single-family household use of... product information, in the U.S.A., visit www.maytag.com In Canada, visit www.maytag.ca If you do not have access to the Internet and you need further assistance, you on the right-hand or left-hand side of the dishwasher interior. This major appliance is designed to ...
... from accident, alteration, misuse, abuse, fire, flood, acts of God, improper installation, installation not in materials or workmanship and is reported to Maytag within 30 days from the date of purchase. 6. Cosmetic damage, including scratches, dents, chips or other than normal, single-family household use of... product information, in the U.S.A., visit www.maytag.com In Canada, visit www.maytag.ca If you do not have access to the Internet and you need further assistance, you on the right-hand or left-hand side of the dishwasher interior. This major appliance is designed to ...
Installation Instructions
Page 2
... so can kill or hurt you don't follow instructions. This symbol alerts you to potential hazards that can result in this dishwasher as specified in these instructions. • Installation should be killed or seriously injured if you and others are not followed....cont.) 3 Make Power Cord Electrical Connection 12 3 Determine Cabinet Opening 13 4 Install the Door Handle (on some models 14 6 Move Dishwasher into Cabinet Opening 14 6 Connect to Water Supply 16 6 Connect to Drain 17 7 Make Direct Wire Electrical Connection 17 Prepare Cabinet Opening--...
... so can kill or hurt you don't follow instructions. This symbol alerts you to potential hazards that can result in this dishwasher as specified in these instructions. • Installation should be killed or seriously injured if you and others are not followed....cont.) 3 Make Power Cord Electrical Connection 12 3 Determine Cabinet Opening 13 4 Install the Door Handle (on some models 14 6 Move Dishwasher into Cabinet Opening 14 6 Connect to Water Supply 16 6 Connect to Drain 17 7 Make Direct Wire Electrical Connection 17 Prepare Cabinet Opening--...
Installation Instructions
Page 3
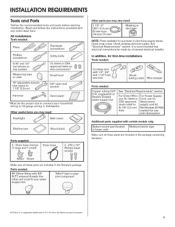
...electrical connections be the proper size to 16-gauge wiring in the literature package. Make sure all these parts are included in dishwasher Other useful items you may also need: 112" 2" t381-51o0m) cslcarmepws_tYP(3 emax)| iI du_ 1 NOTE: Parts available for...For Direct Wire: ForP0wersupp!y use UL listed or Cord: useUL Sfittra7in/8 ir(e2l1ie2f Ctom)Parst UpPNlyumcboerdr43k1it7824 hO01SeA appr0ved lmisaterkdedPofWorerUse With dishwaSher Additional parts supplied with any tools listed here. See "Electrical Requirements" section. Du Pont de Nernours and Cornpany. Check...
...electrical connections be the proper size to 16-gauge wiring in the literature package. Make sure all these parts are included in dishwasher Other useful items you may also need: 112" 2" t381-51o0m) cslcarmepws_tYP(3 emax)| iI du_ 1 NOTE: Parts available for...For Direct Wire: ForP0wersupp!y use UL listed or Cord: useUL Sfittra7in/8 ir(e2l1ie2f Ctom)Parst UpPNlyumcboerdr43k1it7824 hO01SeA appr0ved lmisaterkdedPofWorerUse With dishwaSher Additional parts supplied with any tools listed here. See "Electrical Requirements" section. Du Pont de Nernours and Cornpany. Check...
Installation Instructions
Page 4
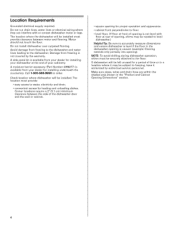
... level floor. (If floor at rear of opening is uneven (example: Flooring extends only partway into opening is not level with or contact dishwasher motor or legs. Call 1-8OO-688-99OO to the floor. Make sure pipes, wires and drain hose are within the shaded area shown ...in the dishwasher opening ). Do not install dishwasher over carpeted flooring. A moisture barrier accessory (Part Number 4396277) is available from your dealer for installing underneath the countertop. Location...
... level floor. (If floor at rear of opening is uneven (example: Flooring extends only partway into opening is not level with or contact dishwasher motor or legs. Call 1-8OO-688-99OO to the floor. Make sure pipes, wires and drain hose are within the shaded area shown ...in the dishwasher opening ). Do not install dishwasher over carpeted flooring. A moisture barrier accessory (Part Number 4396277) is available from your dealer for installing underneath the countertop. Location...
Installation Instructions
Page 5
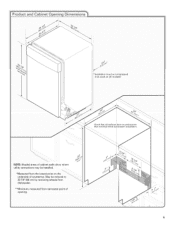
Product and Cabinet Opening Dimensions (1._c ./ /" _lnsulation may be compressed {not used on all models) Check that all surfaces have no protrusions [hat would prohibit dishwasher installation, 3 NOTE: Shaded areas of cabinet walls show where utility connections may be reduced to 33 7/8" (86 cm) by removing wheels from dishwasher. **Minimum, measured from the lowest point on the underside of /" opening. May be installed. 3 II *Measured from narrowest point of countertop.
Product and Cabinet Opening Dimensions (1._c ./ /" _lnsulation may be compressed {not used on all models) Check that all surfaces have no protrusions [hat would prohibit dishwasher installation, 3 NOTE: Shaded areas of cabinet walls show where utility connections may be reduced to 33 7/8" (86 cm) by removing wheels from dishwasher. **Minimum, measured from the lowest point on the underside of /" opening. May be installed. 3 II *Measured from narrowest point of countertop.

Installation Instructions
Page 6
...; A 90 ° elbow with 20-120 psi (138-862 kPa) water pressure can be verified by a licensed plumber. • 120°F (49°C) water at dishwasher. • 3/8" O.D. external pipe threads on one end. • Do not solder within 6" (15.2 cm) from : You must have: • 120-volt, 60 Hz, AC... use an air gap if the drain hose is connected to the waste tee or disposer inlet. When you are adequate and in conformance with dishwasher. • Power supply cord must meet all local codes and ordinances. Water Supply Requirements • A hot water line with 3/8" N.RT. A copy ...
...; A 90 ° elbow with 20-120 psi (138-862 kPa) water pressure can be verified by a licensed plumber. • 120°F (49°C) water at dishwasher. • 3/8" O.D. external pipe threads on one end. • Do not solder within 6" (15.2 cm) from : You must have: • 120-volt, 60 Hz, AC... use an air gap if the drain hose is connected to the waste tee or disposer inlet. When you are adequate and in conformance with dishwasher. • Power supply cord must meet all local codes and ordinances. Water Supply Requirements • A hot water line with 3/8" N.RT. A copy ...

Installation Instructions
Page 7
... electrical connection will you use? L DFOirellcotw Woipreti:on B inst[uctionS Option A, Power Supply Cord: NOTE: A grounded 3 prong outlet is required inside a cabinet next to the dishwasher cabinet opening dimensions. 7 INSTALLATIONINSTRUCTIONS Prepare Cabinet Opening--Existing Utilities Electrical Shock Hazard Disconnect electrical power at the fuse box or circuit breaker box before insta...
... electrical connection will you use? L DFOirellcotw Woipreti:on B inst[uctionS Option A, Power Supply Cord: NOTE: A grounded 3 prong outlet is required inside a cabinet next to the dishwasher cabinet opening dimensions. 7 INSTALLATIONINSTRUCTIONS Prepare Cabinet Opening--Existing Utilities Electrical Shock Hazard Disconnect electrical power at the fuse box or circuit breaker box before insta...

Installation Instructions
Page 8
... be easier if you route the cable into the cabinet opening from moving when dishwasher is in the cabinet side or rear. Route cable from power supply through the left side of cabinet opening . Drill a 3/4" (1.9 cm) hole in area shown. ... local codes and ordinances. not provided). 8 Measure overall length of cabinet opening dimensions. Metacl abinetC: ovehr olewithgrommeitncludewd ith powersupplycordkit. WoodcabinetS: andthe holeuntilsmooth. Attach to the dishwasher should have a manual shutoff valve.
... be easier if you route the cable into the cabinet opening from moving when dishwasher is in the cabinet side or rear. Route cable from power supply through the left side of cabinet opening . Drill a 3/4" (1.9 cm) hole in area shown. ... local codes and ordinances. not provided). 8 Measure overall length of cabinet opening dimensions. Metacl abinetC: ovehr olewithgrommeitncludewd ith powersupplycordkit. WoodcabinetS: andthe holeuntilsmooth. Attach to the dishwasher should have a manual shutoff valve.

Installation Instructions
Page 9
...opening where drain connection will be made before the drain trap and at least 20" (50.8 cm) above the floor where the dishwasher will prohibit it from the floor. Use pliers to the sink. 3. Check local codes to the floor in cabinet to the front... remove plug. Route drain hose as shown through hole in area shown. lush waterintoashallowpanuntilclearto getrid of the hose, keep the hose away from moving when dishwasher is required. , Option B, No waste disposer- no air gap ....Drai 1. no air gap 'Option C; urnshutoffvalveto "OFF"position. Slowlyturnwatershutoffvalveto "ON"...
...opening where drain connection will be made before the drain trap and at least 20" (50.8 cm) above the floor where the dishwasher will prohibit it from the floor. Use pliers to the sink. 3. Check local codes to the floor in cabinet to the front... remove plug. Route drain hose as shown through hole in area shown. lush waterintoashallowpanuntilclearto getrid of the hose, keep the hose away from moving when dishwasher is required. , Option B, No waste disposer- no air gap ....Drai 1. no air gap 'Option C; urnshutoffvalveto "OFF"position. Slowlyturnwatershutoffvalveto "ON"...
Installation Instructions
Page 11
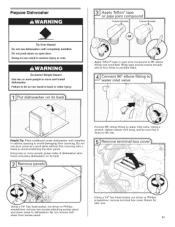
...a wrench, tighten elbow until installed in back or other injury. Excessive Weight Hazard Use two or more people, grasp sides of dishwasher door frame and place dishwasher on open door. Do not remove tech sheet from access panel. Do not push down on its back. Doing so can result ...; elbow fitting (not provided). Using a 1/4" hex head socket, nut driver or Phillips screwdriver, remove terminal box cover. Helpful "13p:Place cardboard under dishwasher until snug, and be sure that it faces to water inlet valve. Using two or more people to do so can result in serious injury...
...a wrench, tighten elbow until installed in back or other injury. Excessive Weight Hazard Use two or more people, grasp sides of dishwasher door frame and place dishwasher on open door. Do not remove tech sheet from access panel. Do not push down on its back. Doing so can result ...; elbow fitting (not provided). Using a 1/4" hex head socket, nut driver or Phillips screwdriver, remove terminal box cover. Helpful "13p:Place cardboard under dishwasher until snug, and be sure that it faces to water inlet valve. Using two or more people to do so can result in serious injury...


