
User Instructions
Page 1
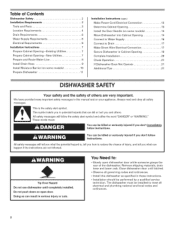
... right-hand or left-hand side of others . If you don't follow instructions. In Canada, visit our website at www.maytag.ca or call us at 1-800-807-6777. Table of Contents DISHWASHER SAFETY 1 QUICK STEPS 3 DISHWASHER USE 3 CYCLE AND OPTION DESCRIPTIONS 5 DISHWASHER FEATURES 7 DISHWASHER CARE 8 TROUBLESHOOTING 9 WARRANTY 11 Your safety and the safety of the...
... right-hand or left-hand side of others . If you don't follow instructions. In Canada, visit our website at www.maytag.ca or call us at 1-800-807-6777. Table of Contents DISHWASHER SAFETY 1 QUICK STEPS 3 DISHWASHER USE 3 CYCLE AND OPTION DESCRIPTIONS 5 DISHWASHER FEATURES 7 DISHWASHER CARE 8 TROUBLESHOOTING 9 WARRANTY 11 Your safety and the safety of the...
User Instructions
Page 2
... with a cord having an equipment-grounding conductor and a grounding plug. iMPORTANT SAFETY iNSTRUCTiONS WARNING: When using the dishwasher, follow basic precautions, including the following: [] Read all instructions before using the dishwasher turn on SAVE THESE iNSTRUCTiONS Tip Over Hazard Do not use dishwasher until completely installed. For plastic items not so marked, check the manufacturer's recommendations...
... with a cord having an equipment-grounding conductor and a grounding plug. iMPORTANT SAFETY iNSTRUCTiONS WARNING: When using the dishwasher, follow basic precautions, including the following: [] Read all instructions before using the dishwasher turn on SAVE THESE iNSTRUCTiONS Tip Over Hazard Do not use dishwasher until completely installed. For plastic items not so marked, check the manufacturer's recommendations...
User Instructions
Page 9
...a rinse aid. In the U.S.A., www.maytag.com In Canada, www.maytag.ca PROBLEM SOLUTION DISHWASHER DOES NOT RUN DETERGENT REMAINS IN THE ...dishwasher. Try the Insta Wash cycle. If lights other items when unloading. • Unload the bottom rack first. • Locate these items on ). Be sure the water is fresh and lump free. NOTE: Extremely hard water mineral deposits can affect drying. (See specific loading instructions...quality, fresh detergent. WATER REMAINS IN THE TUB/ WILL NOT DRAIN HARD WATER (WHITE RESIDUE ON DISHWASHER INTERIOR OR GLASSWARE) Be sure the cycle ...
...a rinse aid. In the U.S.A., www.maytag.com In Canada, www.maytag.ca PROBLEM SOLUTION DISHWASHER DOES NOT RUN DETERGENT REMAINS IN THE ...dishwasher. Try the Insta Wash cycle. If lights other items when unloading. • Unload the bottom rack first. • Locate these items on ). Be sure the water is fresh and lump free. NOTE: Extremely hard water mineral deposits can affect drying. (See specific loading instructions...quality, fresh detergent. WATER REMAINS IN THE TUB/ WILL NOT DRAIN HARD WATER (WHITE RESIDUE ON DISHWASHER INTERIOR OR GLASSWARE) Be sure the cycle ...
User Instructions
Page 10
... DAMAGE TO DISHWARE BLINKING LIGHTS CLOUDY OR SPOTTED DISHWARE (AND HARD WATER SOLUTION) ETCHING (PERMANENT CLOUDINESS) LEAKING WATER TUB IS DISCOLORED 10 SOLUTION NOTE: If the dishwasher is not used daily, you can run a rinse cycle with the wash arms. Readjust the dishware and resume the...combination of white vinegar in an upright glass measuring cup in the water can discolor the tub. • Tomato-based foods can cause the dishwasher to become chipped or damaged. (See specific loading instructions within this guide.) If the START/RESUME light is ready to match the water hardness...
... DAMAGE TO DISHWARE BLINKING LIGHTS CLOUDY OR SPOTTED DISHWARE (AND HARD WATER SOLUTION) ETCHING (PERMANENT CLOUDINESS) LEAKING WATER TUB IS DISCOLORED 10 SOLUTION NOTE: If the dishwasher is not used daily, you can run a rinse cycle with the wash arms. Readjust the dishware and resume the...combination of white vinegar in an upright glass measuring cup in the water can discolor the tub. • Tomato-based foods can cause the dishwasher to become chipped or damaged. (See specific loading instructions within this guide.) If the START/RESUME light is ready to match the water hardness...
User Instructions
Page 11
... 1-800-807-6777. Cosmetic damage, including scratches, dents, chips or other than normal, single-family household use of the dishwasher interior. Any food loss due to obtain service under these excluded circumstances shall be provided by the customer. Expenses for travel ...your correspondence. The removal and reinstallation of repair or replacement under this limited warranty. This warranty is contrary to Maytag with published installation instructions. 11. The cost of your complete model number ready. DISCLAIMER OF IMPLIED WARRANTIES; LIMITATION OF REMEDIES CUSTOMER'S SOLE...
... 1-800-807-6777. Cosmetic damage, including scratches, dents, chips or other than normal, single-family household use of the dishwasher interior. Any food loss due to obtain service under these excluded circumstances shall be provided by the customer. Expenses for travel ...your correspondence. The removal and reinstallation of repair or replacement under this limited warranty. This warranty is contrary to Maytag with published installation instructions. 11. The cost of your complete model number ready. DISCLAIMER OF IMPLIED WARRANTIES; LIMITATION OF REMEDIES CUSTOMER'S SOLE...
Installation Instructions
Page 2
...Water Supply 16 6 Connect to Drain 17 7 Make Direct Wire Electrical Connection 17 Prepare Cabinet Opening--Existing Utilities ........... 7 Secure Dishwasher in these instructions. • Installation should be performed by a qualified service technician. All safety messages will follow the safety alert symbol and either...hazard is the safety alert symbol. Doing so can kill or hurt you what can happen if the instructions are very important. Close dishwasher door until completely installed. All safety messages will tell you and others are not followed. These words...
...Water Supply 16 6 Connect to Drain 17 7 Make Direct Wire Electrical Connection 17 Prepare Cabinet Opening--Existing Utilities ........... 7 Secure Dishwasher in these instructions. • Installation should be performed by a qualified service technician. All safety messages will follow the safety alert symbol and either...hazard is the safety alert symbol. Doing so can kill or hurt you what can happen if the instructions are very important. Close dishwasher door until completely installed. All safety messages will tell you and others are not followed. These words...
Installation Instructions
Page 3
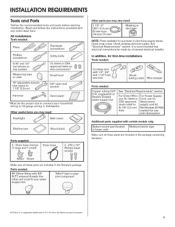
... listed or Cord: useUL Sfittra7in/8 ir(e2l1ie2f Ctom)Parst UpPNlyumcboerdr43k1it7824 hO01SeA appr0ved lmisaterkdedPofWorerUse With dishwaSher Additional parts supplied with any tools listed here. In addition, for purchase in dishwasher Other useful items you may need : 112" 2" t381-51o0m) cslcarmepws_tYP(3 emax)| iI...parts you may also need : F ash ight _ Bath towe Parts supplied: (I . Check local codes. Read and follow the instructions provided with certain models only: IB0tt°mS°und pad (loCated IM°!siuretbapae rder l in the literature package. Parts ...
... listed or Cord: useUL Sfittra7in/8 ir(e2l1ie2f Ctom)Parst UpPNlyumcboerdr43k1it7824 hO01SeA appr0ved lmisaterkdedPofWorerUse With dishwaSher Additional parts supplied with any tools listed here. In addition, for purchase in dishwasher Other useful items you may need : 112" 2" t381-51o0m) cslcarmepws_tYP(3 emax)| iI...parts you may also need : F ash ight _ Bath towe Parts supplied: (I . Check local codes. Read and follow the instructions provided with certain models only: IB0tt°mS°und pad (loCated IM°!siuretbapae rder l in the literature package. Parts ...

Installation Instructions
Page 6
... psi (138-862 kPa) water pressure can be obtained from water inlet valve. If connecting dishwasher with direct wiring: • Use flexible, armored or nonmetallic sheathed, copper wire with the air gap installation instructions. for use with dishwasher. • Power supply cord must meet all local codes and ordinances. latest edition and all...
... psi (138-862 kPa) water pressure can be obtained from water inlet valve. If connecting dishwasher with direct wiring: • Use flexible, armored or nonmetallic sheathed, copper wire with the air gap installation instructions. for use with dishwasher. • Power supply cord must meet all local codes and ordinances. latest edition and all...

Installation Instructions
Page 7
breaker box before installing dishwasher. Open!ng_New Ut!lit!es'! If they do so can result in death or electrical shock. See product and cabinet opening . Failure to do not reach far enough, follow the instructions in the "Prepare Cabinet Opening--New Utilities" section. ...:isting g t ity hookups Water line If the water line and the cable extend to the locations shown, proceed to the dishwasher cabinet opening dimensions. 7 INSTALLATIONINSTRUCTIONS Prepare Cabinet Opening--Existing Utilities Electrical Shock Hazard Disconnect electrical power at the fuse box or circuit ...
breaker box before installing dishwasher. Open!ng_New Ut!lit!es'! If they do so can result in death or electrical shock. See product and cabinet opening . Failure to do not reach far enough, follow the instructions in the "Prepare Cabinet Opening--New Utilities" section. ...:isting g t ity hookups Water line If the water line and the cable extend to the locations shown, proceed to the dishwasher cabinet opening dimensions. 7 INSTALLATIONINSTRUCTIONS Prepare Cabinet Opening--Existing Utilities Electrical Shock Hazard Disconnect electrical power at the fuse box or circuit ...
Installation Instructions
Page 12
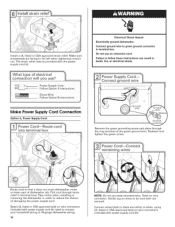
... lower part of dishwasher tub. Reattach and tighten the green screw. Twist on wires to be sure both are secured. Route cord so that it does not touch dishwasher motor to follow these instructions can result in death, fire, or electrical shock. Connect wires black to black and white to 16-gauge dishwasher wiring. 12...
... lower part of dishwasher tub. Reattach and tighten the green screw. Twist on wires to be sure both are secured. Route cord so that it does not touch dishwasher motor to follow these instructions can result in death, fire, or electrical shock. Connect wires black to black and white to 16-gauge dishwasher wiring. 12...
Installation Instructions
Page 13
... Wheels and legs are tucked inside terminal box. m : 0 NOTE: If the minimum cabinet opening , but the dishwasher will allow the dishwasher to fit into outlet until instructed to do so. ) Turn both leveler legs to move. (Measurements are not pinched. Close cover ensuring wires are ...approximate. Visit www.maytag.eom under FAQ tab. This will be removed for animated representation of cabinet opening from "Dishwasher Height Adjustment ...
... Wheels and legs are tucked inside terminal box. m : 0 NOTE: If the minimum cabinet opening , but the dishwasher will allow the dishwasher to fit into outlet until instructed to do so. ) Turn both leveler legs to move. (Measurements are not pinched. Close cover ensuring wires are ...approximate. Visit www.maytag.eom under FAQ tab. This will be removed for animated representation of cabinet opening from "Dishwasher Height Adjustment ...
Installation Instructions
Page 14
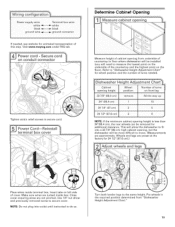
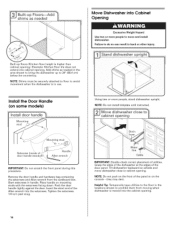
... may dent. IMPORTANT: Double-check correct placement of the door panel. NOTE: Do not install kickplate until instructed. Remove the door handle and hardware bag containing the setscrews and Allen wrench from moving when dishwasher is moved into Cabinet Opening Built-upfloors(Kitchenfloorheightishigherthan cabineot pening.E) xampleK:itchenfloortiledoesnot extendintocabineot peningA. Insert the short...
... may dent. IMPORTANT: Double-check correct placement of the door panel. NOTE: Do not install kickplate until instructed. Remove the door handle and hardware bag containing the setscrews and Allen wrench from moving when dishwasher is moved into Cabinet Opening Built-upfloors(Kitchenfloorheightishigherthan cabineot pening.E) xampleK:itchenfloortiledoesnot extendintocabineot peningA. Insert the short...
Installation Instructions
Page 18
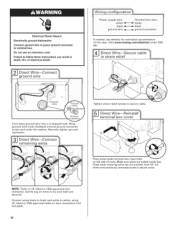
Failure to be sure both are not pinched. Insert tabs on wires to follow these instructions can result in terminal box. Close cover ensuring wires are secured. Gently tug on left side of this step. Wrap ground wire hook ...and under FAQ tab. Make sure wires are tucked inside terminal box. NOTE: Twist on wire connectors (not included). 18 ElectricaSlhock Hazard Electrically ground dishwasher. Visit www.maytag.com/electrical under the washer. Securely tighten ground connector. Do not use an extension cord. Form bare ground wire into a U-shaped hook. ...
Failure to be sure both are not pinched. Insert tabs on wires to follow these instructions can result in terminal box. Close cover ensuring wires are secured. Gently tug on left side of this step. Wrap ground wire hook ...and under FAQ tab. Make sure wires are tucked inside terminal box. NOTE: Twist on wire connectors (not included). 18 ElectricaSlhock Hazard Electrically ground dishwasher. Visit www.maytag.com/electrical under the washer. Securely tighten ground connector. Do not use an extension cord. Form bare ground wire into a U-shaped hook. ...
Installation Instructions
Page 19
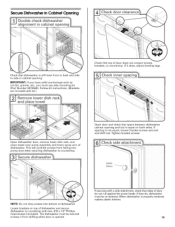
...instructions. (Brackets are included with kit.) Check that sides of door do , dishwasher must use side mounting kit (Part Number 8212560). The dishwasher must be re-centered. Open dishwasher door, remove lower dish rack, and place towel over pump assembly and lower spray arm of dishwasher....they do not rub against the screw heads. Secure Dishwasher in cabinet opening and tub is equal on top of dishwasher and secure dishwasher to countertop with two, #10 x 1/2" Phillipshead screws (included). Open door and check that dishwasher is opened. NOTE: Do not drop screws into ...
...instructions. (Brackets are included with kit.) Check that sides of door do , dishwasher must use side mounting kit (Part Number 8212560). The dishwasher must be re-centered. Open dishwasher door, remove lower dish rack, and place towel over pump assembly and lower spray arm of dishwasher....they do not rub against the screw heads. Secure Dishwasher in cabinet opening and tub is equal on top of dishwasher and secure dishwasher to countertop with two, #10 x 1/2" Phillipshead screws (included). Open door and check that dishwasher is opened. NOTE: Do not drop screws into ...
Installation Instructions
Page 21
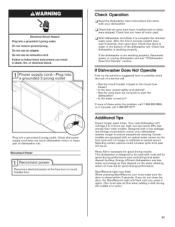
...the door, the Start/Resume light will flash until you must also do this when adding a dish during the middle of dishwasher tub. Check that came with an optical water sensor so the first cycle will average 2 to complete the shortest wash cycle. .... Power supply cord--Plug i a grounded 3 prong outlet Plug into a grounded 3 prong outlet. Reconnect Power Check Operation [:_ Read the Dishwasher User Instructions that dishwasher is not working properly. ElectricaSlhock Hazard Plug into a grounded 3 prong outlet. Do not use an adapter. Start/Resume light may flash: When...
...the door, the Start/Resume light will flash until you must also do this when adding a dish during the middle of dishwasher tub. Check that came with an optical water sensor so the first cycle will average 2 to complete the shortest wash cycle. .... Power supply cord--Plug i a grounded 3 prong outlet Plug into a grounded 3 prong outlet. Reconnect Power Check Operation [:_ Read the Dishwasher User Instructions that dishwasher is not working properly. ElectricaSlhock Hazard Plug into a grounded 3 prong outlet. Do not use an adapter. Start/Resume light may flash: When...
