
User Instructions
Page 8
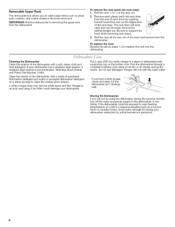
... could be exposed to near freezing temperatures or is recommended - j 2. Stainless Steel Cleaner and Polish Part Number 31464. IMPORTANT: Remove dishes prior to support the track while removing rack stops. _ 3. Run the dishwasher through a complete washing cycle using the dishwasher during the summer months, turn off the water and power supply to the...
... could be exposed to near freezing temperatures or is recommended - j 2. Stainless Steel Cleaner and Polish Part Number 31464. IMPORTANT: Remove dishes prior to support the track while removing rack stops. _ 3. Run the dishwasher through a complete washing cycle using the dishwasher during the summer months, turn off the water and power supply to the...
User Instructions
Page 11
...is not installed in materials or workmanship. Costs associated with published installation instructions. 11. Expenses for travel and transportation for factory specified parts and repair labor to correct defects in accordance with the removal from your home of your complete model number ready. IMPLIED WARRANTIES,...your major appliance, to instruct you on the right-hand or left-hand side of the dishwasher interior. Have your major appliance for future reference. 11 You can write to Maytag with electrical or plumbing codes, or use your major appliance if it was purchased. Proof ...
...is not installed in materials or workmanship. Costs associated with published installation instructions. 11. Expenses for travel and transportation for factory specified parts and repair labor to correct defects in accordance with the removal from your home of your complete model number ready. IMPLIED WARRANTIES,...your major appliance, to instruct you on the right-hand or left-hand side of the dishwasher interior. Have your major appliance for future reference. 11 You can write to Maytag with electrical or plumbing codes, or use your major appliance if it was purchased. Proof ...
Installation Instructions
Page 2
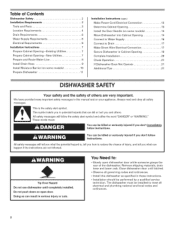
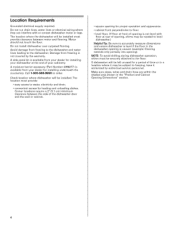
... hurt you and others are not followed. Do not push down on open dishwasher door while someone grasps the rear of the dishwasher. Remove shipping materials, drain hose and lower rack. Table of Contents Dishwasher Safety Installation Requirements Tools and Parts Location Requirements Drain Requirements Water Supply Requirements Electrical Requirements Installation Instructions 2 Installation Instructions...
... hurt you and others are not followed. Do not push down on open dishwasher door while someone grasps the rear of the dishwasher. Remove shipping materials, drain hose and lower rack. Table of Contents Dishwasher Safety Installation Requirements Tools and Parts Location Requirements Drain Requirements Water Supply Requirements Electrical Requirements Installation Instructions 2 Installation Instructions...
Installation Instructions
Page 3
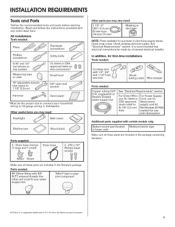
..." section. In addition, for purchase in plumbing supply stores. Make sure all these parts are included in dishwasher Other useful items you may need: F ash ight _ Bath towe Parts supplied: (I . All Installations Tools needed: P ers m Flat-blade screwdriver Phillips ...UL listed or Cord: useUL Sfittra7in/8 ir(e2l1ie2f Ctom)Parst UpPNlyumcboerdr43k1it7824 hO01SeA appr0ved lmisaterkdedPofWorerUse With dishwaSher Additional parts supplied with any tools listed here. Parts needed : C0ppeitubing (3/8, OID. Check local codes. Read and follow the instructions provided ...
..." section. In addition, for purchase in plumbing supply stores. Make sure all these parts are included in dishwasher Other useful items you may need: F ash ight _ Bath towe Parts supplied: (I . All Installations Tools needed: P ers m Flat-blade screwdriver Phillips ...UL listed or Cord: useUL Sfittra7in/8 ir(e2l1ie2f Ctom)Parst UpPNlyumcboerdr43k1it7824 hO01SeA appr0ved lmisaterkdedPofWorerUse With dishwaSher Additional parts supplied with any tools listed here. Parts needed : C0ppeitubing (3/8, OID. Check local codes. Read and follow the instructions provided ...
Installation Instructions
Page 4
... carpeted flooring. A moisture barrier accessory (Part Number 4396277) is available from freezing is available from freezing to the dishwasher and water lines leading to order. Call 1-8OO-688-99OO to the dishwasher. Damage from your dealer for installing your dishwasher at rear of time or in a location where ...dealer for installing underneath the countertop. Make sure pipes, wires and drain hose are within the shaded area shown in the dishwasher opening is uneven (example: Flooring extends only partway into opening is level if the floor in the "Product and Cabinet Opening Dimensions" section...
... carpeted flooring. A moisture barrier accessory (Part Number 4396277) is available from freezing is available from freezing to the dishwasher and water lines leading to order. Call 1-8OO-688-99OO to the dishwasher. Damage from your dealer for installing your dishwasher at rear of time or in a location where ...dealer for installing underneath the countertop. Make sure pipes, wires and drain hose are within the shaded area shown in the dishwasher opening is uneven (example: Flooring extends only partway into opening is level if the floor in the "Product and Cabinet Opening Dimensions" section...

Installation Instructions
Page 6
...only, supply. • copper wire only. If connecting dishwasher with a power supply cord: • Use UL listed power supply cord kit (Part No. 4317824) marked for your dishwasher. copper tubing with compression fitting or flexible braided water supply line (Part Number 4396897RP) NOTE: 1/2" minimum plastic tubing is not ... long enough, use an air gap if the drain hose is connected to the dishwasher opening. Water Supply Requirements • A hot water line with a maximum length of 12' (3.7 m) (Part Number 3385556) that the drain hose either be looped up and securely fastened to ...
...only, supply. • copper wire only. If connecting dishwasher with a power supply cord: • Use UL listed power supply cord kit (Part No. 4317824) marked for your dishwasher. copper tubing with compression fitting or flexible braided water supply line (Part Number 4396897RP) NOTE: 1/2" minimum plastic tubing is not ... long enough, use an air gap if the drain hose is connected to the dishwasher opening. Water Supply Requirements • A hot water line with a maximum length of 12' (3.7 m) (Part Number 3385556) that the drain hose either be looped up and securely fastened to ...

Installation Instructions
Page 8
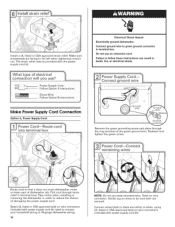
... opening. The water line to the floor in compliance with grommet (Part Number 302797 - Option B, Direct Wire: Helpful Tip: Wiring the dishwasher will make water connection easier. Tape cable to the dishwasher should have a manual shutoff valve. Wood cabinet: Sand the hole...Measure overall length of cabinet opening will be easier if you route the cable into the cabinet opening from moving when dishwasher is in area shown. WoodcabinetS: andthe holeuntilsmooth. See product and cabinet opening ). Metacl abinetC: ovehr olewithgrommeitncludewd ith powersupplycordkit....
... opening. The water line to the floor in compliance with grommet (Part Number 302797 - Option B, Direct Wire: Helpful Tip: Wiring the dishwasher will make water connection easier. Tape cable to the dishwasher should have a manual shutoff valve. Wood cabinet: Sand the hole...Measure overall length of cabinet opening will be easier if you route the cable into the cabinet opening from moving when dishwasher is in area shown. WoodcabinetS: andthe holeuntilsmooth. See product and cabinet opening ). Metacl abinetC: ovehr olewithgrommeitncludewd ith powersupplycordkit....
Installation Instructions
Page 12
...in order to reduce the chance of dishwasher tub. Pull cord through the ring terminal of the green ground wire. Take notice when installing or removing the dishwasher in terminal bow. Connect ground wire to lower part of damaging the power supply cord.... Reattach and tighten the green screw. Gently tug on wire connector. Electrical Shock Hazard Electrically ground dishwasher. Instalal ULlistedorCSAapprovedstrainreliefM. Route cord ...
...in order to reduce the chance of dishwasher tub. Pull cord through the ring terminal of the green ground wire. Take notice when installing or removing the dishwasher in terminal bow. Connect ground wire to lower part of damaging the power supply cord.... Reattach and tighten the green screw. Gently tug on wire connector. Electrical Shock Hazard Electrically ground dishwasher. Instalal ULlistedorCSAapprovedstrainreliefM. Route cord ...
Installation Instructions
Page 17
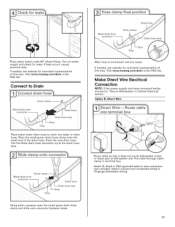
If needed, see website for animated representation of dishwasher tub. Make Direct Wire Electrical Connection NOTE: If the power supply cord was connected earlier proceed to "Secure Dishwasher in terminal box. Drain hose Drain hose stop Stop Stop After hose is connected, remove towel. Drain hose Green clamp ... or lower part of this step. Using pliers, squeeze open the small green drain hose clamp and slide onto connector between stops. 17 Visit www.maytag.com/drain under drain hose to the drain hose stop. Connect to 16-gauge dishwasher wiring. Select UL listed or CSA ...
If needed, see website for animated representation of dishwasher tub. Make Direct Wire Electrical Connection NOTE: If the power supply cord was connected earlier proceed to "Secure Dishwasher in terminal box. Drain hose Drain hose stop Stop Stop After hose is connected, remove towel. Drain hose Green clamp ... or lower part of this step. Using pliers, squeeze open the small green drain hose clamp and slide onto connector between stops. 17 Visit www.maytag.com/drain under drain hose to the drain hose stop. Connect to 16-gauge dishwasher wiring. Select UL listed or CSA ...
Installation Instructions
Page 19
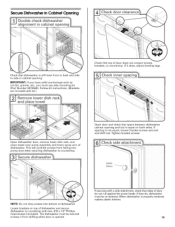
... such as corrian, granite, etc., you must use side mounting kit (Part Number 8212560). Follow kit instructions. (Brackets are included with kit.) Check that space between dishwasher cabinet opening . Open dishwasher door, remove lower dish rack, and place towel over pump assembly and..., #10 x 1/2" Phillipshead screws (included). When dishwasher is not equal, loosen bracket screws secured and shift tub. plastic button ---_- Locate brackets on top of dishwasher and secure dishwasher to countertop with a side attachment, check that dishwasher is still level front to back and side to side...
... such as corrian, granite, etc., you must use side mounting kit (Part Number 8212560). Follow kit instructions. (Brackets are included with kit.) Check that space between dishwasher cabinet opening . Open dishwasher door, remove lower dish rack, and place towel over pump assembly and..., #10 x 1/2" Phillipshead screws (included). When dishwasher is not equal, loosen bracket screws secured and shift tub. plastic button ---_- Locate brackets on top of dishwasher and secure dishwasher to countertop with a side attachment, check that dishwasher is still level front to back and side to side...
Installation Instructions
Page 21
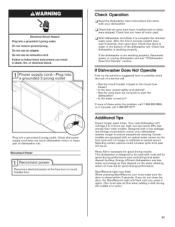
... Is the door closed within 3 seconds. Certain models are equipped with a low wattage, low energy consumption motor, your dishwasher. [:_ Check that all parts have all tools used with rinse aid for good drying performance. If you do this when adding a dish during the middle... of dishwasher tub. ElectricaSlhock Hazard Plug into a grounded 3 prong outlet. Do not remove ground prong. Do not use less water and energy so they depend on ? Ci Start dishwasher...
... Is the door closed within 3 seconds. Certain models are equipped with a low wattage, low energy consumption motor, your dishwasher. [:_ Check that all parts have all tools used with rinse aid for good drying performance. If you do this when adding a dish during the middle... of dishwasher tub. ElectricaSlhock Hazard Plug into a grounded 3 prong outlet. Do not remove ground prong. Do not use less water and energy so they depend on ? Ci Start dishwasher...

