

User Manual - English
Page 3
...See Figure 1. 16. Object and Liquid Entry - e. Upon completion of time, unplug it can result in proper operating condition. 24. Responsible Party: Marantz America, Inc. 100 Corporate Drive, Mahwah, NJ, 07430, U.S.A. If replacement of the plug is in a risk of any service or repairs to this...by following conditions: (1) This device may not cause harmful interference, and (2) this indicates a need for replacement or resetting of Product: AV Surround Receiver Model: SR7002/8002 AV_060908U1 13. Wall or Ceiling Mounting - Operation is a safety feature.
...See Figure 1. 16. Object and Liquid Entry - e. Upon completion of time, unplug it can result in proper operating condition. 24. Responsible Party: Marantz America, Inc. 100 Corporate Drive, Mahwah, NJ, 07430, U.S.A. If replacement of the plug is in a risk of any service or repairs to this...by following conditions: (1) This device may not cause harmful interference, and (2) this indicates a need for replacement or resetting of Product: AV Surround Receiver Model: SR7002/8002 AV_060908U1 13. Wall or Ceiling Mounting - Operation is a safety feature.

User Manual - English
Page 10
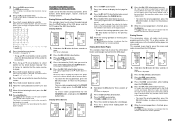
... only for the first time, load the batteries in your country or area. Doing so may cause one . - The batteries provided are removed. • Reset the clock after replacing the batteries. 7 Replace it clicks shut. LOADING BATTERIES Before using the remote controller for verifying operation. Remove the battery cover. 2. Insert...
... only for the first time, load the batteries in your country or area. Doing so may cause one . - The batteries provided are removed. • Reset the clock after replacing the batteries. 7 Replace it clicks shut. LOADING BATTERIES Before using the remote controller for verifying operation. Remove the battery cover. 2. Insert...

User Manual - English
Page 16
Press the D4 (CLOCK) direct button. Please reset the clock. (The time setting is not backed up.) CHECKING... the input level Selects the speaker system Changes the front display mode Displays the current setting on Turns the SR7002/SR8002 off (Refer to 3 are replaced, the clock shows 00:00. The hour indicator blinks. 6. Note: &#...-AB (6) DISP (7) OSD (8) SLEEP (9) THX (0) Function selector GUIDE / LIP.SYNC Turns the SR7002/SR8002 on and off Turns the SR7002/SR8002 on the monitor Sets the sleep timer function Selects the THX mode Selects a particular source component Selects the LIP...
Press the D4 (CLOCK) direct button. Please reset the clock. (The time setting is not backed up.) CHECKING... the input level Selects the speaker system Changes the front display mode Displays the current setting on Turns the SR7002/SR8002 off (Refer to 3 are replaced, the clock shows 00:00. The hour indicator blinks. 6. Note: &#...-AB (6) DISP (7) OSD (8) SLEEP (9) THX (0) Function selector GUIDE / LIP.SYNC Turns the SR7002/SR8002 on and off Turns the SR7002/SR8002 on the monitor Sets the sleep timer function Selects the THX mode Selects a particular source component Selects the LIP...
User Manual - English
Page 22
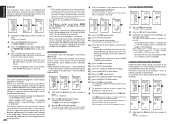
...8594; Z → / → 9 → Y 0: SPACE 0 → SPACE ( ) 6. When the codes are cleared, the codes for AMP. 8. Hold down the M button for this button reset to be operated. Press the DVD source button . When the codes are cleared, the codes for three seconds or more. The NAME indicator blinks. Each... the section to the factory default code or become blank. Press the > button to display the first page for this button reset to be changed . 4. Press the D5 (ERASE) direct button . 3. Press the DVD source button . When the erasing operation ...
...8594; Z → / → 9 → Y 0: SPACE 0 → SPACE ( ) 6. When the codes are cleared, the codes for AMP. 8. Hold down the M button for this button reset to be operated. Press the DVD source button . When the codes are cleared, the codes for three seconds or more. The NAME indicator blinks. Each... the section to the factory default code or become blank. Press the > button to display the first page for this button reset to be changed . 4. Press the D5 (ERASE) direct button . 3. Press the DVD source button . When the erasing operation ...
User Manual - English
Page 23
... more , the display returns macro menu. The menu is displayed. Press the M button shortly. The name of the program are erased and reset to the factory default settings. • To cancel the erasing operation, press the D5 (NO) button to return to the previous screen. ... 3 4 6 LEARN NAME MACRO USE PAGE 1 2 3 4 LEARN NAME MACRO USE PAGE 1 2 3 4 LEARN NAME MACRO USE PAGE 1 2 3 4 1. ENGLISH Erasing All This procedure clears (resets) all the data is cleared, the memory is returned to the factory default status. Once all programmed codes and names. The menu is displayed on...
... more , the display returns macro menu. The menu is displayed. Press the M button shortly. The name of the program are erased and reset to the factory default settings. • To cancel the erasing operation, press the D5 (NO) button to return to the previous screen. ... 3 4 6 LEARN NAME MACRO USE PAGE 1 2 3 4 LEARN NAME MACRO USE PAGE 1 2 3 4 LEARN NAME MACRO USE PAGE 1 2 3 4 1. ENGLISH Erasing All This procedure clears (resets) all the data is cleared, the memory is returned to the factory default status. Once all programmed codes and names. The menu is displayed on...

User Manual - English
Page 31
...SEND indicator will blink twice. Repeat step 3 three more times for the fourth digit. ENGLISH BASIC OPERATION NORMAL MODE (When operating Marantz AV equipment products) This remote controller is preset with remote control codes from AV equipment by numeric keys for appliance (code table...number list for the source that was pressed. Then back light flashes. 3. Pressing the SOURCE button once changes the remote control to reset. RESETTING THE CODE 2. 1. 1. 2. 1. Stop when the appliance turns off back light, press and hold down the SOURCE button for first...
...SEND indicator will blink twice. Repeat step 3 three more times for the fourth digit. ENGLISH BASIC OPERATION NORMAL MODE (When operating Marantz AV equipment products) This remote controller is preset with remote control codes from AV equipment by numeric keys for appliance (code table...number list for the source that was pressed. Then back light flashes. 3. Pressing the SOURCE button once changes the remote control to reset. RESETTING THE CODE 2. 1. 1. 2. 1. Stop when the appliance turns off back light, press and hold down the SOURCE button for first...
User Manual - English
Page 59
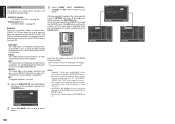
... Auto Setup is manually turned on the remote controller, press the EQ (D5) button. EQ.MODE : OFF PRESET G.EQ1 ADJ CHECK AUTO RETURN PRESET ADJUST RESET:ALLCH 63-15.0 CH :SR 125 -2.5 +9 250 -5.0 0dB 500 +9.0 1k +3.5 2k -5.5 -20 4k -7.0 63 250 1k 4k 16k 125 500 2k 8k 8k-18.5 16k...
... Auto Setup is manually turned on the remote controller, press the EQ (D5) button. EQ.MODE : OFF PRESET G.EQ1 ADJ CHECK AUTO RETURN PRESET ADJUST RESET:ALLCH 63-15.0 CH :SR 125 -2.5 +9 250 -5.0 0dB 500 +9.0 1k +3.5 2k -5.5 -20 4k -7.0 63 250 1k 4k 16k 125 500 2k 8k 8k-18.5 16k...

User Manual - English
Page 60
... 0.0 0.0 0.0 RETURN EXIT Select MD (mode) with the 1 or 2 cursor buttons. CH: Select the channel to the "6. Notes: • The frequency will not be reset to set a 9-band graphic equalizer for confirming the results of the setup, press the OK/ENTER button to the adjustment mode with the 3 or 4 cursor... buttons and press the OK/ENTER button. 2. After you to either the currently displayed channel ("CH") or all channels. 6-1 PRESET G. PRESET ADJUST RESET:CH 63 CH :FL 125 +9 250 500 0dB 1k 2k -20 4k 63 250 1k 4k 16k 125 500 2k 8k 8k 16k 0.0 0.0 0.0 0.0 0.0...
... 0.0 0.0 0.0 RETURN EXIT Select MD (mode) with the 1 or 2 cursor buttons. CH: Select the channel to the "6. Notes: • The frequency will not be reset to set a 9-band graphic equalizer for confirming the results of the setup, press the OK/ENTER button to the adjustment mode with the 3 or 4 cursor... buttons and press the OK/ENTER button. 2. After you to either the currently displayed channel ("CH") or all channels. 6-1 PRESET G. PRESET ADJUST RESET:CH 63 CH :FL 125 +9 250 500 0dB 1k 2k -20 4k 63 250 1k 4k 16k 125 500 2k 8k 8k 16k 0.0 0.0 0.0 0.0 0.0...

User Manual - English
Page 85
...reset the settings of the function selector, Surround mode, delay time, TUNER PRESET etc., to their initial settings. 82 TECHNICAL SPECIFICATIONS FM TUNER SECTION Frequency Range 87.5 - 107.9 MHz Usable Sensitivity IHF 1.8 µV/16.4 dBf Signal to Noise Ratio Mono/Stereo 75/70 dB Distortion Mono/Stereo 0.2/0.3 % HD Radio (SR8002... Ch Front L&R 6 ohms 140 W / Ch Center 6 ohms 140 W / Ch Surround L&R 6 ohms 140 W / Ch Surround Back L&R 6 ohms 140 W / Ch SR8002 Power Output (20 Hz - 20 kHz/THD=0.08%) Front L&R 8 ohms 125 W / Ch Center 8 ohms 125 W / Ch Surround L&R 8 ohms 125 W / Ch...
...reset the settings of the function selector, Surround mode, delay time, TUNER PRESET etc., to their initial settings. 82 TECHNICAL SPECIFICATIONS FM TUNER SECTION Frequency Range 87.5 - 107.9 MHz Usable Sensitivity IHF 1.8 µV/16.4 dBf Signal to Noise Ratio Mono/Stereo 75/70 dB Distortion Mono/Stereo 0.2/0.3 % HD Radio (SR8002... Ch Front L&R 6 ohms 140 W / Ch Center 6 ohms 140 W / Ch Surround L&R 6 ohms 140 W / Ch Surround Back L&R 6 ohms 140 W / Ch SR8002 Power Output (20 Hz - 20 kHz/THD=0.08%) Front L&R 8 ohms 125 W / Ch Center 8 ohms 125 W / Ch Surround L&R 8 ohms 125 W / Ch...

