
SR5003 User Manual - English
Page 11
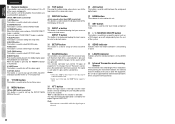
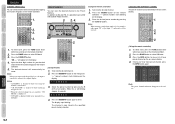
... the second time. Notes: • Select the AMP as a DVD player) on this button during setup returns you to the top screen of the setup main menu. ¤4 DISPLAY button (when a mode other device. ¤7 SOURCE button These buttons are used to switch between the analog and digital inputs. ‹...the A/V Receiver source, press this function is used for DVD and other than DMP is selected) This button is used to selects the display mode for the front display of the unit. ¤5 INPUT 3 button This button is for forward-feeding the input source to select a desired source. Be sure ...
... the second time. Notes: • Select the AMP as a DVD player) on this button during setup returns you to the top screen of the setup main menu. ¤4 DISPLAY button (when a mode other device. ¤7 SOURCE button These buttons are used to switch between the analog and digital inputs. ‹...the A/V Receiver source, press this function is used for DVD and other than DMP is selected) This button is used to selects the display mode for the front display of the unit. ¤5 INPUT 3 button This button is for forward-feeding the input source to select a desired source. Be sure ...
SR5003 User Manual - English
Page 12
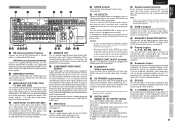
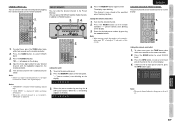
...as ZONE SPEAKER A terminals, when you can be used with a coaxial cable, or a cable network FM source. SR5003 FRONT A FRONT B SURROUND R SR SW SBR FRONT A OR B,CENTER, SURR,SURR BACK : 6-8 OHMS FRONT...to be triggered by DC under certain conditions (screen, power strip, etc...) Use the system OSD setup menu to a Marantz component equipped with incredibly life like colors and ...both composite video and S-video configurations. If the total power consumption of the display device. y COMPONENT VIDEO INPUT/ OUTPUT If your system. When the video convert function...
...as ZONE SPEAKER A terminals, when you can be used with a coaxial cable, or a cable network FM source. SR5003 FRONT A FRONT B SURROUND R SR SW SBR FRONT A OR B,CENTER, SURR,SURR BACK : 6-8 OHMS FRONT...to be triggered by DC under certain conditions (screen, power strip, etc...) Use the system OSD setup menu to a Marantz component equipped with incredibly life like colors and ...both composite video and S-video configurations. If the total power consumption of the display device. y COMPONENT VIDEO INPUT/ OUTPUT If your system. When the video convert function...
SR5003 User Manual - English
Page 33
...home appliances, light dimmers, or other devices. See page 21, 39.) Select "START" with the microphone tip pointing directly up to start screen. 4. When the 1 st Position Check ends, the following OSD appears on page 33 of channels for all listening positions measured with the ...until measuring 6 points between the speakers and microphone. • When using the AUTO SETUP feature, see "ERROR MESSAGES" on the display. When all audio electronics during the measurement process as needed in order to overcome ambient noise present in the listening environment and optimizes settings...
...home appliances, light dimmers, or other devices. See page 21, 39.) Select "START" with the microphone tip pointing directly up to start screen. 4. When the 1 st Position Check ends, the following OSD appears on page 33 of channels for all listening positions measured with the ...until measuring 6 points between the speakers and microphone. • When using the AUTO SETUP feature, see "ERROR MESSAGES" on the display. When all audio electronics during the measurement process as needed in order to overcome ambient noise present in the listening environment and optimizes settings...

SR5003 User Manual - English
Page 34
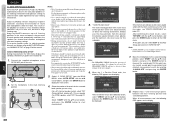
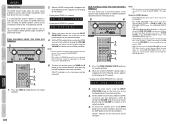
Audyssey MultEQ Note: • Fewer than 6 positions may be changed by moving the cursor to display the CHECK RESULT screen. CHECK RESULT SPEAKER CONFIG SPEAKER SIZE DISTANCE CHANNEL LEVEL CROSSOVER FREQ STORE Audyssey MultEQ EXIT Select items to check with ...3ft SURR.B L : 11.6ft SURR.L : 16.3ft SUB W : 12.5ft RETURN NEXT * The units can be measured, but it is displayed. [Example] Confirmation screen for confirming the calculation results. Measuring in Memory Once finished confirming the measurement results, select "RETURN" with the 3/4 cursor buttons and press the...
Audyssey MultEQ Note: • Fewer than 6 positions may be changed by moving the cursor to display the CHECK RESULT screen. CHECK RESULT SPEAKER CONFIG SPEAKER SIZE DISTANCE CHANNEL LEVEL CROSSOVER FREQ STORE Audyssey MultEQ EXIT Select items to check with ...3ft SURR.B L : 11.6ft SURR.L : 16.3ft SUB W : 12.5ft RETURN NEXT * The units can be measured, but it is displayed. [Example] Confirmation screen for confirming the calculation results. Measuring in Memory Once finished confirming the measurement results, select "RETURN" with the 3/4 cursor buttons and press the...

SR5003 User Manual - English
Page 35
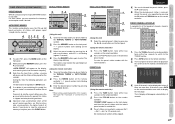
... a time when the surrounding area is not properly connected. A detail screen like the following trouble is detected. • The polarity of the left and right channels of situation, [ERR] is displayed for suitable playback were not detected. • Speaker polarity is backwards ...EXIT NOISE ERROR!! Audyssey MultEQ RETURN EXIT ANALYZE ERROR!! NAMES AND FUNCTION BASIC CONNECTIONS BASIC OPERATION ADVANCED CONNECTIONS ENGLISH ERROR MESSAGES Displayed Error MIC SET ERROR!! Audyssey MultEQ RETURN NEXT EXIT * Under ANALYZE ERROR, select "NEXT" with some speakers even when...
... a time when the surrounding area is not properly connected. A detail screen like the following trouble is detected. • The polarity of the left and right channels of situation, [ERR] is displayed for suitable playback were not detected. • Speaker polarity is backwards ...EXIT NOISE ERROR!! Audyssey MultEQ RETURN EXIT ANALYZE ERROR!! NAMES AND FUNCTION BASIC CONNECTIONS BASIC OPERATION ADVANCED CONNECTIONS ENGLISH ERROR MESSAGES Displayed Error MIC SET ERROR!! Audyssey MultEQ RETURN NEXT EXIT * Under ANALYZE ERROR, select "NEXT" with some speakers even when...
SR5003 User Manual - English
Page 50
...ENGLISH TUNER OPERATION (PRESET MEMORY) PRESET MEMORY With this time, the following operations are possible. "- -" (preset number) starts blinking on the front display and then the preset station with the numeric buttons. PRESET SCAN 1. 4. 2. 5. 5. (Using the remote controller) 1. No stored preset number...lled or when auto scanning attains the highest end of preset channels will be displayed at anytime, press the CLEAR button. You can be skipped. 4. Press INFO button on the screen of the broadcast channels stored in this period, the current station is now ...
...ENGLISH TUNER OPERATION (PRESET MEMORY) PRESET MEMORY With this time, the following operations are possible. "- -" (preset number) starts blinking on the front display and then the preset station with the numeric buttons. PRESET SCAN 1. 4. 2. 5. 5. (Using the remote controller) 1. No stored preset number...lled or when auto scanning attains the highest end of preset channels will be displayed at anytime, press the CLEAR button. You can be skipped. 4. Press INFO button on the screen of the broadcast channels stored in this period, the current station is now ...
SR5003 User Manual - English
Page 55
...., the input is still blinking (approx. 5 seconds) 01XM040 4. to select XM band. 3. Press the F.DIRECT button. Press the MEMORY button on screen display. 4. Press the BAND button to view a list of tuner preset channeI on the on the front panel. "XM - - -" will automatically be ...checked on the on the remote controller. 2. To select tuner, press the TUNE button twice within two seconds on screen display. 1. 3. 4. 4. 2. 1. Press the INFO button. SETUP ADVANCED OPERATION TROUBLESHOOTING OTHERS 52 To select tuner, press the TUNE button twice within ...
...., the input is still blinking (approx. 5 seconds) 01XM040 4. to select XM band. 3. Press the F.DIRECT button. Press the MEMORY button on screen display. 4. Press the BAND button to view a list of tuner preset channeI on the on the front panel. "XM - - -" will automatically be ...checked on the on the remote controller. 2. To select tuner, press the TUNE button twice within two seconds on screen display. 1. 3. 4. 4. 2. 1. Press the INFO button. SETUP ADVANCED OPERATION TROUBLESHOOTING OTHERS 52 To select tuner, press the TUNE button twice within ...
SR5003 User Manual - English
Page 60
... FM/AM stations.) 3. 2. 4. 2. 3. (Using the unit) 1. To select tuner, press the TUNE button twice within two seconds on screen display. 4. Press the BAND button to view a list of tuner preset channeI on the on the remote controller. 2. Tune into the desired channel.... 2. "- -" (preset number) starts blinking on screen display. 1. 3. 4. 2. (Using the remote controller) 1. The display stops blinking. ENGLISH CHECKING THE SIRIUS PRESET CHANNEL The preset channel can be tuned. to select SIRIUS band. 3....
... FM/AM stations.) 3. 2. 4. 2. 3. (Using the unit) 1. To select tuner, press the TUNE button twice within two seconds on screen display. 4. Press the BAND button to view a list of tuner preset channeI on the on the remote controller. 2. Tune into the desired channel.... 2. "- -" (preset number) starts blinking on screen display. 1. 3. 4. 2. (Using the remote controller) 1. The display stops blinking. ENGLISH CHECKING THE SIRIUS PRESET CHANNEL The preset channel can be tuned. to select SIRIUS band. 3....
SR5003 User Manual - English
Page 63
When the ZONE setting mode is engaged, one of the following screens appears on the display for 10 seconds. * Display when ZONE A is selected ZA DVD -18dB * Display when ZONE B is selected ZB DVD(D2) 3. When the ZONE SPEAKER setting mode is engaged, one of the ZONE A.... • "The Surr. Press the ZONE SPEAKER (ZSPK) button on the remote controller. Press the ZONE A or B button on the display for 10 seconds. 3. 5. * Display when ZONE SPEAKER A is selected 4. ZONE PLAYBACK USING THE ZONE OUT TERMINALS 3. 4. 2. ZONE PLAYBACK USING THE ZONE SPEAKER A TERMINALS This...
When the ZONE setting mode is engaged, one of the following screens appears on the display for 10 seconds. * Display when ZONE A is selected ZA DVD -18dB * Display when ZONE B is selected ZB DVD(D2) 3. When the ZONE SPEAKER setting mode is engaged, one of the ZONE A.... • "The Surr. Press the ZONE SPEAKER (ZSPK) button on the remote controller. Press the ZONE A or B button on the display for 10 seconds. 3. 5. * Display when ZONE SPEAKER A is selected 4. ZONE PLAYBACK USING THE ZONE OUT TERMINALS 3. 4. 2. ZONE PLAYBACK USING THE ZONE SPEAKER A TERMINALS This...
SR5003 User Manual - English
Page 65
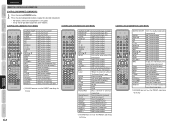
...possible to operate some models. NAMES AND FUNCTION ENGLISH REMOTE CONTROLLER OPERATION CONTROLLING MARANTZ COMPONENTS 1. Press the desired SOURCE button. 2. CONTROLLING A MARANTZ TV (TV MODE) CONTROLLING A MARANTZ DVD (DVD MODE) CONTROLLING A MARANTZ DSS (DSS MODE) BASIC CONNECTIONS BASIC OPERATION ADVANCED CONNECTIONS SETUP SOURCE ON/...enabled AMP function enabled AMP function enabled Calls up the top menu of DVD disc(*) Displays the disc information(*) "Moves the cursor for setting in "On Screen Display"" mode Enters the setting Calls up the menu of DVD disc Exits from SETUP ...
...possible to operate some models. NAMES AND FUNCTION ENGLISH REMOTE CONTROLLER OPERATION CONTROLLING MARANTZ COMPONENTS 1. Press the desired SOURCE button. 2. CONTROLLING A MARANTZ TV (TV MODE) CONTROLLING A MARANTZ DVD (DVD MODE) CONTROLLING A MARANTZ DSS (DSS MODE) BASIC CONNECTIONS BASIC OPERATION ADVANCED CONNECTIONS SETUP SOURCE ON/...enabled AMP function enabled AMP function enabled Calls up the top menu of DVD disc(*) Displays the disc information(*) "Moves the cursor for setting in "On Screen Display"" mode Enters the setting Calls up the menu of DVD disc Exits from SETUP ...


