NR1603_spec sheet
Page 1
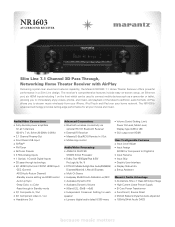
... Auto Calibration w/ MIC n Audyssey Dynamic EQ n Audyssey Dynamic Volume n 9 Band EQ, -20dB - +6dB n Independent Crossover Setting for each speaker n Lip-sync (digital audio delay) 0-200 msec n Volume Control Setting: Limit, Power On Level, Mute Level, Display type (0-98 or dB) n GUI output over your iPhone, iPod Touch and iPad over HDMI User Configurable Features n Input Level Adjust n Input Assign (HDMI In/ Component In/ Digital In) n Input Rename n Input Skip n Graphic User Interface n Display Status Info. NR1603 AV SURROUND RECEIVER Slim Line 7.1 Channel 3D Pass Through, Networking...
... Auto Calibration w/ MIC n Audyssey Dynamic EQ n Audyssey Dynamic Volume n 9 Band EQ, -20dB - +6dB n Independent Crossover Setting for each speaker n Lip-sync (digital audio delay) 0-200 msec n Volume Control Setting: Limit, Power On Level, Mute Level, Display type (0-98 or dB) n GUI output over your iPhone, iPod Touch and iPad over HDMI User Configurable Features n Input Level Adjust n Input Assign (HDMI In/ Component In/ Digital In) n Input Rename n Input Skip n Graphic User Interface n Display Status Info. NR1603 AV SURROUND RECEIVER Slim Line 7.1 Channel 3D Pass Through, Networking...
NR1603_spec sheet
Page 2
... 10 % T.H.D.) Surround: 50 W + 50 W (8 ohm, 20 Hz - 20 kHz with 0.08 % T.H.D.) 80 W + 80 W (6 ohm, 1 kHz with 10 % T.H.D.) Analog Input sensitivity/Input impedance: 130 mV/47 k ohm Frequency response: 10 Hz - 100 kHz - +1, -3 dB (DIRECT mode) S/N: 98 dB (IHF-A weighted, DIRECT mode) Technology Video Section Standard video connectors Input/output level and impedance: 1 Vp-p, 75 ohm Frequency response: 5 Hz - 10 MHz - 0, -3 dB Tuner Section [FM] (Note: μV at 75 , 0 dBf = 1 x 10-15 W) Receiving Range...
... 10 % T.H.D.) Surround: 50 W + 50 W (8 ohm, 20 Hz - 20 kHz with 0.08 % T.H.D.) 80 W + 80 W (6 ohm, 1 kHz with 10 % T.H.D.) Analog Input sensitivity/Input impedance: 130 mV/47 k ohm Frequency response: 10 Hz - 100 kHz - +1, -3 dB (DIRECT mode) S/N: 98 dB (IHF-A weighted, DIRECT mode) Technology Video Section Standard video connectors Input/output level and impedance: 1 Vp-p, 75 ohm Frequency response: 5 Hz - 10 MHz - 0, -3 dB Tuner Section [FM] (Note: μV at 75 , 0 dBf = 1 x 10-15 W) Receiving Range...
NR1603U_ENG_GettingStarted_UG_v00
Page 2
If you have setup problems: If you for Assistance: 9:00AM to 8:00PM M-F E.S.T. For frequency asked questions please visit http://marantz.custhelp.com/app/answers/list For US and Canada only 1 See the address sheet included in your receiver. ENGLISH DEUTSCH Welcome FRANÇAIS ITALIANO ESPAÑOL NEDERLANDS SVENSKA Thank you need additional help in solving problems, contact marantz customer service in the box. 1-855-ONE-MARANTZ 1-855-663-6272 Call for choosing a marantz receiver. This guide provides step-by-step instructions for setting up your area.
If you have setup problems: If you for Assistance: 9:00AM to 8:00PM M-F E.S.T. For frequency asked questions please visit http://marantz.custhelp.com/app/answers/list For US and Canada only 1 See the address sheet included in your receiver. ENGLISH DEUTSCH Welcome FRANÇAIS ITALIANO ESPAÑOL NEDERLANDS SVENSKA Thank you need additional help in solving problems, contact marantz customer service in the box. 1-855-ONE-MARANTZ 1-855-663-6272 Call for choosing a marantz receiver. This guide provides step-by-step instructions for setting up your area.
NR1603U_ENG_GettingStarted_UG_v00
Page 3
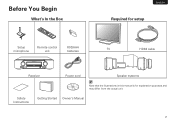
SVENSKA Before You Begin NEDERLANDS ESPAÑOL ITALIANO FRANÇAIS DEUTSCH ENGLISH What's In the Box Required for setup Setup microphone Remote control unit R03/AAA batteries TV HDMI cable Receiver Power cord Speaker systems Note that the illustrations in this manual is for explanation purposes and may differ from the actual unit. Safety Instructions Getting Started Owner's Manual 2
SVENSKA Before You Begin NEDERLANDS ESPAÑOL ITALIANO FRANÇAIS DEUTSCH ENGLISH What's In the Box Required for setup Setup microphone Remote control unit R03/AAA batteries TV HDMI cable Receiver Power cord Speaker systems Note that the illustrations in this manual is for explanation purposes and may differ from the actual unit. Safety Instructions Getting Started Owner's Manual 2
NR1603U_ENG_GettingStarted_UG_v00
Page 4
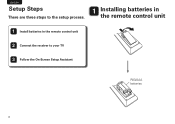
NEDERLANDS SVENSKA 1 Installing batteries in the remote control unit 1 Install batteries in the remote control unit 2 Connect the receiver to the setup process. ENGLISH DEUTSCH FRANÇAIS Setup Steps ITALIANO ESPAÑOL There are three steps to your TV 3 Follow the On-Screen Setup Assistant R03/AAA batteries 3
NEDERLANDS SVENSKA 1 Installing batteries in the remote control unit 1 Install batteries in the remote control unit 2 Connect the receiver to the setup process. ENGLISH DEUTSCH FRANÇAIS Setup Steps ITALIANO ESPAÑOL There are three steps to your TV 3 Follow the On-Screen Setup Assistant R03/AAA batteries 3
NR1603U_ENG_GettingStarted_UG_v00
Page 5
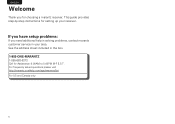
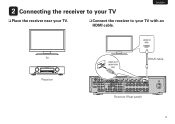
nnConnect the receiver to your TV nnPlace the receiver near your TV with an HDMI cable. HDMI IN (ARC) TV Receiver HDMI OUT MONITOR (ARC) HDMI cable Receiver (Rear panel) 4 SVENSKA NEDERLANDS ESPAÑOL ITALIANO FRANÇAIS DEUTSCH ENGLISH 2 Connecting the receiver to your TV.
nnConnect the receiver to your TV nnPlace the receiver near your TV with an HDMI cable. HDMI IN (ARC) TV Receiver HDMI OUT MONITOR (ARC) HDMI cable Receiver (Rear panel) 4 SVENSKA NEDERLANDS ESPAÑOL ITALIANO FRANÇAIS DEUTSCH ENGLISH 2 Connecting the receiver to your TV.
NR1603U_ENG_GettingStarted_UG_v00
Page 6
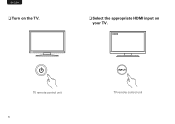
nnSelect the appropriate HDMI input on the TV. ENGLISH DEUTSCH FRANÇAIS ITALIANO ESPAÑOL NEDERLANDS SVENSKA nnTurn on your TV. HDMI TV remote control unit 5 INPUT TV remote control unit
nnSelect the appropriate HDMI input on the TV. ENGLISH DEUTSCH FRANÇAIS ITALIANO ESPAÑOL NEDERLANDS SVENSKA nnTurn on your TV. HDMI TV remote control unit 5 INPUT TV remote control unit
NR1603U_ENG_GettingStarted_UG_v00
Page 7
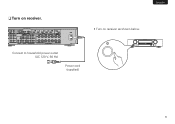
SVENSKA NEDERLANDS ESPAÑOL ITALIANO FRANÇAIS DEUTSCH ENGLISH • Turn on receiver. nnTurn on receiver as shown below. Connect to household power outlet (AC 120 V, 60 Hz) Power cord (supplied) 6
SVENSKA NEDERLANDS ESPAÑOL ITALIANO FRANÇAIS DEUTSCH ENGLISH • Turn on receiver. nnTurn on receiver as shown below. Connect to household power outlet (AC 120 V, 60 Hz) Power cord (supplied) 6
NR1603U_ENG_GettingStarted_UG_v00
Page 8
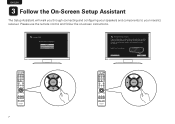
... 7 The Setup Assistant will walk you through connecting and configuring your speakers and components to your AV receiver. ENGLISH DEUTSCH FRANÇAIS ITALIANO ESPAÑOL NEDERLANDS SVENSKA 3 Follow the On-Screen Setup Assistant The Setup Assistant will walk you through connecting your speakers and components to your marantz receiver. Please use the remote control and follow the on-screen instructions. Select "Next" to providing the best possible sound and video experience.
... 7 The Setup Assistant will walk you through connecting and configuring your speakers and components to your AV receiver. ENGLISH DEUTSCH FRANÇAIS ITALIANO ESPAÑOL NEDERLANDS SVENSKA 3 Follow the On-Screen Setup Assistant The Setup Assistant will walk you through connecting your speakers and components to your marantz receiver. Please use the remote control and follow the on-screen instructions. Select "Next" to providing the best possible sound and video experience.
NR1603U_ENG_GettingStarted_UG_v00
Page 9
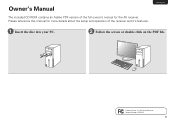
Product Name: AV Surround Receiver Model Number: NR1603 8 Please reference this manual for the AV receiver. ENGLISH 1 Insert the disc into your PC. 2 Follow the screen or double click on the PDF file. SVENSKA Owner's Manual NEDERLANDS ESPAÑOL ITALIANO FRANÇAIS DEUTSCH The included CD-ROM contains an Adobe PDF version of the full owner's manual for more details about the setup and operation of the receiver and it's features.
Product Name: AV Surround Receiver Model Number: NR1603 8 Please reference this manual for the AV receiver. ENGLISH 1 Insert the disc into your PC. 2 Follow the screen or double click on the PDF file. SVENSKA Owner's Manual NEDERLANDS ESPAÑOL ITALIANO FRANÇAIS DEUTSCH The included CD-ROM contains an Adobe PDF version of the full owner's manual for more details about the setup and operation of the receiver and it's features.


