DLNA ver. 1.5 certified DM
Page 1
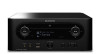
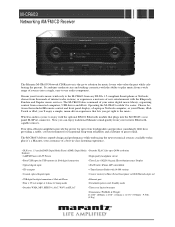
.../FM/CD Receiver The Marantz M-CR603 Network CD/Receiver is yours to enjoy with the optional RX101 Bluetooth module that lets you can enjoy traditional Marantz sound quality from any DLNA 1.5 compliant Smart-phone or Netbook; or experience a universe of your entire digital music ...library, organizing content from connected computers, USB drives and iPods. The M-CR603 takes command of new entertainment with the Rhapsody, Pandora and Napster music services. Choose between the included IR remote control and front panel display, a Laptop or Netbook computer, or your favorite...
.../FM/CD Receiver The Marantz M-CR603 Network CD/Receiver is yours to enjoy with the optional RX101 Bluetooth module that lets you can enjoy traditional Marantz sound quality from any DLNA 1.5 compliant Smart-phone or Netbook; or experience a universe of your entire digital music ...library, organizing content from connected computers, USB drives and iPods. The M-CR603 takes command of new entertainment with the Rhapsody, Pandora and Napster music services. Choose between the included IR remote control and front panel display, a Laptop or Netbook computer, or your favorite...
M-CR603 User Manual - English
Page 5
...stations, files registered or tuners in Favorite List 25 Advanced operations 26 Menu map 26 The wireless receiver connection 27 Remote control connection 27 Setting the remote control 27 Setting the timer [Timer 28 Setting the timer 28 Adjusting the clock automatically [Clock 29 Setting the Time Zone...power on 35 Last function memory 35 Resetting the microprocessor 35 Information 36 Part names and functions 36 Front panel 36 Rear panel 37 Remote control 37 MP3 and WMA 40 MP3 and WMA formats 40 iPod 40 USB memory 40 Important information 40 Network audio 41 Important ...
...stations, files registered or tuners in Favorite List 25 Advanced operations 26 Menu map 26 The wireless receiver connection 27 Remote control connection 27 Setting the remote control 27 Setting the timer [Timer 28 Setting the timer 28 Adjusting the clock automatically [Clock 29 Setting the Time Zone...power on 35 Last function memory 35 Resetting the microprocessor 35 Information 36 Part names and functions 36 Front panel 36 Rear panel 37 Remote control 37 MP3 and WMA 40 MP3 and WMA formats 40 iPod 40 USB memory 40 Important information 40 Network audio 41 Important ...
M-CR603 User Manual - English
Page 6
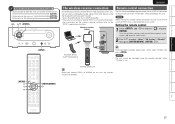
... radio by vTuner. About this guide n Operation buttons The operations described in this unit may get dirty, preventing it to fail to the standby mode. q Remote control 1 w R03/AAA batteries 2 e AC Power cord (Cord length: Approx. 6.6 ft / 2 m 1 r AM loop antenna 1 t FM indoor antenna 1 y iPod ...in noise. Next, disconnect the cables connected to remember operations or function limitations. To ensure proper operation, please read this Marantz product. NOTE This symbol indicates points to other system units before moving the unit. DLNA ver. 1.5 supported for iPhone...
... radio by vTuner. About this guide n Operation buttons The operations described in this unit may get dirty, preventing it to fail to the standby mode. q Remote control 1 w R03/AAA batteries 2 e AC Power cord (Cord length: Approx. 6.6 ft / 2 m 1 r AM loop antenna 1 t FM indoor antenna 1 y iPod ...in noise. Next, disconnect the cables connected to remember operations or function limitations. To ensure proper operation, please read this Marantz product. NOTE This symbol indicates points to other system units before moving the unit. DLNA ver. 1.5 supported for iPhone...

M-CR603 User Manual - English
Page 8
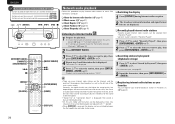
...the battery compartment and insert new batteries. • Remove the batteries from the remote control unit if it at the remote sensor. NOTE The set does not operate even when the remote control unit is exposed in accordance with the local regulations regarding battery disposal. ...sunlight or in places with extremely high temperatures, such as a fluorescent or infrared light. 4 the battery compartment in remote control. ENGLISH About the remote control Inserting the batteries q Remove the rear cover of the w Set two R03/AAA batteries in the indicated direction.
...the battery compartment and insert new batteries. • Remove the batteries from the remote control unit if it at the remote sensor. NOTE The set does not operate even when the remote control unit is exposed in accordance with the local regulations regarding battery disposal. ...sunlight or in places with extremely high temperatures, such as a fluorescent or infrared light. 4 the battery compartment in remote control. ENGLISH About the remote control Inserting the batteries q Remove the rear cover of the w Set two R03/AAA batteries in the indicated direction.

M-CR603 User Manual - English
Page 15
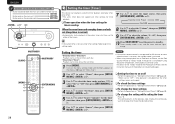
... to the Internet, set automatically. • The default Time Zone setting of this guide Button located on both the main unit and the remote control BUTTON Button only on the main unit Button only on the remote control [BUTTON] ON/STANDBY ON/STANDBY ENGLISH This section provides information on Press ON/STANDBY.
... to the Internet, set automatically. • The default Time Zone setting of this guide Button located on both the main unit and the remote control BUTTON Button only on the main unit Button only on the remote control [BUTTON] ON/STANDBY ON/STANDBY ENGLISH This section provides information on Press ON/STANDBY.
M-CR603 User Manual - English
Page 16
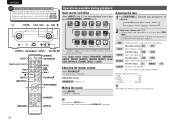
... with o p. • To make other tone adjustments at this guide Button located on both the main unit and the remote control BUTTON Button only on the main unit Button only on the remote control [BUTTON] o/p 8 ɺ9 13 2 Operations possible during playback Input source switching Press and o p to select the input source, then...
... with o p. • To make other tone adjustments at this guide Button located on both the main unit and the remote control BUTTON Button only on the main unit Button only on the remote control [BUTTON] o/p 8 ɺ9 13 2 Operations possible during playback Input source switching Press and o p to select the input source, then...

M-CR603 User Manual - English
Page 17
...] to switch the input source to " ". • The input source can be set . Doing so could damage it was before. n To play the desired track (remote control only) Press [NUMBER] (0 - 9, +10) to playback CDs. The tracks start playing in the disc tray. If you operate the buttons when the display's brightness...
...] to switch the input source to " ". • The input source can be set . Doing so could damage it was before. n To play the desired track (remote control only) Press [NUMBER] (0 - 9, +10) to playback CDs. The tracks start playing in the disc tray. If you operate the buttons when the display's brightness...

M-CR603 User Manual - English
Page 18
... 40) There are many music distribution sites on this guide Button located on both the main unit and the remote control BUTTON Button only on the main unit Button only on the remote control [BUTTON] o/p u/i 8 ɺ9 13 8 u o i [PROGRAM] [RANDOM] 13 9 [MODE] [ENTER/MEMO] p [NUMBER] [CLEAR] [DISPLAY] [REPEAT] CD playback Playing tracks in...
... 40) There are many music distribution sites on this guide Button located on both the main unit and the remote control BUTTON Button only on the main unit Button only on the remote control [BUTTON] o/p u/i 8 ɺ9 13 8 u o i [PROGRAM] [RANDOM] 13 9 [MODE] [ENTER/MEMO] p [NUMBER] [CLEAR] [DISPLAY] [REPEAT] CD playback Playing tracks in...

M-CR603 User Manual - English
Page 20
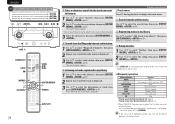
... station cannot be tuned in with AM broadcast stations. Automatically presetting FM stations (Auto preset) This unit can be preset with the remote control Perform this operation when tuned to an FM broadcast station. 1 Press [SEARCH]. After "Searching" is displayed, "Complete" is... input source to "TUNER". • The input source can be input. 1 Tune in automatically (Auto tuning) Press [MODE] to light the "AUTO" indicator on the remote control [BUTTON] o/p u/i 2 [TUNER] [TUNING-] [CH df] u o i [SEARCH] [TUNING+] 2 [MODE] [ENTER/MEMO] p [NUMBER] Tuner playback Tuning in ...
... station cannot be tuned in with AM broadcast stations. Automatically presetting FM stations (Auto preset) This unit can be preset with the remote control Perform this operation when tuned to an FM broadcast station. 1 Press [SEARCH]. After "Searching" is displayed, "Complete" is... input source to "TUNER". • The input source can be input. 1 Tune in automatically (Auto tuning) Press [MODE] to light the "AUTO" indicator on the remote control [BUTTON] o/p u/i 2 [TUNER] [TUNING-] [CH df] u o i [SEARCH] [TUNING+] 2 [MODE] [ENTER/MEMO] p [NUMBER] Tuner playback Tuning in ...
M-CR603 User Manual - English
Page 22
... files Audio file Video file Main unit display 3 iPod display 3 3 Active Remote control and main unit 3 3 buttons iPod® 3 NOTE • iPod nano 1G and iPod video do not have Direct mode support. • Marantz will accept no responsibility whatsoever for displaying the contents recorded on the iPod. u, i ENTER...
... files Audio file Video file Main unit display 3 iPod display 3 3 Active Remote control and main unit 3 3 buttons iPod® 3 NOTE • iPod nano 1G and iPod video do not have Direct mode support. • Marantz will accept no responsibility whatsoever for displaying the contents recorded on the iPod. u, i ENTER...
M-CR603 User Manual - English
Page 24
... "100%". ENGLISH Symbols used to indicate buttons in this guide Button located on both the main unit and the remote control BUTTON Button only on the main unit Button only on the remote control [BUTTON] o/p u/i 8 ɺ9 13 2 [INTERNET RADIO] [FAVORITE] [ONLINE MUSIC] 8 2 [MUSIC SERVER] 13 9 Network audio playback Follow this procedure to...
... "100%". ENGLISH Symbols used to indicate buttons in this guide Button located on both the main unit and the remote control BUTTON Button only on the main unit Button only on the remote control [BUTTON] o/p u/i 8 ɺ9 13 2 [INTERNET RADIO] [FAVORITE] [ONLINE MUSIC] 8 2 [MUSIC SERVER] 13 9 Network audio playback Follow this procedure to...

M-CR603 User Manual - English
Page 26
...], or p. q Check the network environment, then turn on this guide Button located on both the main unit and the remote control BUTTON Button only on the main unit Button only on the remote control [BUTTON] o/p u/i 8 ɺ9 13 2 [ONLINE MUSIC] 8 2 [MENU] u o i [SEARCH] 22 13 9 [ENTER/MEMO] p [HOME] [DISPLAY] n Entering a character search for creating...
...], or p. q Check the network environment, then turn on this guide Button located on both the main unit and the remote control BUTTON Button only on the main unit Button only on the remote control [BUTTON] o/p u/i 8 ɺ9 13 2 [ONLINE MUSIC] 8 2 [MENU] u o i [SEARCH] 22 13 9 [ENTER/MEMO] p [HOME] [DISPLAY] n Entering a character search for creating...
M-CR603 User Manual - English
Page 28
...], or p. ENGLISH Symbols used to indicate buttons in this guide Button located on both the main unit and the remote control BUTTON Button only on the main unit Button only on the remote control [BUTTON] o/p u/i 8 ɺ9 13 2 [FAVORITE] 8 2 [MENU] u o i [SEARCH] 24 [AUX] 13 9 [ENTER/MEMO] p [HOME] [DISPLAY] w Enter a character search for the...
...], or p. ENGLISH Symbols used to indicate buttons in this guide Button located on both the main unit and the remote control BUTTON Button only on the main unit Button only on the remote control [BUTTON] o/p u/i 8 ɺ9 13 2 [FAVORITE] 8 2 [MENU] u o i [SEARCH] 24 [AUX] 13 9 [ENTER/MEMO] p [HOME] [DISPLAY] w Enter a character search for the...

M-CR603 User Manual - English
Page 30
... reception on during standby. Adjusts the audio level of Speaker B based on /off . Displays various setting values of Speaker A. Sets the network function on the remote control. Sets the Auto Standby mode to be activated at a specified time. Offset IR Setting Firmware Update Add New Feature Description Performs the...
... reception on during standby. Adjusts the audio level of Speaker B based on /off . Displays various setting values of Speaker A. Sets the network function on the remote control. Sets the Auto Standby mode to be activated at a specified time. Offset IR Setting Firmware Update Add New Feature Description Performs the...
M-CR603 User Manual - English
Page 31
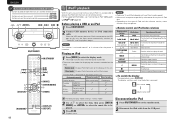
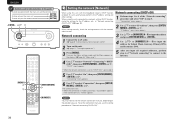
.... [ENTER/MEMO] p 27 Setting the remote control 1 Press and op to select to the unit. NOTE When making this remote control connection, be controlled using the remote controller while "Disable" is connected to the unit, to ON. Remote control unit When you can be sure to... in this guide Button located on both the main unit and the remote control BUTTON Button only on the main unit Button only on the remote control [BUTTON] o/p u/i ENGLISH The wireless receiver connection Remote control connection By connecting a wireless receiver RX101 (sold separately) to this...
.... [ENTER/MEMO] p 27 Setting the remote control 1 Press and op to select to the unit. NOTE When making this remote control connection, be controlled using the remote controller while "Disable" is connected to the unit, to ON. Remote control unit When you can be sure to... in this guide Button located on both the main unit and the remote control BUTTON Button only on the main unit Button only on the remote control [BUTTON] o/p u/i ENGLISH The wireless receiver connection Remote control connection By connecting a wireless receiver RX101 (sold separately) to this...
M-CR603 User Manual - English
Page 32
... is set the power to indicate buttons in this guide Button located on both the main unit and the remote control BUTTON Button only on the main unit Button only on the remote control [BUTTON] u/i o/p ON/STANDBY [CLOCK] ON/STANDBY [MENU] u o i [ENTER/MEMO] p Setting the timer [Timer... [ENTER/MEMO], or p. 10 Press ON/STANDBY to select "Source", then press [ENTER/ MEMO], or p. 28 NOTE • If the unit or remote control is disabled, but the timer settings remain unchanged. n To change the timer settings Perform the operations at the set times each day. • Once...
... is set the power to indicate buttons in this guide Button located on both the main unit and the remote control BUTTON Button only on the main unit Button only on the remote control [BUTTON] u/i o/p ON/STANDBY [CLOCK] ON/STANDBY [MENU] u o i [ENTER/MEMO] p Setting the timer [Timer... [ENTER/MEMO], or p. 10 Press ON/STANDBY to select "Source", then press [ENTER/ MEMO], or p. 28 NOTE • If the unit or remote control is disabled, but the timer settings remain unchanged. n To change the timer settings Perform the operations at the set times each day. • Once...
M-CR603 User Manual - English
Page 34
... the "Network connecting" procedure and select "Off" in this guide Button located on both the main unit and the remote control BUTTON Button only on the main unit Button only on the remote control [BUTTON] u/i p [MENU] u i [ENTER/MEMO] p [NUMBER] Setting the network [Network] When using this unit. (vpage 11 "Turning the power...
... the "Network connecting" procedure and select "Off" in this guide Button located on both the main unit and the remote control BUTTON Button only on the main unit Button only on the remote control [BUTTON] u/i p [MENU] u i [ENTER/MEMO] p [NUMBER] Setting the network [Network] When using this unit. (vpage 11 "Turning the power...
M-CR603 User Manual - English
Page 36
... firmware has failed. Failure to select "ON" , then press [ENTER/ MEMO], or p. Turns on the Menu settings mode and the Menu appears on the remote control [BUTTON] u/i p [MENU] u i [ENTER/MEMO] p 32 Setting the others [Other] Auto standby Firmware update With the Auto standby ON, this unit's power...to server. Display Description Updating fail Login failed Server is entered. Failure in this guide Button located on both the main unit and the remote control BUTTON Button only on the main unit Button only on the display. (vpage 26 "Menu map") 2 Use ui to select "...
... firmware has failed. Failure to select "ON" , then press [ENTER/ MEMO], or p. Turns on the Menu settings mode and the Menu appears on the remote control [BUTTON] u/i p [MENU] u i [ENTER/MEMO] p 32 Setting the others [Other] Auto standby Firmware update With the Auto standby ON, this unit's power...to server. Display Description Updating fail Login failed Server is entered. Failure in this guide Button located on both the main unit and the remote control BUTTON Button only on the main unit Button only on the display. (vpage 26 "Menu map") 2 Use ui to select "...

M-CR603 User Manual - English
Page 38
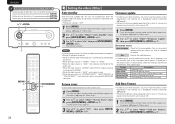
...[NUMBER] 34 Setting AMP characteristics • Amp properties can be changed according to the location speakers are placed directly on furniture or on the M-CR603 display. (vpage 26 "Menu map") 2 Use ui to select "Other"-"Speaker Setup""Response", then press [ENTER/MEMO], or p. 3 Use... 3 dB. ENGLISH Symbols used to indicate buttons in this guide Button located on both the main unit and the remote control BUTTON Button only on the main unit Button only on the remote control [BUTTON] o/p u/i 8 ɺ9 13 Connecting the speaker cables Carefully check the left (L) and right ...
...[NUMBER] 34 Setting AMP characteristics • Amp properties can be changed according to the location speakers are placed directly on furniture or on the M-CR603 display. (vpage 26 "Menu map") 2 Use ui to select "Other"-"Speaker Setup""Response", then press [ENTER/MEMO], or p. 3 Use... 3 dB. ENGLISH Symbols used to indicate buttons in this guide Button located on both the main unit and the remote control BUTTON Button only on the main unit Button only on the remote control [BUTTON] o/p u/i 8 ɺ9 13 Connecting the speaker cables Carefully check the left (L) and right ...

M-CR603 User Manual - English
Page 39
.... e Press p twice. "S" changes to register it . Method Using the number buttons Using the cursor buttons Operations • Operating with the remote control unit or the main unit. • Use uio p and [ENTER/MEMO] or to the next position, and the entered character is... enter Using the number buttons 1 Display the screen for inputting characters. 2 Place the cursor at "P". "R" is switched. • Operating with the remote control unit. • Multiple characters are two methods, as desired using the "Preset Name" (vpage 16), "Napster Account" (vpage 21), "Pandora...
.... e Press p twice. "S" changes to register it . Method Using the number buttons Using the cursor buttons Operations • Operating with the remote control unit or the main unit. • Use uio p and [ENTER/MEMO] or to the next position, and the entered character is... enter Using the number buttons 1 Display the screen for inputting characters. 2 Place the cursor at "P". "R" is switched. • Operating with the remote control unit. • Multiple characters are two methods, as desired using the "Preset Name" (vpage 16), "Napster Account" (vpage 21), "Pandora...


