

Leaflet
Page 2
...Koninklijke Philips N.V. MSB4620/F7 2.1ch Soundbar with Wireless Subwoofer Product specifications Sound • Total Power (RMS): 80 W • Equalizer settings: Movie, Music, News, Sports, Standard • Subwoofer Driver: 5 inches • Subwoofer Type: Active Connectivity • Rear Connections: Digital optical in, Digital coaxial in, Line-in (3.5mm audio in), USB, Analog Audio Left/Right In, Subwoofer Out • Bluetooth Convenience • LED Indicator: Bluetooth/Pair/Volume: Blue, Line-in cable • Accessories on the web: Owner's Manual, Quick Start Guide Total wattage...
...Koninklijke Philips N.V. MSB4620/F7 2.1ch Soundbar with Wireless Subwoofer Product specifications Sound • Total Power (RMS): 80 W • Equalizer settings: Movie, Music, News, Sports, Standard • Subwoofer Driver: 5 inches • Subwoofer Type: Active Connectivity • Rear Connections: Digital optical in, Digital coaxial in, Line-in (3.5mm audio in), USB, Analog Audio Left/Right In, Subwoofer Out • Bluetooth Convenience • LED Indicator: Bluetooth/Pair/Volume: Blue, Line-in cable • Accessories on the web: Owner's Manual, Quick Start Guide Total wattage...
Owners Manual English
Page 2
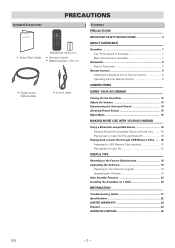
... Quick Start Guide (NC303UH) ( AAA x 2 ) • Remote Control • Batteries (AAA, 1.5V x 2) • Digital Audio Optical cable • Line-In cable Contents PRECAUTIONS IMPORTANT SAFETY INSTRUCTIONS 3 ABOUT SOUNDBAR Soundbar 7 Top / Front panels of Soundbar 7 Back Connectors on Soundbar 7 Subwoofer 8 Rear of Subwoofer 8 Remote Control 9 Installing the Batteries for the Remote Control 9 Operating with the Remote Control 9 CONNECTIONS USING YOUR SOUNDBAR Turning On the Soundbar 12 Adjust the Volume 13 Experiencing the Surround Sound 14 Choosing Preset Sound 15 Night Mode...
... Quick Start Guide (NC303UH) ( AAA x 2 ) • Remote Control • Batteries (AAA, 1.5V x 2) • Digital Audio Optical cable • Line-In cable Contents PRECAUTIONS IMPORTANT SAFETY INSTRUCTIONS 3 ABOUT SOUNDBAR Soundbar 7 Top / Front panels of Soundbar 7 Back Connectors on Soundbar 7 Subwoofer 8 Rear of Subwoofer 8 Remote Control 9 Installing the Batteries for the Remote Control 9 Operating with the Remote Control 9 CONNECTIONS USING YOUR SOUNDBAR Turning On the Soundbar 12 Adjust the Volume 13 Experiencing the Surround Sound 14 Choosing Preset Sound 15 Night Mode...

Owners Manual English
Page 3
... sources such as power-supply cord or plug is used in accordance with dry cloth. 7. CAUTION RISK OF ELECTRIC SHOCK DO NOT OPEN CAUTION: TO REDUCE THE RISK OF ELECTRIC SHOCK, DO NOT REMOVE COVER (OR BACK). NO USER SERVICEABLE PARTS INSIDE. The important note and rating are designed to avoid injury from tip-over. 13. Read these instructions. 3. Do not use...
... sources such as power-supply cord or plug is used in accordance with dry cloth. 7. CAUTION RISK OF ELECTRIC SHOCK DO NOT OPEN CAUTION: TO REDUCE THE RISK OF ELECTRIC SHOCK, DO NOT REMOVE COVER (OR BACK). NO USER SERVICEABLE PARTS INSIDE. The important note and rating are designed to avoid injury from tip-over. 13. Read these instructions. 3. Do not use...

Owners Manual English
Page 4
...located or operated in Use. Depending on a Wall, allow this unit, especially lighted candles or other antenna or transmitter. When Installing the Soundbar on the wall material, use . ● Drill screw holes into the wall. Make sure to leave a space of installation or improper use Molly Anchor...replaced. Top: 4"/10 cm Left and right sides: 4"/10 cm Bottom: 4"/10 cm Space between Mounting Screw and Wall: 9/64"- 5/32"/3.5 - 4mm EN - 4 - Disconnect the AC Power cord to shut Off the Unit when Trouble is found or not in conjunction with any other flaming objects. Operation...
...located or operated in Use. Depending on a Wall, allow this unit, especially lighted candles or other antenna or transmitter. When Installing the Soundbar on the wall material, use . ● Drill screw holes into the wall. Make sure to leave a space of installation or improper use Molly Anchor...replaced. Top: 4"/10 cm Left and right sides: 4"/10 cm Bottom: 4"/10 cm Space between Mounting Screw and Wall: 9/64"- 5/32"/3.5 - 4mm EN - 4 - Disconnect the AC Power cord to shut Off the Unit when Trouble is found or not in conjunction with any other flaming objects. Operation...

Owners Manual English
Page 5
...disturbance of the picture and / or sound may increase slightly. Note about Recycling ● This unit's packaging materials are recyclable and can be generated if the unit is placed too close to a warm place. - Grasp it from an AC outlet. Do not place anything directly on top or ... changes. ● Install the unit in the following conditions. If so, do not use this unit may be reused. After heating a cold room. The unit is not a malfunction. ● Be sure to Unplug the AC Power cord from a cold place to them. This is moved from the AC outlet before Removing ...
...disturbance of the picture and / or sound may increase slightly. Note about Recycling ● This unit's packaging materials are recyclable and can be generated if the unit is placed too close to a warm place. - Grasp it from an AC outlet. Do not place anything directly on top or ... changes. ● Install the unit in the following conditions. If so, do not use this unit may be reused. After heating a cold room. The unit is not a malfunction. ● Be sure to Unplug the AC Power cord from a cold place to them. This is moved from the AC outlet before Removing ...

Owners Manual English
Page 6
...; Please refer to repair it by Bluetooth SIG, Inc. Turn Off the unit, unplug the AC Power cord and then call our support center mentioned on the unit. Information in any form or for any solution there, our service center is subject to change the content herein without the express prior written consent of their respective owners. Dolby, Dolby Audio, and the double-D symbol...
...; Please refer to repair it by Bluetooth SIG, Inc. Turn Off the unit, unplug the AC Power cord and then call our support center mentioned on the unit. Information in any form or for any solution there, our service center is subject to change the content herein without the express prior written consent of their respective owners. Dolby, Dolby Audio, and the double-D symbol...
Owners Manual English
Page 7
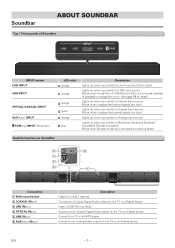
...-In source (3.5mm jack). Insert a USB Memory Stick. EN - 7 - Soundbar ABOUT SOUNDBAR Top / Front panels of playback or recognition error. Connect to an Analog Audio output on the TV or a Digital device. Lights up when you switch to Optical Input source. Lights up when you switch to Coaxial Input source. Lights up when you switch to USB Input source. Connect to a Coaxial Digital Audio output on the TV or an Analog device. Back Connectors on Soundbar B F C D E A Connectors A Wall mount hooks B COAXIAL...
...-In source (3.5mm jack). Insert a USB Memory Stick. EN - 7 - Soundbar ABOUT SOUNDBAR Top / Front panels of playback or recognition error. Connect to an Analog Audio output on the TV or a Digital device. Lights up when you switch to Optical Input source. Lights up when you switch to Coaxial Input source. Lights up when you switch to USB Input source. Connect to a Coaxial Digital Audio output on the TV or an Analog device. Back Connectors on Soundbar B F C D E A Connectors A Wall mount hooks B COAXIAL...

Owners Manual English
Page 9
... USB Mode only) R Press to Play or Pause a music file. (Bluetooth Mode and USB Mode only) S Press to adjust Volume Up / Down on the Soundbar. Line of the connected device to turn Night Mode On/Off. Below: approx. 10 feet (3m) within 30° - This will be switched back and forth between the two Sources. N Press to this Soundbar. Operating with the Remote Control A J B K C L D M E F N G O H P I Description Press to select Line Input...
... USB Mode only) R Press to Play or Pause a music file. (Bluetooth Mode and USB Mode only) S Press to adjust Volume Up / Down on the Soundbar. Line of the connected device to turn Night Mode On/Off. Below: approx. 10 feet (3m) within 30° - This will be switched back and forth between the two Sources. N Press to this Soundbar. Operating with the Remote Control A J B K C L D M E F N G O H P I Description Press to select Line Input...

Owners Manual English
Page 10
... / Optical / AUX Connection fails when connected to your TV's User Manual for details. Connect Audio from the Headphone Output on the Soundbar, make sure the Volume from other devices (Blu-ray player, Game System, etc.), see your Device's User Manual. To Connect Soundbar directly to other Device Rear of Soundbar e.g.) Blu-ray player AUX OPTICAL Audio cable (not Included) LINE Line-In cable Included e.g.) MP3 player HEADPHONE Digital Audio Optical cable Included e.g.) Video game DIGITAL AUDIO OUT (OPTICAL) R AUDIO OUT L NOTE(S) ● Make sure the Soundbar is set to...
... / Optical / AUX Connection fails when connected to your TV's User Manual for details. Connect Audio from the Headphone Output on the Soundbar, make sure the Volume from other devices (Blu-ray player, Game System, etc.), see your Device's User Manual. To Connect Soundbar directly to other Device Rear of Soundbar e.g.) Blu-ray player AUX OPTICAL Audio cable (not Included) LINE Line-In cable Included e.g.) MP3 player HEADPHONE Digital Audio Optical cable Included e.g.) Video game DIGITAL AUDIO OUT (OPTICAL) R AUDIO OUT L NOTE(S) ● Make sure the Soundbar is set to...

Owners Manual English
Page 12
... selected. Using the Remote Control, switch the Soundbar Input to an AC outlet. 2. LINE USB INPUT OPTICAL/ COAXIAL AUX PAIR e.g.) When was pressed the OPTICAL INPUT (Orange LED) was selected. ● One of the INPUT indicators will steadily light up after the pairing success. 3 Select Input source. Make sure the Subwoofer is connected to AUX by pressing the AUX button. 4. Press and Hold the PAIR button on the Remote Control until the Red LED starts blinking rapidly. 3. The Red LED...
... selected. Using the Remote Control, switch the Soundbar Input to an AC outlet. 2. LINE USB INPUT OPTICAL/ COAXIAL AUX PAIR e.g.) When was pressed the OPTICAL INPUT (Orange LED) was selected. ● One of the INPUT indicators will steadily light up after the pairing success. 3 Select Input source. Make sure the Subwoofer is connected to AUX by pressing the AUX button. 4. Press and Hold the PAIR button on the Remote Control until the Red LED starts blinking rapidly. 3. The Red LED...

Owners Manual English
Page 13
... Connected device. ● If the Volume level is Set Above 18 when the Soundbar is turned Off, the Volume will blink. Pressing VOL+/- NOTE(S) ● The Volume might be Reset to 18 when the Soundbar is shown will stop blinking. 2 To Mute the Sound, press on the Remote Control. EN - 13 - while the current Volume is turned back On. Volume levels LED lighting patterns LED behavior Mute LINE USB OPTICAL/ AUX...
... Connected device. ● If the Volume level is Set Above 18 when the Soundbar is turned Off, the Volume will blink. Pressing VOL+/- NOTE(S) ● The Volume might be Reset to 18 when the Soundbar is shown will stop blinking. 2 To Mute the Sound, press on the Remote Control. EN - 13 - while the current Volume is turned back On. Volume levels LED lighting patterns LED behavior Mute LINE USB OPTICAL/ AUX...

Owners Manual English
Page 14
... the center (OPTICAL/COAXIAL) to Off, press on the Remote Control once again. ● The 3 LEDs in Standby mode. EN - 14 - NOTE(S) ● The Default setting is Off. ● This Setting will remain while the Soundbar is in the middle (USB, OPTICAL/COAXIAL, AUX) blink twice. Surround status LED lighting patterns Sound effects OFF LINE USB OPTICAL/ AUX COAXIAL PAIR Outputs the original sound. Surround status LED lighting patterns Sound effects LINE USB OPTICAL/ AUX COAXIAL PAIR...
... the center (OPTICAL/COAXIAL) to Off, press on the Remote Control once again. ● The 3 LEDs in Standby mode. EN - 14 - NOTE(S) ● The Default setting is Off. ● This Setting will remain while the Soundbar is in the middle (USB, OPTICAL/COAXIAL, AUX) blink twice. Surround status LED lighting patterns Sound effects OFF LINE USB OPTICAL/ AUX COAXIAL PAIR Outputs the original sound. Surround status LED lighting patterns Sound effects LINE USB OPTICAL/ AUX COAXIAL PAIR...

Owners Manual English
Page 15
... current Input. Input Source Night Mode 1 OPTICAL/COAXIAL Dolby Digital PCM p p LINE p AUX p USB p BLUETOOTH p Night Mode 2 p - Night Mode Night Mode 1 Turns down loud sounds and turns up Off : Outputs the Sound at night. 1 To switch the unit to Night Mode 1, press . Night Mode 2 LINE USB OPTICAL/ AUX COAXIAL PAIR On : Flashes 4 times Off : Flashes twice On : Turns down the Volume on the Remote Control to select the desired preset sound suitable for Dolby Digital sounds. * This function is only available when the Soundbar is in Standby mode, so again use mode...
... current Input. Input Source Night Mode 1 OPTICAL/COAXIAL Dolby Digital PCM p p LINE p AUX p USB p BLUETOOTH p Night Mode 2 p - Night Mode Night Mode 1 Turns down loud sounds and turns up Off : Outputs the Sound at night. 1 To switch the unit to Night Mode 1, press . Night Mode 2 LINE USB OPTICAL/ AUX COAXIAL PAIR On : Flashes 4 times Off : Flashes twice On : Turns down the Volume on the Remote Control to select the desired preset sound suitable for Dolby Digital sounds. * This function is only available when the Soundbar is in Standby mode, so again use mode...
Owners Manual English
Page 16
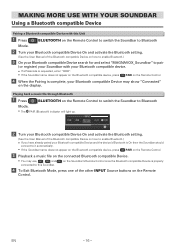
... - LINE USB OPTICAL/ AUX COAXIAL PAIR 2 Turn your Bluetooth compatible Device On and activate the Bluetooth setting. (See the User Manual of the Bluetooth compatible Device on how to enable Bluetooth.) ● If you have already paired your Bluetooth compatible Device may use, , and connected to this Unit 1 Press BLUETOOTH on the Remote Control to switch the Soundbar to Bluetooth Mode. 2 Turn your Bluetooth compatible Device On and activate the Bluetooth setting. (See the User Manual of the Bluetooth compatible Device on...
... - LINE USB OPTICAL/ AUX COAXIAL PAIR 2 Turn your Bluetooth compatible Device On and activate the Bluetooth setting. (See the User Manual of the Bluetooth compatible Device on how to enable Bluetooth.) ● If you have already paired your Bluetooth compatible Device may use, , and connected to this Unit 1 Press BLUETOOTH on the Remote Control to switch the Soundbar to Bluetooth Mode. 2 Turn your Bluetooth compatible Device On and activate the Bluetooth setting. (See the User Manual of the Bluetooth compatible Device on...

Owners Manual English
Page 17
... that operate in this chart. *1 This Soundbar's name is connected. To reconnect with another audio input is selected or the Soundbar is no interference or obstacles. On the Bluetooth compatible Device to connect (Status: Pairing). The (Bluetooth) indicator will start blinking or light up to disconnect the current connection. ● Depending on the last connected Bluetooth compatible Device and wait a moment (*2). A Bluetooth compatible Device is connected. 2 Remains lit Music...
... that operate in this chart. *1 This Soundbar's name is connected. To reconnect with another audio input is selected or the Soundbar is no interference or obstacles. On the Bluetooth compatible Device to connect (Status: Pairing). The (Bluetooth) indicator will start blinking or light up to disconnect the current connection. ● Depending on the last connected Bluetooth compatible Device and wait a moment (*2). A Bluetooth compatible Device is connected. 2 Remains lit Music...

Owners Manual English
Page 18
... INPUT source buttons on some USB Memory Sticks with a music file to the previous music file. LINE USB OPTICAL/ AUX COAXIAL PAIR 3 Press on the Remote Control to Pause playback. Press it repeatedly to go back to the USB terminal on the rear of music files which has extension of the USB device 1 Remains lit No USB device is connected or during playback. 2 Blinks rapidly USB device recognition is playing...
... INPUT source buttons on some USB Memory Sticks with a music file to the previous music file. LINE USB OPTICAL/ AUX COAXIAL PAIR 3 Press on the Remote Control to Pause playback. Press it repeatedly to go back to the USB terminal on the rear of music files which has extension of the USB device 1 Remains lit No USB device is connected or during playback. 2 Blinks rapidly USB device recognition is playing...
Owners Manual English
Page 19
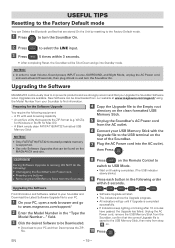
... AC Power cord, remove the USB Memory Stick from step 6 on the Remote Control to switch to USB Mode. ● Wait until loading completes. (The USB indicator slowly blinks.) 9 Press each button in the "Type the Model Number..." Upgrading the Software MAGNAVOX continuously tries to improve its products and we strongly recommend that the correct Upgrade file is supported. ● Use only Software Upgrades that supports the ZIP-format (e.g. NOTE(S) ● In order to reset Volume, Sound preset, INPUT source, SURROUND...
... AC Power cord, remove the USB Memory Stick from step 6 on the Remote Control to switch to USB Mode. ● Wait until loading completes. (The USB indicator slowly blinks.) 9 Press each button in the "Type the Model Number..." Upgrading the Software MAGNAVOX continuously tries to improve its products and we strongly recommend that the correct Upgrade file is supported. ● Use only Software Upgrades that supports the ZIP-format (e.g. NOTE(S) ● In order to reset Volume, Sound preset, INPUT source, SURROUND...

Owners Manual English
Page 20
...; In order to use the Soundbar again while it is in or Turned On. Some mounts are mounting the Soundbar is plugged in Standby mode, press on a sturdy vertical Wall. It may damage the product or cause the product to fall which could result in an electrical shock injury. ● Install the screws on the Remote Control. This may...
...; In order to use the Soundbar again while it is in or Turned On. Some mounts are mounting the Soundbar is plugged in Standby mode, press on a sturdy vertical Wall. It may damage the product or cause the product to fall which could result in an electrical shock injury. ● Install the screws on the Remote Control. This may...

Owners Manual English
Page 21
... product supports Dolby Digital and LPCM) - INFORMATION Troubleshooting Guide If the Unit does not perform properly when operated as instructed in this Owner's Manual, refer to the Soundbar. Decrease the volume on the Soundbar stay lit for 20 seconds. Be sure the Cable(s) are all LEDs on the Connected Bluetooth compatible Device. Aim Remote at the Camera Lens and press any Remote button. If the Remote Control does not work...
... product supports Dolby Digital and LPCM) - INFORMATION Troubleshooting Guide If the Unit does not perform properly when operated as instructed in this Owner's Manual, refer to the Soundbar. Decrease the volume on the Soundbar stay lit for 20 seconds. Be sure the Cable(s) are all LEDs on the Connected Bluetooth compatible Device. Aim Remote at the Camera Lens and press any Remote button. If the Remote Control does not work...

Owners Manual English
Page 23
... in delay. • Product lost software. EXCLUSIONS AND LIMITATIONS: • Failure to operate per Owner's Manual. Contact the Customer Care Center at company's option. property and the replaced item becomes company property. • Damage from state/province to state/province. Replacement product ...use, or or part is not covered under this Limited Warranty. WHAT IS NOT COVERED - Recovery or reinstallation of programs, data or other cause not within the installation or repair of the original product's warranty, other information is exchanged, any serial number...
... in delay. • Product lost software. EXCLUSIONS AND LIMITATIONS: • Failure to operate per Owner's Manual. Contact the Customer Care Center at company's option. property and the replaced item becomes company property. • Damage from state/province to state/province. Replacement product ...use, or or part is not covered under this Limited Warranty. WHAT IS NOT COVERED - Recovery or reinstallation of programs, data or other cause not within the installation or repair of the original product's warranty, other information is exchanged, any serial number...


