Owners Manual
Page 1
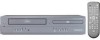
... Shock and Fire 4 Moisture Condensation Warning 4 About Copyright 4 Symbols Used in From this unit From TV Supplied Accessories Remote control (NB612UD/NB662UD) with Video Cassette Player DV200MW8 INSTRUCCIONES EN ESPAÑOL INCLUIDAS. Owner's Manual Please read before using this unit) DIGITAL AUDIO OUT...15 Subtitle Language 15 Audio Language 15 Camera Angles 15 Black Level Setting 15 Stereo Sound Mode 15 Virtual Surround 15 ■ DVD Setup 16 LANGUAGE Setting 16 DISPLAY Setting 17 AUDIO Setting 17 PARENTAL Setting 18 OTHERS Settings 18 Reset to the Default Setting ...
... Shock and Fire 4 Moisture Condensation Warning 4 About Copyright 4 Symbols Used in From this unit From TV Supplied Accessories Remote control (NB612UD/NB662UD) with Video Cassette Player DV200MW8 INSTRUCCIONES EN ESPAÑOL INCLUIDAS. Owner's Manual Please read before using this unit) DIGITAL AUDIO OUT...15 Subtitle Language 15 Audio Language 15 Camera Angles 15 Black Level Setting 15 Stereo Sound Mode 15 Virtual Surround 15 ■ DVD Setup 16 LANGUAGE Setting 16 DISPLAY Setting 17 AUDIO Setting 17 PARENTAL Setting 18 OTHERS Settings 18 Reset to the Default Setting ...
Owners Manual
Page 7
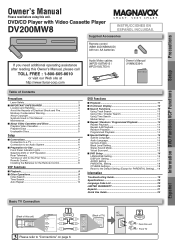
...[B] to the VIDEO IN jack of special audio and video cables, which are included for both VCP and DVD viewing. is inserted. DVD MODE Press [DVD] on the remote control. (The DVD SOURCE light will illuminate.) STANDBY-ON OPEN/CLOSE 12 45 78 CLEAR/ C. EN Blinks when an unacceptable disc... is in the DVD mode. See your TV manual for details.) 1 2 3 456 1: DIGITAL AUDIO OUT COAXIAL* Jack Connect a ...
...[B] to the VIDEO IN jack of special audio and video cables, which are included for both VCP and DVD viewing. is inserted. DVD MODE Press [DVD] on the remote control. (The DVD SOURCE light will illuminate.) STANDBY-ON OPEN/CLOSE 12 45 78 CLEAR/ C. EN Blinks when an unacceptable disc... is in the DVD mode. See your TV manual for details.) 1 2 3 456 1: DIGITAL AUDIO OUT COAXIAL* Jack Connect a ...
Owners Manual
Page 8
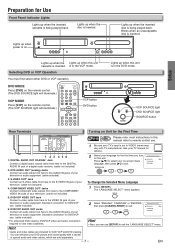
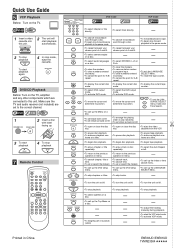
... • To begin slow forward playback in mind the following when using the remote control: • Make sure that there are as follows. - R-ch. DVD • To select DVD output • To select the DVD output mode. Keep in the pause mode. Be sure to use [OPEN/CLOSE...camera angles on a disc. CLEAR/ C. determine its position. EN cassette from the unit are no obstacles between your chosen point of the remote control. 1 2 3 DVD mode Button Disc/Tape (Alphabetical order) 123 456 789 • To select chapter or title directly. • To select track directly....
... • To begin slow forward playback in mind the following when using the remote control: • Make sure that there are as follows. - R-ch. DVD • To select DVD output • To select the DVD output mode. Keep in the pause mode. Be sure to use [OPEN/CLOSE...camera angles on a disc. CLEAR/ C. determine its position. EN cassette from the unit are no obstacles between your chosen point of the remote control. 1 2 3 DVD mode Button Disc/Tape (Alphabetical order) 123 456 789 • To select chapter or title directly. • To select track directly....
Owners Manual
Page 12
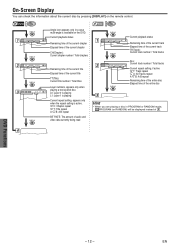
...:45 DISPLAY 3 T L1 DISPLAY Angle icon appears only in PROGRAM or RANDOM mode, PROGRAM (or RANDOM) will be displayed instead of 2 . 4 DVD Functions - 12 - L0: Layer 0 is playing L1: Layer 1 is playing Current repeat setting, appears only when the repeat setting is available on the... remote control. C: Chapter repeat T: Title repeat A B: A-B repeat BIT RATE: The amount of audio and video data currently being read DISPLAY Current playback ...
...:45 DISPLAY 3 T L1 DISPLAY Angle icon appears only in PROGRAM or RANDOM mode, PROGRAM (or RANDOM) will be displayed instead of 2 . 4 DVD Functions - 12 - L0: Layer 0 is playing L1: Layer 1 is playing Current repeat setting, appears only when the repeat setting is available on the... remote control. C: Chapter repeat T: Title repeat A B: A-B repeat BIT RATE: The amount of audio and video data currently being read DISPLAY Current playback ...

Owners Manual
Page 19
...for details on correct operations. • Playback from different camera angles. -This is in this is connected to initialize, select "NO" at the remote sensor. screen, prohibiting an operation. -This is not a malfunction. Read the description in the VCP mode. Reset to the TV. •...- 19 - Cannot remove the tape. • Check if this is not available for a better picture by this unit. • Press [DVD] on the DVD. No picture. • Connect the video cable firmly. • Insert a correct video disc that you confirm infrared light through the digital camera...
...for details on correct operations. • Playback from different camera angles. -This is in this is connected to initialize, select "NO" at the remote sensor. screen, prohibiting an operation. -This is not a malfunction. Read the description in the VCP mode. Reset to the TV. •...- 19 - Cannot remove the tape. • Check if this is not available for a better picture by this unit. • Press [DVD] on the DVD. No picture. • Connect the video cable firmly. • Insert a correct video disc that you confirm infrared light through the digital camera...

Owners Manual
Page 20
... of God. This product is extended only to replace defective parts without prior written approval. THIS WARRANTY DOES NOT COVER PACKING MATERIALS, ANY ACCESSORIES (EXCEPT REMOTE CONTROL), ANY COSMETIC PARTS, COMPLETE ASSEMBLY PARTS, DEMO OR FLOOR MODELS. will not reimburse you choose any other languages, '---' will provide parts to the original...
... of God. This product is extended only to replace defective parts without prior written approval. THIS WARRANTY DOES NOT COVER PACKING MATERIALS, ANY ACCESSORIES (EXCEPT REMOTE CONTROL), ANY COSMETIC PARTS, COMPLETE ASSEMBLY PARTS, DEMO OR FLOOR MODELS. will not reimburse you choose any other languages, '---' will provide parts to the original...

Owners Manual
Page 23
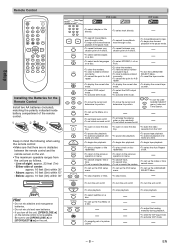
... TOP MENU SEARCH MODE AUDIO MENU ENTER SETUP ZOOM RETURN SUBTITLE ANGLE REPEAT A-B DVD MODE Press [DVD] on the remote control. (Verify that the DVD SOURCE light illuminates.) VCP MODE Press [VCP] on the remote control. (Verify that the VCP SOURCE light illuminates.) 4 Turning on Unit for... on this unit. 2 Installing the Batteries for the Remote Control 1 2 3 3 DVD/VCP Switching OPEN/CLOSE STANDBY-ON OPEN/CLOSE VCP DVD DISC IN PLAY SOURCE PREV STOP PLAY NEXT VCP DVD SOURCE VCP button DVD button VCP SOURCE light DVD SOURCE light SOURCE button 12 45 78 CLEAR/ C....
... TOP MENU SEARCH MODE AUDIO MENU ENTER SETUP ZOOM RETURN SUBTITLE ANGLE REPEAT A-B DVD MODE Press [DVD] on the remote control. (Verify that the DVD SOURCE light illuminates.) VCP MODE Press [VCP] on the remote control. (Verify that the VCP SOURCE light illuminates.) 4 Turning on Unit for... on this unit. 2 Installing the Batteries for the Remote Control 1 2 3 3 DVD/VCP Switching OPEN/CLOSE STANDBY-ON OPEN/CLOSE VCP DVD DISC IN PLAY SOURCE PREV STOP PLAY NEXT VCP DVD SOURCE VCP button DVD button VCP SOURCE light DVD SOURCE light SOURCE button 12 45 78 CLEAR/ C....
Owners Manual
Page 24
...8226; To call up . 3 To start playback again PLAY 4 In stop playback STOP 7 Remote Control STANDBY-ON OPEN/CLOSE 12 45 78 CLEAR/ C. RESET 0 DISPLAY VCP 3 TRACKING 6 9 +10 DVD MODE PLAY STOP SKIP PAUSE TOP MENU SEARCH MODE AUDIO MENU ENTER SETUP ZOOM RETURN SUBTITLE ANGLE ... To play randomly. • To set the LANGUAGE SELECT menu, Index and Time Search. chosen point of A and B. DVD • To select DVD output • To select the DVD output mode. STOP SUBTITLE TOP MENU TRACKING TRACKING • To stop playback. • To stop playback. • To ...
...8226; To call up . 3 To start playback again PLAY 4 In stop playback STOP 7 Remote Control STANDBY-ON OPEN/CLOSE 12 45 78 CLEAR/ C. RESET 0 DISPLAY VCP 3 TRACKING 6 9 +10 DVD MODE PLAY STOP SKIP PAUSE TOP MENU SEARCH MODE AUDIO MENU ENTER SETUP ZOOM RETURN SUBTITLE ANGLE ... To play randomly. • To set the LANGUAGE SELECT menu, Index and Time Search. chosen point of A and B. DVD • To select DVD output • To select the DVD output mode. STOP SUBTITLE TOP MENU TRACKING TRACKING • To stop playback. • To stop playback. • To ...


