Owners Manual
Page 6
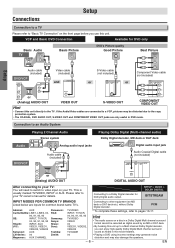
... Curtis Mathis: LINE1, LINE2, 00, RCA: INPUT, TV/VCR, * To complete these settings, refer to other equipment (an MD deck or DAT deck etc.) without Dolby Digital decoder. Please refer to your TV. LXI-Series: 00 Zenith: 00 • Playing a DVD using incorrect settings may generate noise Magnavox: AUX CHANNEL distortion and may be...
... Curtis Mathis: LINE1, LINE2, 00, RCA: INPUT, TV/VCR, * To complete these settings, refer to other equipment (an MD deck or DAT deck etc.) without Dolby Digital decoder. Please refer to your TV. LXI-Series: 00 Zenith: 00 • Playing a DVD using incorrect settings may generate noise Magnavox: AUX CHANNEL distortion and may be...
Owners Manual
Page 7
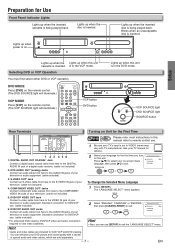
...of your television or audio equipment. STANDBY-ON Lights up when power is inserted. Blinks when an unacceptable disc is inserted. Standard connection for DVD/VCP use . 1 Be sure your on the remote control. (The VCP SOURCE light will illuminate.) VCP MODE Press [VCP] on ...manual refer to remote control use . (cable included) * For enhanced DVD viewing. B ENGLISH [ON] Press [K/L] to select your TV's input is being played back. Hint • Audio and video cables are sold separately. - 7 - SETUP 5: DVD/VCP VIDEO OUT Jack Connect a video cable from here to the ...
...of your television or audio equipment. STANDBY-ON Lights up when power is inserted. Blinks when an unacceptable disc is inserted. Standard connection for DVD/VCP use . 1 Be sure your on the remote control. (The VCP SOURCE light will illuminate.) VCP MODE Press [VCP] on ...manual refer to remote control use . (cable included) * For enhanced DVD viewing. B ENGLISH [ON] Press [K/L] to select your TV's input is being played back. Hint • Audio and video cables are sold separately. - 7 - SETUP 5: DVD/VCP VIDEO OUT Jack Connect a video cable from here to the ...
Owners Manual
Page 8
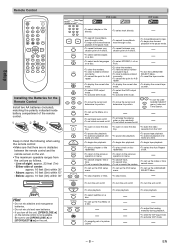
... • To open or close the disc • To eject the video tray. R-ch. Be sure to the previous operation in program input. • To clear numbers entered incorrectly. • To cancel the point for the Remote Control Install two AA batteries (included), matching the...track. • To search time. • To set the LANGUAGE SELECT menu, Index and Time Search. RESET 0 DISPLAY VCP 3 TRACKING 6 9 +10 DVD MODE PLAY STOP SKIP PAUSE TOP MENU SEARCH MODE AUDIO MENU ENTER SETUP ZOOM RETURN SUBTITLE ANGLE REPEAT A-B Installing the Batteries for A-B repeat. • To...
... • To open or close the disc • To eject the video tray. R-ch. Be sure to the previous operation in program input. • To clear numbers entered incorrectly. • To cancel the point for the Remote Control Install two AA batteries (included), matching the...track. • To search time. • To set the LANGUAGE SELECT menu, Index and Time Search. RESET 0 DISPLAY VCP 3 TRACKING 6 9 +10 DVD MODE PLAY STOP SKIP PAUSE TOP MENU SEARCH MODE AUDIO MENU ENTER SETUP ZOOM RETURN SUBTITLE ANGLE REPEAT A-B Installing the Batteries for A-B repeat. • To...
Owners Manual
Page 13
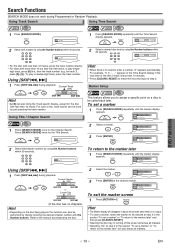
... less than 10 tracks, press the track number directly. • For discs with more than 10 but less than 99 tracks, to erase the incorrect input at step 2 in the section "To set a marker 1 Press [SEARCH MODE] repeatedly until the marker display appears. For such a disc, track ...playback. RETURN Hint • The Marker display will also erase all markers. - 13 - SEARCH MODE PLAY 2 Select a marker. Using Title / Chapter Search DVD 1 Press [SEARCH MODE] once for the disc with the Number buttons. Refer to the marker later 1 Press [SEARCH MODE] repeatedly until the Time Search display...
... less than 10 tracks, press the track number directly. • For discs with more than 10 but less than 99 tracks, to erase the incorrect input at step 2 in the section "To set a marker 1 Press [SEARCH MODE] repeatedly until the marker display appears. For such a disc, track ...playback. RETURN Hint • The Marker display will also erase all markers. - 13 - SEARCH MODE PLAY 2 Select a marker. Using Title / Chapter Search DVD 1 Press [SEARCH MODE] once for the disc with the Number buttons. Refer to the marker later 1 Press [SEARCH MODE] repeatedly until the Time Search display...

Owners Manual
Page 19
... in the remote control. • Aim the remote control directly at step 3. If not, press [VCP] on the remote control. Check if the DVD SOURCE light will illuminate. Distorted picture. • Connect this unit directly to an AC outlet. • Check the batteries in and out when •...; Some functions are not a sign of the audio component on. • Correct the audio output settings. • Correct the input settings on the DVD. Read the description in specific modes, but the audio is not a malfunction. NO YES INITIALIZE 4 To exit the menu ENTER SETUP Press twice...
... in the remote control. • Aim the remote control directly at step 3. If not, press [VCP] on the remote control. Check if the DVD SOURCE light will illuminate. Distorted picture. • Connect this unit directly to an AC outlet. • Check the batteries in and out when •...; Some functions are not a sign of the audio component on. • Correct the audio output settings. • Correct the input settings on the DVD. Read the description in specific modes, but the audio is not a malfunction. NO YES INITIALIZE 4 To exit the menu ENTER SETUP Press twice...

Owners Manual
Page 23
...Switching OPEN/CLOSE STANDBY-ON OPEN/CLOSE VCP DVD DISC IN PLAY SOURCE PREV STOP PLAY NEXT VCP DVD SOURCE VCP button DVD button VCP SOURCE light DVD SOURCE light SOURCE button 12 45 78 CLEAR/ C. See your TV manual for details.) 2 Select your TV's input is set to exit. RESET 0 DISPLAY VCP... 3 TRACKING 6 9 +10 DVD MODE PLAY STOP SKIP PAUSE ...
...Switching OPEN/CLOSE STANDBY-ON OPEN/CLOSE VCP DVD DISC IN PLAY SOURCE PREV STOP PLAY NEXT VCP DVD SOURCE VCP button DVD button VCP SOURCE light DVD SOURCE light SOURCE button 12 45 78 CLEAR/ C. See your TV manual for details.) 2 Select your TV's input is set to exit. RESET 0 DISPLAY VCP... 3 TRACKING 6 9 +10 DVD MODE PLAY STOP SKIP PAUSE ...
Owners Manual
Page 24
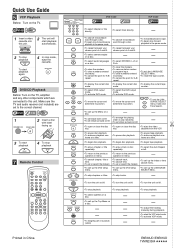
... playback one frame at a time. • To begin disc playback. • To begin disc playback. • To begin slow forward playback in program input. • To clear numbers entered incorrectly. • To cancel the point for A-B repeat. • To display the current disc mode. • To...LANGUAGE SELECT Menu. • To reset the tape counter. • To display the current tape counter. mode. • To activate DVD mode. • To activate DVD mode. tray. DVD 1 STANDBY-ON 2 Insert a disc with label OPEN/CLOSE facing up the Menu on a disc. • To set black level on...
... playback one frame at a time. • To begin disc playback. • To begin disc playback. • To begin slow forward playback in program input. • To clear numbers entered incorrectly. • To cancel the point for A-B repeat. • To display the current disc mode. • To...LANGUAGE SELECT Menu. • To reset the tape counter. • To display the current tape counter. mode. • To activate DVD mode. • To activate DVD mode. tray. DVD 1 STANDBY-ON 2 Insert a disc with label OPEN/CLOSE facing up the Menu on a disc. • To set black level on...


