User manual, English (US)
Page 1
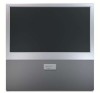
51MP6100D 51" Rear Projection TV 3139 125 34823-English 2005-10-03
51MP6100D 51" Rear Projection TV 3139 125 34823-English 2005-10-03
User manual, English (US)
Page 4
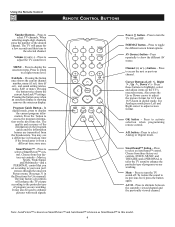
...33 Care and Cleaning 34 Model Specifications 35 Glossary of Television Terms 36 Index 37 Limited Warranty 38 Items Included with This TV As you unpack your registration card. Please take a few minutes to use the Timer Menu Controls 20 Understanding AutoLock 21 Block... Channels Part 1 - CONTENTS INTRODUCTION Welcome/Registration of Your TV 2 Safety/Precautions 2-3 Features 5 POWER TV SWAP VCR PIP CH ACC ACTIVE CONTROL FREEZE DN UP SOUND PICTURE USING THE REMOTE CONTROL Remote Control Buttons 6 STATUS/...
...33 Care and Cleaning 34 Model Specifications 35 Glossary of Television Terms 36 Index 37 Limited Warranty 38 Items Included with This TV As you unpack your registration card. Please take a few minutes to use the Timer Menu Controls 20 Understanding AutoLock 21 Block... Channels Part 1 - CONTENTS INTRODUCTION Welcome/Registration of Your TV 2 Safety/Precautions 2-3 Features 5 POWER TV SWAP VCR PIP CH ACC ACTIVE CONTROL FREEZE DN UP SOUND PICTURE USING THE REMOTE CONTROL Remote Control Buttons 6 STATUS/...
User manual, English (US)
Page 5
...day and maintains it easy to your remote control. Automatic Format automatically detects the incoming signal's format and adjusts it is time to the TV (HD INPUT-AV 4 only). Smart Sound™ allows you press the CH +/- Channel Edit allows you have black bars on screen changes. Progressive... supports the demands of programs, such as horizontal and vertical sync. Saving energy reduces air pollution and lowers utility bills. Copyright 2004 Magnavox. End-of visible picture lines per field by displaying all picture frame lines at an even level. The batteries used by making the...
...day and maintains it easy to your remote control. Automatic Format automatically detects the incoming signal's format and adjusts it is time to the TV (HD INPUT-AV 4 only). Smart Sound™ allows you press the CH +/- Channel Edit allows you have black bars on screen changes. Progressive... supports the demands of programs, such as horizontal and vertical sync. Saving energy reduces air pollution and lowers utility bills. Copyright 2004 Magnavox. End-of visible picture lines per field by displaying all picture frame lines at an even level. The batteries used by making the...
User manual, English (US)
Page 6
...information on the next time slot. Choose from three factory-set controls (VOICE, MUSIC, and THEATRE) and a PERSONAL to tailor the TV sound to adjust the picture format for Use manual.) The four factory-set according to the selected channel. Press to display the current ...Movies, Sports, Weak Signal, and Multimedia-and a PERSONAL control that you are transmitted from a different time zone area. Press these buttons to select TV channels. Press to highlight, select and adjust items on the program guide and the information banner are watching. Volume (+) or (-) - Choose from...
...information on the next time slot. Choose from three factory-set controls (VOICE, MUSIC, and THEATRE) and a PERSONAL to tailor the TV sound to adjust the picture format for Use manual.) The four factory-set according to the selected channel. Press to display the current ...Movies, Sports, Weak Signal, and Multimedia-and a PERSONAL control that you are transmitted from a different time zone area. Press these buttons to select TV channels. Press to highlight, select and adjust items on the program guide and the information banner are watching. Volume (+) or (-) - Choose from...
User manual, English (US)
Page 7
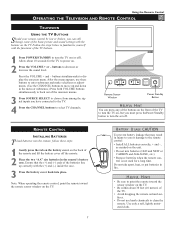
... cloth. Remote Sensor Window Power Standby Button H ELPFUL H INT You can press any of the buttons on the front of the TV to turn the TV on (or off). REMOTE CONTROL INSTALLING BATTERIES To load batteries into the remote, follow these buttons to enter submenus and make selections ...or adjustments. (Use the CHANNEL buttons to move up correctly with the buttons on the TV. 7 B ATTERY U SAGE CAUTION To prevent battery leakage that the (+) and (-) ends of the basic picture and sound settings with the (+) and (-) inside the...
... cloth. Remote Sensor Window Power Standby Button H ELPFUL H INT You can press any of the buttons on the front of the TV to turn the TV on (or off). REMOTE CONTROL INSTALLING BATTERIES To load batteries into the remote, follow these buttons to enter submenus and make selections ...or adjustments. (Use the CHANNEL buttons to move up correctly with the buttons on the TV. 7 B ATTERY U SAGE CAUTION To prevent battery leakage that the (+) and (-) ends of the basic picture and sound settings with the (+) and (-) inside the...
User manual, English (US)
Page 8
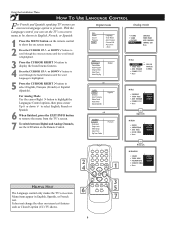
...press the EXIT/INFO button to select English, Français (French) or Español (Spanish). HELPFUL HINT The Language control only makes the TV's on-screen Menu items appear in English, French, or Spanish. 1 Press the MENU button on the remote control to show the on screen menu... is present. Using the Installation Menu HOW TO USE LANGUAGE CONTROL For French and Spanish speaking TV owners an onscreen Language option is highlighted. 5 Press the CURSOR RIGHTubutton to remove the menu from the TV's screen. 7 To switch between Digital and Analog Channels, use the A/D button on -screen...
...press the EXIT/INFO button to select English, Français (French) or Español (Spanish). HELPFUL HINT The Language control only makes the TV's on-screen Menu items appear in English, French, or Spanish. 1 Press the MENU button on the remote control to show the on screen menu... is present. Using the Installation Menu HOW TO USE LANGUAGE CONTROL For French and Spanish speaking TV owners an onscreen Language option is highlighted. 5 Press the CURSOR RIGHTubutton to remove the menu from the TV's screen. 7 To switch between Digital and Analog Channels, use the A/D button on -screen...
User manual, English (US)
Page 9
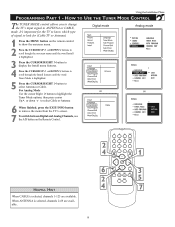
... options, then press cursor Upv or down w to select Cable or Antenna 6 When finished, press the EXIT/INFO button to remove the menu from the TV's screen. 7 To switch between Digital and Analog Channels, use the A/D button on the remote control to show the onscreen menu. 2 Press the CURSOR ... CURSOR UPv or DOWNwbuttons to ANTENNA or CABLE, mode. HOW TO USE THE TUNER MODE CONTROL The TUNER MODE control allows you to change the TV's input signal to scroll through the Install features until the word Tuner Mode is selected, channels 1-125 are available. 9 When ANTENNA is selected, channels...
... options, then press cursor Upv or down w to select Cable or Antenna 6 When finished, press the EXIT/INFO button to remove the menu from the TV's screen. 7 To switch between Digital and Analog Channels, use the A/D button on the remote control to show the onscreen menu. 2 Press the CURSOR ... CURSOR UPv or DOWNwbuttons to ANTENNA or CABLE, mode. HOW TO USE THE TUNER MODE CONTROL The TUNER MODE control allows you to change the TV's input signal to scroll through the Install features until the word Tuner Mode is selected, channels 1-125 are available. 9 When ANTENNA is selected, channels...
User manual, English (US)
Page 10
...6 Press the CURSOR RIGHTubutton to start the select antenna or cable mode. 7 When finished, press the EXIT/INFO button to remove the menu from the TV's screen. 8 To switch between Digital and Analog Channels, use the A/D button on the Remote Control. * Digital installation may take 20 to 40 minutes ...depending on the no. When you to select only the TV stations in Digital mode, it easy for local area (or Cable TV) channels. When ANTENNA is selected, channels 1-125 are available. HELPFUL HINT When CABLE is selected, channels 2-69 ...
...6 Press the CURSOR RIGHTubutton to start the select antenna or cable mode. 7 When finished, press the EXIT/INFO button to remove the menu from the TV's screen. 8 To switch between Digital and Analog Channels, use the A/D button on the Remote Control. * Digital installation may take 20 to 40 minutes ...depending on the no. When you to select only the TV stations in Digital mode, it easy for local area (or Cable TV) channels. When ANTENNA is selected, channels 1-125 are available. HELPFUL HINT When CABLE is selected, channels 2-69 ...
User manual, English (US)
Page 11
... use the CURSOR RIGHT ubutton to toggle between On or Off. Using the Installation Menu HELPFUL HINT Skipped channel members will be displayed in the TV's memory. 1 Press the MENU button on the Remote Control. 11 To switch between Added or Skipped. In analogue mode, now use the CURSOR ...If OFF is selected the channels is highlighted. 5 Press the CURSOR RIGHTubutton to add or skip. Or, you wish to remove the menu from the TV's memory. to quickly scan through all available channels that have not been skipped. 7 In digital mode, using the CURSOR DOWNw button, scroll the menu ...
... use the CURSOR RIGHT ubutton to toggle between On or Off. Using the Installation Menu HELPFUL HINT Skipped channel members will be displayed in the TV's memory. 1 Press the MENU button on the Remote Control. 11 To switch between Added or Skipped. In analogue mode, now use the CURSOR ...If OFF is selected the channels is highlighted. 5 Press the CURSOR RIGHTubutton to add or skip. Or, you wish to remove the menu from the TV's memory. to quickly scan through all available channels that have not been skipped. 7 In digital mode, using the CURSOR DOWNw button, scroll the menu ...
User manual, English (US)
Page 12
buttons, or the AV button to select a TV channel or input source to which you want to assign a name or whose name you to the INSTALL submenu, with NAME highlighted. At this point ..., press the MENU button. NAME HELPFUL HINT • The five PERSONAL name characters you can choose between options of creating a personal name for example). The TV has in step 4 to highlight the NAME options area again and choose a preset name as explained in memory a list of the name. The onscreen menu...
buttons, or the AV button to select a TV channel or input source to which you want to assign a name or whose name you to the INSTALL submenu, with NAME highlighted. At this point ..., press the MENU button. NAME HELPFUL HINT • The five PERSONAL name characters you can choose between options of creating a personal name for example). The TV has in step 4 to highlight the NAME options area again and choose a preset name as explained in memory a list of the name. The onscreen menu...
User manual, English (US)
Page 13
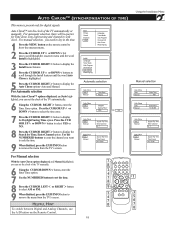
... option. For manual selection, you want to seek the time. 9 When finished, press the EXIT/INFO button to remove the menu from the TV's screen. For Automatic selection With the Auto Chron™ options displayed, andAuto highlighted; Auto and Manual. Press the CUR SOR UPv or DOWNwbutton ... OF TIME) This menu is highlighted. 5 Press the CURSOR RIGHTubutton to display the Auto Chron options- Auto Chron™ sets the clock of the TV automatically. 6 Using the CURSOR RIGHTubutton, enter the Time Zone option. Press the CURSOR UPv or DOWNwbutton to select the time zone. 7 Press the ...
... option. For manual selection, you want to seek the time. 9 When finished, press the EXIT/INFO button to remove the menu from the TV's screen. For Automatic selection With the Auto Chron™ options displayed, andAuto highlighted; Auto and Manual. Press the CUR SOR UPv or DOWNwbutton ... OF TIME) This menu is highlighted. 5 Press the CURSOR RIGHTubutton to display the Auto Chron options- Auto Chron™ sets the clock of the TV automatically. 6 Using the CURSOR RIGHTubutton, enter the Time Zone option. Press the CURSOR UPv or DOWNwbutton to select the time zone. 7 Press the ...

User manual, English (US)
Page 14
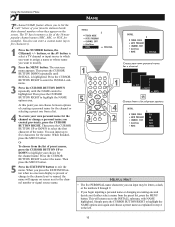
... Menu WEAK DIGITAL SIGNAL This menu is present only for digital mode. PRESS the INFO button to remove the menu from the TV's screen. You may see a difference in the TV's memory. 1 Press the MENU button on the remote control to show the onscreen menu. 2 Press the CURSOR DOWNwbutton to scroll through...
... Menu WEAK DIGITAL SIGNAL This menu is present only for digital mode. PRESS the INFO button to remove the menu from the TV's screen. You may see a difference in the TV's memory. 1 Press the MENU button on the remote control to show the onscreen menu. 2 Press the CURSOR DOWNwbutton to scroll through...
User manual, English (US)
Page 15
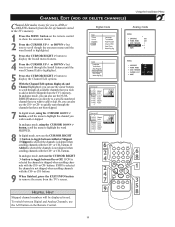
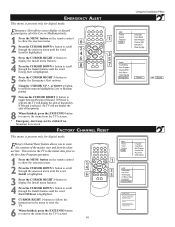
... master, user and favorite channel lists. FACTORY CHANNEL RESET This menu is selected, the TV will not display the alert of that priority. 8 When finished, press the EXIT/INFO button to remove the... menu from the TV's screen. * Emergency Alert may not be visible if no broadcast is received.broadcast is present ...scroll through the Install features until the word Emerg Alert is selected, the TV will display the alert of that priority. Emergency Alert allows you to toggle between Present or Discard. This restores...
... master, user and favorite channel lists. FACTORY CHANNEL RESET This menu is selected, the TV will not display the alert of that priority. 8 When finished, press the EXIT/INFO button to remove the... menu from the TV's screen. * Emergency Alert may not be visible if no broadcast is received.broadcast is present ...scroll through the Install features until the word Emerg Alert is selected, the TV will display the alert of that priority. Emergency Alert allows you to toggle between Present or Discard. This restores...
User manual, English (US)
Page 16
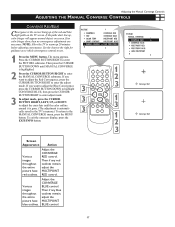
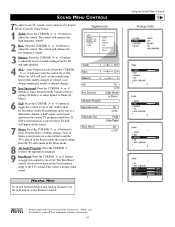
... follows: BRIGHTNESS adds or subtracts light from the darkest part of the picture. Using the Onscreen Submenus: Picture ADJUSTING THE PICTURE CONTROLS To adjust your TV picture controls, select a channel and follow these steps. BRIGHTNESS will be highlighted and an adjustment bar will be shown to the right. 3 Press the CURSOR...
... follows: BRIGHTNESS adds or subtracts light from the darkest part of the picture. Using the Onscreen Submenus: Picture ADJUSTING THE PICTURE CONTROLS To adjust your TV picture controls, select a channel and follow these steps. BRIGHTNESS will be highlighted and an adjustment bar will be shown to the right. 3 Press the CURSOR...
User manual, English (US)
Page 17
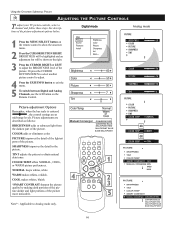
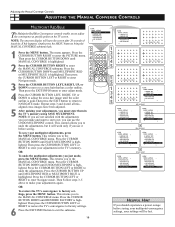
... submenu. Various images throughout the entire picture have red outlines. Then press the CURSOR BUTTON DOWN until the color outline around objects on the TV screen. Then if any red outlines remain, adjust the MULTIPOINT RED control. If you want to adjust the Blue Convergence, press the CURSOR ...CONVERGE RED/BLUE Convergence is the correct lining up , color fringes will appear around it is gone. (The adjustment is automatically saved in the TV's memory.) To return to warm up 20 minutes before adjusting convergence. If the paths don't line up of the red and blue light paths...
... submenu. Various images throughout the entire picture have red outlines. Then press the CURSOR BUTTON DOWN until the color outline around objects on the TV screen. Then if any red outlines remain, adjust the MULTIPOINT RED control. If you want to adjust the Blue Convergence, press the CURSOR ...CONVERGE RED/BLUE Convergence is the correct lining up , color fringes will appear around it is gone. (The adjustment is automatically saved in the TV's memory.) To return to warm up 20 minutes before adjusting convergence. If the paths don't line up of the red and blue light paths...
User manual, English (US)
Page 18
... adjustments, press the MENU button. Press the CURSOR BUTTON UP until RESTORE FACTORY is highlighted. This returns you must store them in the TV's memory. This returns you to the MANUAL CONVERGE menu. Press the CURSOR BUTTON LEFT or RIGHT to bring the MANUAL CONVERGE submenu back.... BUTTON DOWN until MULTIPOINT RED or MULTIPOINT BLUE is highlighted. NOTE: The onscreen display will be lost. To save your adjustments in the TV's memory using SAVE MULTIPOINT. This returns you to the MANUAL CONVERGE menu. Then press the EXIT/INFO button to enter adjust mode. 4...
... adjustments, press the MENU button. Press the CURSOR BUTTON UP until RESTORE FACTORY is highlighted. This returns you must store them in the TV's memory. This returns you to the MANUAL CONVERGE menu. Press the CURSOR BUTTON LEFT or RIGHT to bring the MANUAL CONVERGE submenu back.... BUTTON DOWN until MULTIPOINT RED or MULTIPOINT BLUE is highlighted. NOTE: The onscreen display will be lost. To save your adjustments in the TV's memory using SAVE MULTIPOINT. This returns you to the MANUAL CONVERGE menu. Then press the EXIT/INFO button to enter adjust mode. 4...
User manual, English (US)
Page 19
...or Off. SAP is short for Secondary Audio Programming and is sent as a third audio channel, a SAP signal can be heard apart from the current TV program sound.Note: If SAP is placed in volume occur during commercial breaks or channel changes. 5 Incr. Note: If Stereo is not present on ...Analog channels, use the Sound Menu Controls listed below: 1 Treble: Press the CURSOR ˙ or ˝buttons to increase the low-frequency range of the TV's sound. "Dolby" and the double-D symbol £ are trademarks of sound coming from Dolby Laboratories. The control will appear on a selected show No ...
...or Off. SAP is short for Secondary Audio Programming and is sent as a third audio channel, a SAP signal can be heard apart from the current TV program sound.Note: If SAP is placed in volume occur during commercial breaks or channel changes. 5 Incr. Note: If Stereo is not present on ...Analog channels, use the Sound Menu Controls listed below: 1 Treble: Press the CURSOR ˙ or ˝buttons to increase the low-frequency range of the TV's sound. "Dolby" and the double-D symbol £ are trademarks of sound coming from Dolby Laboratories. The control will appear on a selected show No ...
User manual, English (US)
Page 20
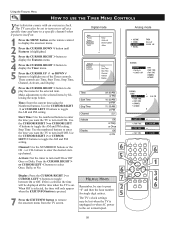
... when AC power to the set to turn itself on. 1 Press the MENU button on the remote control to remove the onscreen menu from the TV screen. These controls are Time, Start Time, Stop Time, Channel, Activate, and Display. 6 Press the CURSOR RIGHTubutton to select Once, Daily, or No. .... 2 Press the CURSOR DOWNwbutton until Features is on. Use the CURSOR RIGHTuor CURSOR LEFTxbuttons to the selected items by following the steps below. The TV can also be sure to toggle the AM and PM setting. Time: Enter the current time using the Numbered buttons. Using the Features Menu HOW...
... when AC power to the set to turn itself on. 1 Press the MENU button on the remote control to remove the onscreen menu from the TV screen. These controls are Time, Start Time, Stop Time, Channel, Activate, and Display. 6 Press the CURSOR RIGHTubutton to select Once, Daily, or No. .... 2 Press the CURSOR DOWNwbutton until Features is on. Use the CURSOR RIGHTuor CURSOR LEFTxbuttons to the selected items by following the steps below. The TV can also be sure to toggle the AM and PM setting. Time: Enter the current time using the Numbered buttons. Using the Features Menu HOW...
User manual, English (US)
Page 21
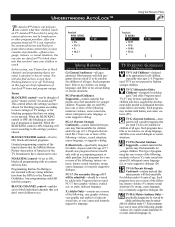
...no violence, no strong language, and little or no sexual dialogue or sexual situations. or intensely suggestive dialogue. explicit sex; TV-Y7 (Directed to distinguish between make-believe and reality. Such programs have graphic violence; strong, coarse language (L); or intensely... graphic violence, very graphic and explicit or indecent sexual acts, or very coarse and intensely suggestive language. 21 TV PARENTAL GUIDELINES (TV BROADCASTERS) TV-Y (All Children)-designed to frighten younger children. Anyone under 17. Such programs may be unsuitable for children under...
...no violence, no strong language, and little or no sexual dialogue or sexual situations. or intensely suggestive dialogue. explicit sex; TV-Y7 (Directed to distinguish between make-believe and reality. Such programs have graphic violence; strong, coarse language (L); or intensely... graphic violence, very graphic and explicit or indecent sexual acts, or very coarse and intensely suggestive language. 21 TV PARENTAL GUIDELINES (TV BROADCASTERS) TV-Y (All Children)-designed to frighten younger children. Anyone under 17. Such programs may be unsuitable for children under...

User manual, English (US)
Page 22
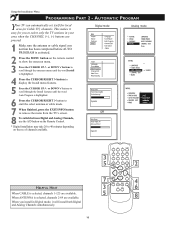
... as you to confirm the receipt of the rating terms for certain programming. Using the Features Menu BLOCK CHANNELS PART 1 - First, let's start by the TV as you enter your new code again. Enter a "new" 4 digit code using the NUMBERED buttons. The screen will appear when you press the numbered buttons...
... as you to confirm the receipt of the rating terms for certain programming. Using the Features Menu BLOCK CHANNELS PART 1 - First, let's start by the TV as you enter your new code again. Enter a "new" 4 digit code using the NUMBERED buttons. The screen will appear when you press the numbered buttons...


