User Manual
Page 6
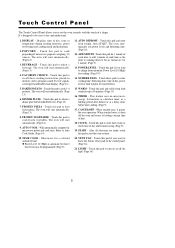
... display. (Page 13) 15. The oven will start automatically. (Page 13) 18. The oven will start automatically. (Page 14) 19. The oven automatically sets power levels and defrosting time. (Page 10) 12. NUMBER PADS - When touched once, it shuts off the light. (Page 16) 5 LIGHT - Touch Control Panel The ...control panel. (Page 16) 21. DINNER PLATE - AUTO COOK - TIME COOK - ADD MINUTE -Touch this pad if you want to change from antomatic Power Level 10 (High) for up to set the oven controls with the touch of a finger. Touch this pad and safely keep food warm for cooking. (Page...
... display. (Page 13) 15. The oven will start automatically. (Page 13) 18. The oven will start automatically. (Page 14) 19. The oven automatically sets power levels and defrosting time. (Page 10) 12. NUMBER PADS - When touched once, it shuts off the light. (Page 16) 5 LIGHT - Touch Control Panel The ...control panel. (Page 16) 21. DINNER PLATE - AUTO COOK - TIME COOK - ADD MINUTE -Touch this pad if you want to change from antomatic Power Level 10 (High) for up to set the oven controls with the touch of a finger. Touch this pad and safely keep food warm for cooking. (Page...

User Manual
Page 9
... number pad. If you wish to the current time when the oven turns off. Set the time of day returns to use a different power level, touch the POWER LEVEL Pad before touching START Pad. Touch the CLOCK PAD. ◆ After plugging in the Display window. ◆ The oven will start until...:88" will be displayed. 3. Operating Basics Time-of day will always be opened any time during operation. Touch the TIME COOK Pad. 2. Enter the power level desired by touching the appropriate numbers. 3. Touch the CANCEL/OFF PAD and set the clock following the directions above. ◆ The "time-of-day"...
... number pad. If you wish to the current time when the oven turns off. Set the time of day returns to use a different power level, touch the POWER LEVEL Pad before touching START Pad. Touch the CLOCK PAD. ◆ After plugging in the Display window. ◆ The oven will start until...:88" will be displayed. 3. Operating Basics Time-of day will always be opened any time during operation. Touch the TIME COOK Pad. 2. Enter the power level desired by touching the appropriate numbers. 3. Touch the CANCEL/OFF PAD and set the clock following the directions above. ◆ The "time-of-day"...
User Manual
Page 10
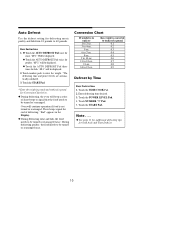
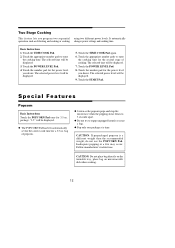
...to your cooking cycle while in progress. Add Minute The ADD MINUTE Pad provides a convenient way to 99 minutes. Each power level gives you 100% power. Medium 7 Gentle cooking of the time. Medium 5 Slow cooking and tenderizing for the timer to stirring or rotating the ...show the selected time. 3. Most of day. ◆ The timer cannot be set while cooking. ◆ The door must be used . Power Level Best Uses High 10 Fish, bacon, vegetables, boiling liquids. Low 3 Defrosting, simmering, delicate sauces. Warm 1 Keeping food warm without overcooking, ...
...to your cooking cycle while in progress. Add Minute The ADD MINUTE Pad provides a convenient way to 99 minutes. Each power level gives you 100% power. Medium 7 Gentle cooking of the time. Medium 5 Slow cooking and tenderizing for the timer to stirring or rotating the ...show the selected time. 3. Most of day. ◆ The timer cannot be set while cooking. ◆ The door must be used . Power Level Best Uses High 10 Fish, bacon, vegetables, boiling liquids. Low 3 Defrosting, simmering, delicate sauces. Warm 1 Keeping food warm without overcooking, ...
User Manual
Page 11
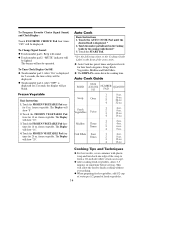
... to 15-oz. "End" appears in the Display. ◆ During defrosting meat and fish, the food needs to be turned or rearranged once. Touch the POWER LEVEL Pad. 4. Note . . . ◆ See page 11 for additional defrosting tips for poultry. Three beeps signal the end of a pound. Basic Instructions 1. ◆ ... to 4-oz. 5-oz. 6 to 7-oz. 8-oz. 9 to 10-oz. 11 to 12-oz. 13-oz. 14 to enter the weight. *The defrosting time and power levels are automatically calculated. 3. Conversion Chart If weight is converted to 6.0 pounds. then weight is in pounds and tenths of defrosting.
... to 15-oz. "End" appears in the Display. ◆ During defrosting meat and fish, the food needs to be turned or rearranged once. Touch the POWER LEVEL Pad. 4. Note . . . ◆ See page 11 for additional defrosting tips for poultry. Three beeps signal the end of a pound. Basic Instructions 1. ◆ ... to 4-oz. 5-oz. 6 to 7-oz. 8-oz. 9 to 10-oz. 11 to 12-oz. 13-oz. 14 to enter the weight. *The defrosting time and power levels are automatically calculated. 3. Conversion Chart If weight is converted to 6.0 pounds. then weight is in pounds and tenths of defrosting.
User Manual
Page 12
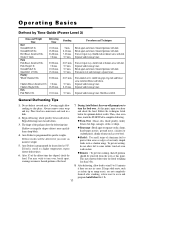
... the techniques listed below for foods weighing less than a deep block. 4. After 1/3 of the package alters the defrosting time. Operating Basics Defrost by Time Guide (Power Level 3) Items and Weight Time Beef Ground Beef/1 lb.
... the techniques listed below for foods weighing less than a deep block. 4. After 1/3 of the package alters the defrosting time. Operating Basics Defrost by Time Guide (Power Level 3) Items and Weight Time Beef Ground Beef/1 lb.
User Manual
Page 13
... and stop the microwave when the popping slows down to 3 seconds apart. ◆ Do not try to enter the cooking time. The selected power level will be displayed. 9. bag of cooking. The selected time will be displayed. 7. Touch the number pad for the second stage of popcorn.... ◆ Listen as defrosting and cooking or cooking using two different power levels. Touch the appropriate number pads to repop unpopped kernels or reuse a bag. ◆ Pop only one package at a time. Special Features ...
... and stop the microwave when the popping slows down to 3 seconds apart. ◆ Do not try to enter the cooking time. The selected power level will be displayed. 9. bag of cooking. The selected time will be displayed. 7. Touch the number pad for the second stage of popcorn.... ◆ Listen as defrosting and cooking or cooking using two different power levels. Touch the appropriate number pads to repop unpopped kernels or reuse a bag. ◆ Pop only one package at a time. Special Features ...

User Manual
Page 14
... Pad until desired program number appears in oven and close door. 2. Favorite Choice To Program and Change Favorite choice Setting: 1. Touch the POWER LEVEL Pad. 3. Put food in the Display. 3. Touch FAVORITE CHOICE Pad "FC-1" will show "2CUP". 3. Touch the FROZEN PIZZA Pad....◆ The programmed time (3:00) will show "HEAt". 2. Touch the BEVERAGE Pad twice for 3 cups (24 oz.)/mugs. Enter power level. Basic Instructions 1. Touch the START Pad. 13 Beverage Basic Instructions 1. Touch the TIME COOK Pad. Special Features Dinner Plate Baked Potato Basic...
... Pad until desired program number appears in oven and close door. 2. Favorite Choice To Program and Change Favorite choice Setting: 1. Touch the POWER LEVEL Pad. 3. Put food in the Display. 3. Touch FAVORITE CHOICE Pad "FC-1" will show "2CUP". 3. Touch the FROZEN PIZZA Pad....◆ The programmed time (3:00) will show "HEAt". 2. Touch the BEVERAGE Pad twice for 3 cups (24 oz.)/mugs. Enter power level. Basic Instructions 1. Touch the START Pad. 13 Beverage Basic Instructions 1. Touch the TIME COOK Pad. Special Features Dinner Plate Baked Potato Basic...
User Manual
Page 15
... weight desired.* 3. Auto Cook Basic Instructions 1. Touch the number pad indicated on the front of the oven cavity. ◆ Auto Cook has preset times and power levels for 2 seconds, the time of day will be operated. After "OFF" is displayed. * 2. The Display will show "16". 4. frozen vegetable. Fish Fillets Four 1 4 oz. To...
... weight desired.* 3. Auto Cook Basic Instructions 1. Touch the number pad indicated on the front of the oven cavity. ◆ Auto Cook has preset times and power levels for 2 seconds, the time of day will be operated. After "OFF" is displayed. * 2. The Display will show "16". 4. frozen vegetable. Fish Fillets Four 1 4 oz. To...
User Manual
Page 16
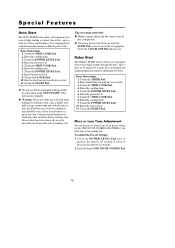
...to start when you touch the START Pad, you have not set Settings: 1. Enter the cooking time. 15. Enter the power level. 17. Touch the POWER LEVEL Pad once to increase the time by 20 seconds or twice to start should never stand more or less cooking time. up to...Touch the CANCEL/OFF Pad and start . 11. You can program two sequential operations using two different power levels. You can program two sequential operations using two different power levels. Enter the Power level. 15. Unfrozen foods should be very cold or frozen before cooking starts. Enter desired time you want ...
...to start when you touch the START Pad, you have not set Settings: 1. Enter the cooking time. 15. Enter the power level. 17. Touch the POWER LEVEL Pad once to increase the time by 20 seconds or twice to start should never stand more or less cooking time. up to...Touch the CANCEL/OFF Pad and start . 11. You can program two sequential operations using two different power levels. You can program two sequential operations using two different power levels. Enter the Power level. 15. Unfrozen foods should be very cold or frozen before cooking starts. Enter desired time you want ...
User Manual
Page 21
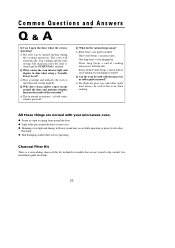
... door and moisture droplets form on the inside of three short beeps = check food to dim when using a Variable Power Level? The door can be used in blower sound may occur while operating at power levels other than high. ◆ Dull thumping sound while oven is touched. Q.Why does steam and/or vapor escape...
... door and moisture droplets form on the inside of three short beeps = check food to dim when using a Variable Power Level? The door can be used in blower sound may occur while operating at power levels other than high. ◆ Dull thumping sound while oven is touched. Q.Why does steam and/or vapor escape...
User Manual
Page 22
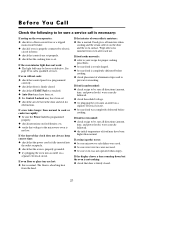
...may have been set. ◆ the Control Lockout may have been higher than normal to cook or cooks too rapidly: ◆ be sure the Power Level is programmed properly. ◆ check instructions on food density, etc. ◆ verify that the cooking time is set. If oven floor or ... normal. Food gives off excess moisture from the food. If food is overcooked: ◆ check recipe to be sure all directions (amount, time, and power levels) were correctly followed. ◆ check household voltage. ◆ try plugging the oven into an outlet on a separate electrical circuit. ◆ be sure ...
...may have been set. ◆ the Control Lockout may have been higher than normal to cook or cooks too rapidly: ◆ be sure the Power Level is programmed properly. ◆ check instructions on food density, etc. ◆ verify that the cooking time is set. If oven floor or ... normal. Food gives off excess moisture from the food. If food is overcooked: ◆ check recipe to be sure all directions (amount, time, and power levels) were correctly followed. ◆ check household voltage. ◆ try plugging the oven into an outlet on a separate electrical circuit. ◆ be sure ...


