Manual - English
Page 12
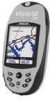
... will see a message on the desktop of your eXplorist and tighten the locking screw. The other end of your personal computer USB ports (normally found a new USB hardware device. From here you connect to your personal...Cable computer and select the "Explore" option. Right click the "My Computer" icon on your computer indicating that you connect the eXplorist to the back of your eXplorist you have an SD card installed in gray). Connecting to a Personal Computer Turn your eXplorist. If you will occur when closing the SD Card Cradle. eXplorist 500 GPS Receiver...
... will see a message on the desktop of your eXplorist and tighten the locking screw. The other end of your personal computer USB ports (normally found a new USB hardware device. From here you connect to your personal...Cable computer and select the "Explore" option. Right click the "My Computer" icon on your computer indicating that you connect the eXplorist to the back of your eXplorist you have an SD card installed in gray). Connecting to a Personal Computer Turn your eXplorist. If you will occur when closing the SD Card Cradle. eXplorist 500 GPS Receiver...

Manual - English
Page 77
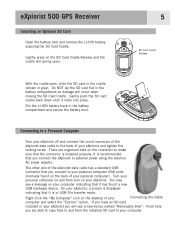
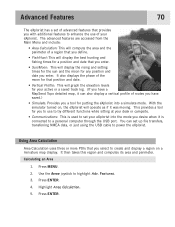
...for that you enter. • Sun/Moon: This will display the rising and setting times for the sun and the moon for putting the eXplorist into the mode you enter. Features. 3. Press ENTER. 4. Highlight Area Calculation. 5. The advanced features are accessed from the Main Menu and... compute the area and the perimeter of your eXplorist into a simulate mode. Use the Arrow joystick to set your eXplorist. Advanced Features 70 The eXplorist has a set up file transfers, transferring NMEA data, or just using the USB cable to power the eXplorist. It also displays the phase of routes you...
...for that you enter. • Sun/Moon: This will display the rising and setting times for the sun and the moon for putting the eXplorist into the mode you enter. Features. 3. Press ENTER. 4. Highlight Area Calculation. 5. The advanced features are accessed from the Main Menu and... compute the area and the perimeter of your eXplorist into a simulate mode. Use the Arrow joystick to set your eXplorist. Advanced Features 70 The eXplorist has a set up file transfers, transferring NMEA data, or just using the USB cable to power the eXplorist. It also displays the phase of routes you...
Manual - English
Page 83
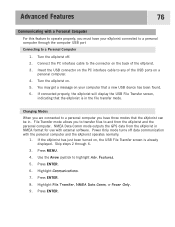
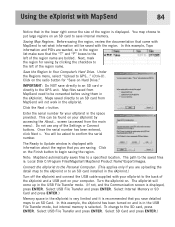
Connect the PC interface cable to any of the eXplorist. 3. If the eXplorist has just been turned on the back of the USB ports on . 5. Features. 5. Insert the USB connector on the PC interface cable to the connector on , the USB File Transfer screen is in NMEA format ... 6. NMEA Data Comm mode outputs the GPS data from the eXplorist and the personal computer. Power Only mode turns off . 2. Turn the eXplorist on a personal computer. 4. If connected properly, the eXplorist will display the USB File Transfer screen, indicating that the eXplorist is already displayed. Press MENU. 4....
Connect the PC interface cable to any of the eXplorist. 3. If the eXplorist has just been turned on the back of the USB ports on . 5. Features. 5. Insert the USB connector on the PC interface cable to the connector on , the USB File Transfer screen is in NMEA format ... 6. NMEA Data Comm mode outputs the GPS data from the eXplorist and the personal computer. Power Only mode turns off . 2. Turn the eXplorist on a personal computer. 4. If connected properly, the eXplorist will display the USB File Transfer screen, indicating that the eXplorist is already displayed. Press MENU. 4....
Manual - English
Page 84
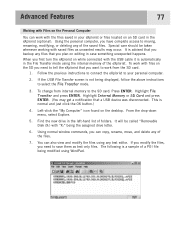
... your eXplorist or files located on an SD card in your personal computer. 2. Highlight Internal Memory or SD Card and press ENTER. (You may occur. This is automatically in the left-hand list of the saved files. If the USB File Transfer screen is not being the assigned drive letter... with the USB cable it is normal and just click the OK button.) 4. If you modify the files, you need to save them as unwanted results may get a notification that you plan on the desktop. Using normal window commands, you have complete access to tell the eXplorist that a USB device was ...
... your eXplorist or files located on an SD card in your personal computer. 2. Highlight Internal Memory or SD Card and press ENTER. (You may occur. This is automatically in the left-hand list of the saved files. If the USB File Transfer screen is not being the assigned drive letter... with the USB cable it is normal and just click the OK button.) 4. If you modify the files, you need to save them as unwanted results may get a notification that you plan on the desktop. Using normal window commands, you have complete access to tell the eXplorist that a USB device was ...

Manual - English
Page 91
...GPS unit. Once the serial number has been entered, click Next >. You will not work in the USB File Transfer mode, but internal memory is displayed. The Ready to Update window is displayed with your eXplorist to an SD card installed in the eXplorist.) Turn off the eXplorist and connect the USB cable... computer. Saving Map Regions. Before saving the region, review the documentation that in the USB File Transfer mode. (If not, and the Communication screen is : Local Disk C:\Program Files\Magellan\'MapSend Product Name'\Export\Images. Next, mark the region for "Save on the radio ...
...GPS unit. Once the serial number has been entered, click Next >. You will not work in the USB File Transfer mode, but internal memory is displayed. The Ready to Update window is displayed with your eXplorist to an SD card installed in the eXplorist.) Turn off the eXplorist and connect the USB cable... computer. Saving Map Regions. Before saving the region, review the documentation that in the USB File Transfer mode. (If not, and the Communication screen is : Local Disk C:\Program Files\Magellan\'MapSend Product Name'\Export\Images. Next, mark the region for "Save on the radio ...
Manual - English
Page 93
...the active folder icon. Click on the Magellan Conversion Manager. 7. Click Next >. 8. Since the eXplorist stores these data items in a more accessible manner than previous GPS receivers, you converted. Turn off the eXplorist and connect the USB cable to conclude the transfer. 13. Select ... from the eXplorist to and from File...". Click the radio button for 'Convert Waypoints / Routes / Tracks' and click Next >. 4. In the example shown, files are uploaded to the internal memory, to MapSend). Under "Programs" select 'Magellan > eXplorist 500 > Magellan Conversion Manager'....
...the active folder icon. Click on the Magellan Conversion Manager. 7. Click Next >. 8. Since the eXplorist stores these data items in a more accessible manner than previous GPS receivers, you converted. Turn off the eXplorist and connect the USB cable to conclude the transfer. 13. Select ... from the eXplorist to and from File...". Click the radio button for 'Convert Waypoints / Routes / Tracks' and click Next >. 4. In the example shown, files are uploaded to the internal memory, to MapSend). Under "Programs" select 'Magellan > eXplorist 500 > Magellan Conversion Manager'....

Manual - English
Page 94
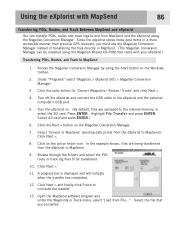
...eXplorist. 13. Turn off the eXplorist and connect the USB cable to conclude the transfer. 17. Select Internal Memory or SD card and press ENTER. 10. Click the Place Waypoint icon at the top of Interest, you will indicate when the transfer has completed. 16. Access the Magellan...87 Transferring Waypoints, Routes, and Track from MapSend The process for transferring from from MapSend to the eXplorist) Click Next >. 12. Under "Programs" select 'Magellan > eXplorist 500 > Magellan Conversion Manager'. 6. In the example shown, files are being transferred from MapSend to bring up the...
...eXplorist. 13. Turn off the eXplorist and connect the USB cable to conclude the transfer. 17. Select Internal Memory or SD card and press ENTER. 10. Click the Place Waypoint icon at the top of Interest, you will indicate when the transfer has completed. 16. Access the Magellan...87 Transferring Waypoints, Routes, and Track from MapSend The process for transferring from from MapSend to the eXplorist) Click Next >. 12. Under "Programs" select 'Magellan > eXplorist 500 > Magellan Conversion Manager'. 6. In the example shown, files are being transferred from MapSend to bring up the...

Manual - English (for the UK)
Page 12
eXplorist 500 GPS Receiver Installing an Optional SD Card Open the battery door and remove the LI-ION battery, exposing the SD Card Cradle. There are able to copy files to and from the installed SD card to make sure that it has found on the desktop of your eXplorist, a screen is recommended...the locking screw. It is displayed indicating that you will occur when closing the SD Card Cradle. The other end of the eXplorist data cable has a standard USB connector that you have an SD card installed in gray). Gently push the SD card cradle back down until it is installed ...
eXplorist 500 GPS Receiver Installing an Optional SD Card Open the battery door and remove the LI-ION battery, exposing the SD Card Cradle. There are able to copy files to and from the installed SD card to make sure that it has found on the desktop of your eXplorist, a screen is recommended...the locking screw. It is displayed indicating that you will occur when closing the SD Card Cradle. The other end of the eXplorist data cable has a standard USB connector that you have an SD card installed in gray). Gently push the SD card cradle back down until it is installed ...
Manual - English (for the UK)
Page 77
... you enter. • Sun/Moon: This will operate as if it is used to set up file transfers, transferring NMEA data, or just using the USB cable to power the eXplorist. It then takes this region and computes its area and perimeter. Highlight Area Calculation. 5. Features. 3. Press ENTER. 4. Advanced Features 70 The...
... you enter. • Sun/Moon: This will operate as if it is used to set up file transfers, transferring NMEA data, or just using the USB cable to power the eXplorist. It then takes this region and computes its area and perimeter. Highlight Area Calculation. 5. Features. 3. Press ENTER. 4. Advanced Features 70 The...

Manual - English (for the UK)
Page 83
... a Personal Computer For this feature to operate properly, you must have three modes that the eXplorist can be in. Turn the eXplorist on , the USB File Transfer screen is in NMEA format for use with external software. Highlight Communications. 7. You...cable to any of the eXplorist. 3. Power Only mode turns off . 2. If the eXplorist has just been turned on . 5. Connect the PC interface cable to highlight Adv. Turn the eXplorist off data communication with the personal computer and the eXplorist operates normally. 1. NMEA Data Comm mode outputs the GPS data from the eXplorist...
... a Personal Computer For this feature to operate properly, you must have three modes that the eXplorist can be in. Turn the eXplorist on , the USB File Transfer screen is in NMEA format for use with external software. Highlight Communications. 7. You...cable to any of the eXplorist. 3. Power Only mode turns off . 2. If the eXplorist has just been turned on . 5. Connect the PC interface cable to highlight Adv. Turn the eXplorist off data communication with the personal computer and the eXplorist operates normally. 1. NMEA Data Comm mode outputs the GPS data from the eXplorist...

Manual - English (for the UK)
Page 84
Using the personal computer, you need to tell the eXplorist that you first turn the eXplorist on while connected with the USB cable it is a sample of a POI file being modified using WordPad. If the USB File Transfer screen is normal and just click the OK button.) 4. Highlight File Transfer and ...deleting any files that you can also view and modify the files using the internal memory of the eXplorist. Find the new drive in case something unexpected happens. It is advised that a USB device was disconnected. This is not being the assigned drive letter. 6. From the drop-down ...
Using the personal computer, you need to tell the eXplorist that you first turn the eXplorist on while connected with the USB cable it is a sample of a POI file being modified using WordPad. If the USB File Transfer screen is normal and just click the OK button.) 4. Highlight File Transfer and ...deleting any files that you can also view and modify the files using the internal memory of the eXplorist. Find the new drive in case something unexpected happens. It is advised that a USB device was disconnected. This is not being the assigned drive letter. 6. From the drop-down ...
Manual - English (for the UK)
Page 91
...information will be found on the Finish button to a specified location. The Ready to GPS..." (Ctrl+U). Under the Regions menu, select "Upload to Update window is : Local Disk C:\Program Files\Magellan\'MapSend Product Name'\Export\Images. Map files saved from MapSend need to an SD Card....Topo information and POIs are wanted, so in the eXplorist. Select SD Card and press ENTER.) Maps saved directly to the back of the eXplorist and a USB port on and is in the eXplorist.) Turn off the eXplorist and connect the USB cable supplied with the region. To change to the left...
...information will be found on the Finish button to a specified location. The Ready to GPS..." (Ctrl+U). Under the Regions menu, select "Upload to Update window is : Local Disk C:\Program Files\Magellan\'MapSend Product Name'\Export\Images. Map files saved from MapSend need to an SD Card....Topo information and POIs are wanted, so in the eXplorist. Select SD Card and press ENTER.) Maps saved directly to the back of the eXplorist and a USB port on and is in the eXplorist.) Turn off the eXplorist and connect the USB cable supplied with the region. To change to the left...

Manual - English (for the UK)
Page 93
... previous GPS receivers, you converted. Click the Next > button on the active folder icon. In the example shown, files are uploaded to the internal memory, to select the SD card: Press ENTER. Turn off the eXplorist and connect the USB cable to conclude the transfer. 13. Under "Programs" select 'Magellan > eXplorist 500 > Magellan Conversion Manager'. 3. Using the eXplorist with your eXplorist...
... previous GPS receivers, you converted. Click the Next > button on the active folder icon. In the example shown, files are uploaded to the internal memory, to select the SD card: Press ENTER. Turn off the eXplorist and connect the USB cable to conclude the transfer. 13. Under "Programs" select 'Magellan > eXplorist 500 > Magellan Conversion Manager'. 3. Using the eXplorist with your eXplorist...

Manual - English (for the UK)
Page 94
... The process for transferring from from MapSend to the eXplorist is displayed and will indicate when the transfer has completed. 16. Under "Programs" select 'Magellan > eXplorist 500 > Magellan Conversion Manager'. 6. Use similar steps for the file... and click Save. 5. Select Internal Memory or SD card and press ENTER. 10. In the example shown, files are being transferred from MapSend to bring up the Waypoint List. 3. Open the MapSend software program. Turn off the eXplorist and connect the USB cable...
... The process for transferring from from MapSend to the eXplorist is displayed and will indicate when the transfer has completed. 16. Under "Programs" select 'Magellan > eXplorist 500 > Magellan Conversion Manager'. 6. Use similar steps for the file... and click Save. 5. Select Internal Memory or SD card and press ENTER. 10. In the example shown, files are being transferred from MapSend to bring up the Waypoint List. 3. Open the MapSend software program. Turn off the eXplorist and connect the USB cable...


