
Manual - English
Page 3
Table of Contents i eXplorist 300 GPS Receiver 1 Features of the Magellan eXplorist GPS receiver 1 Button Descriptions 2 Installing the Batteries 4 Using the eXplorist 300 5 Going to a Destination 5 Saving Your Position 6 Tracing Your Steps 7 Additional Features 8 Summary 8 Starting Up 9 Turning the eXplorist On 9 Turning the eXplorist Off 9 Turning the Display Backlight On/Off 9 Using the eXplorist for the First Time 10 Conclusion...
Table of Contents i eXplorist 300 GPS Receiver 1 Features of the Magellan eXplorist GPS receiver 1 Button Descriptions 2 Installing the Batteries 4 Using the eXplorist 300 5 Going to a Destination 5 Saving Your Position 6 Tracing Your Steps 7 Additional Features 8 Summary 8 Starting Up 9 Turning the eXplorist On 9 Turning the eXplorist Off 9 Turning the Display Backlight On/Off 9 Using the eXplorist for the First Time 10 Conclusion...

Manual - English
Page 4
... Making POIs for Locations Other Than Your Present Position 27 Marking a Position by Entering Coordinates 27 Marking a Position using the Map Cursor 28 Marking a Position from a Map Object 28 The POI Database 29 Searching for a User-Entered POI 29 Searching for a Preloaded POI using Nearest 30 Searching ... Alphabetical 31 Editing a User-Created POI 32 Deleting a User-Created POI 33 Viewing a User-Created POI on the Map Screen 34 Copying a Preloaded POI 35 Viewing a Preloaded POI on the Map Screen 36 Routes 37 GOTO Routes 37 Creating a GOTO Route 38 Creating a GOTO Route from the...
... Making POIs for Locations Other Than Your Present Position 27 Marking a Position by Entering Coordinates 27 Marking a Position using the Map Cursor 28 Marking a Position from a Map Object 28 The POI Database 29 Searching for a User-Entered POI 29 Searching for a Preloaded POI using Nearest 30 Searching ... Alphabetical 31 Editing a User-Created POI 32 Deleting a User-Created POI 33 Viewing a User-Created POI on the Map Screen 34 Copying a Preloaded POI 35 Viewing a Preloaded POI on the Map Screen 36 Routes 37 GOTO Routes 37 Creating a GOTO Route 38 Creating a GOTO Route from the...
Manual - English
Page 5
...Track Log 53 Creating a BackTrack Route 54 Clearing the Active Track 55 Converting the Track Log to a Route 56 Viewing the Track Log on the Map 57 Working with Saved Track Logs 58 Following Saved Track Logs 58 Reversing a Saved Track Log 58 Deleting a Saved Track Log 59 Weather 60 Weather...the Pressure Altimeter 61 Electronic Compass 62 Calibrating the Compass 63 Turning the Compass Off/On 64 Preferences 65 Restarting the GPS 66 Setting the Map Units 68 Selecting Navigational Units of Measure 68 Selecting the North Reference 69 Selecting the Coordinate System 70 Selecting the...
...Track Log 53 Creating a BackTrack Route 54 Clearing the Active Track 55 Converting the Track Log to a Route 56 Viewing the Track Log on the Map 57 Working with Saved Track Logs 58 Following Saved Track Logs 58 Reversing a Saved Track Log 58 Deleting a Saved Track Log 59 Weather 60 Weather...the Pressure Altimeter 61 Electronic Compass 62 Calibrating the Compass 63 Turning the Compass Off/On 64 Preferences 65 Restarting the GPS 66 Setting the Map Units 68 Selecting Navigational Units of Measure 68 Selecting the North Reference 69 Selecting the Coordinate System 70 Selecting the...
Manual - English
Page 7
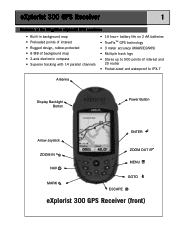
eXplorist 300 GPS Receiver 1 Features of the Magellan eXplorist GPS receiver: • Built-in background map • Preloaded points of interest • Rugged design, rubber-protected • 8 MB of background map • 2-axis electronic compass • Superior tracking with 14 parallel channels • 14 hour+ battery life on 2 AA batteries • TrueFix™ GPS technology • 3...• Pocket-sized and waterproof to IPX-7 Antenna Display Backlight Button Power Button Arrow Joystick ENTER ZOOM IN NAV MARK ZOOM OUT MENU GOTO ESCAPE eXplorist 300 GPS Receiver (front)
eXplorist 300 GPS Receiver 1 Features of the Magellan eXplorist GPS receiver: • Built-in background map • Preloaded points of interest • Rugged design, rubber-protected • 8 MB of background map • 2-axis electronic compass • Superior tracking with 14 parallel channels • 14 hour+ battery life on 2 AA batteries • TrueFix™ GPS technology • 3...• Pocket-sized and waterproof to IPX-7 Antenna Display Backlight Button Power Button Arrow Joystick ENTER ZOOM IN NAV MARK ZOOM OUT MENU GOTO ESCAPE eXplorist 300 GPS Receiver (front)
Manual - English
Page 8
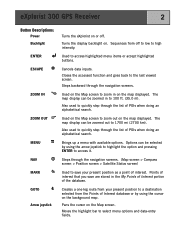
... to low to select menu options and data-entry fields. Steps backward through the list of interest. The map display can be zoomed in to zoom out on the map displayed. Moves the highlight bar to high intensity. Sequences from your present position as a point of POIs... cursor on . Used to the last viewed screen. Turns the display backlight on the Map screen. Closes the accessed function and goes back to access highlighted menu items or accept highlighted buttons. eXplorist 300 GPS Receiver 2 Button Descriptions: Power Backlight ENTER ESCAPE ZOOM IN ZOOM OUT MENU NAV ...
... to low to select menu options and data-entry fields. Steps backward through the list of interest. The map display can be zoomed in to zoom out on the map displayed. Moves the highlight bar to high intensity. Sequences from your present position as a point of POIs... cursor on . Used to the last viewed screen. Turns the display backlight on the Map screen. Closes the accessed function and goes back to access highlighted menu items or accept highlighted buttons. eXplorist 300 GPS Receiver 2 Button Descriptions: Power Backlight ENTER ESCAPE ZOOM IN ZOOM OUT MENU NAV ...
Manual - English
Page 12
... will provide you instructions to guide you along that you can enter the name "Catfish1" and save it has computed your display. Using the eXplorist 300 6 Step Two: Where Do You Want To Go? Step Three: Calculating Movement As you can be able to come back to go . ... your eXplorist (Background Map). Suppose that the eXplorist knows where you are on a large body of water, it will provide you have been preloaded into your limit. This database has two main options: positions you with the satellites and is accessed by using the Points of your eXplorist 300. Saving...
... will provide you instructions to guide you along that you can enter the name "Catfish1" and save it has computed your display. Using the eXplorist 300 6 Step Two: Where Do You Want To Go? Step Three: Calculating Movement As you can be able to come back to go . ... your eXplorist (Background Map). Suppose that the eXplorist knows where you are on a large body of water, it will provide you have been preloaded into your limit. This database has two main options: positions you with the satellites and is accessed by using the Points of your eXplorist 300. Saving...
Manual - English
Page 14
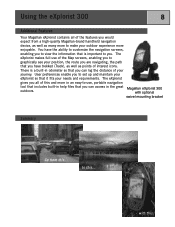
...this ... with optional swivel mounting bracket Summary Go from a high-quality Magellan-brand handheld navigation device, as well as points of interest icons. Using the eXplorist 300 8 Additional Features Your Magellan eXplorist contains all of this and more to graphically see your journey. User ... your needs and requirements. There is important to -use of the Map screens, enabling you . You have trekked (Track), as well as many more in the great Magellan eXplorist 300 outdoors. The eXplorist gives you all of your position, the route you are navigating,...
...this ... with optional swivel mounting bracket Summary Go from a high-quality Magellan-brand handheld navigation device, as well as points of interest icons. Using the eXplorist 300 8 Additional Features Your Magellan eXplorist contains all of this and more to graphically see your journey. User ... your needs and requirements. There is important to -use of the Map screens, enabling you . You have trekked (Track), as well as many more in the great Magellan eXplorist 300 outdoors. The eXplorist gives you all of your position, the route you are navigating,...

Manual - English
Page 17
... region you , and press the ENTER button. Region Select Region. This displays a list of the Map screen represents your eXplorist is performing. River 62 Tip: Use the ZOOM IN and ZOOM OUT buttons to change the map scale so that you may see how well your 62 position. Starting Up 11 The Satellite...
... region you , and press the ENTER button. Region Select Region. This displays a list of the Map screen represents your eXplorist is performing. River 62 Tip: Use the ZOOM IN and ZOOM OUT buttons to change the map scale so that you may see how well your 62 position. Starting Up 11 The Satellite...

Manual - English
Page 18
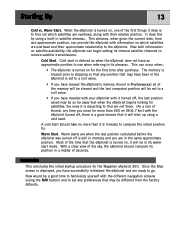
... 10:16AM 21 MAY 04 Done The Satellite Status screen is displayed again, and the eXplorist will be displayed, with your position using the same technique used before , when the eXplorist computes the initial position, the Map screen will try moving the arrow joystick up or down when AM or PM is highlighted...
... 10:16AM 21 MAY 04 Done The Satellite Status screen is displayed again, and the eXplorist will be displayed, with your position using the same technique used before , when the eXplorist computes the initial position, the Map screen will try moving the arrow joystick up or down when AM or PM is highlighted...
Manual - English
Page 19
...things it is displayed, you have successfully initialized the eXplorist and are in Preferences) all of seconds. Once the Map screen is expecting to find out which satellites are overhead, along with the eXplorist turned off is set to compute the initial position ... approximate position, can provide the eXplorist with information on satellite availability, the eXplorist can occur when: • The eXplorist is turned on which satellites are overhead and their relative position. Warm Start. Now with information on for the Magellan eXplorist 300. Starting Up 13 Cold vs...
...things it is displayed, you have successfully initialized the eXplorist and are in Preferences) all of seconds. Once the Map screen is expecting to find out which satellites are overhead, along with the eXplorist turned off is set to compute the initial position ... approximate position, can provide the eXplorist with information on satellite availability, the eXplorist can occur when: • The eXplorist is turned on which satellites are overhead and their relative position. Warm Start. Now with information on for the Magellan eXplorist 300. Starting Up 13 Cold vs...
Manual - English
Page 20
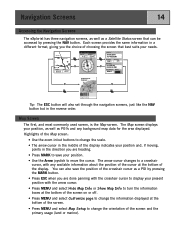
... cursor as POI's and any available information about the position of the cursor at the bottom of the screen. • Press MENU and select Map Setup to change the scale. • The arrow cursor in the middle of the display indicates your position and, if moving, points in a...Time 01 FEB 04 03:30:36 PM Trip Odometer Battery 0000.0 M I 3D Position Fix Tracking 7.... Navigation Screens 14 Accessing the Navigation Screens The eXplorist has three navigation screens, as well as a Satellite Status screen that best suits your position, as well as a POI by pressing the NAV button....
... cursor as POI's and any available information about the position of the cursor at the bottom of the screen. • Press MENU and select Map Setup to change the scale. • The arrow cursor in the middle of the display indicates your position and, if moving, points in a...Time 01 FEB 04 03:30:36 PM Trip Odometer Battery 0000.0 M I 3D Position Fix Tracking 7.... Navigation Screens 14 Accessing the Navigation Screens The eXplorist has three navigation screens, as well as a Satellite Status screen that best suits your position, as well as a POI by pressing the NAV button....
Manual - English
Page 21
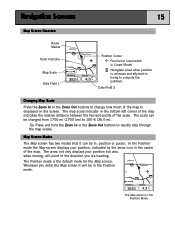
...vina 10 10 1.60mi Heading Speed 352 o M 4.3 M H Position Cursor Pan Cursor (used when in Cursor Mode) Hourglass (used when position is unknown and eXplorist is trying to compute the position) Data Field 2 Changing Map Scale Press the Zoom In or the Zoom Out buttons to change how much of the...displays your position but also, when moving, will be in the direction you enter the Map screen it can be in the center of the map is the default mode for the Map screen. The map scale indicator in the Position Mode Glendora 210 ent San Dimas vina 10 10 1.60mi Heading...
...vina 10 10 1.60mi Heading Speed 352 o M 4.3 M H Position Cursor Pan Cursor (used when in Cursor Mode) Hourglass (used when position is unknown and eXplorist is trying to compute the position) Data Field 2 Changing Map Scale Press the Zoom In or the Zoom Out buttons to change how much of the...displays your position but also, when moving, will be in the direction you enter the Map screen it can be in the center of the map is the default mode for the Map screen. The map scale indicator in the Position Mode Glendora 210 ent San Dimas vina 10 10 1.60mi Heading...
Manual - English
Page 22
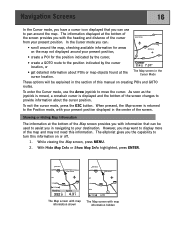
... can : • scroll around the map, checking available information for areas on or off. 1. The information displayed at the bottom of the screen provides you with information that you can use the Arrow joystick to move the cursor. The eXplorist gives you in navigating to your present... position, • create a POI for the position indicated by the cursor, • create a GOTO route to the Position mode, with map information hidden With Hide Map Info or Show Map Info highlighted, press ENTER. As...
... can : • scroll around the map, checking available information for areas on or off. 1. The information displayed at the bottom of the screen provides you with information that you can use the Arrow joystick to move the cursor. The eXplorist gives you in navigating to your present... position, • create a POI for the position indicated by the cursor, • create a GOTO route to the Position mode, with map information hidden With Hide Map Info or Show Map Info highlighted, press ENTER. As...

Manual - English
Page 23
...) • ETE (Estimated Time Enroute) • Elevation • Time • Date To customize the map information: 1. Navigation Screens 17 Customizing the Map Information The information displayed at the bottom of the screen can select from the list. 7. You can be ...; Distance • Speed [default] • Heading [default] • ETA (Estimated Time of the fields is shown in the two map information fields. When the information to be customized to change what is highlighted. Press ENTER. 8. Press ENTER. 4. Customize page GleBndeoararing D2i1s0tance ...
...) • ETE (Estimated Time Enroute) • Elevation • Time • Date To customize the map information: 1. Navigation Screens 17 Customizing the Map Information The information displayed at the bottom of the screen can select from the list. 7. You can be ...; Distance • Speed [default] • Heading [default] • ETA (Estimated Time of the fields is shown in the two map information fields. When the information to be customized to change what is highlighted. Press ENTER. 8. Press ENTER. 4. Customize page GleBndeoararing D2i1s0tance ...
Manual - English
Page 24
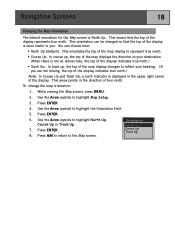
.... Press NAV to return to highlight North Up, Course Up or Track Up. 7. This orientates the top of the map display to highlight the Orientation field. 5. Use the Arrow joystick to represent true north. • Course Up. This orientation can choose from: • North Up...You can be changed so that the top of true north. While viewing the Map screen, press MENU. 2. Orientation North Up Course Up Track Up Navigation Screens 18 Changing the Map Orientation The default orientation for the Map screen is displayed in the direction of the display represents true north. Use the ...
.... Press NAV to return to highlight North Up, Course Up or Track Up. 7. This orientates the top of the map display to highlight the Orientation field. 5. Use the Arrow joystick to represent true north. • Course Up. This orientation can choose from: • North Up...You can be changed so that the top of true north. While viewing the Map screen, press MENU. 2. Orientation North Up Course Up Track Up Navigation Screens 18 Changing the Map Orientation The default orientation for the Map screen is displayed in the direction of the display represents true north. Use the ...

Manual - English
Page 25
... usage, land areas are displayed as dark gray.) This is provided as an option to provide you are navigating. The opposite is true when the map is set for marine usage. (Water is white and land areas are displayed as dark gray. Press ENTER. 4. Press ENTER. 6. Press NAV to return to... the Arrow joystick to be changed to highlight the Primary Usage field. 5. To change the primary usage: 1. Navigation Screens 19 Changing the Primary Usage The Map screen can be primarily used on the display and water is displayed as white areas on land (default) or marine. Press ENTER. 8.
... usage, land areas are displayed as dark gray.) This is provided as an option to provide you are navigating. The opposite is true when the map is set for marine usage. (Water is white and land areas are displayed as dark gray. Press ENTER. 4. Press ENTER. 6. Press NAV to return to... the Arrow joystick to be changed to highlight the Primary Usage field. 5. To change the primary usage: 1. Navigation Screens 19 Changing the Primary Usage The Map screen can be primarily used on the display and water is displayed as white areas on land (default) or marine. Press ENTER. 8.

Manual - English
Page 27
...] • Speed [default] • Heading • ETA (Estimated Time of Arrival) • ETE (Estimated Time Enroute) • Elevation • Time • Date To customize the map information: 1. CVusItoEmWize page 2B.e8aring 0.84 D2i1s0tance San Dimas Speed Heading ETA ETE Elevat1i0on Time Date Speed Press ENTER. 8. You can be displayed is important...
...] • Speed [default] • Heading • ETA (Estimated Time of Arrival) • ETE (Estimated Time Enroute) • Elevation • Time • Date To customize the map information: 1. CVusItoEmWize page 2B.e8aring 0.84 D2i1s0tance San Dimas Speed Heading ETA ETE Elevat1i0on Time Date Speed Press ENTER. 8. You can be displayed is important...
Manual - English
Page 31
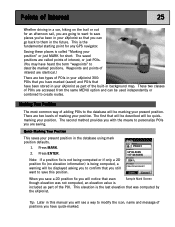
...you have marked (saved) and POIs that even Sample Mark Screen though elevation was computed by the eXplorist. Waypoints and points of interest are identical.) There are two types of POIs in your eXplorist 300: POIs that you still want to create routes. Press MARK. 2. Note: If a position fix..." to personalize POIs you with the means to describe marked positions. The second method provides you are going to want to them in background map. The saved positions are two levels of interest, or just POIs. (You may have quick-marked. There are called "Marking your position....
...you have marked (saved) and POIs that even Sample Mark Screen though elevation was computed by the eXplorist. Waypoints and points of interest are identical.) There are two types of POIs in your eXplorist 300: POIs that you still want to create routes. Press MARK. 2. Note: If a position fix..." to personalize POIs you with the means to describe marked positions. The second method provides you are going to want to them in background map. The saved positions are two levels of interest, or just POIs. (You may have quick-marked. There are called "Marking your position....

Manual - English
Page 33
... Locations Other Than Your Present Position Sometimes, you may want to save a position that your eXplorist. 1. Before beginning, make sure that is not your present position or you can use the Cursor mode of the Map screen to pan to the location you want to save this POI in your... eXplorist database. Save Cancel 5. Press MARK. 2. line. Entering new positioning coordinates 7. Use the Arrow joystick to enter. ...
... Locations Other Than Your Present Position Sometimes, you may want to save a position that your eXplorist. 1. Before beginning, make sure that is not your present position or you can use the Cursor mode of the Map screen to pan to the location you want to save this POI in your... eXplorist database. Save Cancel 5. Press MARK. 2. line. Entering new positioning coordinates 7. Use the Arrow joystick to enter. ...

Manual - English
Page 34
...field, press ENTER. 9. The Save option will be highlighted. 7. While viewing the Map screen, use the Arrow joystick to the Position mode. Press ESC to exit the Cursor mode and return to put the eXplorist into Cursor mode. 2. Press ESC to exit the Cursor mode and return to put... the eXplorist into Cursor mode. 2. Press ENTER. 4. While viewing the Map screen, use the Arrow joystick to the Position mode. Press MARK. 4. ...
...field, press ENTER. 9. The Save option will be highlighted. 7. While viewing the Map screen, use the Arrow joystick to the Position mode. Press ESC to exit the Cursor mode and return to put the eXplorist into Cursor mode. 2. Press ESC to exit the Cursor mode and return to put... the eXplorist into Cursor mode. 2. Press ENTER. 4. While viewing the Map screen, use the Arrow joystick to the Position mode. Press MARK. 4. ...


