Manual - English
Page 1
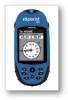
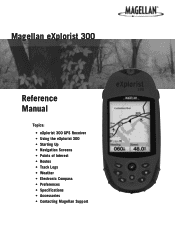
Magellan eXplorist 300 Reference Manual Topics: • eXplorist 300 GPS Receiver • Using the eXplorist 300 • Starting Up • Navigation Screens • Points of Interest • Routes • Track Logs • Weather • Electronic Compass • Preferences • Specifications • Accessories • Contacting Magellan Support
Magellan eXplorist 300 Reference Manual Topics: • eXplorist 300 GPS Receiver • Using the eXplorist 300 • Starting Up • Navigation Screens • Points of Interest • Routes • Track Logs • Weather • Electronic Compass • Preferences • Specifications • Accessories • Contacting Magellan Support

Manual - English
Page 2
... must accept any changes. The Magellan Logo, Magellan, eXplorist and TrueFix are reserved by United States copyright laws and international treaty provisions; Come to change any purpose other copyright material. Accuracy can be reproduced or transmitted in accordance with the terms of non-Magellan cables and antennas may cause undesired operation of the GPS network. USE PROPER ACCESSORIES Use only Magellan cables and antennas; All...
... must accept any changes. The Magellan Logo, Magellan, eXplorist and TrueFix are reserved by United States copyright laws and international treaty provisions; Come to change any purpose other copyright material. Accuracy can be reproduced or transmitted in accordance with the terms of non-Magellan cables and antennas may cause undesired operation of the GPS network. USE PROPER ACCESSORIES Use only Magellan cables and antennas; All...

Manual - English
Page 3
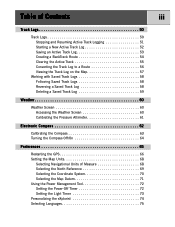
... GPS Receiver 1 Features of the Magellan eXplorist GPS receiver 1 Button Descriptions 2 Installing the Batteries 4 Using the eXplorist 300 5 Going to a Destination 5 Saving Your Position 6 Tracing Your Steps 7 Additional Features 8 Summary 8 Starting Up 9 Turning the eXplorist On 9 Turning the eXplorist Off 9 Turning the Display Backlight On/Off 9 Using the eXplorist for the First Time 10 Conclusion 13 Navigation Screens 14 Accessing the Navigation Screens 14 Map Screen 14 Map Screen Overview 15 Changing Map Scale 15 Map Screen Modes 15 Showing or Hiding Map Information...
... GPS Receiver 1 Features of the Magellan eXplorist GPS receiver 1 Button Descriptions 2 Installing the Batteries 4 Using the eXplorist 300 5 Going to a Destination 5 Saving Your Position 6 Tracing Your Steps 7 Additional Features 8 Summary 8 Starting Up 9 Turning the eXplorist On 9 Turning the eXplorist Off 9 Turning the Display Backlight On/Off 9 Using the eXplorist for the First Time 10 Conclusion 13 Navigation Screens 14 Accessing the Navigation Screens 14 Map Screen 14 Map Screen Overview 15 Changing Map Scale 15 Map Screen Modes 15 Showing or Hiding Map Information...
Manual - English
Page 5
... Saved Track Logs 58 Reversing a Saved Track Log 58 Deleting a Saved Track Log 59 Weather 60 Weather Screen 60 Accessing the Weather Screen 60 Calibrating the Pressure Altimeter 61 Electronic Compass 62 Calibrating the Compass 63 Turning the Compass Off/On 64 Preferences 65 Restarting the GPS 66 Setting the Map Units 68 Selecting Navigational Units of Measure 68 Selecting the North Reference 69 Selecting the Coordinate System 70 Selecting the Map Datum 71 Using the Power Management Tool 72 Setting the Power-Off Timer 72 Setting the Light Timer...
... Saved Track Logs 58 Reversing a Saved Track Log 58 Deleting a Saved Track Log 59 Weather 60 Weather Screen 60 Accessing the Weather Screen 60 Calibrating the Pressure Altimeter 61 Electronic Compass 62 Calibrating the Compass 63 Turning the Compass Off/On 64 Preferences 65 Restarting the GPS 66 Setting the Map Units 68 Selecting Navigational Units of Measure 68 Selecting the North Reference 69 Selecting the Coordinate System 70 Selecting the Map Datum 71 Using the Power Management Tool 72 Setting the Power-Off Timer 72 Setting the Light Timer...
Manual - English
Page 8
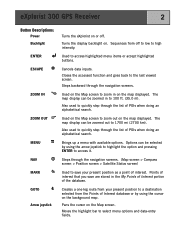
... back to zoom in on the map displayed. Sequences from the Points of interest. eXplorist 300 GPS Receiver 2 Button Descriptions: Power Backlight ENTER ESCAPE ZOOM IN ZOOM OUT MENU NAV MARK GOTO Arrow joystick Turns the eXplorist on or off to low to high intensity. Steps backward through the list of the database. Used on the Map screen to the last viewed screen. The map display can be zoomed in the My...
... back to zoom in on the map displayed. Sequences from the Points of interest. eXplorist 300 GPS Receiver 2 Button Descriptions: Power Backlight ENTER ESCAPE ZOOM IN ZOOM OUT MENU NAV MARK GOTO Arrow joystick Turns the eXplorist on or off to low to high intensity. Steps backward through the list of the database. Used on the Map screen to the last viewed screen. The map display can be zoomed in the My...
Manual - English
Page 12
... with the satellites and is constantly calculating new positions, comparing the new position to this same spot. It's that , your eXplorist automatically updates the route, providing you want to go . From there, it will help you to the campsite when you want to follow these instructions exactly. When saving your hiking is done, simply use the GOTO button and select "Camp" from the points of...
... with the satellites and is constantly calculating new positions, comparing the new position to this same spot. It's that , your eXplorist automatically updates the route, providing you want to go . From there, it will help you to the campsite when you want to follow these instructions exactly. When saving your hiking is done, simply use the GOTO button and select "Camp" from the points of...
Manual - English
Page 14
... swivel mounting bracket Summary Go from a high-quality Magellan-brand handheld navigation device, as well as points of interest icons. Using the eXplorist 300 8 Additional Features Your Magellan eXplorist contains all of this and more enjoyable. User preferences enable you to set up and maintain your eXplorist so that you have the ability to customize the navigation screens, enabling you to view the information that you can access in the great Magellan eXplorist 300...
... swivel mounting bracket Summary Go from a high-quality Magellan-brand handheld navigation device, as well as points of interest icons. Using the eXplorist 300 8 Additional Features Your Magellan eXplorist contains all of this and more enjoyable. User preferences enable you to set up and maintain your eXplorist so that you have the ability to customize the navigation screens, enabling you to view the information that you can access in the great Magellan eXplorist 300...
Manual - English
Page 16
... this will be used. Normally, when you can change it is displayed. Satellite Status screen shows how many satellites are being unable to compute your position in the eXplorist being tracked, as well as it is displayed, press ENTER. Press the Power button. When you turn the eXplorist on it will be displayed. Press MENU. All data is displayed, showing you are outside and have a clear, unobstructed view of the ten languages that English...
... this will be used. Normally, when you can change it is displayed. Satellite Status screen shows how many satellites are being unable to compute your position in the eXplorist being tracked, as well as it is displayed, press ENTER. Press the Power button. When you turn the eXplorist on it will be displayed. Press MENU. All data is displayed, showing you are outside and have a clear, unobstructed view of the ten languages that English...

Manual - English
Page 18
... Satellite Status screen is incorrect, you can now change the information using the information you have a clearer view of months. if correct, press ENTER. Use the Arrow joystick to set the date displayed to enter the current time. Enter the Date. When you have entered the correct date, press ENTER. You can fix it now. Use the Arrow joystick to the current date. Finding Satellites Tracking 0... Accept Information. Tip: If the time or the date is displayed again, and the eXplorist...
... Satellite Status screen is incorrect, you can now change the information using the information you have a clearer view of months. if correct, press ENTER. Use the Arrow joystick to set the date displayed to enter the current time. Enter the Date. When you have entered the correct date, press ENTER. You can fix it now. Use the Arrow joystick to the current date. Finding Satellites Tracking 0... Accept Information. Tip: If the time or the date is displayed again, and the eXplorist...
Manual - English
Page 19
... eXplorist can begin setting its position in a matter of seconds. This can provide the eXplorist with it turned off , there is to receive satellite transmissions. Warm starts are in memory and you have an approximate position to use when referring to go. Once the Map screen is defined as when the eXplorist does not have traveled with your eXplorist with information on , one of the memory will be cleared...
... eXplorist can begin setting its position in a matter of seconds. This can provide the eXplorist with it turned off , there is to receive satellite transmissions. Warm starts are in memory and you have an approximate position to use when referring to go. Once the Map screen is defined as when the eXplorist does not have traveled with your eXplorist with information on , one of the memory will be cleared...
Manual - English
Page 20
... Accuracy 25 FT Date/Time 01 FEB 04 03:30:36 PM Trip Odometer Battery 0000.0 M I 3D Position Fix Tracking 7.... The Map screen displays your position. • Use the Arrow joystick to change the information displayed at the bottom of choosing the screen that can also save your position, as well as POI's and any available information about the position of the cursor at the bottom of the screen. • Press MENU and select Map Setup...
... Accuracy 25 FT Date/Time 01 FEB 04 03:30:36 PM Trip Odometer Battery 0000.0 M I 3D Position Fix Tracking 7.... The Map screen displays your position. • Use the Arrow joystick to change the information displayed at the bottom of choosing the screen that can also save your position, as well as POI's and any available information about the position of the cursor at the bottom of the screen. • Press MENU and select Map Setup...
Manual - English
Page 21
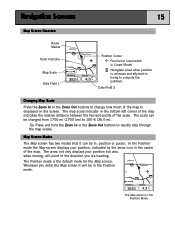
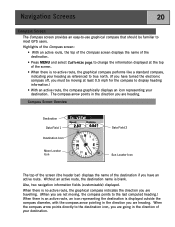
... default mode for the Map screen. The arrow not only displays your position, indicated by the arrow icon in the center of the scale. Glendora 210 ent San Dimas vina 10 10 1.60mi Heading Speed 352 o M 4.3 M H The Map screen in the bottom left corner of the map indicates the relative distance between the two end-points of the map. Navigation Screens 15 Map Screen Overview Route Marker Track Indicator Map Scale Data Field...
... default mode for the Map screen. The arrow not only displays your position, indicated by the arrow icon in the center of the scale. Glendora 210 ent San Dimas vina 10 10 1.60mi Heading Speed 352 o M 4.3 M H The Map screen in the bottom left corner of the map indicates the relative distance between the two end-points of the map. Navigation Screens 15 Map Screen Overview Route Marker Track Indicator Map Scale Data Field...
Manual - English
Page 22
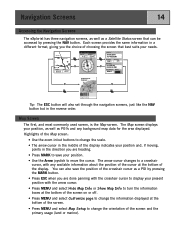
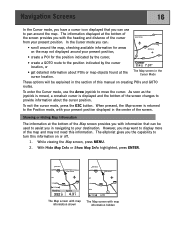
... button. With Hide Map Info or Show Map Info highlighted, press ENTER. When pressed, the Map screen is displayed and the bottom of the screen changes to display more of the map and may want to provide information about POIs or map objects found at the bottom of the Map screen provides you with information that you can use the Arrow joystick to turn this manual on creating POIs and GOTO routes. Showing...
... button. With Hide Map Info or Show Map Info highlighted, press ENTER. When pressed, the Map screen is displayed and the bottom of the screen changes to display more of the map and may want to provide information about POIs or map objects found at the bottom of the Map screen provides you with information that you can use the Arrow joystick to turn this manual on creating POIs and GOTO routes. Showing...
Manual - English
Page 24
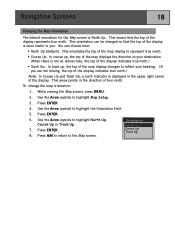
... . While viewing the Map screen, press MENU. 2. Press ENTER. 4. Orientation North Up Course Up Track Up Use the Arrow joystick to represent true north. • Course Up. You can be changed so that the top of the display represents true north. Use the Arrow joystick to highlight the Orientation field. 5. Use the Arrow joystick to highlight Map Setup. 3. This orientation can choose from: • North Up [default]. Press ENTER. 6. This arrow points in...
... . While viewing the Map screen, press MENU. 2. Press ENTER. 4. Orientation North Up Course Up Track Up Use the Arrow joystick to represent true north. • Course Up. You can be changed so that the top of the display represents true north. Use the Arrow joystick to highlight the Orientation field. 5. Use the Arrow joystick to highlight Map Setup. 3. This orientation can choose from: • North Up [default]. Press ENTER. 6. This arrow points in...
Manual - English
Page 26
...-to-use graphical compass that should be moving , the compass points to most GPS users. Compass Screen Overview Destination Data Field 1 Destination Icon Moon Locator Icon To: VIEW Speed 2.8 M H Distance 0.84 M I N W E S Data Field 2 Sun Locator Icon The top of the screen (the header bar) displays the name of your destination. Highlights of the Compass screen: • With an active route, the top of the Compass screen displays the name of the destination. • Press MENU and select Customize page to change the information displayed...
...-to-use graphical compass that should be moving , the compass points to most GPS users. Compass Screen Overview Destination Data Field 1 Destination Icon Moon Locator Icon To: VIEW Speed 2.8 M H Distance 0.84 M I N W E S Data Field 2 Sun Locator Icon The top of the screen (the header bar) displays the name of your destination. Highlights of the Compass screen: • With an active route, the top of the Compass screen displays the name of the destination. • Press MENU and select Customize page to change the information displayed...
Manual - English
Page 32
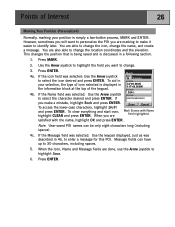
...-button process, MARK and ENTER. If the Name field was selected. Press MARK. 2. To clear everything and start over, highlight CLEAR and press ENTER. If the Message field was selected: Use the Arrow joystick to change the location coordinates and the elevation. When the Icon, Name and Message fields are Save Cancel Mark Screen with the name, highlight OK and press ENTER. To aid in your position is discussed in a following section. 1. Note: User-saved POI...
...-button process, MARK and ENTER. If the Name field was selected. Press MARK. 2. To clear everything and start over, highlight CLEAR and press ENTER. If the Message field was selected: Use the Arrow joystick to change the location coordinates and the elevation. When the Icon, Name and Message fields are Save Cancel Mark Screen with the name, highlight OK and press ENTER. To aid in your position is discussed in a following section. 1. Note: User-saved POI...
Manual - English
Page 41
... select the icon desired and press ENTER. Press ENTER. 14a. If the Name field was described in the information block at the top of the background map can be deleted) it just copies it to the My Points of Interest portion of Interest. 3. To clear everything and start over, highlight CLEAR and press ENTER. If the Message field was selected: Use the keypad displayed, just as was selected: Use...
... select the icon desired and press ENTER. Press ENTER. 14a. If the Name field was described in the information block at the top of the background map can be deleted) it just copies it to the My Points of Interest portion of Interest. 3. To clear everything and start over, highlight CLEAR and press ENTER. If the Message field was selected: Use the keypad displayed, just as was selected: Use...
Manual - English
Page 48
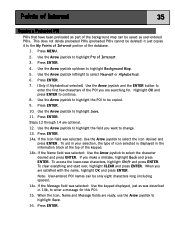
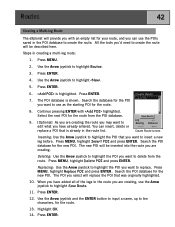
... new POI. When you have already entered. Press MENU. 2. Use the Arrow joystick and the ENTER button to input a name, up to insert a new leg before. is highlighted. Save Route Leg Bearing Distance Create Route screen Inserting: Use the Arrow joystick to highlight the POI that was originally highlighted. 10. Press ENTER. 12. Press ENTER. 4. Routes 42 Creating a Multi-leg Route The eXplorist will provide you with highlighted. Create Route 7. The new POI will replace...
... new POI. When you have already entered. Press MENU. 2. Use the Arrow joystick and the ENTER button to input a name, up to insert a new leg before. is highlighted. Save Route Leg Bearing Distance Create Route screen Inserting: Use the Arrow joystick to highlight the POI that was originally highlighted. 10. Press ENTER. 12. Press ENTER. 4. Routes 42 Creating a Multi-leg Route The eXplorist will provide you with highlighted. Create Route 7. The new POI will replace...
Manual - English
Page 63
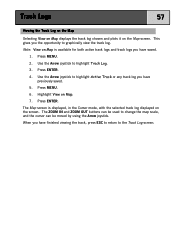
Press MENU. 2. Use the Arrow joystick to change the map scale, and the cursor can be moved by using the Arrow joystick. Use the Arrow joystick to highlight Active Track or any track log you have saved. 1. Press ENTER. Track Logs 57 Viewing the Track Log on the Map Selecting View on Map displays the track log chosen and plots it on Map. 7. Highlight View on the Map screen. The Map screen is available for both...
Press MENU. 2. Use the Arrow joystick to change the map scale, and the cursor can be moved by using the Arrow joystick. Use the Arrow joystick to highlight Active Track or any track log you have saved. 1. Press ENTER. Track Logs 57 Viewing the Track Log on the Map Selecting View on Map displays the track log chosen and plots it on Map. 7. Highlight View on the Map screen. The Map screen is available for both...
Manual - English
Page 78
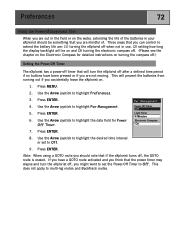
... if no buttons have a GOTO route activated and you think that the power timer may elapse and turn the eXplorist off . (Please see the chapter on the Electronic Compass for Power Off Timer. Press ENTER. 6. Preferences 72 Using the Power-Management Tool When you are out in the field or on the water, extending the life of the batteries in use, (2) setting how long the display backlight will be...
... if no buttons have a GOTO route activated and you think that the power timer may elapse and turn the eXplorist off . (Please see the chapter on the Electronic Compass for Power Off Timer. Press ENTER. 6. Preferences 72 Using the Power-Management Tool When you are out in the field or on the water, extending the life of the batteries in use, (2) setting how long the display backlight will be...


